
Fitbit Alta is a popular fitness tracker that allows you to monitor your activity levels, track your sleep, and receive notifications from your smartphone. One of the key features of the Fitbit Alta is its interchangeable bands, which allow you to personalize your device to match your style and taste. Whether you want to switch up your look for a special occasion or just want a fresh new look, changing the band on your Fitbit Alta is a simple and straightforward process. In this article, we will guide you through the steps to change the band on your Fitbit Alta, ensuring that you can enjoy a new and stylish accessory that suits your individuality.
Inside This Article
- Step 1: Remove the current band
- Step 2: Choose a new band – Consider different band styles – Check compatibility with Fitbit Alta – Select the desired color or material
- Step 3: Attach the new band
- Step 4: Secure the new band – Check for proper fitting and alignment – Ensure a snug and comfortable fit – Adjust the band if needed
- Troubleshooting Tips
- Conclusion
- FAQs
Step 1: Remove the current band
Before you can change the band on your Fitbit Alta, you’ll need to remove the current band. There are a few different methods you can use to do this:
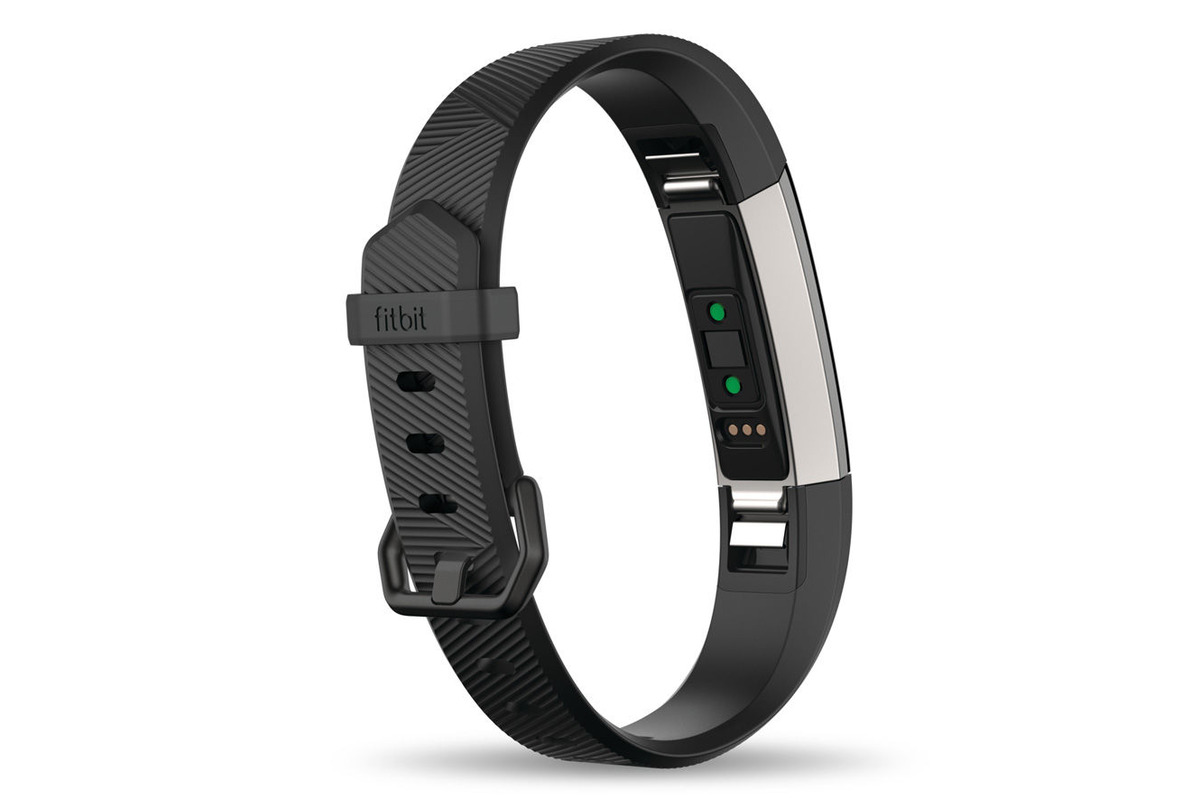
Method 1: Using the quick release lever
The Fitbit Alta comes with a convenient quick release lever that allows you to easily remove the band. To use this method, simply locate the quick release lever on the underside of the band near the connection point to the tracker. Gently lift the lever, and the band will detach from the tracker. Make sure to hold onto the tracker securely while releasing the band.
Method 2: Using a small tool
If your Fitbit Alta doesn’t have a quick release lever or you prefer an alternative method, you can use a small tool to remove the band. Look for a small pinhole or groove on the underside of the band near the connection point to the tracker. Insert a small tool, such as a paperclip or a pushpin, into the pinhole or slide it along the groove to release the band. Apply gentle pressure to disconnect the band from the tracker.
Method 3: Using a pin or paperclip
If you don’t have a small tool available, you can still remove the band using a pin or a paperclip. Find a pin or paperclip and straighten it out. Insert the straightened end into the pinhole or groove on the underside of the band, and gently push or twist it to release the band from the tracker. Take care not to apply too much force to avoid damaging the band or the tracker.
You can choose whichever method is most convenient for you and works best with your Fitbit Alta band. Once you’ve successfully removed the current band, you can move on to selecting and attaching a new band.
Step 2: Choose a new band – Consider different band styles – Check compatibility with Fitbit Alta – Select the desired color or material
Once you have successfully removed the current band from your Fitbit Alta, it’s time to choose a new band that suits your style and preferences. There are several factors to consider when selecting a new band:
- Consider different band styles: Fitbit Alta offers a wide range of band styles to choose from, including classic bands, leather bands, metal bands, and even designer bands. Think about the look and feel you want for your Fitbit Alta and explore the various options available. Whether you prefer a sporty, casual, or elegant look, there is a band style to match your taste.
- Check compatibility with Fitbit Alta: Before making your final decision, ensure that the band you choose is compatible with the specific model of Fitbit Alta you own. Different Fitbit Alta models may require different band sizes or connectors. It’s important to double-check the compatibility to ensure a seamless fit.
- Select the desired color or material: Fitbit Alta bands come in a variety of colors and materials. From vibrant and playful colors to classic and neutral tones, there is a color that will suit your personal style. Additionally, consider the material of the band, such as durable silicone, comfortable nylon, or premium leather. Choose a material that not only matches your preferences but also offers the comfort and durability you desire.
By considering different band styles, checking compatibility, and selecting the desired color or material, you can find the perfect band to personalize your Fitbit Alta and enhance your overall experience. Take your time and explore the options available, ensuring that your new band reflects your unique style while providing the functionality you need.
Step 3: Attach the new band
Once you have chosen the new band for your Fitbit Alta, it’s time to attach it securely. There are three different methods you can use to accomplish this, depending on the type of band you have and your personal preference. In this step, we will walk you through each method to make sure you can easily attach the new band to your Fitbit Alta.
Method 1: Using the quick release lever
If your new band has a quick release lever, this is likely the easiest way to attach it. Start by locating the quick release pins on the back of your Fitbit Alta. Gently press the lever in the direction indicated by the arrow, and at the same time, slide the old band out of the notch. Take your new band and align the pins with the corresponding holes on your Fitbit Alta. Push the new band in until you hear a click, indicating that it is securely attached.
Method 2: Using a small tool
If your new band does not have a quick release lever, you can use a small tool to remove the old band and attach the new one. Look for a small button or pinhole on the side of your Fitbit Alta near the band attachment point. Insert the tool – a paperclip or a small pin works well – into the button or pinhole and apply gentle pressure. This will release the latch holding the old band in place. Slide the old band out and slide the new band in until you feel it click into position.
Method 3: Using a pin or paperclip
If you don’t have access to a small tool, you can alternatively use a pin or a paperclip to attach the new band. Straighten out the pin or paperclip and insert one end into the small hole or slot near the band attachment point on your Fitbit Alta. Gently push the pin or paperclip until you feel a slight resistance, indicating that the old band is released. Carefully remove the old band and insert the new band, making sure it is aligned properly. Push until you feel it securely click into place.
Regardless of the method you choose, it is important to make sure the new band is securely attached to your Fitbit Alta. Give it a gentle tug to ensure it doesn’t come loose. It’s also a good idea to check that the band is aligned properly with the device and sits comfortably on your wrist.
Now that you know the different methods for attaching a new band to your Fitbit Alta, you can confidently switch out bands to match your style or occasion. Enjoy customizing your Fitbit Alta with different bands and make a statement while staying on top of your fitness goals!
Step 4: Secure the new band – Check for proper fitting and alignment – Ensure a snug and comfortable fit – Adjust the band if needed
After attaching the new band to your Fitbit Alta, it is important to ensure that it is securely fastened and properly aligned. This step will ensure that the band stays in place during your activities and provides a comfortable fit.
To check for proper fitting and alignment, start by placing the band on your wrist and adjusting it to your desired position. The band should sit snugly on your wrist without being too tight or too loose.
Make sure that the band is aligned with the display of your Fitbit Alta. The display should be centered on your wrist, and the band clasps should be positioned symmetrically on either side of the display.
If the band feels too loose, you may need to adjust the fit. Most Fitbit Alta bands come with multiple adjustment holes or a buckle mechanism that allows you to tighten or loosen the band according to your preference.
Use your finger to slide the band through the adjustment holes or adjust the buckle to achieve the desired tightness. Test the fit by moving your wrist and ensuring that the band stays in place without sliding around.
Once you have found the right fit, make sure to secure the band by ensuring that the clasp is fully engaged. Double-check that the band is securely latched and that there are no gaps or openings that could cause the band to come loose.
If needed, you can make additional adjustments to the band to ensure maximum comfort. Pay attention to any pressure points or areas where the band may be rubbing against your skin. If necessary, you can gently reposition the band to alleviate any discomfort.
Remember, a properly secured and well-fitted band will not only enhance the overall comfort of your Fitbit Alta but also ensure accurate tracking of your fitness activities and heart rate data.
Troubleshooting Tips
If you’re experiencing issues with your Fitbit Alta band, such as it not fitting securely or not aligning properly, don’t worry! We’ve got some troubleshooting tips to help you resolve these problems and ensure a smooth band change process.
Band not fitting securely
If your new band is not fitting securely on your Fitbit Alta, there are a few things you can try to fix this issue. First, make sure you have chosen the correct band size for your wrist. Fitbit Alta offers small and large band options, so double-check that you have the right size. If the band still feels loose, try adjusting the clasp or closure mechanism. Sometimes, a slight readjustment can provide a more secure fit. If these steps don’t work, consider contacting Fitbit customer support for further assistance.
Band not aligning properly
If you have successfully attached your new band to your Fitbit Alta but it is not aligning properly, there are a few troubleshooting steps you can follow. Firstly, make sure that you have aligned the pins or connectors correctly. Check for any debris or dirt that may be obstructing the connection and clean it if necessary. If the band is still not aligning, remove it and reattach it, ensuring that it clicks securely into place. If you continue to have alignment issues, it might be worth contacting Fitbit customer support for additional guidance.
Need assistance with the band change process
If you’re finding it difficult to change the band on your Fitbit Alta and need assistance, don’t worry, help is available. Fitbit provides detailed instructions for band replacement in their user guide and on their website. You can refer to these resources for step-by-step guidance. Additionally, there are numerous video tutorials available online that demonstrate the band change process visually. If you prefer a more hands-on approach, consider visiting a local authorized Fitbit retailer, where staff can assist you with the band change process and answer any questions you may have.
Remember, it’s important to take your time and follow the instructions carefully when changing the band on your Fitbit Alta. With a little troubleshooting and assistance if needed, you’ll be able to enjoy your new band and continue using your Fitbit device with ease.
Conclusion
Changing the band on your Fitbit Alta is a simple and effective way to customize the look and feel of your fitness tracker. With a wide range of bands available, you can easily find one that suits your style and personality. Whether you prefer a sleek and professional look or something more vibrant and colorful, there is a band out there for you.
By following the step-by-step instructions provided in this article, you can confidently change your Fitbit Alta band in just a few minutes. Remember to choose a band that is compatible with your device and ensure that it is securely fastened to avoid any issues during your workouts.
So go ahead and give your Fitbit Alta a fresh new look by changing its band. With the ability to switch bands whenever you want, you’ll never get bored with your fitness tracker again. Embrace the style and functionality of your Fitbit Alta with a band that reflects your personal taste and complements your active lifestyle.
FAQs
1. How do I change the band on my Fitbit Alta?
To change the band on your Fitbit Alta, follow these steps:
1. Turn your Fitbit Alta upside down and locate the two metal latches on each end of the band.
2. Press the latch on one end of the band and slide it to release the band from the tracker.
3. Repeat the same step for the other end of the band.
4. Take the new band and align the pins on the back of the tracker with the holes on the band.
5. Push the band into place until you hear a click indicating it is securely attached.
Note: Be sure to choose a band that is compatible with your Fitbit Alta model.
2. What types of bands are available for Fitbit Alta?
Fitbit Alta offers a wide range of bands to suit individual styles and preferences. Some popular options include:
– Classic bands: These bands are made from flexible and durable elastomer material and come in various colors.
– Leather bands: For a more refined look, Fitbit offers leather bands that can be chosen in different colors and textures.
– Metal bands: If you prefer a sleek and sophisticated appearance, metal bands are ideal. They are available in stainless steel or gold-plated options.
– Special edition bands: Fitbit occasionally releases special edition bands with unique designs or collaborations with fashion brands.
You can explore these options and choose a band that matches your personal style.
3. Can I use third-party bands with Fitbit Alta?
Yes, you can use third-party bands with Fitbit Alta. There are numerous companies that produce bands compatible with Fitbit Alta, offering a wide range of materials, colors, and designs. However, it’s essential to ensure that the third-party band is specifically labeled as compatible with Fitbit Alta to ensure proper fit and functionality. Always check the product description or consult customer reviews before making a purchase.
4. Are Fitbit Alta bands interchangeable with other Fitbit models?
No, Fitbit Alta bands are not interchangeable with other Fitbit models. Each Fitbit model has a unique design and attachment mechanism, which means the bands are specifically made for their respective models. Fitbit Alta bands are designed to fit the Alta model only. If you have a different Fitbit model, be sure to purchase bands that are compatible with that specific model.
5. How often should I change the band on my Fitbit Alta?
The frequency of changing the band on your Fitbit Alta really depends on your personal preference and the usage of the tracker. If you wear your Fitbit Alta regularly and engage in activities that may cause wear and tear on the band, such as intense workouts or exposure to water, it’s recommended to change the band every few months or as soon as signs of damage or wear become noticeable. Regular cleaning and maintenance of the band can also help prolong its lifespan.