
Are you tired of constantly switching between your headphones and headset while using Windows 10? Well, you’re in luck! In this article, we will guide you on how to seamlessly transition from using your headphones to transforming them into a headset on your Windows 10 computer. With just a few simple steps, you’ll be able to enjoy audio playback and communicate with others using a single device. Whether you need to join a conference call, chat with your gaming teammates, or simply make hands-free calls, we’ve got you covered. Say goodbye to the hassle of fumbling with multiple devices, and say hello to the convenience of transforming your headphones into a fully functional headset on your Windows 10 system.
Inside This Article
- Connecting Headphones to Headset Adapter
- Configuring Headset Settings in Windows 10
- Adjusting Audio and Microphone Levels
- Troubleshooting Common Issues with Headset Connection
- Conclusion
- FAQs
Connecting Headphones to Headset Adapter
Many people are unaware that it is possible to convert a regular pair of headphones into a headset by using a headset adapter. This can be incredibly useful for those who want to use headphones for gaming or making calls, as it allows for both audio playback and microphone functionality. In this article, we will guide you through the process of connecting headphones to a headset adapter in Windows 10.
The first step is to ensure that you have the appropriate headset adapter. There are different types of adapters available in the market, so it’s important to choose one that is compatible with your headphones and computer. Look for an adapter that has separate audio and microphone ports, typically labeled as “Audio In” and “Microphone In”. This will allow you to connect your headphones to the adapter using standard audio and microphone cables.
Once you have the headset adapter, the next step is to connect your headphones to it. Start by plugging the audio cable of your headphones into the “Audio In” port on the adapter. This is usually color-coded green or labeled with a headphone icon. Make sure the connection is secure.
Next, connect the microphone cable of your headphones to the “Microphone In” port on the adapter. This port is usually color-coded pink or labeled with a microphone icon. Again, ensure that the connection is tight and secure.
Now that your headphones are connected to the headset adapter, plug the adapter into the audio and microphone ports on your computer. These ports are usually located on the front or back of the computer tower. Insert the audio plug into the green audio port, and the microphone plug into the pink microphone port. You may need to refer to your computer’s user manual or the manufacturer’s website to locate these ports if you’re unsure.
Once the headset adapter is properly connected to your computer, Windows 10 should recognize it as a headset device. You may need to wait a few moments for the system to automatically detect and configure the audio and microphone settings. If prompted, select the appropriate audio input and output devices in the Windows sound settings.
That’s it! You have successfully connected your headphones to a headset adapter in Windows 10. Now you can enjoy both audio playback and microphone functionality, allowing you to use your headphones for gaming, making calls, and other multimedia purposes.
Note that the process of connecting headphones to a headset adapter may vary slightly depending on the specific adapter and headphones you are using. Always refer to the instructions provided by the manufacturer for the most accurate and up-to-date guidance.
Configuring Headset Settings in Windows 10
Windows 10 provides a variety of options to configure and customize your headset settings. Whether you want to fine-tune audio playback, adjust microphone sensitivity, or manage communication settings, Windows 10 has you covered. In this section, we will guide you through the steps to configure your headset settings in Windows 10.
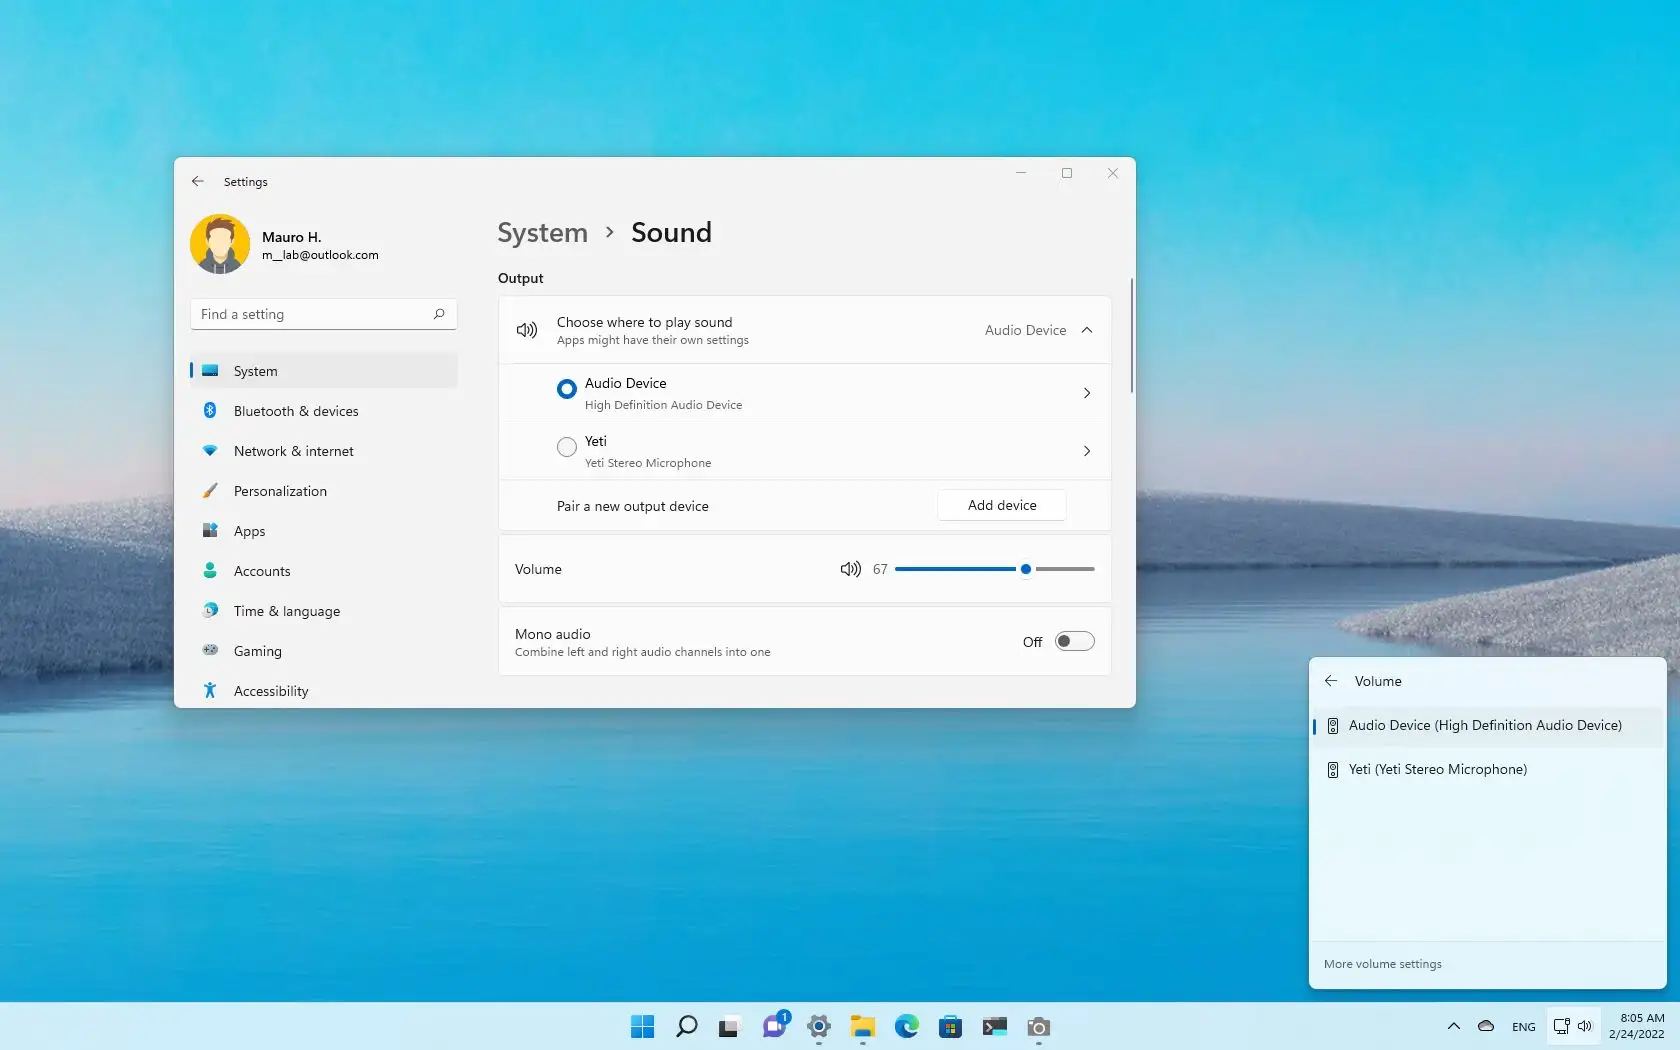
1. Accessing Sound Settings: To begin, right-click on the volume icon located in the system tray and select “Sounds” from the context menu. Alternatively, you can access the Sound settings by going to the Start menu, clicking on the “Settings” icon, and selecting “Sound.”
2. Setting Default Playback and Recording Devices: Once in the Sound settings, navigate to the “Playback” tab to set your default playback device. Here, you can choose your headset from the list of available devices and click on the “Set Default” button. Similarly, in the “Recording” tab, select your headset and click on the “Set Default” button to set it as the default recording device.
3. Adjusting Audio Levels: To adjust the volume levels of your headset, go back to the “Sound” settings window and click on the “Volume Mixer” button. This will open a new window where you can individually adjust the volume levels for different applications and devices.
4. Configuring Communication Settings: Windows 10 allows you to configure communication settings specifically for your headset. To access these settings, go to the “Sound” settings window and click on the “Communications” tab. Here, you can choose to automatically reduce the volume of other sounds when a call or communication activity is detected, or you can select the “Do nothing” option if you do not want any changes in volume.
5. Enhancing Audio Quality: If you want to enhance the audio quality of your headset, Windows 10 provides additional options in the “Sound” settings. Go to the “Playback” tab, select your headset, and click on the “Properties” button. In the properties window, navigate to the “Enhancements” tab and check the box next to the enhancements you want to apply, such as bass boost or virtual surround sound.
Remember to click on the “Apply” or “OK” button after making any changes to save the settings.
By following these steps, you can easily configure your headset settings in Windows 10 to ensure optimal audio playback and recording quality. Experiment with different settings and enhancements to personalize your audio experience and make the most out of your headset.
Adjusting Audio and Microphone Levels
Once you have successfully connected your headphones to the headset adapter and configured the headset settings in Windows 10, you may still need to adjust the audio and microphone levels to ensure optimal performance and clarity. Here are some steps to help you make these adjustments:
1. Open the Sound Settings: To access the audio settings in Windows 10, right-click on the speaker icon in the taskbar and select “Open Sound Settings”.
2. Adjust the Output Volume: In the Sound Settings window, under the “Output” section, you will see a volume slider. Drag the slider to increase or decrease the output volume according to your preference. You can also click on the speaker icon to mute or unmute the audio.
3. Configure the Microphone Level: To adjust the microphone level, navigate to the “Input” section in the Sound Settings window. You will find a microphone slider. Move the slider up or down to increase or decrease the microphone sensitivity. You can test the microphone by speaking into it and observing the level bar next to the slider. Ideally, the bar should move slightly when you speak, indicating that the microphone is picking up sound.
4. Enable Microphone Enhancements (optional): Windows 10 provides various enhancements to improve the quality of the microphone input. To access these options, click on the “Device properties” link located below the microphone slider. In the Properties window, go to the “Enhancements” tab. Here, you can check or uncheck the available enhancements such as noise suppression, echo cancellation, and equalizer settings, depending on your preferences and the requirements of your headset.
5. Test the Audio and Microphone: After making the adjustments, it is a good idea to test both the audio output and microphone input to ensure they are working correctly. You can use the “Test your microphone” and “Test your speakers” options in the Sound Settings window to verify the functionality.
6. Fine-tune the Settings: If you find that the audio or microphone levels are still not satisfactory, you can continue to fine-tune the settings by repeating the steps mentioned above. Experiment with different volume levels and microphone sensitivities until you achieve the desired results.
By adjusting the audio and microphone levels, you can optimize the performance of your headset and enhance your overall audio experience while using it in Windows 10.
Troubleshooting Common Issues with Headset Connection
Connecting a headset to your device can sometimes come with its fair share of challenges. If you’re experiencing any difficulties with your headset connection, don’t worry, we’re here to help. In this section, we’ll discuss some common issues that you may encounter and provide troubleshooting tips to resolve them.
1. No sound coming from the headset: If you’re unable to hear any audio through your headset, there are a few steps you can take to troubleshoot the issue. First, check if the headset is properly connected to the device. Ensure that the audio jack or USB connector is securely plugged in. If it’s a wireless headset, make sure it’s paired or connected via Bluetooth. Additionally, check the volume levels on both your device and the headset itself. Adjust the volume accordingly and test if the sound is working.
2. Poor or distorted audio quality: If you’re experiencing poor audio quality or distortion in the sound, there are a few things you can try. First, check if the audio drivers on your device are up to date. Outdated drivers can sometimes cause audio issues. You can visit the manufacturer’s website to download and install the latest drivers. Additionally, make sure that the audio settings on your device are properly configured. Try adjusting the sound settings, including equalizer settings, to improve the audio quality.
3. Mic not working: If the microphone on your headset is not working, it can be frustrating, especially during important voice calls or gaming sessions. Start by checking if the microphone is securely connected to the device. If it’s a detachable microphone, ensure that it’s properly attached. Next, check the microphone settings on your device. Go to the sound settings and make sure the microphone input is selected and the volume is turned up. If the issue persists, try using the headset with another device to determine if the problem lies with the headset or the device itself.
4. Interference or background noise: Sometimes, you may encounter issues such as interference or background noise while using your headset. This can be due to various factors, including wireless interference or microphone sensitivity settings. Try moving away from any potential sources of interference, such as other electronic devices or Wi-Fi routers. Additionally, you can adjust the microphone sensitivity settings on your device to reduce background noise. Experiment with different sensitivity levels to find the optimal setting for your environment.
5. Headset not recognized by the device: If your device doesn’t recognize your headset, it could be a compatibility issue or a driver problem. Ensure that the headset is compatible with your specific device. If it’s a USB headset, try connecting it to a different USB port. If it’s a wireless headset, check if the necessary drivers or software are installed on your device. You may need to update the drivers or install additional software provided by the headset manufacturer.
By following these troubleshooting tips, you can overcome common issues encountered while connecting and using headsets with your device. Remember to always check the connectivity, audio settings, and compatibility to ensure a seamless headset experience. If the problems persist, it may be helpful to reach out to the manufacturer’s support team for further assistance.
Conclusion
Changing your headphones to a headset in Windows 10 can greatly enhance your audio experience and enable you to communicate effectively during calls or gaming sessions. By following the simple steps outlined in this guide, you can easily transform your regular headphones into a fully functional headset.
Remember to ensure that your headphones have an integrated microphone or a separate microphone connected to your computer. Additionally, make sure to check and update your audio drivers regularly to avoid any compatibility issues.
With your new headset, you’ll be able to enjoy crystal clear audio, participate in online meetings, and communicate with your friends and teammates seamlessly. So go ahead and give it a try!
FAQs
Q: Can I change my headphones to a headset on Windows 10?
A: Absolutely! With the right accessories and a few simple steps, you can easily transform your headphones into a headset on Windows 10.
Q: What accessories do I need to convert my headphones into a headset on Windows 10?
A: To convert your headphones into a headset on Windows 10, you will need a headphone splitter with microphone and audio connectors. This splitter will allow you to connect your headphones and microphone to the respective audio and microphone jacks on your computer.
Q: Where can I find a headphone splitter with microphone and audio connectors?
A: You can find a headphone splitter with microphone and audio connectors at electronics stores, online marketplaces, and even at some department stores. Be sure to check for compatibility with Windows 10 before making a purchase.
Q: How do I connect the headphone splitter to my computer?
A: Connecting the headphone splitter to your computer is easy. Simply plug the audio connector from the splitter into the audio jack on your computer, and plug the microphone connector into the microphone jack. Then, connect your headphones and microphone to the respective connectors on the splitter.
Q: Do I need to make any settings changes in Windows 10 to use my headphones as a headset?
A: In most cases, your headphones should work as a headset without any additional settings changes. However, if you experience any issues with audio or microphone functionality, you may need to check your sound settings in Windows 10 and ensure that the correct audio input and output devices are selected.