
In today’s digital era, it seems like there’s nothing our smartphones can’t do. They serve as our alarm clocks, our personal assistants, and even our entertainment centers. But what keeps these devices powered and running smoothly? The answer lies in the often-overlooked mobile accessories, which play a crucial role in enhancing our smartphone experience.
From protective cases to screen guards, from wireless chargers to power banks, mobile accessories are designed to cater to our diverse needs and preferences. Whether we want to enhance our phone’s functionality, protect it from accidental damage, or simply personalize it with a stylish case, the world of mobile accessories offers endless possibilities.
In this comprehensive guide, we will dive into the world of mobile accessories, highlighting their importance, types, and benefits. So, if you’re in search of the latest gadgets to jazz up your smartphone, look no further. Let’s explore the exciting world of mobile accessories together!
Inside This Article
- Understanding Trolling Motor Batteries
- Step-by-Step Guide to Charging a Trolling Motor Battery
- Tips and Precautions for Charging a Trolling Motor Battery
- Conclusion
- FAQs
Understanding Trolling Motor Batteries
Trolling motor batteries are an essential component for anyone who enjoys boating and fishing. These specialized batteries power the electric motors used to propel and navigate fishing boats. Unlike traditional boat batteries, trolling motor batteries are designed to provide sustained power over extended periods.
Trolling motor batteries are typically deep cycle batteries, which means they are designed to be discharged and recharged regularly without damaging the battery’s performance. They are built to handle the demands of powering electric motors, which require a steady and continuous energy supply.
The two main types of trolling motor batteries are flooded lead-acid batteries and sealed AGM (Absorbent Glass Mat) batteries. Flooded lead-acid batteries are the more common and affordable option. They consist of lead plates submerged in an electrolyte solution, and they require regular maintenance, including checking and refilling the water levels.
Sealed AGM batteries, on the other hand, are maintenance-free and provide better performance and durability. They use a glass mat to contain the electrolyte, which eliminates the need for refilling. AGM batteries are also more resistant to vibration and can be mounted in any position, making them ideal for boating applications.
When choosing a trolling motor battery, it is important to consider factors such as battery capacity (measured in ampere-hours), voltage compatibility with the motor, and the battery’s overall lifespan. Additionally, it is crucial to ensure that the battery’s power output matches the requirements of your trolling motor.
Understanding the different types of trolling motor batteries and their features is essential for maximizing your boating experience. Whether you opt for a flooded lead-acid battery or a sealed AGM battery, ensuring that you have a reliable and appropriately sized battery will ensure smooth operation of your trolling motor and hours of enjoyment on the water.
Step-by-Step Guide to Charging a Trolling Motor Battery
Charging a trolling motor battery is a crucial step in ensuring optimal performance and longevity. Here is a step-by-step guide to help you through the process:
- Choose the Right Charger: The first step is to ensure that you have the correct charger for your trolling motor battery. Make sure the charger is specifically designed for deep cycle batteries, as they have different charging requirements compared to regular automotive batteries.
- Position the Battery: Before charging, it’s important to position the battery in a well-ventilated area. Ensure that the battery is on a stable surface and away from any flammable materials or sources of ignition.
- Disconnect the Trolling Motor: To avoid any electrical mishaps, disconnect the trolling motor from the battery before charging. This will prevent any accidental discharge or damage to the motor.
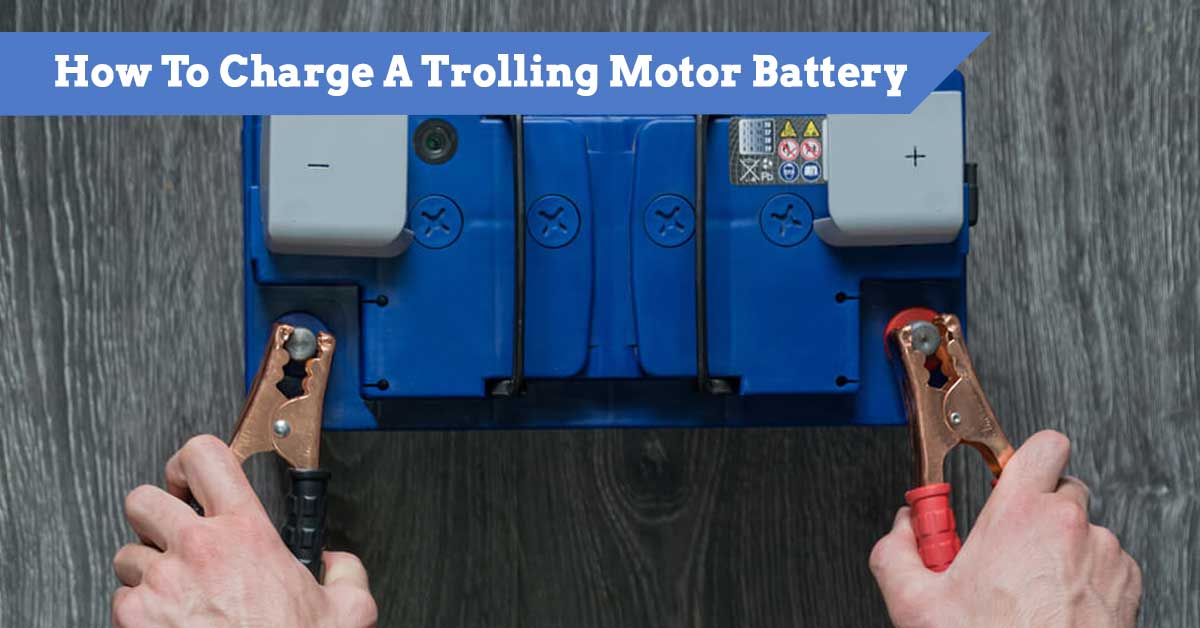
- Connect the Charger: Attach the charger’s positive (red) clamp to the battery’s positive terminal, and the negative (black) clamp to the battery’s negative terminal. Ensure a secure connection and verify that the clamps are not touching each other or any metal surfaces.
- Set the Charging Parameters: Consult the charger’s instructions and set the appropriate charging parameters for your battery. This may include selecting the battery type (such as AGM or gel), voltage, and charging mode (such as float or maintenance mode).
- Start the Charging Process: Once the charging parameters are set, plug in the charger and switch it on. The charger will begin supplying the necessary charge to the battery. Monitor the charger during the process and ensure that it remains connected and functioning properly.
- Monitor the Charging Progress: Keep an eye on the charger’s display or indicators to track the charging progress. It’s important to let the battery reach a full charge to maximize its capacity and lifespan. This may take several hours, depending on the battery’s size and current charge level.
- Unplug and Disconnect: Once the battery has reached a full charge, unplug the charger from the power source and disconnect the clamps from the battery terminals. Double-check that the charger is off before disconnecting.
- Reconnect the Trolling Motor: After charging, it’s time to reconnect the trolling motor to the battery. Ensure that the connections are secure and tight to avoid any electrical issues while on the water.
- Maintain Proper Charging Habits: Lastly, maintain proper charging habits to prolong the battery’s life, such as avoiding overcharging or discharging the battery too deeply. Regularly check the battery’s charge level and recharge as necessary to keep it in optimal condition.
By following this step-by-step guide, you can confidently charge your trolling motor battery and ensure reliable performance on your fishing adventures. Remember to always prioritize safety and refer to the specific instructions provided by the battery charger manufacturer.
Tips and Precautions for Charging a Trolling Motor Battery
Charging a trolling motor battery properly is essential to ensure its longevity and maintain peak performance. Here are some valuable tips and precautions to keep in mind:
1. Choose the Right Charger: Make sure to use a charger specifically designed for trolling motor batteries. These chargers are equipped with features such as a deep cycle mode that is suitable for the unique needs of trolling motor batteries.
2. Follow Charging Instructions: Always read and follow the manufacturer’s instructions for your specific trolling motor battery and charger. Each battery and charger may have different requirements, so it’s crucial to adhere to the guidelines provided.
3. Check Battery Voltage: Before charging, check the battery voltage using a multimeter or a battery voltage tester. It helps to determine if the battery needs charging or if there are any issues with the battery’s capacity.
4. Charge in a Well-Ventilated Area: Charging batteries can produce hydrogen gas, which is highly flammable. Ensure that the charging area has proper ventilation to reduce the risk of accidents and prevent the accumulation of potentially dangerous gases.
5. Avoid Overcharging: Overcharging can lead to battery damage and reduced lifespan. Use a charger with an automatic shut-off feature or a smart charger that stops charging when the battery reaches full capacity. This prevents overcharging and ensures the longevity of your trolling motor battery.
6. Monitor Charging Process: Keep an eye on the charging process to ensure that everything is proceeding smoothly. Check for any signs of overheating or unusual behavior during the charging process. In case of any issues, stop the charging immediately and consult a professional if needed.
7. Disconnect the Battery: Once the battery is fully charged, disconnect it from the charger. Leaving the battery connected to the charger for an extended period can cause damage due to continuous trickle charging.
8. Store Batteries Properly: If you need to store your trolling motor battery for an extended period, it is essential to store them in a cool and dry location. Ensure the battery is fully charged before storage and periodically check its charge level to prevent excessive discharge.
9. Regular Maintenance: Proper maintenance is crucial to prolong the life of your trolling motor battery. Clean the battery terminals regularly, check for any signs of corrosion, and keep the battery and connections free from dirt and debris. This helps maintain optimal performance and extends battery life.
10. Seek Professional Help: If you have any doubts or concerns about charging your trolling motor battery, it’s best to consult a professional. They can provide personalized guidance based on your specific battery and charger setup.
By following these tips and precautions, you can ensure safe and efficient charging of your trolling motor battery, allowing you to enjoy long-lasting performance on the water.
Conclusion
In conclusion, knowing how to charge a trolling motor battery is essential for any angler or boat enthusiast. Taking proper care of your battery will not only ensure its longevity but will also enhance your overall boating experience. By following the steps outlined in this guide, you can confidently charge your trolling motor battery and keep it in optimal condition.
Remember to always refer to the manufacturer’s instructions for your specific battery model and type. Stay mindful of safety precautions and invest in a quality battery charger to avoid any potential damage. Regularly maintaining and charging your trolling motor battery will provide you with reliable power and uninterrupted fishing trips.
So, whether you’re planning a day on the water, fishing in remote areas, or simply enjoying the serenity of nature, make sure your trolling motor battery is fully charged and ready to go. With proper care and attention, your battery will support you in navigating the waters and create lasting memories for years to come.
FAQs
Q: How long does it take to charge a trolling motor battery?
A: The charging time for a trolling motor battery can vary depending on the battery’s capacity and the charging method. On average, it takes about 8 to 10 hours to fully charge a trolling motor battery using a standard charger. However, some faster chargers may be able to charge the battery in as little as 4 to 6 hours.
Q: Can I use a regular car battery charger to charge a trolling motor battery?
A: It is not recommended to use a regular car battery charger to charge a trolling motor battery. Trolling motor batteries have different charging requirements and using a car battery charger can potentially damage the battery. It is best to use a charger specifically designed for trolling motor batteries to ensure proper charging and to preserve the battery’s lifespan.
Q: Should I charge my trolling motor battery while it is still connected to the motor?
A: It is generally recommended to disconnect the trolling motor battery from the motor before charging it. Charging the battery while it is connected to the motor may cause electrical issues or damage the battery. Make sure to follow the manufacturer’s instructions for proper battery removal and charging.
Q: How often should I charge my trolling motor battery?
A: The frequency of charging will depend on how often you use your trolling motor. As a general rule, it is recommended to recharge the battery after each use or at least once a month, even if you haven’t used it. This helps maintain the battery’s charge and prolong its lifespan.
Q: Can I overcharge my trolling motor battery?
A: Yes, it is possible to overcharge a trolling motor battery if it is left connected to the charger for an extended period of time. Overcharging can lead to the battery’s performance degradation or even permanent damage. It is essential to use a charger equipped with a smart charging system or a timer to prevent overcharging. Once the battery is fully charged, disconnect it from the charger to avoid any risks.