
The 3DS XL joystick is a crucial component of the handheld gaming experience. Whether you’re an avid gamer or a casual player, it’s important to keep your joystick clean and well-maintained to ensure optimal performance. Over time, dirt, dust, and grime can accumulate on the joystick, leading to sticky or unresponsive movements. Cleaning your 3DS XL joystick regularly not only improves its functionality but also extends its lifespan. In this article, we will guide you through the step-by-step process of cleaning your 3DS XL joystick, including helpful tips and tricks to keep it in top condition. So grab your cleaning supplies and get ready to give your joystick some tender loving care!
Inside This Article
- Overview
- Materials Needed
- Step 1: Removing the Joystick Cap
- Step 2: Cleaning the Joystick Cap
- Step 3: Cleaning Around the Joystick
- Step 4: Reassembling the Joystick Cap
- Conclusion
- FAQs
Overview
Is your 3DS XL joystick getting sticky or unresponsive? It’s time to give it a good cleaning! The joystick is an essential part of your gaming experience, and keeping it clean is crucial for optimal performance. In this guide, we’ll show you how to clean your 3DS XL joystick step by step, so you can get back to enjoying your favorite games without any issues.
To clean your 3DS XL joystick, you’ll need a few basic materials. Don’t worry; you probably already have most of them at home. Here’s what you need:
- A microfiber cloth
- Isopropyl alcohol (70% or higher concentration)
- Cotton swabs
- A small screwdriver (if needed)
Before you start cleaning, make sure your 3DS XL is turned off and disconnected from any power source. This will prevent any accidental damage and ensure your safety throughout the process.
Now, let’s get started with the step-by-step cleaning process for your 3DS XL joystick:
Materials Needed
Before you can clean your 3DS XL joystick, you’ll need a few essential materials to ensure an effective and thorough cleaning process. Here are the materials you’ll need:
1. Isopropyl Alcohol: Isopropyl alcohol is a common household cleaning agent that is effective at removing dirt, grime, and oils from delicate electronic components. Choose a high-purity alcohol with a concentration of at least 90% to ensure maximum effectiveness.
2. Cotton Swabs: Cotton swabs, also known as Q-tips, are perfect for reaching those tight spots around the joystick. They can be used with the isopropyl alcohol to clean the nooks and crannies effectively.
3. Microfiber Cloth: A microfiber cloth is ideal for wiping down the joystick and removing any smudges or fingerprints. The soft and lint-free texture of a microfiber cloth ensures a scratch-free cleaning process.
4. Toothpicks or Soft Brush: Toothpicks or a soft-bristled brush can be used to dislodge any stubborn dirt or debris that might be stuck around the joystick. Be gentle when using these tools to avoid damaging the delicate components.
5. Compressed Air Canister: If you have one available, a compressed air canister is handy for blowing away any loose particles or dust that may have accumulated around the joystick area.
6. Small Container: A small container or dish is useful for holding the isopropyl alcohol during the cleaning process. This will prevent any spills and keep your workspace neat and organized.
7. Optional: Gloves: While not necessary, wearing gloves can help protect your hands from the isopropyl alcohol if you have sensitive skin. It’s always better to err on the side of caution when working with cleaning agents.
Now that you have gathered all the necessary materials, let’s move on to the step-by-step process of cleaning your 3DS XL joystick.
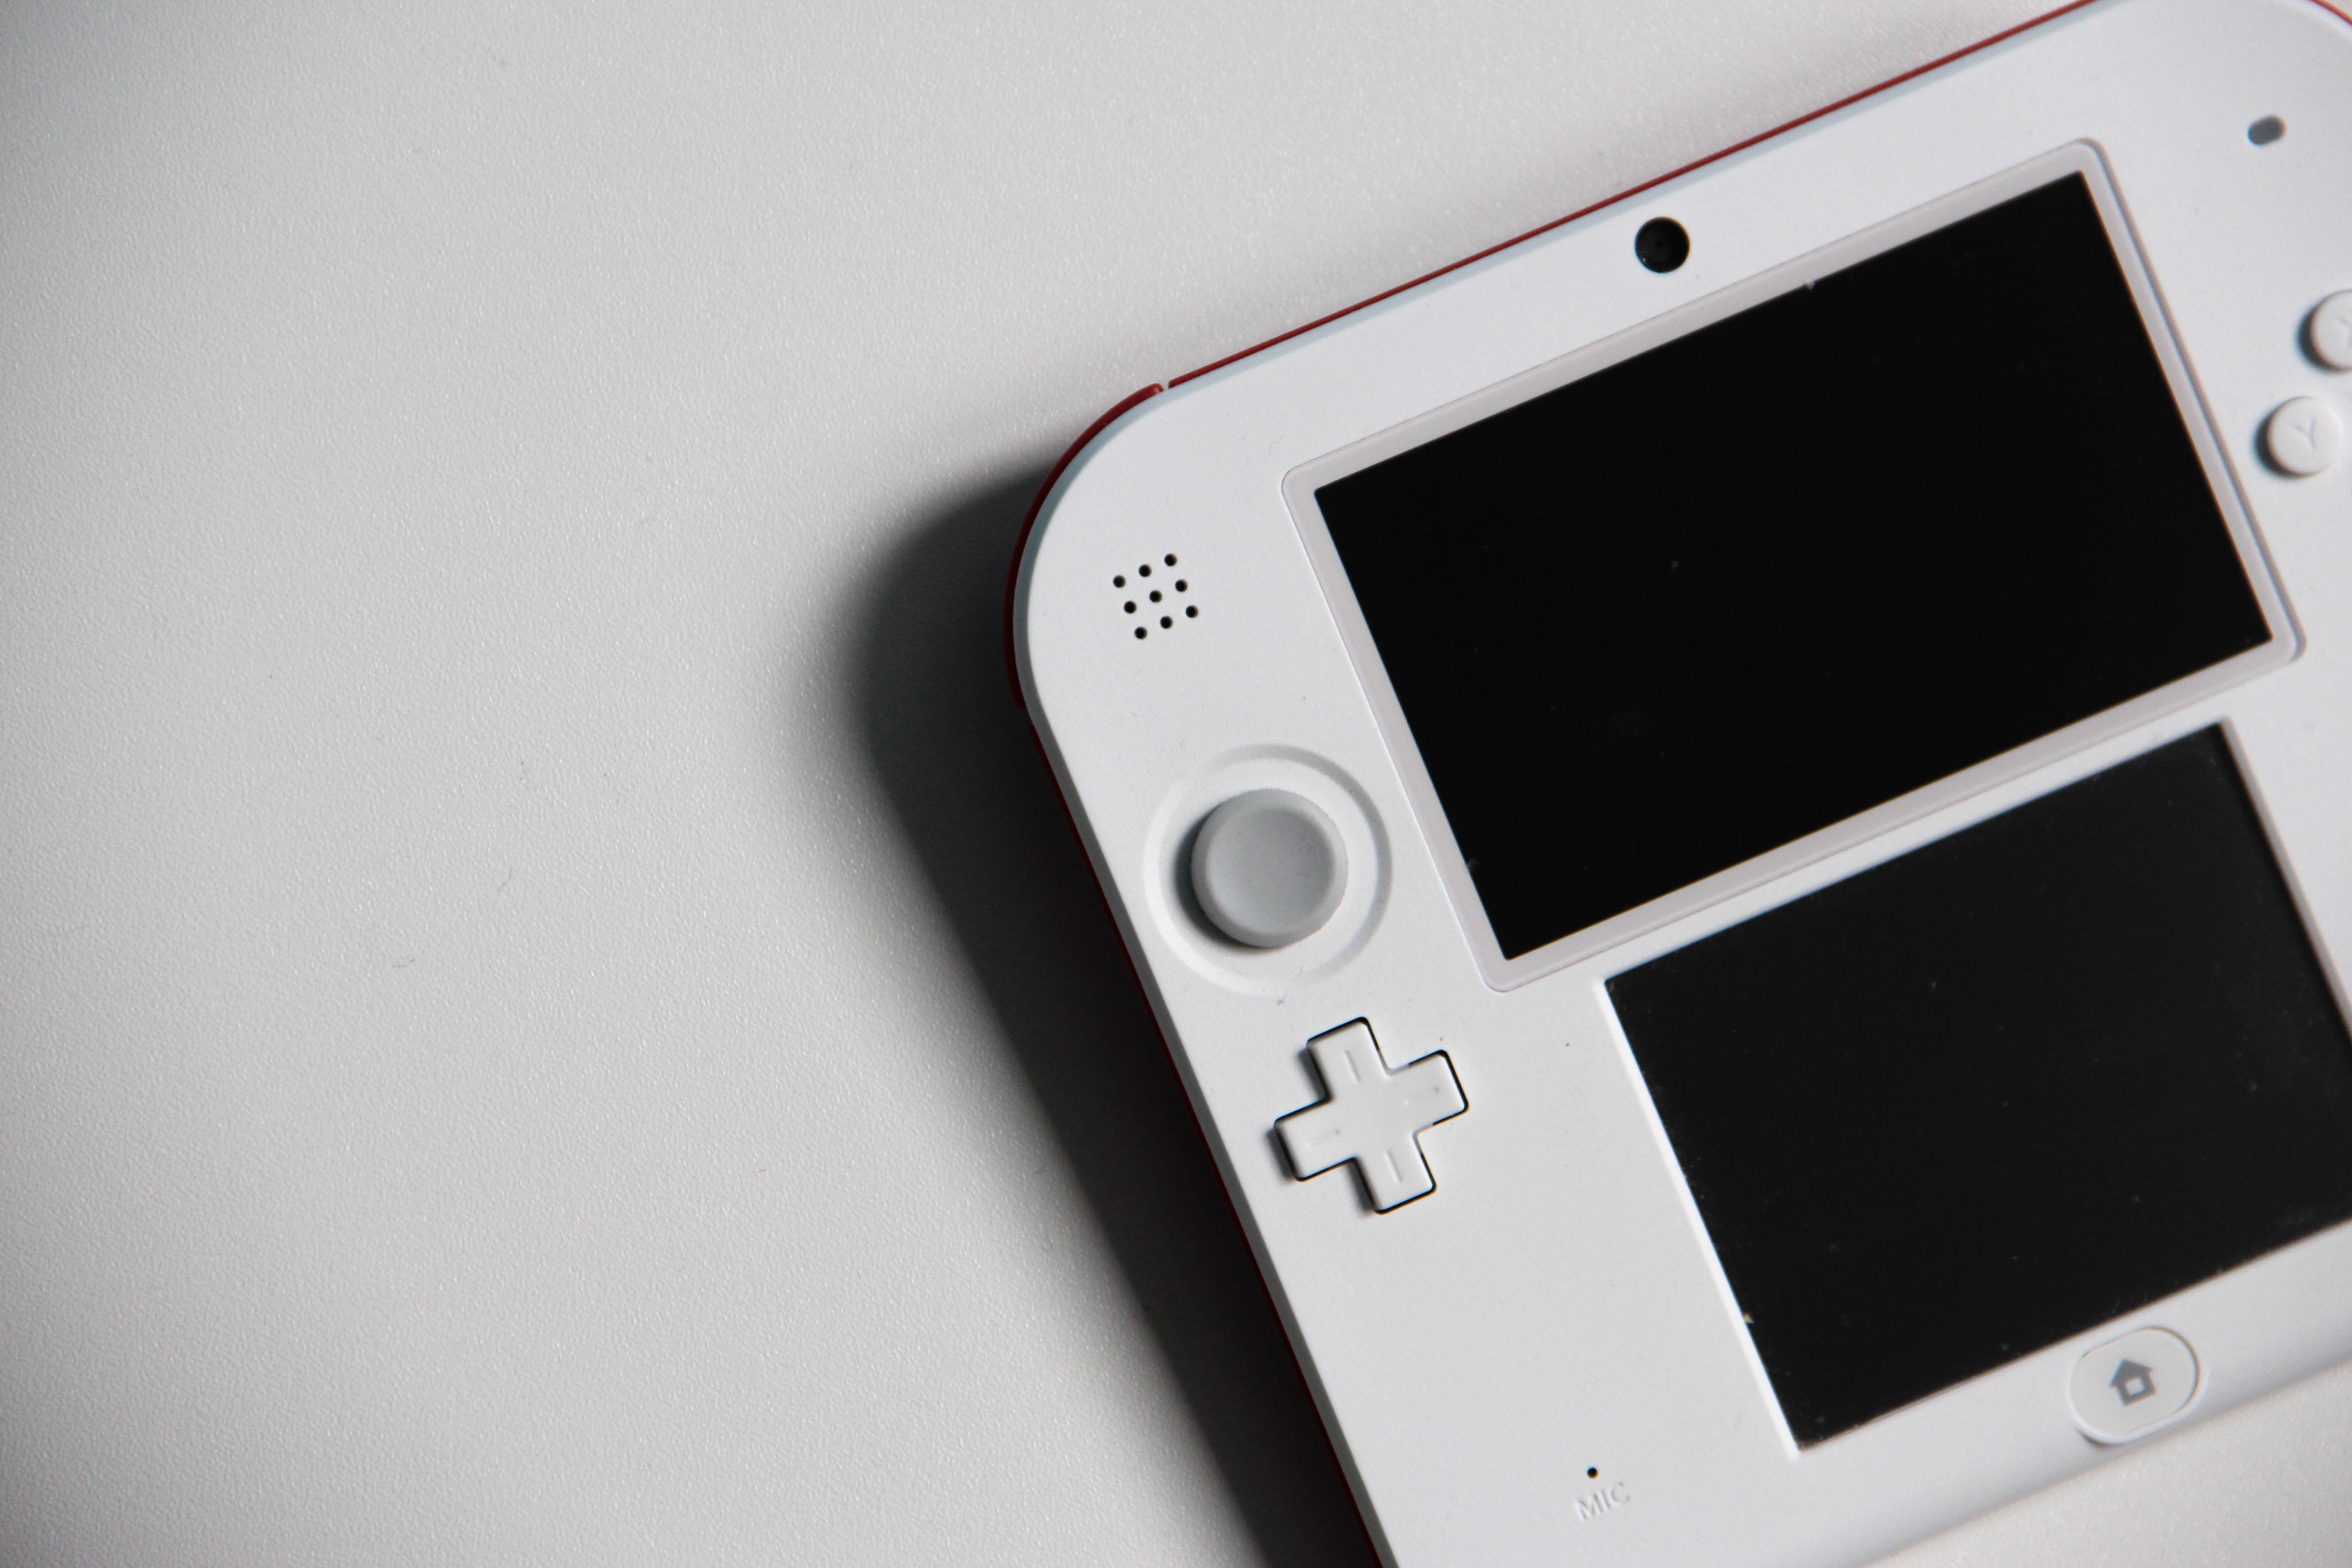
Step 1: Removing the Joystick Cap
Before you can clean your 3DS XL joystick, you need to start by removing the joystick cap. Here’s a step-by-step guide on how to do it:
1. Start by powering off your 3DS XL to ensure that you don’t accidentally trigger any actions while removing the joystick cap.
2. Take a small, thin tool, such as a flathead screwdriver or a plastic opening tool, and gently insert it into the gap between the joystick cap and the joystick base.
3. Apply gentle pressure and slowly lift the tool to pry the joystick cap away from the joystick base. Be careful not to use excessive force to avoid causing any damage.
4. Continue to lift around the entire joystick cap until it pops off. Take your time and be patient during this process to prevent any accidental breakage.
5. Once the joystick cap is removed, set it aside in a safe place where it won’t get lost or damaged.
By following these steps, you can easily remove the joystick cap from your 3DS XL, allowing you to proceed with the cleaning process.
Step 2: Cleaning the Joystick Cap
Now that you have successfully removed the joystick cap in the previous step, it’s time to clean it thoroughly. The joystick cap can accumulate dirt, dust, and grime over time, affecting its performance and responsiveness. Cleaning it regularly can help restore its smooth movement and ensure a better gaming experience.
Here’s how you can clean the joystick cap:
1. Prepare a Cleaning Solution
Start by preparing a mild cleaning solution. You can use a mixture of warm water and gentle dish soap. Avoid using harsh chemicals or abrasive cleaners as they can damage the surface of the joystick cap. Mix the solution in a small bowl or container.
2. Remove Stains or Stubborn Dirt
If there are any stains or stubborn dirt on the joystick cap, you can use a soft-bristled toothbrush or a cotton swab dipped in the cleaning solution to gently scrub the affected areas. Be careful not to apply excessive pressure that could cause damage. Keep scrubbing until the dirt is loosened and removed.
3. Rinse the Joystick Cap
After removing the dirt, rinse the joystick cap thoroughly with clean water to remove any remaining soap residue. Make sure to rinse it under running water or use a separate container with clean water for this step. Avoid submerging the cap completely in water, as it could damage the internal electronics.
4. Dry the Joystick Cap
Once rinsed, gently pat the joystick cap dry using a soft, lint-free cloth or paper towel. Avoid rubbing the cap vigorously, as it can cause friction and potentially damage the surface. Allow the cap to air dry completely before reassembling it.
5. Optional: Disinfect the Joystick Cap
If you want to ensure an extra level of cleanliness, you can use a disinfectant wipe or a mild disinfectant solution to carefully wipe the joystick cap. This step is especially useful if you share your gaming console with others or if the cap has come into contact with potentially harmful substances.
6. Reattach the Joystick Cap
Once the joystick cap is completely dry, align it with the joystick on your 3DS XL and gently press it down until it clicks into place. Make sure it fits securely and moves smoothly without any resistance. Your joystick cap is now clean and ready to enhance your gaming experience.
Step 3: Cleaning Around the Joystick
Once you have removed the joystick cap and cleaned it, it’s time to focus on cleaning the area around the joystick. This step is crucial to ensure smooth and accurate movement of the joystick during gameplay. Here’s how you can clean around the joystick:
1. Use a soft, lint-free cloth or cotton swab dampened with a small amount of isopropyl alcohol. Be careful not to use excessive liquid, as it can seep into the electronics of the device.
2. Gently wipe the area around the joystick, removing any dirt, grime, or residue that may have accumulated. Pay close attention to the edges and crevices where dirt tends to accumulate.
3. If there are stubborn stains or debris that are difficult to remove with the cloth or cotton swab, you can use a small brush with soft bristles to gently scrub the area. Ensure that the bristles are not too harsh to avoid scratching the surface of the device.
4. Once you have cleaned the area thoroughly, take a dry cloth or cotton swab and gently remove any excess moisture or remaining cleaning solution from the surface.
5. Allow the area to dry completely before reassembling the joystick cap.
Cleaning around the joystick is essential to maintain the longevity and functionality of your 3DS XL. By removing any debris or dirt, you can ensure smooth and precise movements when playing games. Remember to be gentle in your cleaning process and avoid using excessive force or liquid to prevent any damage to the device.
Step 4: Reassembling the Joystick Cap
Now that you have successfully cleaned the joystick cap and the area around it, it’s time to reassemble everything. Follow these simple steps to put the joystick cap back in place:
1. Place the Joystick Cap
Take the cleaned joystick cap and carefully align it with the joystick base. Ensure that the grooves on the cap slot into the corresponding grooves on the base.
2. Press Firmly
Apply light pressure and press the joystick cap firmly onto the base. Make sure it fits snugly and securely into place. You should feel a slight click or resistance when it is properly attached.
3. Test the Joystick
Once the cap is reassembled, test the functionality of the joystick. Move it in all directions to ensure smooth and responsive movement. If there are any issues, check the cap’s alignment and reattach it if necessary.
4. Replace the Battery Cover
If you had removed the battery cover earlier, now is the time to put it back on. Align it correctly and gently press it until it clicks into place. This will ensure the cover is securely fastened and your 3DS XL is ready for use.
5. Enjoy Gaming
Now that your 3DS XL joystick cap is clean and properly reassembled, you can get back to enjoying your gaming sessions. The smooth and responsive joystick will enhance your gaming experience, allowing you to navigate your favorite games effortlessly.
By following these steps, you can effectively clean and reassemble the joystick cap of your 3DS XL. It’s important to maintain a clean joystick to ensure optimal performance and extend the lifespan of your gaming device.
Remember, regular cleaning and maintenance will help keep your 3DS XL joystick in top shape and ensure you have the best gaming experience possible.
Conclusion
Keeping your 3DS XL joystick clean is essential for optimal gaming performance. By regularly cleaning and maintaining your joystick, you can ensure smooth and precise movements, prolong the lifespan of your device, and enhance your overall gaming experience.
Remember to carefully remove any debris that may have accumulated on the joystick, using a soft brush or compressed air. Avoid using harsh cleaning agents or excessive force that could damage the joystick. Additionally, consider using a joystick cover or protective case to prevent dirt and dust from entering the joystick mechanism.
By following these simple cleaning tips and incorporating them into your gaming routine, you can keep your 3DS XL joystick in excellent condition and enjoy countless hours of immersive gameplay.
FAQs
1. Q: Why is it important to clean the joystick of my 3DS XL?
A: The joystick on your 3DS XL is an integral part of the gaming experience. Over time, dirt, dust, and debris can accumulate, resulting in decreased responsiveness and accuracy. Cleaning the joystick helps to restore its functionality and ensure smooth gameplay.
2. Q: How often should I clean the joystick of my 3DS XL?
A: The frequency of cleaning depends on your usage and the environment in which the device is used. It is recommended to clean the joystick at least once every few months or whenever you notice a decrease in performance.
3. Q: What tools do I need to clean the joystick?
A: To clean the joystick of your 3DS XL, you will need some basic tools such as cotton swabs, isopropyl alcohol, and a soft cloth. These items are readily available and can be purchased from most electronics stores or online.
4. Q: How do I clean the joystick of my 3DS XL?
A: Firstly, turn off your 3DS XL and disconnect any power source. Dampen a cotton swab with a small amount of isopropyl alcohol, making sure it’s not too wet. Gently rub the joystick in a circular motion, removing any dirt or grime. Use another cotton swab dipped in clean water to remove any remaining alcohol residue. Finally, dry the joystick with a soft cloth before turning the device back on.
5. Q: Are there any precautions I should take while cleaning the joystick?
A: Yes, it is important to be gentle while cleaning the joystick to avoid causing any damage. Avoid using excessive force or harsh cleaning agents that may harm the delicate components. Additionally, ensure that the device is powered off and disconnected from any power source before cleaning to prevent any electrical issues.