
Connecting a BNC connector is a crucial skill for anyone working with electronics or communications equipment. Whether you’re setting up surveillance cameras, working with oscilloscopes, or connecting antennas, understanding how to properly connect a BNC connector is essential. In this article, we will provide you with a step-by-step guide on how to connect a BNC connector. From identifying the different components of a BNC connector to ensuring a secure connection, we will cover all the necessary information you need to know. So, whether you’re a beginner or an experienced technician, read on to learn the proper techniques for connecting a BNC connector and ensure smooth signal transmission for your devices.
Inside This Article
- Types of BNC Connectors
- Tools and Materials Needed
- Step-by-Step Guide to Connecting a BNC Connector
- Tips and Troubleshooting
- Conclusion
- FAQs
Types of BNC Connectors
BNC connectors, also known as Bayonet Neill-Concelman connectors, are widely used in a variety of applications, including telecommunications, audio/video systems, and surveillance equipment. There are several types of BNC connectors available in the market, each with its own unique features and uses. Here are some of the most common types:
1. Standard BNC: The standard BNC connector is the most commonly used type. It is designed for coaxial cables with a 50-ohm impedance and is commonly used in video applications.
2. Miniature BNC: The miniature BNC connector, also known as the “mini BNC,” is a smaller version of the standard BNC connector. It is commonly used in high-frequency and digital applications, such as networking equipment and test instruments.
3. High-Density BNC: The high-density BNC connector features a smaller footprint and enhanced electrical performance. It is commonly used in applications where space is limited, such as high-density patch panels and broadcast video equipment.
4. Compression BNC: The compression BNC connector is designed for quick and easy installation. It features a compression mechanism that provides a secure connection and minimizes signal loss. This type of connector is commonly used in CCTV and surveillance systems.
5. Waterproof BNC: The waterproof BNC connector is specially designed to provide protection against moisture and harsh environmental conditions. It is commonly used in outdoor applications, such as security cameras and outdoor networking equipment.
6. Right-Angle BNC: The right-angle BNC connector features a 90-degree angle design, allowing for a low-profile connection in tight spaces. It is commonly used in applications where space constraints are a concern, such as in racks and cabinets.
7. TNC to BNC Adapter: The TNC to BNC adapter is used to convert a TNC connector to a BNC connector. This adapter is commonly used when connecting devices with different connector types.
Each type of BNC connector has its own advantages and is suitable for different applications. When choosing a BNC connector, it’s important to consider the specific requirements and compatibility with your equipment.
Tools and Materials Needed
Before you can connect a BNC connector, you will need a few essential tools and materials. Here’s a list of what you’ll need:
- BNC Connector: Ensure you have a BNC connector that matches the type (male or female) and the impedance (50 ohms or 75 ohms) required for your specific application.
- Coaxial Cable: Use a high-quality coaxial cable that is suitable for your intended use. The cable should have the correct impedance and be of the appropriate length for your installation.
- Wire Stripping Tool: Invest in a wire stripping tool with blades specifically designed for coaxial cables. This tool will help you strip the outer jacket and insulation from the cable without damaging the inner conductor.
- Coaxial Cable Cutter: A coaxial cable cutter is essential for cleanly cutting the cable to the desired length without leaving any frayed edges or compromising the signal quality.
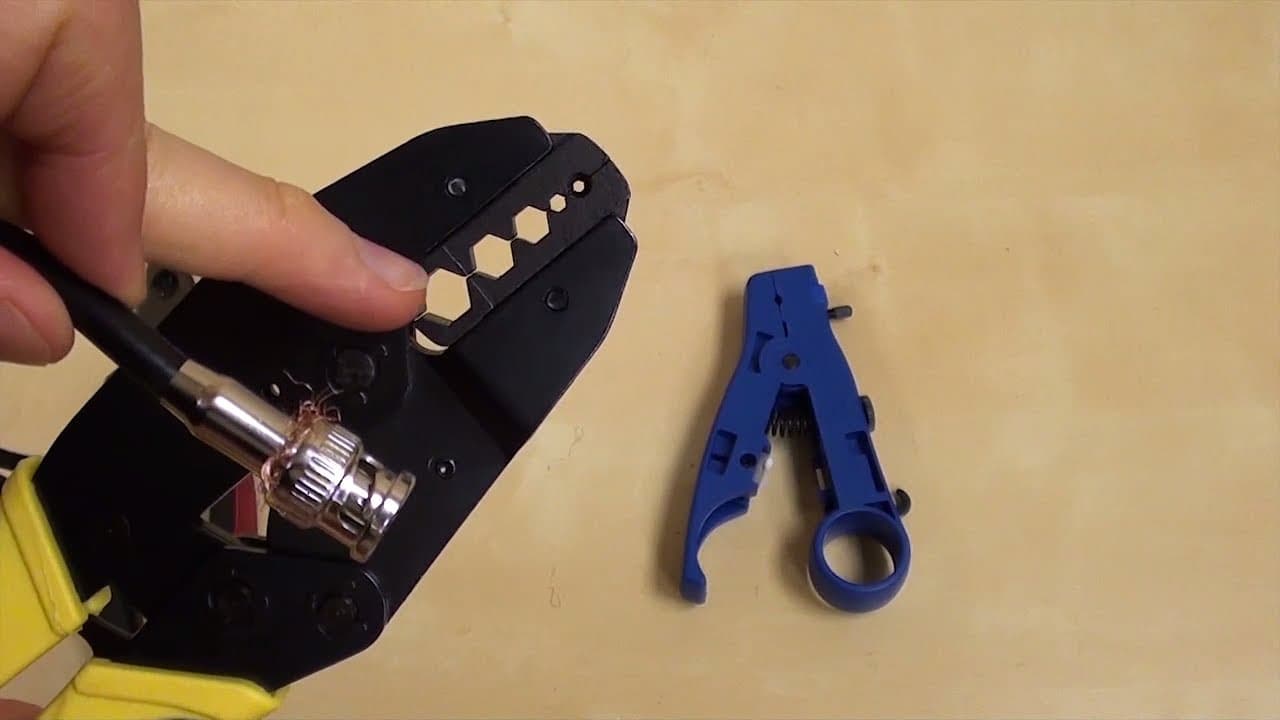
- BNC Crimping Tool: If you are using crimp-style BNC connectors, a BNC crimping tool is necessary to securely attach the connector to the stripped cable ends.
- BNC Compression Tool: For compression-style BNC connectors, you’ll need a BNC compression tool. This tool compresses the connector onto the cable, ensuring a tight and reliable connection.
- Heat Shrink Tubing (optional): Heat shrink tubing can provide extra protection and strain relief for the cable connections. It is particularly useful for outdoor installations or areas prone to movement or vibration.
- Heat Gun: If you opt for heat shrink tubing, you’ll need a heat gun to shrink the tubing and create a snug fit around the cable and connector.
- Electrical Tape (optional): Electrical tape can be used as an additional layer of insulation or to secure the cable and connector in place after the connection is made.
- Cable Tester: A cable tester is an invaluable tool to verify the continuity and signal integrity of your BNC connections. It will help you detect any faults or miswiring in the cable.
With these tools and materials on hand, you’ll be well-prepared to successfully connect your BNC connector and ensure a reliable and high-quality signal transmission.
###
Step-by-Step Guide to Connecting a BNC Connector
Connecting a BNC (Bayonet Neill-Concelman) connector is a straightforward process that can be done in a few simple steps. Whether you are setting up a security system, working on a video production project, or simply need to connect a BNC cable to your device, this guide will walk you through the process. So, let’s get started!
-
Gather the necessary tools and materials: Before you begin, make sure you have all the required tools and materials. You will need a BNC cable, a BNC connector, a coaxial cable stripper, a cable cutter, and a BNC crimping tool. Double-check that you have the correct size of BNC connector for your cable.
-
Prepare the cable: Start by stripping off the outer jacket of the coaxial cable. Use the coaxial cable stripper to carefully remove the outer layer, being cautious not to damage the inner conductor. Once the outer jacket is removed, you will see the braided shielding and an inner insulating layer.
-
Prepare the braided shielding: Gently fold back the braided shielding and twist it to create a tight bundle. This will prevent any stray wires from interfering with the connection. Trim off any excess shielding to ensure a clean and tidy connection.
-
Prepare the inner conductor: After the braided shielding is secured, strip off the inner insulating layer to expose the inner conductor. Use a cable cutter or stripper to carefully remove the insulation without damaging the conductor. Make sure that the conductor is clean and free from any debris.
-
Insert the BNC connector: Slide the BNC connector onto the prepared coaxial cable. Ensure that the connector is aligned with the exposed inner conductor and that the braided shielding fits snugly into the connector’s outer sleeve.
-
Crimp the BNC connector: Once the BNC connector is in place, use a BNC crimping tool to secure it to the cable. Apply even pressure to the crimping tool, ensuring a tight and reliable connection. Check to see if the connector is securely attached to the cable.
-
Check the connection: After the crimping process is complete, give the cable a gentle tug to test the connection. It should not come loose or slide off easily. Inspect the connection for any visible defects or loose components.
Following these steps will allow you to easily connect a BNC connector to a coaxial cable. Remember to double-check all the connections and ensure they are secure before using the cable. Now you’re ready to enjoy a reliable and high-quality BNC connection for your various needs!
Tips and Troubleshooting
When it comes to connecting a BNC connector, there are a few tips and troubleshooting strategies that can help ensure a successful and reliable connection. Here are some important points to keep in mind:
- Inspect the cables: Before connecting the BNC connector, check the cables for any signs of damage or wear. Look for frayed wires, bent pins, or loose connections. It’s essential to have clean and intact cables to ensure a proper connection.
- Proper alignment: When connecting the BNC connector, make sure the male and female connectors are properly aligned. A misalignment can result in a weak or intermittent signal. Take your time to ensure a snug and secure fit.
- Tighten the connectors: After connecting the BNC connector, use the appropriate tools to tighten the connectors. This will help eliminate any potential signal loss caused by loose connections. Be careful not to overtighten, as this can damage the connectors.
- Use quality connectors: Investing in high-quality BNC connectors can make a significant difference in the overall performance and reliability of your connection. Cheap or poorly-made connectors may result in signal degradation or intermittent connectivity.
- Eliminate interference: In some cases, interference from nearby electronic devices or cables can affect the signal quality. Keep your BNC cables away from sources of electromagnetic interference, such as power cables or wireless devices.
- Test the connection: Once you’ve connected the BNC connector, it’s important to test the connection to ensure it’s working correctly. Use appropriate testing equipment or devices to verify the signal strength and quality.
- Troubleshooting: If you encounter any issues with your BNC connection, first check for loose or damaged cables. Ensure the connectors are properly aligned and tightened. If the problem persists, try using a different BNC connector or cable to troubleshoot the issue.
By following these tips and troubleshooting strategies, you can ensure a reliable and high-quality connection when connecting a BNC connector. Remember to always handle the connectors and cables with care and attention to detail to avoid any potential damage or signal loss.
Conclusion
In conclusion, connecting a BNC connector is a simple process that can be done with just a few easy steps. Whether you need to connect a BNC connector for CCTV cameras or other electronic devices, following the correct procedure will ensure a secure and reliable connection. Remember to choose the appropriate BNC connector for your specific needs and make sure to properly prepare the cables before installation. By following the guidelines outlined in this article, you can confidently connect a BNC connector and enjoy seamless and high-quality audio and video transmission. So go ahead and give it a try, and make the most out of your BNC-enabled devices!
FAQs
1. What is a BNC connector?
A BNC (Bayonet Neill-Concelman) connector is a type of coaxial connector that is commonly used for audio and video applications. It features a bayonet-style locking mechanism that ensures a secure and reliable connection. BNC connectors are known for their durability and ease of use, making them a popular choice in various industries.
2. How do I connect a BNC connector?
To connect a BNC connector, simply follow these steps:
- Ensure that the cable you are using has a BNC connector on one end.
- Align the BNC connector with the port on the device or equipment you want to connect it to.
- Push the connector into the port and give it a slight clockwise twist until you feel it lock into place.
- To disconnect, twist the connector counterclockwise and gently pull it out.
3. What are the advantages of using BNC connectors?
BNC connectors offer several advantages, including:
- Secure connection: The bayonet-style locking mechanism ensures a tight and secure connection, preventing accidental disconnections.
- Durability: BNC connectors are designed to withstand frequent use and are built to last.
- Ease of use: Connecting and disconnecting BNC connectors is a straightforward process, making them user-friendly.
- Wide range of applications: BNC connectors are widely used in audio and video equipment, CCTV systems, and telecommunications.
4. Can BNC connectors be used for digital signals?
Yes, BNC connectors can be used for both analog and digital signals. They are commonly used for video applications, including SDI (Serial Digital Interface) and HD-SDI (High Definition Serial Digital Interface). BNC connectors provide a stable and reliable connection for high-quality digital signals.
5. Are BNC connectors interchangeable with other types of connectors?
In most cases, BNC connectors are not interchangeable with other types of connectors. They have their own unique design and locking mechanism, making them specific to BNC-compatible ports and devices. However, there are adapters available that allow you to convert a BNC connector to other types, such as RCA or F-type connectors, for certain applications.