
Are you looking to install a BNC connector for your electronic devices? Whether you want to set up a security camera system, connect to a radio frequency device, or establish a high-quality audio or video connection, understanding how to install a BNC connector is essential. This guide will walk you through the step-by-step process of installing a BNC connector and ensure that your connections are secure and reliable. From choosing the right tools to properly terminating the cables, we will cover everything you need to know to successfully install a BNC connector. So, let’s dive in and get started on this exciting journey of learning how to install a BNC connector!
Inside This Article
- Overview of BNC Connectors
- Tools and Equipment Needed
- Step-by-Step Installation Process
- Conclusion
- FAQs
Overview of BNC Connectors
BNC (Bayonet Neill-Concelman) connectors are widely used in the field of telecommunications and electronics for connecting coaxial cables. They were originally developed by Paul Neill and Carl Concelman of Bell Labs in the 1940s and have since become a standard connector for various applications, including video surveillance systems, networking equipment, and audio equipment.
BNC connectors are known for their ease of use and reliable connection. They have a unique bayonet-style coupling mechanism that allows for quick and secure connections without the need for tools. This makes them convenient for installations and enables users to easily swap cables or devices without hassle.
One of the notable features of BNC connectors is their impedance of 75 ohms, which makes them suitable for video and RF (radio frequency) applications. This impedance ensures optimal signal transmission and minimizes signal loss, resulting in better performance and enhanced video and audio quality.
BNC connectors are designed to handle high-frequency signals and have excellent shielding properties. This makes them resistant to electromagnetic interference (EMI) and helps maintain signal integrity, especially in noisy environments. Their robust construction and durability make them suitable for various industrial and commercial applications.
In addition to their use in coaxial cables, BNC connectors are also compatible with certain types of twisted pair cables, making them versatile for different connectivity needs. They are available in various configurations, such as BNC male or female connectors, straight or right-angle adapters, and bulkhead or panel-mount options.
BNC connectors are relatively easy to install and require minimal maintenance. They have a reputation for being reliable and long-lasting, which contributes to their popularity in the industry. Whether you are setting up a surveillance system, connecting audio equipment, or working with RF applications, BNC connectors provide a reliable and efficient solution.
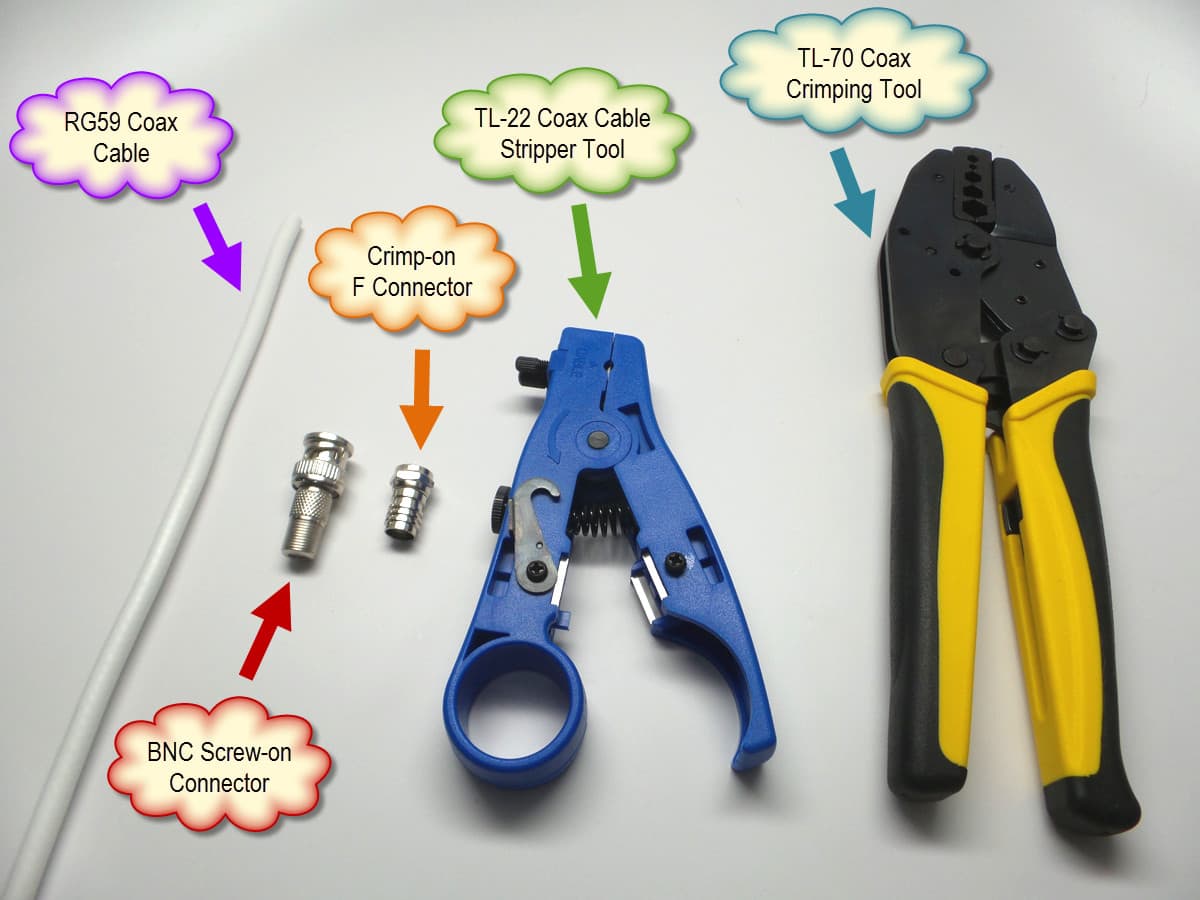
Tools and Equipment Needed
Before you begin installing a BNC connector, it’s important to gather all the necessary tools and equipment. Having the right tools will make the installation process smoother and more efficient. Here are the tools and equipment you’ll need:
- BNC connector: Ensure you have a high-quality BNC connector that matches the specifications of your cable. There are different types of BNC connectors available, such as crimp type or twist-on type, so choose the one that suits your needs.
- Coaxial Cable: Make sure you have a suitable length of coaxial cable for your installation. The cable should have the appropriate impedance (usually 50 or 75 Ohms) and be of good quality to ensure reliable signal transmission.
- Cable Cutter: A cable cutter is essential for cutting the coaxial cable to the desired length. It should have sharp blades to ensure clean and precise cuts.
- Wire Strippers: You’ll need wire strippers to remove the outer jacket and insulation from the coaxial cable. Make sure you choose a wire stripper that is compatible with the diameter of your cable.
- BNC Crimp Tool: If you’re using a crimp type BNC connector, you’ll need a BNC crimp tool to secure the connector onto the cable. This tool ensures a strong and reliable connection.
- BNC Compression Tool: For compression type BNC connectors, you’ll need a BNC compression tool. This tool compresses the connector onto the cable, creating a secure and waterproof seal.
- BNC Connector Removal Tool: In case you need to remove or replace a BNC connector, having a BNC connector removal tool will make the process easier and minimize any damage to the cable.
- Electrical Tape: Electrical tape helps secure the connection and provides additional protection against moisture and external elements. Use high-quality electrical tape to ensure long-lasting performance.
- Heat Gun: If you’re using heat shrink tubing to protect the connection, a heat gun will be necessary to shrink the tubing and create a tight seal.
- Multimeter: A multimeter is useful for checking the continuity and impedance of the cable connection. It can help troubleshoot any potential issues and ensure a proper connection.
Step-by-Step Installation Process
Installing a BNC connector requires a few simple steps. Follow the guide below to ensure a successful installation:
Step 1: Prepare the Cable
Start by stripping the outer insulation of the coaxial cable, using a cable stripper or sharp knife. Carefully measure the distance according to the connector’s specifications to ensure the proper length of exposed inner conductor and shielding.
Step 2: Trim the Inner Conductor and Shielding
Use cable cutters or a sharp blade to trim and even out the inner conductor and the metallic shielding. This will ensure a clean and precise connection.
Step 3: Insert the Connector
Gently twist the BNC connector onto the prepared coaxial cable. Make sure the connector’s threads are aligned with the cable’s threads, and apply a slight pressure to secure the connection.
Step 4: Tighten the Connector
Use an adjustable wrench or BNC tightening tool to firmly tighten the connector. Be careful not to overtighten, as it may damage the connector or the cable.
Step 5: Test the Connection
Once the connector is securely attached, use a cable tester or multimeter to verify the continuity and signal quality of the installation. This will ensure a reliable and efficient connection.
Step 6: Protect the Connection
Finally, apply heat shrink tubing or electrical tape around the base of the connector to provide additional protection against moisture and physical damage.
That’s it! By following these step-by-step instructions, you can easily install a BNC connector onto your coaxial cable. Remember to take your time and pay attention to the details, ensuring a proper and secure connection that will deliver optimal signal quality.
Conclusion
Installing a BNC connector may seem intimidating at first, but with the right tools and a step-by-step guide, it can be a straightforward process. Whether you’re setting up a surveillance system or connecting your audio/video equipment, a BNC connector provides a reliable and secure connection.
By following the instructions outlined in this article, you now have the knowledge and confidence to successfully install a BNC connector. Remember to prepare the cable properly, strip the insulation, and attach the connector firmly. Don’t forget to test the connection to ensure it’s working correctly.
With practice, you’ll become proficient in installing BNC connectors and be able to handle various networking and audio/video setups with ease. Embrace the convenience and reliability offered by BNC connectors, and enjoy uninterrupted signal transmission in your devices.
FAQs
Here are some commonly asked questions about installing BNC connectors:
-
What is a BNC connector?
A BNC (Bayonet Neill-Concelman) connector is a type of coaxial connector that is commonly used for video and RF (radio frequency) applications. It features a bayonet mount that allows for quick and secure connections. -
What tools do I need to install a BNC connector?
To install a BNC connector, you will typically need a coaxial cable stripper, a set of crimping pliers, and a BNC connector itself. Some connectors may also require a soldering iron if they have a center pin that needs to be soldered. -
What is the proper technique to strip a coaxial cable?
To strip a coaxial cable for installing a BNC connector, follow these steps:- Use a coaxial cable stripper to score the outer jacket of the cable.
- Remove the scored section of the jacket.
- Carefully cut away the shielding, being careful not to damage the inner core.
- Ensure that the exposed inner core is smooth and free of any stray strands.
-
How do I properly crimp a BNC connector?
To crimp a BNC connector, follow these steps:- Slide the BNC connector onto the stripped end of the coaxial cable.
- Ensure that the center conductor is inserted into the center pin of the connector.
- Using a crimping tool, apply firm pressure to the connector to secure it to the cable.
- Check the connection to ensure that it is secure and there are no visible gaps.
-
Are there any precautions I should take when installing a BNC connector?
Yes, there are a few precautions to keep in mind when installing a BNC connector:- Ensure that the cable is prepared and stripped correctly to avoid signal loss or interference.
- Double-check that the connector is compatible with the cable and the intended application.
- Avoid overtightening the connector, as it may cause damage to the cable or the connector itself.
- Test the connection after installation to ensure that it is functioning properly.
With these FAQs, you should have a good understanding of how to install a BNC connector and the tools and techniques involved. Remember to always consult the instructions provided with your specific connector, as there may be slight variations in the installation process.