
Are you looking to enhance the functionality of your desktop computer? One of the best ways to do that is by connecting a docking station. A docking station is a device that allows you to easily connect and disconnect your laptop or mobile devices to your desktop computer. It provides additional ports and features, such as USB ports, HDMI outputs, and audio jacks, expanding your desktop’s capabilities.
In this article, we will guide you through the process of connecting a docking station to your desktop computer. Whether you’re a tech-savvy individual or a beginner, we will break down the steps in a clear and concise manner. By the end of this article, you’ll have the knowledge to seamlessly connect your docking station and enjoy the convenience it offers. So, let’s get started and unlock the full potential of your desktop computer!
Inside This Article
- What is a Docking Station?
- Checking Compatibility
- Connecting the Docking Station to the Desktop
- Configuring the Docking Station with the Desktop
- Conclusion
- FAQs
What is a Docking Station?
A docking station is a device that allows you to easily connect your laptop or mobile device to a desktop computer, providing you with additional connectivity options and enhancing your productivity. It serves as a central hub, enabling you to connect various peripherals and accessories to your computer through a single connection point.
With a docking station, you can quickly and conveniently connect your laptop or mobile device to a larger monitor, keyboard, mouse, speakers, and other peripherals. This is particularly useful for individuals who work with multiple screens or require a more comfortable and ergonomic setup.
Docking stations come in different forms, including standalone units, which can be connected to your desktop via USB or Thunderbolt ports, or integrated docking stations that are designed specifically for certain laptop models. These integrated solutions often provide additional features, such as charging capabilities or specialized ports for specific devices.
Overall, a docking station simplifies the process of connecting and disconnecting your laptop or mobile device from a desktop setup. It offers convenience, flexibility, and improved functionality, making it an essential accessory for professionals and anyone looking to maximize their computing experience.
Checking Compatibility
Before connecting a docking station to your desktop, it’s crucial to ensure compatibility between the two devices. Here are some steps to follow when checking compatibility:
1. Verify the Connectivity Ports
Check the ports available on both your docking station and your desktop. The most common ports on a docking station include USB, Thunderbolt, HDMI, DisplayPort, Ethernet, and audio jacks. Make sure that your desktop has the corresponding ports to establish a seamless connection.
2. Confirm the Operating System Compatibility
Some docking stations may have specific compatibility requirements based on the operating system of your desktop. Ensure that your operating system is supported by the docking station, whether it’s Windows, macOS, or Linux. This information can usually be found in the manufacturer’s specifications or user manual.
3. Consider Power Requirements
Docking stations often require power to function correctly. Check if your desktop can provide the necessary power supply to the docking station. Some docking stations come with their own power adapters, while others draw power directly from the desktop via a USB or Thunderbolt connection. Make sure you have the appropriate power options available.
4. Check for Driver Updates
Drivers play a crucial role in establishing a stable connection between the docking station and the desktop. Visit the manufacturer’s website and check for any available driver updates for your docking station. Keeping your drivers up to date ensures compatibility and can resolve any potential connection issues.
5. Research Additional Compatibility Considerations
Depending on your specific needs, there may be additional compatibility factors to consider. For example, if you plan to connect multiple monitors to your docking station, check if your desktop’s graphics card supports the required number of monitors and resolutions. Additionally, if you have any specialized peripherals or devices, ensure that they are compatible with the docking station.
By following these compatibility checks, you can avoid any unexpected issues and ensure a smooth and reliable connection between your docking station and desktop. Once you have confirmed compatibility, you can proceed to connect the docking station to your desktop.
Connecting the Docking Station to the Desktop
Connecting a docking station to your desktop can provide you with a convenient way to expand your computer’s capabilities and increase productivity. Whether you need to connect multiple monitors, additional USB devices, or even an Ethernet connection, a docking station can simplify the process.
Before you begin, make sure you have a compatible docking station for your desktop. Check the specifications of your computer model or consult the manufacturer’s website to ensure compatibility. Different docking stations may have different connection options, so it’s important to choose one that suits your needs.
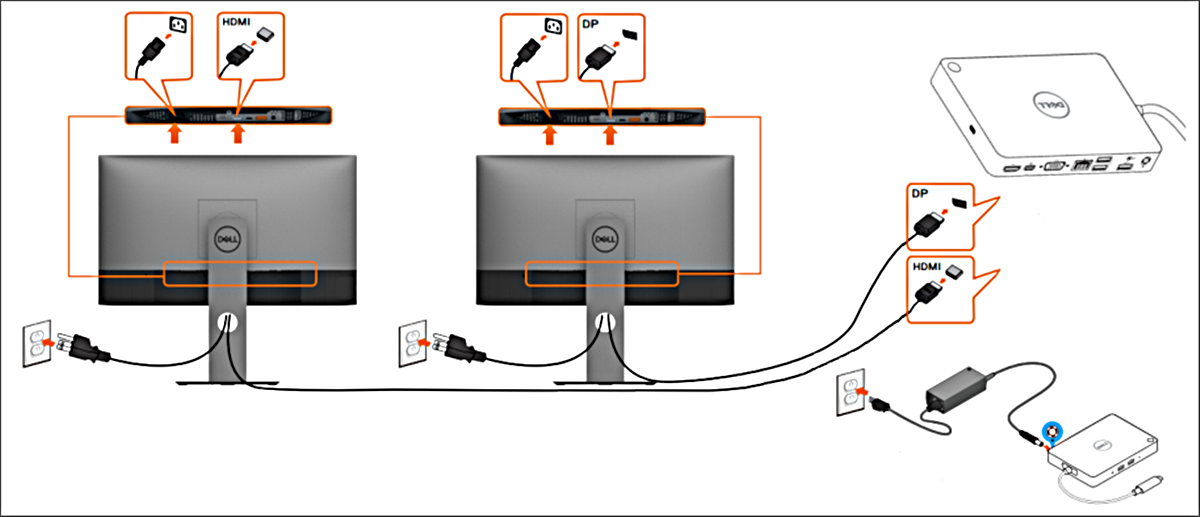
Here are the steps to connect a docking station to your desktop:
- Power off your desktop and disconnect all peripherals.
- Locate the docking station’s port replicator on the back of your desktop. It is usually labeled with the docking station symbol.
- Align the docking station’s connector with the port replicator on the desktop.
- Gently push the docking station’s connector into the port replicator until it clicks into place. Ensure a secure connection.
- Power on your desktop.
- Once the desktop is on, your operating system should automatically detect the docking station and install the necessary drivers. If prompted, follow the on-screen instructions to complete the driver installation.
- To verify that the docking station is properly connected, check the system tray for any relevant icons or notifications.
- Connect your peripherals and accessories to the docking station’s ports, such as monitors, USB devices, Ethernet cables, and audio equipment.
With the docking station successfully connected to your desktop, you can now enjoy the benefits of enhanced functionality and convenience. Whether you’re a professional looking for a streamlined work setup or a gamer wanting to connect multiple monitors for an immersive experience, a docking station can greatly enhance your desktop computing experience.
Remember, if you encounter any issues during the connection process, consult the docking station’s user manual or reach out to the manufacturer’s support team for assistance. Happy docking!
Configuring the Docking Station with the Desktop
Once you have connected your docking station to your desktop, the next step is to configure it. This process involves setting up the necessary software and ensuring the proper settings are in place to ensure optimal performance and functionality. Here are the steps to follow when configuring your docking station with the desktop:
1. Install the Docking Station Software: Before you can begin configuring your docking station, you need to install any required software. This software typically comes with the docking station and can be found on a CD or downloaded from the manufacturer’s website. Follow the installation instructions provided to complete the software installation process.
2. Update Drivers: It is important to ensure that all drivers for your docking station and any connected devices are up to date. Manufacturers often release driver updates to improve compatibility and performance. Visit the manufacturer’s website to download and install the latest drivers for your specific docking station model.
3. Configure Display Settings: If your docking station supports multiple displays, you may need to configure the display settings to extend or duplicate your desktop across the screens. Access the display settings on your desktop by right-clicking on the desktop and selecting “Display settings” or “Graphics options.” From there, you can adjust the resolution, arrangement, and other settings as desired.
4. Set Audio Output Preferences: If your docking station includes audio capabilities, you may need to configure the audio output preferences. On your desktop, access the sound settings by right-clicking on the volume icon in the system tray and selecting “Open sound settings” or “Playback devices.” From there, choose the appropriate audio output device for your docking station.
5. Connect and Configure Peripherals: If you have any peripherals connected to your docking station, such as a keyboard, mouse, or external hard drive, make sure they are properly connected and recognized by the desktop. You may need to install additional drivers or configure settings for these peripherals separately.
6. Customize Power and Performance Settings: Some docking stations offer power and performance management features. You can adjust these settings to optimize battery life and system performance. Access the power settings on your desktop by searching for “Power & sleep settings” and selecting the desired options.
7. Test Connectivity and Functionality: Once you have completed the configuration steps, ensure that all connections are functioning correctly. Test the connectivity of your peripherals, including any external displays, audio devices, and USB devices. Verify that all features of the docking station are working as expected.
By following these steps, you can successfully configure your docking station with your desktop. Keep in mind that the specific configuration process may vary depending on the make and model of your docking station and desktop. Refer to the user manual or manufacturer’s website for further guidance if needed.
Conclusion
Connecting a docking station to your desktop is a simple and effective way to expand your device’s capabilities. By following the step-by-step instructions and utilizing the appropriate cables and connectors, you can enhance your desktop experience and make the most out of your mobile accessories. Whether you need to connect multiple monitors, transfer data quickly, or charge your devices simultaneously, a docking station provides a convenient solution.
Remember to check the compatibility of your docking station with your desktop and ensure that all the necessary drivers are installed. With the right setup, you’ll have a seamless connection between your desktop and mobile devices, allowing you to work more efficiently, stay organized, and enjoy the benefits of a fully integrated digital workspace.
So don’t hesitate to explore the options available and choose a docking station that meets your specific needs. With a bit of setup and configuration, you’ll have a powerful workstation that can handle all your tasks and streamline your workflow.
FAQs
1. Can I connect a docking station to my desktop?
Yes, you can connect a docking station to your desktop. Docking stations provide a convenient way to expand the connectivity options of your desktop computer, allowing you to connect multiple peripherals such as monitors, keyboards, mice, and external storage devices through a single connection.
2. What types of docking stations are available for desktop computers?
There are various types of docking stations available for desktop computers, including USB docking stations, Thunderbolt docking stations, and HDMI docking stations. The type of docking station you choose will depend on your specific needs and the ports available on your desktop computer.
3. How do I connect a docking station to my desktop?
To connect a docking station to your desktop, follow these steps:
– Ensure that your desktop computer is powered off.
– Locate the appropriate port on your desktop computer for connecting the docking station (e.g., USB, Thunderbolt, HDMI).
– Connect the docking station to the port on your desktop computer using the appropriate cable.
– Power on the docking station and then power on your desktop computer.
– Your desktop should now recognize the docking station, and you can start connecting your peripherals to the docking station.
4. Do I need to install any drivers for the docking station to work with my desktop?
Most docking stations do not require any additional drivers to work with your desktop computer. They typically use generic drivers that are already installed on your operating system. However, it’s always a good idea to check the manufacturer’s website for any specific driver updates or compatibility requirements.
5. Can I use a docking station with a laptop as well as a desktop?
Yes, you can use a docking station with both a laptop and a desktop computer. Docking stations are designed to provide a seamless transition between different devices, allowing you to connect and disconnect your laptop or desktop easily. Just make sure that the docking station you choose is compatible with both your laptop and desktop computer.