
Welcome to our guide on how to connect solar panels to a battery. Solar power is a reliable and eco-friendly way to generate electricity, and by harnessing the energy from the sun, you can power various devices and appliances, even when you’re off the grid. One of the key components in a solar power system is the battery, which stores the energy produced by the solar panels for later use. In this article, we will walk you through the steps to properly connect solar panels to a battery, ensuring efficient energy storage and utilization. Whether you’re looking to power your camping trip or reduce your reliance on traditional grid electricity, we’ve got you covered with the essential knowledge and expert tips. So let’s dive into the world of solar power and discover how to connect solar panels to a battery!
Inside This Article
- Benefits of Connecting Solar Panels to Battery
- Preparing the Solar Panel System
- Step 1: Calculate Your Energy Needs
- Step 2: Choose the Right Battery
- Step 3: Select the Proper Charge Controller
- Step 4: Connect the Solar Panels to the Battery
- Step 5: Install a Battery Monitor
- Step 6: Test the System
- Conclusion
- FAQs
Benefits of Connecting Solar Panels to Battery
Connecting solar panels to a battery provides numerous benefits, making it an excellent investment for those seeking a reliable and sustainable source of power. Let’s explore some of the key advantages:
1. Energy Independence: By connecting solar panels to a battery, you can store excess energy generated during the day and use it during times of low or no sunlight. This enables you to become less reliant on the grid, reducing your dependence on traditional energy sources and potentially lowering your electricity bills.
2. Uninterrupted Power: With a battery-connected solar system, you can enjoy uninterrupted power supply, even during power outages. When the grid goes down, the battery kicks in, providing you with a backup power source. This is particularly beneficial in areas prone to frequent blackouts or natural disasters.
3. Environmental Friendly: Solar energy is clean and renewable, resulting in a reduced carbon footprint. By connecting solar panels to a battery, you maximize the utilization of solar power and minimize the need for fossil fuel-based energy sources. This contributes to a healthier environment and helps combat climate change.
4. Cost Savings: In addition to the environmental benefits, connecting solar panels to a battery can help save money in the long run. By storing excess energy, you can avoid peak-time electricity rates charged by utility companies. Additionally, you can take advantage of net metering programs, where you can sell surplus energy generated by your solar panels back to the grid, further offsetting your energy costs.
5. Flexibility and Portability: A battery-connected solar system offers flexibility and portability. It allows you to have power in remote or off-grid locations where accessing the grid might be challenging. This is especially useful for outdoor enthusiasts, campers, or individuals living in rural areas.
6. Reduced Generator Usage: If you rely on a backup generator during power outages, connecting solar panels to a battery can help reduce its usage. The battery stores energy from the solar panels, providing an alternative power source and minimizing the need for running the generator, which can be noisy, polluting, and expensive to fuel.
Overall, connecting solar panels to a battery offers multiple advantages, including energy independence, uninterrupted power supply, environmental friendliness, cost savings, flexibility, and reduced reliance on generators. It is a smart and sustainable solution for harnessing the power of the sun and securing a reliable source of energy.
Preparing the Solar Panel System
Before you can connect solar panels to a battery, you need to ensure that your solar panel system is properly prepared. Here are the key steps to follow:
1. Determine your energy needs: Start by assessing your energy requirements. Consider the appliances and devices you plan to power with the solar panels. This will help you determine the size and capacity of the battery that you need.
2. Choose the right solar panels: Selecting the appropriate solar panels is crucial for efficient energy conversion. Look for panels that match your energy needs and are compatible with your battery system. Consider factors such as wattage, efficiency, and durability.
3. Position the solar panels: Decide on the best location to install your solar panels. Ideally, they should be placed in an area with maximum exposure to sunlight throughout the day. Avoid shading from nearby trees or buildings that could obstruct the panel’s performance.
4. Install mounting brackets: Once you’ve determined the positioning, securely mount the panels using appropriate brackets on a roof or ground-mounted structure. Ensure that the panels are angled correctly to receive optimal sunlight.
5. Connect solar panels in series or parallel: Depending on the voltage and current requirements of your battery system, you will need to connect the solar panels in series or parallel. Connect the positive (+) terminal of one panel to the negative (-) terminal of the next panel, ensuring a secure connection.
6. Install combiner box: To consolidate the wiring from multiple solar panels, install a combiner box. This allows for a clean and organized connection of the solar panel cables to the charge controller.
7. Use appropriate wiring: To connect the solar panels to the battery, use the correct gauge of wires based on the distance and current produced. Using undersized wires can result in voltage drops and reduced charging efficiency.
8. Install charge controller: A charge controller is essential to protect your battery from overcharging and optimizing charging efficiency. Connect the solar panel output to the charge controller’s input, and then connect the charge controller’s output to the battery.
9. Check connections and conduct tests: Before connecting the battery, double-check all the connections to ensure they are secure and properly insulated. Conduct a test to ensure that the solar panels are generating power and the charge controller is functioning correctly.
By following these steps, you can prepare your solar panel system effectively and ensure a smooth and efficient connection to your battery. Remember to consult the specific instructions provided by the manufacturer for your solar panels and battery system to ensure proper installation.
Step 1: Calculate Your Energy Needs
Before connecting solar panels to a battery, it’s essential to calculate your energy needs. This step is crucial in determining the size and capacity of the battery required to meet your power requirements.
To begin, assess the number of devices or appliances you plan to power with solar energy. Look at their power consumption ratings, usually measured in watts. Add up the wattage of all the devices to determine the total power requirement.
Next, estimate the duration for which you intend to use these devices or appliances daily. This will help you calculate the energy consumed in watt-hours (Wh). Multiply the total power requirement by the number of hours you expect to use these devices to get an estimate of your daily energy needs.
Consider any additional energy requirements, such as the need to charge the battery for backup power during non-sunlight hours. This will affect the battery size and capacity as well.
Remember to account for any inefficiencies or losses in the solar panel system. It’s recommended to add a buffer of around 20% to your calculated energy needs to compensate for these losses.
By accurately calculating your energy needs, you can ensure that the solar panels and battery system you connect are properly sized to meet your power requirements. This step sets the foundation for a successful and efficient solar power setup.
Step 2: Choose the Right Battery
Choosing the right battery for your solar panel system is crucial for ensuring optimal performance and longevity. With various options available in the market, it’s important to consider factors such as capacity, voltage, and type of battery to make an informed decision.
The first factor to consider is the battery capacity, which determines how much energy the battery can store. This is measured in Ampere-Hours (Ah) or Watt-Hours (Wh). It’s essential to calculate your power requirements and choose a battery with a sufficient capacity to meet your needs. Keep in mind that larger capacity batteries will generally be more expensive.
Next, consider the voltage requirement of your system. Solar panel systems typically operate on either 12V, 24V, or 48V battery banks. Ensure that the battery you choose matches the voltage requirement of your equipment to ensure compatibility and optimal performance.
Furthermore, it’s important to choose the right battery type for your system. The most commonly used battery types for solar panel systems are lead-acid and lithium-ion batteries.
Lead-acid batteries are affordable but require regular maintenance. They come in two variants: Flooded (wet cell) and Sealed (maintenance-free). Flooded batteries need to be regularly checked and topped up with distilled water, while sealed batteries are maintenance-free but typically have a higher upfront cost.
Lithium-ion batteries, on the other hand, are more expensive but offer several advantages. They have a longer lifespan and higher energy density, meaning they can store more energy in a compact size. They also require less maintenance and have a higher depth of discharge, allowing you to utilize a larger portion of their capacity without damaging the battery.
Consider your budget, system requirements, and long-term goals when choosing between lead-acid and lithium-ion batteries. While lithium-ion batteries may have a higher upfront cost, they often offer better performance, longevity, and a lower cost of ownership over time.
Before making a final decision, it’s always recommended to do thorough research, read reviews, and consult with professionals in the field. They can help guide you in selecting the right battery that best fits your specific needs and ensures the optimal performance of your solar panel system.
Step 3: Select the Proper Charge Controller
When connecting solar panels to a battery, it is essential to choose the right charge controller. The charge controller plays a vital role in regulating the flow of electricity and protecting the battery from overcharging or overheating.
There are several factors to consider when selecting a charge controller:
1. Battery Type: Different batteries require different charge controllers. For example, if you have a lithium-ion battery, you will need a charge controller that is compatible with lithium-ion chemistry.
2. Charging Current: Determine the charging current of your solar panels and select a charge controller that can handle the maximum current output. It is crucial to match the charge controller’s capacity with the solar panel’s output to ensure efficient charging.
3. Voltage Compatibility: The charge controller you choose should be compatible with the voltage of your battery system. Whether you have a 12V, 24V, or 48V battery bank, make sure to select a charge controller that can handle the voltage range.
4. Advanced Features: Consider additional features that may benefit your specific needs. Some charge controllers offer features like LCD displays, remote monitoring capability, load control, and temperature compensation.
When making your selection, it is also important to verify the charge controller’s wattage rating to ensure it can handle the total wattage of your solar panel array.
Remember, the charge controller is a crucial component in maintaining the health and longevity of your battery. It regulates the charging process, prevents overcharging, and optimizes the battery’s performance.
Lastly, consult with a reputable solar energy professional or review the manufacturer’s recommendations to ensure you are choosing the right charge controller for your specific solar panel and battery system.
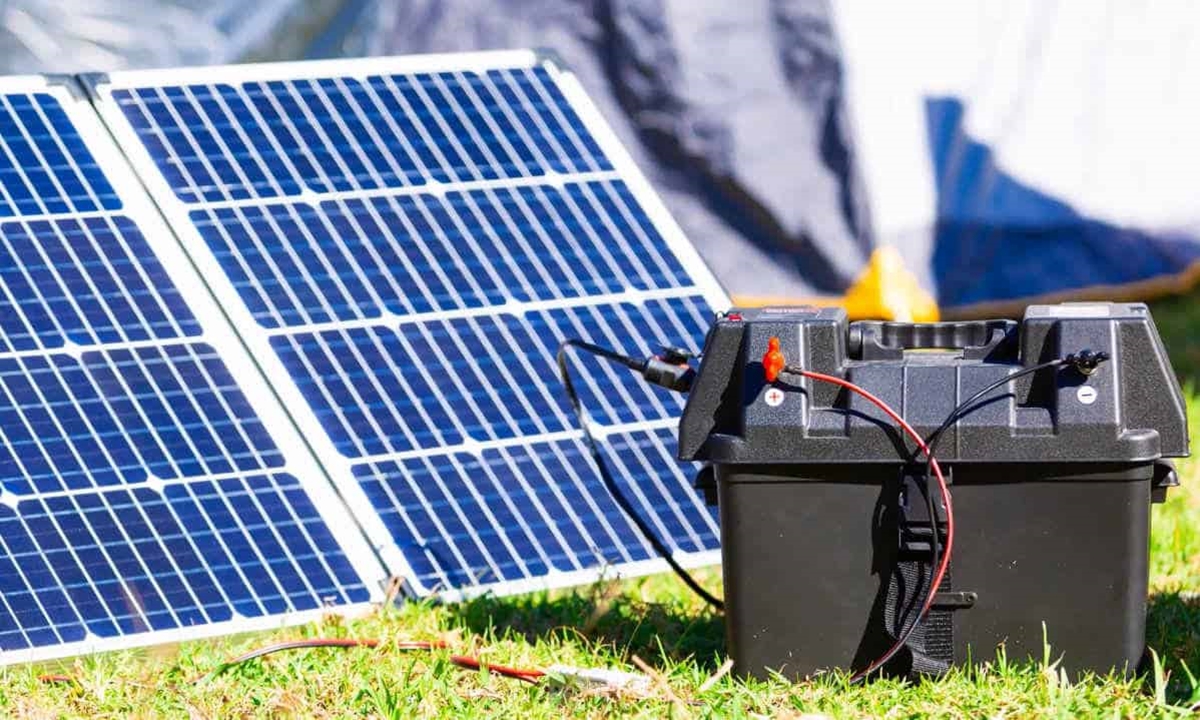
Step 4: Connect the Solar Panels to the Battery
Now that you have chosen the right battery, selected the correct wiring configuration, and installed the charge controllers, it’s time to connect the solar panels to the battery. This step is crucial in ensuring that your solar power system functions effectively and efficiently.
1. Determine the voltage and current requirements: Before connecting the solar panels to the battery, it’s important to understand the voltage and current requirements of your system. Check the specifications provided by the manufacturer to ensure that you select the appropriate size and type of cables and connectors.
2. Connect the charge controllers to the solar panels: Most solar power systems utilize charge controllers to regulate the flow of electricity from the solar panels to the battery. Connect the charge controllers to the solar panels following the manufacturer’s instructions. Ensure that the positive and negative terminals of the panels are correctly aligned with the charge controller’s input terminals.
3. Connect the charge controller to the battery: After connecting the charge controllers to the solar panels, it’s time to link them to the battery. Again, refer to the manufacturer’s instructions to determine the appropriate wiring configuration. Generally, you will need to connect the positive terminal of the charge controller to the positive terminal of the battery, and the negative terminal of the charge controller to the negative terminal of the battery.
4. Use appropriate cables and connectors: To connect the solar panels to the battery, it’s crucial to use high-quality cables and connectors that can handle the voltage and current requirements of your system. Opt for cables and connectors that are designed for solar applications, as they are durable and resistant to environmental factors such as heat, moisture, and UV radiation.
5. Secure the connections: Once all the cables and connectors are properly installed, ensure that the connections are secure. Loose connections can result in power loss and inefficient operation of your solar power system. Use cable ties or clamps to hold the cables in place and prevent them from being accidentally dislodged.
6. Test the system: After connecting the solar panels to the battery, it’s important to test the system to ensure that everything is functioning correctly. Monitor the voltage and current being generated by the panels and check if the battery is receiving the appropriate charge. If any issues are detected, refer to the manufacturer’s guidelines for troubleshooting or seek professional assistance.
By following these steps and ensuring a proper connection between the solar panels and the battery, you can optimize the performance of your solar power system and harness the maximum energy from the sun.
Step 5: Install a Battery Monitor
Once you have connected your solar panels to the battery, it is important to monitor its performance to ensure optimal power usage and battery health. Installing a battery monitor is a crucial step in this process.
A battery monitor allows you to track the state of charge (SOC) of your battery, providing valuable information about its current capacity and remaining charge. This helps you to prevent overcharging, which can damage the battery, and also avoid discharging it beyond safe limits.
Here are the steps to install a battery monitor:
- Choose the right monitor: There are various types of battery monitors available in the market. Make sure to select one that is compatible with your battery type and voltage.
- Locate the battery’s positive and negative terminals: Identify the terminals on your battery where the positive and negative wires are connected.
- Disconnect the battery: Before starting the installation, it is essential to disconnect the battery from any power source to prevent any electrical mishaps.
- Connect the monitor’s shunt: Most battery monitors use a shunt, which acts as a current sensor. Connect the shunt between the battery’s negative terminal and the negative wire.
- Connect the monitor’s positive and negative wires: Follow the manufacturer’s instructions to connect the monitor’s positive wire to the battery’s positive terminal and the negative wire to the shunt.
- Mount the monitor: Depending on the monitor’s design, you may need to mount it on a suitable surface near your battery. Ensure the monitor is securely attached and easily accessible for monitoring.
- Reconnect the battery: After completing the installation, reconnect the battery to its power source.
- Calibrate the monitor: Follow the manufacturer’s instructions to calibrate the battery monitor, setting it to accurately measure the battery’s capacity.
- Monitor and interpret the readings: Once the battery monitor is installed and calibrated, you can start tracking the battery’s state of charge and use the information to optimize your power usage and battery maintenance.
Installing a battery monitor is a wise investment as it allows you to keep a close eye on your battery’s performance. It helps you make informed decisions about power consumption and ensures the longevity of your battery system.
Step 6: Test the System
Once you have completed the installation process and connected all the components, it is crucial to test the system to ensure that everything is functioning correctly. Testing the system will help you identify any potential issues or problems and allow you to troubleshoot them before relying on your solar panels for power. Here are the steps to test your solar panel system:
1. Check the Battery Voltage: Begin by checking the voltage of your battery. Use a voltmeter to measure the voltage across the battery terminals. If your battery is fully charged, it should read around 12.6 to 12.8 volts for a 12-volt battery. For a 24-volt battery system, the voltage should be around 25.2 to 25.6 volts. If the voltage is significantly lower than these ranges, it may indicate a problem with the battery or the charging process.
2. Monitor Solar Panel Output: Monitor the output of your solar panels. You can use a solar panel meter or charge controller display to determine the amount of energy being generated. Compare this with the expected output based on the solar panel specifications. If the output is significantly lower than expected, it may indicate a problem with the panels, wiring, or connections.
3. Test the Charge Controller: The charge controller regulates the current flowing from the solar panels to the battery. Check the charge controller to ensure that it is functioning correctly. Verify that the settings are configured as recommended by the manufacturer. Monitor the charge controller display or indicators for any error messages or abnormal behavior.
4. Measure the Battery Charging Rate: Use your voltmeter to measure the charging rate of the battery. Connect the voltmeter to the battery terminals and observe the voltage. Over a specific time period, note any changes in voltage. A healthy charging rate is typically around 13.6 to 14.4 volts for a 12-volt battery system and 27.2 to 28.8 volts for a 24-volt battery system. If the charging rate is consistently below or above these ranges, it may indicate a problem with the charge controller or the battery itself.
5. Check for System Errors: Keep an eye out for any error messages or warning indicators on your charge controllers, inverters, or monitoring systems. These can help identify any issues that may need attention or troubleshooting. Consult your product manuals or contact the manufacturer for guidance on how to interpret and resolve these errors.
6. Monitor Battery Health: Regularly monitor the health of your battery by observing its performance and capacity. Keep track of the battery’s charge level, how long it takes to charge, and how long it lasts when powering your devices or appliances. If you notice a significant decrease in battery performance or capacity, it may indicate a problem that needs to be addressed.
By following these steps and conducting regular tests, you can ensure that your solar panel system is functioning optimally and providing the desired power output. If you encounter any issues during the testing process, refer to your product manuals or contact a professional for assistance in troubleshooting and resolving the problem.
Conclusion
Connecting solar panels to a battery is a crucial step in harnessing the power of the sun and utilizing it to its full potential. By following the steps outlined in this article, you can ensure a seamless and efficient connection that will keep your battery charged and ready for use.
Remember to carefully select the appropriate solar panels for your specific needs and ensure compatibility with your battery. It is essential to use the correct wiring and connectors to maintain a safe and reliable connection. Regularly monitor and maintain your solar panels and battery system to ensure optimal performance and longevity.
With the knowledge gained from this article, you can confidently embark on your journey towards a sustainable and eco-friendly power solution. Enjoy the benefits of off-grid living, reduced electricity bills, and the satisfaction of knowing that you are doing your part to protect the environment.
FAQs
1. How do I connect solar panels to a battery?
To connect solar panels to a battery, you will need a solar charge controller. The solar charge controller acts as a middleman between the solar panels and the battery, regulating the flow of electricity. The basic steps are as follows:
- Start by connecting the positive and negative wires from the solar panels to the corresponding terminals on the solar charge controller.
- Next, connect the positive and negative wires from the battery to the appropriate terminals on the solar charge controller.
- Make sure all connections are secure and tighten any loose screws.
- Finally, check the charge controller’s manual to configure any necessary settings, such as battery type and desired charge levels.
2. Can I connect multiple solar panels to one battery?
Yes, you can connect multiple solar panels to one battery. This is typically done by connecting the positive terminals of the solar panels together and then connecting the negative terminals together. The combined positive connection is then connected to the positive terminal of the battery, while the combined negative connection is connected to the negative terminal of the battery.
3. What type of battery is best for connecting solar panels?
The best type of battery for connecting solar panels is a deep cycle battery. Deep cycle batteries are designed to provide a steady amount of power over an extended period of time. They are specially designed to handle the constant charging and discharging that comes with solar panel systems. Lead-acid batteries, such as AGM or gel batteries, are often used for solar installations due to their durability and ability to handle repeated deep discharges.
4. Do I need a solar charge controller to connect solar panels to a battery?
Yes, a solar charge controller is necessary when connecting solar panels to a battery. The solar charge controller regulates the charging process, preventing overcharging and ensuring that the battery receives the appropriate amount of power. This helps extend the lifespan of the battery and protects it from potential damage caused by fluctuating voltage levels.
5. How can I tell if my solar panels are charging the battery?
To know if your solar panels are charging the battery, you can use a multimeter to measure the voltage between the battery’s positive and negative terminals. If the voltage is increasing, it means that the solar panels are charging the battery. However, it’s important to note that the charging process may be affected by factors such as weather conditions, panel orientation, and the presence of any shading.