
Are you a photography enthusiast looking to level up your skills and equipment? If you own a Zomei tripod, you’re already on your way to capturing stunning images. But did you know that you can easily convert your Zomei tripod into a monopod? This simple transformation allows you to have more versatility and flexibility in your photography adventures.
In this article, we’ll guide you through the process of converting your Zomei tripod into a monopod. We’ll explain the benefits of using a monopod, as well as provide step-by-step instructions on how to make the conversion. Whether you’re a professional photographer or a hobbyist, knowing how to convert your tripod into a monopod will broaden your creative possibilities and enhance your photography experience. So, let’s dive in and discover how to unleash the full potential of your Zomei tripod!
Inside This Article
- How To Convert Zomei Tripod To Monopod
- Materials Needed
- Step 1: Detaching the Center Column
- Step 2: Removing the Tripod Legs
- Step 3: Attaching the Monopod Leg
- Step 4: Adjusting the Height
- Conclusion
- FAQs
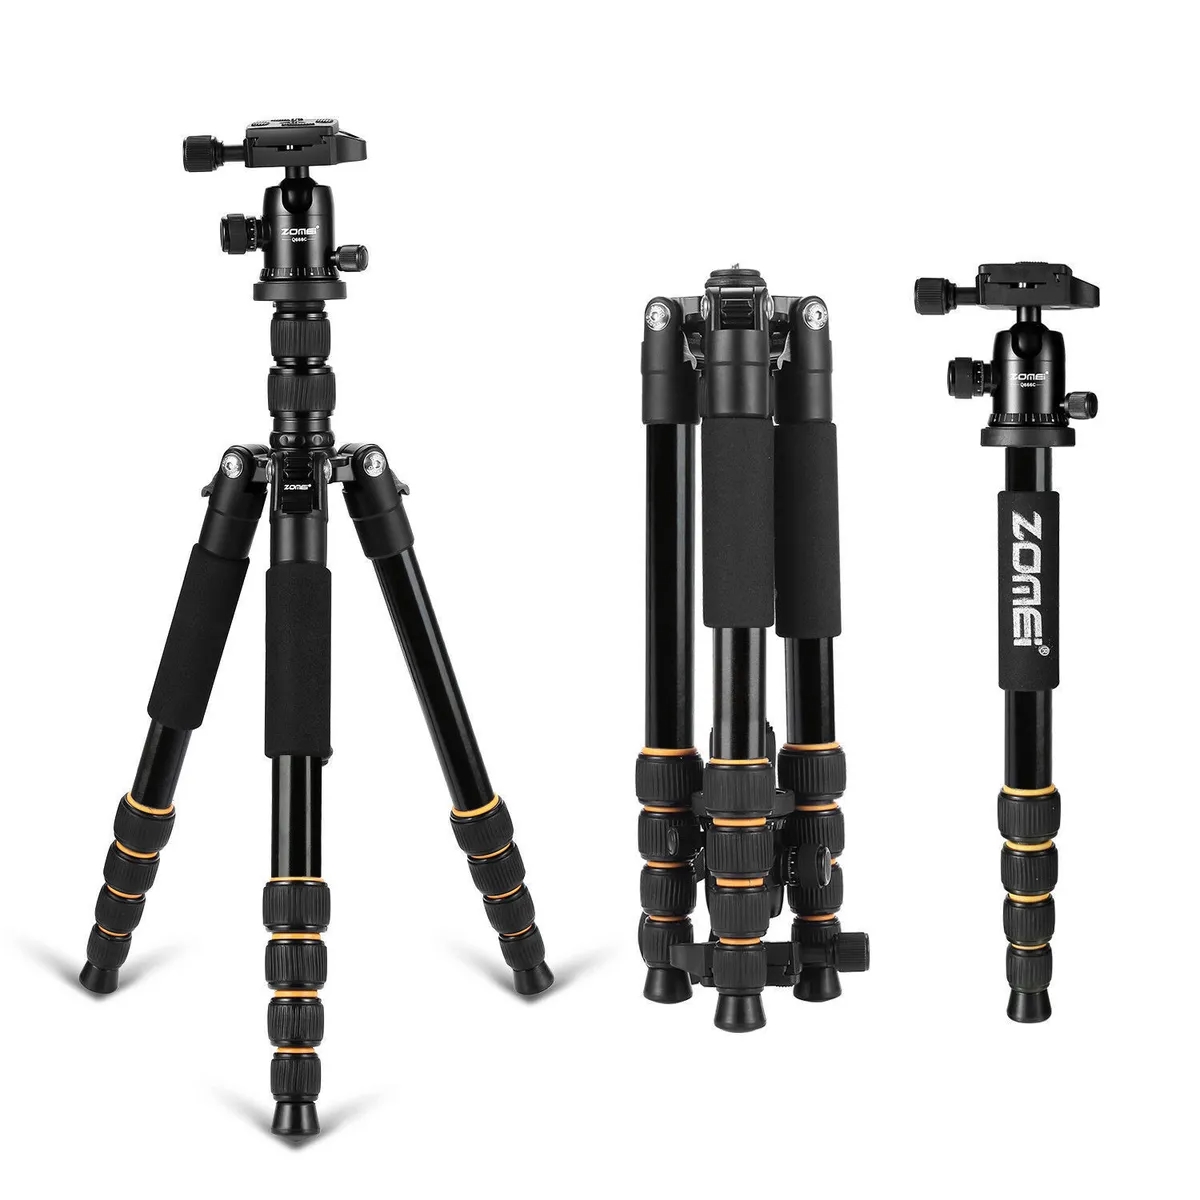
How To Convert Zomei Tripod To Monopod
If you own a Zomei tripod and need the versatility of a monopod, you’re in luck! Zomei tripods are known for their high-quality construction and innovative features. One of these features is the ability to convert the tripod into a monopod.
To convert your Zomei tripod into a monopod, you will need a few materials and follow a simple step-by-step process. Let’s dive in!
Materials Needed
- Zomei tripod
- Hex key
Step 1: Detaching the Center Column
The first step is to detach the center column of your Zomei tripod. The center column is the long adjustable pole that runs through the tripod legs. Locate the locking mechanism on the tripod head and release it. Use the hex key to unscrew the center column from the tripod base.
Step 2: Removing the Tripod Legs
Once the center column is detached, you can remove the tripod legs. Extend each leg fully and locate the leg lock mechanism. Release each leg lock and unscrew the legs from the tripod base using the hex key. Keep the legs aside, as they won’t be needed for the monopod setup.
Step 3: Attaching the Monopod Leg
Now it’s time to attach the monopod leg to the tripod base. Take one of the tripod legs and screw it into the tripod base using the hex key. Ensure that it is securely tightened to provide stability during use. This leg will act as the monopod leg, providing support for your camera or other equipment.
Step 4: Adjusting the Height
Once the monopod leg is attached, you can adjust the height according to your preference. The Zomei tripod usually has multiple sections on the leg, allowing for height adjustments. Extend or retract the monopod leg to achieve the desired height.
Step 5: Securing the Monopod
After adjusting the height, make sure to securely tighten the leg lock mechanism to lock the monopod leg in place. This will ensure stability and prevent any accidental collapsing of the monopod during use.
And there you have it! Your Zomei tripod is successfully converted into a monopod. You can now enjoy the convenience and flexibility of a monopod for your photography needs.
Remember to always double-check the stability and security of your monopod before using it with your camera or equipment. Happy shooting!
Materials Needed
Converting your Zomei tripod into a monopod is a simple process that requires just a few materials. Before you begin, make sure you have the following items:
- A Zomei tripod: Make sure you have a stable and sturdy Zomei tripod. This will serve as the foundation for your monopod.
- A monopod leg: You will need a separate monopod leg that is compatible with your Zomei tripod. This can be purchased separately and should have a mounting plate that fits your tripod head.
- An Allen wrench or screwdriver: Depending on the design of your tripod, you may need an Allen wrench or screwdriver to detach the center column and secure the monopod leg.
Once you have these materials ready, you can proceed with the conversion process. It’s important to ensure that the monopod leg you choose is compatible with your tripod model, as this will ensure a secure and stable monopod setup.
Step 1: Detaching the Center Column
Converting your Zomei tripod to a monopod is a relatively simple process that involves a few easy steps. The first step is detaching the center column of the tripod. This is the part of the tripod that connects the legs and holds the camera mount.
To detach the center column, start by loosening the locking mechanism. This may be a twist lock or a quick-release lever, depending on the model of your Zomei tripod. Once the locking mechanism is loose, you can gently pull the center column up and out of the tripod.
It’s important to be careful when removing the center column, as it may be secured tightly. If you encounter any resistance, try gently twisting and pulling at the same time to loosen it. Be sure to support the tripod and hold onto the legs to prevent it from tipping over.
Once you have successfully detached the center column, set it aside for now. You will need it later when reassembling the tripod. With the center column removed, you’re now ready to move on to the next step in converting your Zomei tripod to a monopod.
Step 2: Removing the Tripod Legs
Now that you have successfully detached the center column in Step 1, it’s time to move on to removing the tripod legs to convert your Zomei tripod into a monopod. This step is crucial as it will allow you to have a single-legged support for your camera or other equipment.
To remove the tripod legs, start by loosening the leg locks located at the top, just below the head of the tripod. The number of leg locks may vary depending on the specific model of your Zomei tripod, but typically there are three locks for each leg.
Once you have loosened the leg locks, hold the tripod securely and extend the legs outwards. You will notice that each leg has a metal pin or bolt at the bottom, near the tripod base. This is what attaches the legs to the tripod.
Grasp the legs firmly and twist them counterclockwise to unscrew them from the tripod base. It may require some force, but be careful not to apply too much pressure that could potentially damage the tripod or your equipment.
Continue unscrewing each leg until all three legs are completely detached from the tripod. Now you can set aside the tripod legs as they won’t be needed for the monopod conversion.
Remember to keep the tripod legs in a safe place, as you may want to reattach them in the future if you need to use your tripod in its original form again. Storing the legs in a protective case or bag will help prevent any damage or misplacement.
With the tripod legs removed, you are one step closer to transforming your Zomei tripod into a versatile monopod. Now, let’s move on to the next step to learn how to attach the monopod leg.
Step 3: Attaching the Monopod Leg
Once you have successfully removed the tripod legs, it is time to attach the monopod leg to convert your Zomei tripod into a monopod. Attaching the monopod leg is a simple and straightforward process that can be completed in just a few simple steps.
Start by locating the monopod leg from your Zomei tripod kit. The monopod leg is usually labeled or color-coded for easy identification. It will have a single telescopic section with a grip at the top and a rubber foot at the bottom.
Next, take the center column that you previously detached in Step 1 and insert it into the top of the monopod leg. Make sure it is securely attached and tightened to prevent any wobbling or instability.
Once the monopod leg and center column are connected, extend the telescopic section of the monopod leg to your desired height. Most monopods have adjustable height options, allowing you to customize it according to your needs.
As you extend the monopod leg, you will notice that there are marked height indicators on the leg itself. These indicators will help you choose the desired height and ensure that both legs are extended evenly for better stability.
When you have reached your desired height, lock the telescopic section in place by tightening the locking mechanism. This will prevent the monopod leg from collapsing or sliding down while in use.
Finally, give the monopod leg a gentle shake or tap to ensure that it is securely attached and stable. If it feels loose or wobbly, double-check the connections and tighten any loose parts to ensure proper stability and function.
Once you have successfully attached the monopod leg, you are now ready to use your Zomei tripod as a monopod. The monopod leg provides you with a versatile and portable solution for capturing steady shots on the go, perfect for photographers or videographers who need mobility without compromising stability.
Step 4: Adjusting the Height
Adjusting the height of your Zomei tripod-turned-monopod is a crucial step to ensure optimal stability and shooting position. By properly setting the height, you can easily capture the perfect shots without any discomfort or limitations.
Here’s how you can adjust the height of your converted Zomei tripod:
- Extend the Monopod Leg: Start by extending the monopod leg to its desired length. If you’re using a Zomei tripod with adjustable leg sections, unlock the leg locks and pull the leg section outwards. Make sure to extend all the sections evenly for better stability.
- Lock the Leg Sections: Once you have extended the monopod leg, securely lock the leg sections in place. You can do this by tightening the leg locks firmly. Make sure not to over-tighten them so that you can still make height adjustments if needed.
- Check the Balance: After locking the leg sections, check the balance of your monopod by gently holding the tripod base or the monopod leg. Ensure that it stands upright without tilting or wobbling. If needed, make slight adjustments to the leg length or reposition your monopod until it remains stable and balanced.
- Set the Desired Height: Determine the specific height you want for your monopod. If you’re photographing at eye level, stand in front of the monopod and adjust its height accordingly. You can raise or lower the leg sections until the camera aligns perfectly with your eye level.
- Check for Stability: Once you have set the desired height, double-check the stability of your monopod. Gently press down on the monopod to see if it remains firm without any wobbling. If you notice any instability, readjust the leg sections or tighten the leg locks.
By following these steps, you can easily adjust the height of your Zomei tripod that has been converted into a monopod. Take your time to find the perfect height that suits your shooting needs and enjoy capturing stunning photographs with enhanced stability.
The process of converting a Zomei tripod to a monopod is a simple and effective way to maximize the versatility of your photography gear. With just a few adjustments, you can transform your tripod into a convenient monopod, allowing for greater mobility and flexibility in your shooting experience.
By converting your Zomei tripod to a monopod, you can easily capture stunning images in situations where a tripod may be impractical or cumbersome. Whether you’re exploring outdoor landscapes, attending events, or engaging in fast-paced action photography, the monopod conversion offers a lightweight and portable solution without compromising stability.
With its adjustable height and stable design, the Zomei monopod gives you the freedom to experiment with different angles and perspectives. It provides the necessary support for your camera, ensuring sharp and blur-free shots even in challenging shooting conditions.
So, don’t limit yourself to just using your Zomei tripod as it is. Unlock its full potential by converting it into a monopod. Embrace the convenience and flexibility it offers, and elevate your photography to new heights.
FAQs
- Q: Can I convert a Zomei Tripod to a monopod?
- Q: How do I convert my Zomei Tripod to a monopod?
- Q: What are the advantages of using a monopod?
- Q: Can I use the Zomei monopod independently without the tripod?
- Q: Are there any limitations to using a Zomei monopod?
Yes, you can convert a Zomei Tripod to a monopod. Many Zomei Tripod models come with detachable legs that can be used as a standalone monopod. This feature provides flexibility and convenience for photographers and videographers who need the stability of a tripod in some situations and the portability of a monopod in others.
To convert your Zomei Tripod to a monopod, you need to detach one of the legs from the tripod. Most Zomei Tripods have a quick-release mechanism that allows you to remove and reattach the legs easily. Simply unlock the leg using the provided locking mechanism, slide it out of the tripod, and tighten the locking mechanism to secure it in place. Voila, you now have a functional monopod!
Using a monopod offers several advantages for photographers and videographers. Firstly, it provides improved stability compared to handheld shooting, reducing camera shake and resulting in sharper images or smoother videos. Secondly, monopods are lighter and more portable than tripods, making them ideal for photographers who need to move quickly or shoot in challenging environments. Lastly, monopods allow for greater flexibility in positioning and angle adjustments, enabling you to capture a wider range of shots.
Yes, the Zomei monopod can be used independently without the tripod. When detached, the monopod functions as a standalone support for your camera or camcorder. It provides stability and helps minimize camera shake when shooting handheld in situations where using a full tripod is not necessary or practical.
While the Zomei monopod offers numerous advantages, it does have a few limitations. Firstly, since it is a single-legged support, it may not provide the same level of stability as a tripod, especially in very windy or uneven conditions. Secondly, the height of the monopod may be limited compared to a tripod in its fully extended position. Lastly, you will need to support the monopod by hand, as it does not have the same self-standing capability as a tripod.