
Are you tired of the same old phone case options available in the market? Do you want to add a personal touch to your phone’s appearance? Look no further! In this article, we will guide you on how to DIY (do-it-yourself) your very own phone case. Whether you’re a craft enthusiast or simply looking for a unique and customized accessory, creating your own phone case can be a fun and rewarding experience.
With just a few materials and some creativity, you can design a phone case that reflects your personality and style. From choosing the materials and colors to incorporating patterns and embellishments, the possibilities are endless. So, grab your artistic spirit and let’s dive into the world of DIY phone cases!
Inside This Article
- Materials Needed
- Step 1: Choosing a Phone Case
- Step 2: Designing Your Phone Case
- Step 3: Deciding on a DIY Technique
- Step 4: Decorating Your Phone Case
- Step 5: Adding Final Touches
- Tips and Tricks
- Frequently Asked Questions (FAQs)
- Conclusion
- FAQs
Materials Needed
Before you begin your DIY phone case project, you’ll need a few essential materials. Gather the following items to ensure a smooth and successful crafting experience:
- Plain phone case: Start with a blank canvas by purchasing a plain phone case that fits your device. You can find a variety of options online or at your local craft store.
- Decorative materials: Get creative with your phone case design by using various materials such as fabric, beads, sequins, rhinestones, buttons, ribbons, or washi tape. Choose materials that align with your personal style and preferences.
- Adhesive: Depending on the materials you choose, you’ll need adhesive to secure them to the phone case. Consider using craft glue, fabric glue, or adhesive tape for a sturdy hold.
- Crafting tools: Equip yourself with basic crafting tools like scissors, paintbrushes, markers, rulers, or stencils. These tools will aid in cutting, drawing, and measuring your design.
- Protective sealant (optional): If you want to give your DIY phone case a glossy finish or protect it from wear and tear, consider using a clear sealant or mod podge.
Once you have gathered all the necessary materials, you’re ready to dive into the world of DIY phone case making. Let your creativity fly and personalize your phone case to showcase your unique style!
Step 1: Choosing a Phone Case
When it comes to DIY phone case projects, one of the first and most crucial steps is choosing the right phone case to work with. Here are some factors to consider when selecting a phone case:
- Compatibility: Ensure that the phone case you choose is compatible with your specific phone model. Different phones have different dimensions and button placements, so it’s important to find a case that fits your phone perfectly.
- Material: Phone cases come in various materials such as plastic, silicone, leather, and metal. Each material offers different levels of protection and durability. Consider your needs and preferences to determine which material would be the best fit for your DIY phone case.
- Design: Look for a phone case that has a smooth and flat surface, as it will be easier to work with when adding your own design or decorations. Avoid cases with excessive textures or patterns, as they might interfere with your DIY project.
- Color: Choose a phone case color that complements your personal style and preferences. You can opt for a neutral color if you want to add vibrant designs or decorations, or choose a bold color if you prefer a more eye-catching look.
- Budget: Consider your budget when selecting a phone case. There is a wide range of options available, from affordable basic cases to high-end designer cases. Determine how much you are willing to spend on your DIY project and find a phone case that fits within that budget.
By taking these factors into account, you can ensure that you choose the perfect phone case as the foundation for your DIY project. Once you have the right phone case, you can move on to the next step of designing and personalizing it to make it uniquely yours.
Step 2: Designing Your Phone Case
Once you have chosen the perfect phone case, it’s time to unleash your creativity and design a case that reflects your unique style and personality. Here are some steps to help you with the design process:
- Gather inspiration: Start by gathering inspiration for your phone case design. Browse through magazines, websites, or social media platforms for design ideas. You can also look for inspiration in nature, art, or your favorite hobbies.
- Sketch your ideas: Before diving into the actual design, sketch your ideas on a piece of paper. This will help you visualize and refine your design before applying it to your phone case. Play around with different patterns, shapes, and color combinations to find what resonates with you.
- Choose your design elements: Now it’s time to decide on the design elements you want to incorporate into your phone case. This can include anything from hand-drawn illustrations, quotes, geometric patterns, or even photographs. Think about what speaks to you and represents your personal style.
- Consider different materials: Depending on the type of phone case you have chosen, you may have different materials to work with. For example, if you have a clear plastic case, you can experiment with inserting different materials like fabric, beads, or dried flowers to create a unique texture or 3D effect.
- Experiment with DIY techniques: There are various DIY techniques you can explore to design your phone case. You can try painting, decoupage, stenciling, or even using heat transfer vinyl to create intricate designs. Choose a technique that aligns with your artistic skills and preferences.
- Test your design: Before applying your final design to the phone case, it’s a good idea to test it out on a scrap piece of material or paper first. This will allow you to make any necessary adjustments and ensure that you are satisfied with the outcome.
- Apply your design: Finally, it’s time to apply your design to the phone case. Follow the instructions for the specific DIY technique you have chosen. Take your time and pay attention to the details to achieve the desired result. Allow the design to dry or set completely before handling or using the phone case.
Designing your own phone case is a fun and creative process that allows you to showcase your personal style. Remember to have fun with it and let your imagination run wild. Your phone case will not only protect your device but also serve as a unique expression of your creativity.
Step 3: Deciding on a DIY Technique
Now that you have chosen a phone case and designed it, it’s time to decide on a DIY technique to bring your design to life. There are several popular techniques that you can choose from, depending on your preference and skill level.
1. Paint: Painting your phone case is a great way to add color and personality. You can use acrylic or fabric paint, depending on the material of your case. Use a brush or sponge to apply the paint, and let it dry thoroughly before handling.
2. Decoupage: Decoupage is the art of decorating an object by gluing cut-out paper or fabric designs onto it. You can use decorative papers, magazine clippings, or even fabric scraps to create a unique design on your phone case. Simply apply a layer of decoupage glue or Mod Podge to the case, lay the cut-outs on top, and seal with another layer of glue.
3. Embroidery: If you have some basic sewing skills, you can try embroidering your phone case. Use colorful embroidery floss to stitch designs or patterns onto the case. You can also incorporate beads or sequins for an added touch of sparkle.
4. Stickers and decals: If you’re looking for a quick and easy option, you can use stickers or decals to decorate your phone case. There are endless options available, from cute characters to inspirational quotes. Simply peel and stick them onto your case for an instant makeover.
5. Washi tape: Washi tape is a decorative adhesive tape that comes in a wide range of colors and patterns. It’s perfect for creating fun and intricate designs on your phone case. Cut the tape into different shapes and sizes, and stick them onto your case to create a unique and personalized look.
Remember, the choice of technique depends on your personal preferences and skill level. Don’t be afraid to experiment and try different methods to find the one that suits you best. Be creative and have fun with it!
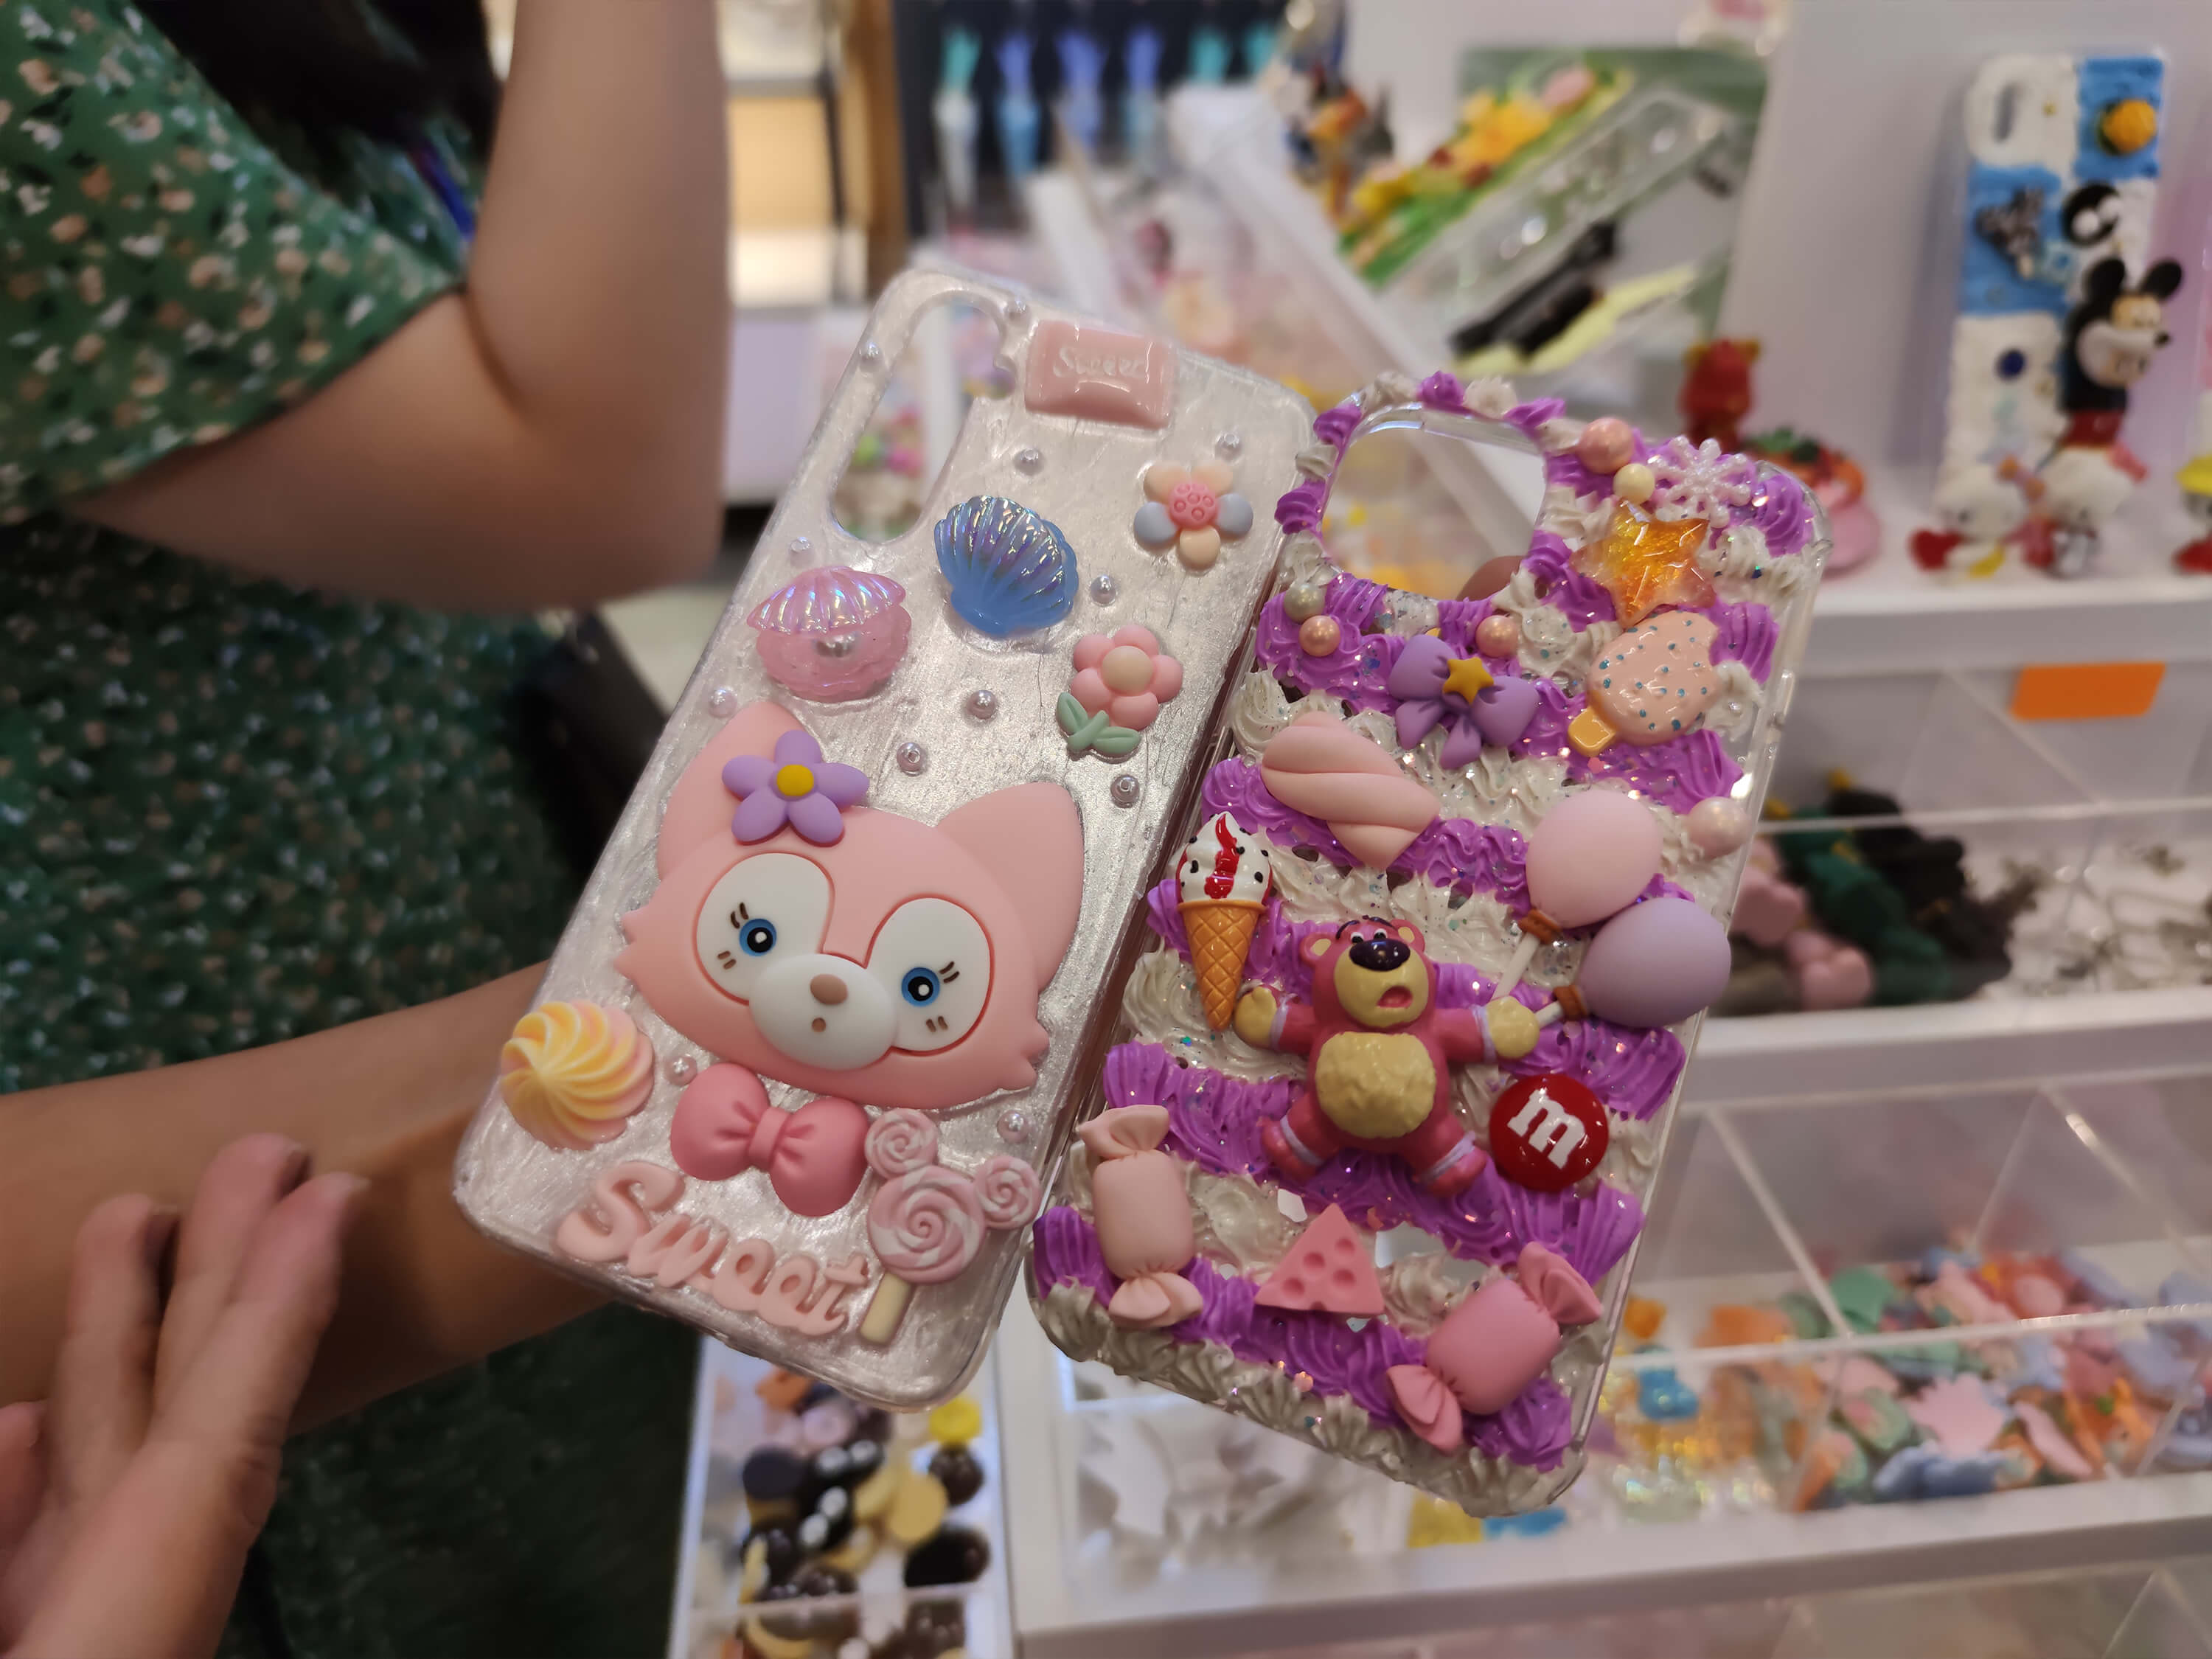
Step 4: Decorating Your Phone Case
Now comes the fun part – decorating your phone case! There are countless ways you can embellish your DIY phone case to make it unique and personalized to your style. Here are some creative ideas to get you started:
- Paint: Grab some acrylic paints and unleash your artistic side. You can create intricate designs, abstract patterns, or even paint a favorite quote or image on your phone case. Use fine brushes for detailed work and larger brushes for broad strokes.
- Stickers: Decorative stickers are an easy and quick way to add flair to your phone case. You can find a wide variety of stickers in different shapes, designs, and themes. From floral patterns to quirky characters, let your personality shine through your sticker choices.
- Decoupage: Decoupage is a technique where you glue cut-out images or paper onto a surface and seal it with a protective coat. You can use magazine cutouts, printed photos, or even fabric to create a collage effect on your phone case. Experiment with different combinations and layering for a unique look.
- Embroidery: If you’re feeling crafty, consider adding embroidery to your phone case. Choose a plain fabric phone case and use colorful thread to create intricate designs. You can stitch flowers, patterns, or even your initials for a personalized touch.
- Jewels and Gems: For a touch of glamour, embellish your phone case with jewels and gems. Use glue to attach rhinestones, sequins, or beads in any design you desire. Opt for a maximalist look with an abundance of gems or go for a minimalist approach with a few well-placed accents.
- Washi Tape: Washi tape is a decorative adhesive tape that comes in various patterns and colors. It’s an easy and mess-free way to add vibrant designs to your phone case. Create geometric shapes, stripes, or even write uplifting messages using washi tape.
Feel free to experiment with different decorating techniques and mix and match ideas to create a phone case that reflects your unique style. Remember, the possibilities are endless, and the choice is entirely up to you!
Step 5: Adding Final Touches
After completing the decorating process, you are now ready to add the final touches to your DIY phone case. These finishing touches will not only enhance the overall appearance of your case but also ensure its durability. Here are some additional steps you can take to complete your DIY phone case:
- Seal the Design: Depending on the materials you used for decorating, it is a good idea to seal the design on your phone case to protect it from wear and tear. You can use a clear nail polish or a sealant spray to create a protective layer over the design. Apply the sealant evenly and allow it to dry fully before using the case.
- Secure Loose Elements: If you used any embellishments or accessories that might be prone to falling off, secure them properly using a strong adhesive. Be sure to follow the instructions provided with the adhesive and allow it to cure fully before handling the phone case.
- Check for Smooth Edges: Run your fingers along the edges of the phone case to ensure that there are no rough or sharp edges that could potentially scratch your phone or cause discomfort when holding it. If you find any rough spots, use fine-grit sandpaper or a nail file to gently smooth them out.
- Clean the Case: Give your phone case a final clean before using it. Use a soft cloth or a microfiber cloth to wipe away any dust or fingerprints. This will ensure that your phone case looks its best when it’s time to put it on your phone.
- Test the Fit: Before placing your phone into the case, double-check that the fit is secure and snug. Make sure that all the openings align properly with your phone’s buttons, ports, and camera. If necessary, make any adjustments to ensure a perfect fit.
Once you have completed these final touches, your DIY phone case is now ready to be used. Slip it onto your phone and enjoy the personalized look and added protection it provides.
Tips and Tricks
When it comes to DIY phone case projects, there are a few tips and tricks you should keep in mind to ensure successful results:
- Start with a clean case: Before you begin decorating, make sure your phone case is free from dust, dirt, and grease. Use a mild cleaning solution and a soft cloth to wipe it down and ensure a smooth surface for your design.
- Use quality materials: Invest in high-quality markers, paints, and adhesives to ensure that your design will last. Cheap materials may fade, chip, or peel over time, resulting in a less durable and less visually appealing phone case.
- Experiment with different techniques: Don’t be afraid to explore different DIY techniques to create unique and eye-catching designs. Try using stencils, masking tape, or even fabric to add texture and dimension to your phone case.
- Protect your design: Once you’ve finished decorating your phone case, it’s essential to protect your design. Consider applying a clear coat or sealant to prevent the colors from fading or smudging. This will help your DIY case withstand daily wear and tear.
- Personalize it: Take advantage of the DIY aspect and make your phone case truly unique. Add initials, quotes, or symbols that hold personal meaning to you. This way, your phone case becomes more than just a protective accessory; it becomes a reflection of your personality.
- Get inspiration: If you’re feeling stuck or uninspired, don’t hesitate to seek inspiration online. Platforms like Pinterest and Instagram are filled with creative DIY phone case projects that can spark your imagination and help you come up with new ideas.
Remember, DIY phone case projects are all about creativity and personalization. Don’t be afraid to think outside the box and let your imagination run wild. With the right materials and a little bit of patience, you can create a unique phone case that showcases your style and adds a touch of personality to your device.
Frequently Asked Questions (FAQs)
Q: Can I use any type of phone case for DIY projects?
A: Yes, you can use any type of phone case for your DIY projects. Whether it’s a hard case, soft case, or even a clear case, you can customize and transform it according to your preferences.
Q: What are some DIY techniques I can use to decorate my phone case?
A: There are numerous DIY techniques you can use to decorate your phone case. Some popular ones include painting, decoupage, fabric and washi tape wrapping, stenciling, and using adhesive gems or stickers. You can get creative and experiment with different techniques to achieve the desired look.
Q: Are there any precautions I should take while decorating my phone case?
A: It’s important to handle any paints, adhesives, or other materials used for decoration in a well-ventilated area. Make sure to follow the instructions provided with the specific products you are using. Additionally, be careful not to obstruct any important features of your phone or cover any buttons or ports that need to remain accessible.
Q: How long do DIY phone case decorations usually last?
A: The longevity of DIY phone case decorations can vary depending on the materials and techniques used, as well as how well they are applied and maintained. In general, if you properly seal and protect the decorations, they can last for a considerable amount of time. However, it’s important to keep in mind that repeated use and exposure to external factors may cause gradual wear and tear.
Q: Can I remove the DIY decorations from my phone case?
A: In most cases, yes, you can remove the DIY decorations from your phone case. However, the ease of removal may depend on the materials used. Adhesive stickers, for example, are usually easy to remove without leaving any residue. On the other hand, paints or other permanent markers may require more effort to remove completely.
Q: Can I add additional accessories to my DIY phone case?
A: Absolutely! You can add additional accessories to your DIY phone case to further personalize and enhance its appearance. Consider attaching small charms, beads, or pendants to add extra flair. Just make sure that the accessories are securely attached and do not interfere with the functionality or usability of the phone case.
Q: Are there any limitations to what I can do with a DIY phone case?
A: While DIY phone cases offer a great opportunity for personalization, it’s essential to consider the practicality and functionality of the case. Ensure that any decorations or modifications do not interfere with the phone’s usability, such as blocking the camera or obstructing the charging port. Additionally, it’s always recommended to exercise caution and use non-toxic materials when working on DIY projects.
Hopefully, these FAQs have provided some valuable insights and answers to common questions about DIY phone case projects. Enjoy the process of creating a unique and personalized phone case that reflects your style and personality!
Conclusion
In conclusion, DIY phone cases are a fun and creative way to personalize and protect your cell phone. With a wide range of materials and design options available, you can easily create a unique phone case that reflects your style and personality. Whether you prefer a sleek and minimalist look or a bold and colorful design, there are countless DIY techniques and tutorials to guide you through the process.
Not only are DIY phone cases a budget-friendly alternative to store-bought options, but they also offer a sense of satisfaction and pride in creating something with your own hands. Additionally, customizing your phone case allows you to showcase your individuality and stand out from the crowd.
So, grab some materials, unleash your creativity, and start experimenting with DIY phone cases. Whether it’s adding a touch of glitter, painting a custom pattern, or embellishing with beads and gems, the possibilities are endless. Let your imagination run wild and transform your cell phone into a true reflection of your personal style.
Remember, DIY phone cases are not only functional but also a form of self-expression. So, go ahead and get crafty – your uniquely designed phone case will undoubtedly become a conversation starter wherever you go.
FAQs
Q: Can I make my own phone case?
A: Absolutely! With the right materials and a little creativity, you can easily make your own DIY phone case. There are various methods and techniques available, such as using clear phone case molds, customizing printable phone case templates, or even upcycling existing materials to create unique designs. The possibilities are endless!
Q: What materials do I need to make a DIY phone case?
A: The materials you’ll need will vary depending on the DIY method you choose. However, some common materials include clear phone case molds, craft foam sheets, decorative paper or fabric, glue, scissors, and various embellishments such as rhinestones, stickers, or beads. Be sure to gather all the necessary materials before starting your DIY project.
Q: Are DIY phone cases durable?
A: The durability of a DIY phone case depends on the materials and crafting techniques used. If you choose high-quality materials and properly seal the case, it can provide adequate protection for your phone. However, keep in mind that DIY phone cases may not offer the same level of durability as commercially manufactured cases. It’s also important to note that DIY phone cases may not provide the same level of shock absorption in case of accidental drops.
Q: Can I personalize my DIY phone case?
A: Absolutely! One of the best things about making your own phone case is the ability to personalize it according to your own style and preferences. You can choose your favorite colors, patterns, designs, or even add your initials or name. This provides a unique touch and allows you to showcase your creativity and individuality.
Q: Is making a DIY phone case cost-effective?
A: Making a DIY phone case can be a cost-effective alternative to purchasing commercially manufactured cases. While the initial investment in materials may be required, you’ll have the flexibility to create multiple cases using the same materials. Moreover, DIY phone cases allow you to customize and experiment with different designs without spending a fortune. It’s a great way to have a personalized phone case on a budget.