
Are you struggling to access your Wii U settings without a gamepad? Don’t worry, we’ve got you covered! The Wii U is a popular gaming console known for its innovative features and user-friendly interface. However, if you find yourself in a situation where your gamepad is unavailable or not functioning correctly, it can be frustrating to navigate the settings. In this article, we will guide you on how to access your Wii U settings without a gamepad, allowing you to make adjustments and customize your console effortlessly. Whether you’ve misplaced your gamepad or simply prefer using alternative control methods, we’ll provide you with simple and effective solutions. So, let’s dive in and explore the various ways to access your Wii U settings without a gamepad!
Inside This Article
- Wii U Settings without Gamepad: An Overview
- Method 1: Using a Wii Remote
- Method 2: Utilizing the Pro Controller
- Method 3: Employing a Wii U Gamepad Substitute
- Conclusion
- FAQs
Wii U Settings without Gamepad: An Overview
By default, the Wii U gamepad is the primary controller for accessing the console’s settings. However, there may be situations where the gamepad is unavailable or not functioning properly. The good news is that you can still access the Wii U settings without the gamepad by using alternative controllers or utilizing a gamepad emulator.
In this article, we will explore different methods that allow you to navigate the Wii U settings menu without the gamepad. Whether you have a Pro Controller, a Wii Remote with Nunchuk, or even want to use a gamepad emulator, we’ve got you covered.
Using a Pro Controller
If you have a Pro Controller for your Wii U, you can easily access the settings menu without using the gamepad. Simply follow these steps:
- Ensure that your Wii U console is turned on and the Pro Controller is charged and synced.
- Press the Home button on the Pro Controller to bring up the quick menu.
- Using the control stick, navigate to the “System Settings” option and press the A button to select it.
- You will now be able to access all the settings and make the necessary changes using the Pro Controller.
Using a Pro Controller provides a convenient alternative for accessing your Wii U settings when the gamepad is not available.
Using a Wii Remote with Nunchuk
If you own a Wii Remote with Nunchuk, you can also navigate the Wii U settings without the gamepad. Here’s how:
- Make sure your Wii U console is powered on and the Wii Remote is synced.
- Point the Wii Remote at the screen and press the A button to bring up the Wii U menu.
- Using the arrow buttons on the Wii Remote, navigate to the “System Settings” icon and press A to select it.
- You can now access the settings menu using the Wii Remote and navigate through the options using the arrow buttons and A button.
Using a Wii Remote with Nunchuk is another versatile option for accessing your Wii U settings without relying on the gamepad.
Syncing a Wii U Pro Controller
If you have a Wii U Pro Controller but have not synced it with your console before, here’s how you can do it:
- Ensure that your Wii U console is powered on.
- On the Wii U menu, select the “Controller Settings” option.
- Select “Pair” in the “Change Order” menu.
- Press and hold the sync button on the Wii U Pro Controller until the Player LED lights start flashing.
- Once the controller is successfully synced, you can follow the steps mentioned earlier to access the Wii U settings using the Pro Controller.
Synching the Wii U Pro Controller allows you to use it as an alternative to the gamepad for accessing and navigating the Wii U settings menu.
Using the Wii U Gamepad Emulator
If you don’t have access to any alternative controllers or if you prefer using a computer keyboard and mouse, you can utilize a Wii U gamepad emulator. There are various emulator options available that allow you to control your Wii U settings using your computer. Simply install the emulator, follow the setup instructions, and launch the Wii U settings to control them using your keyboard and mouse.
Remember that using an emulator requires some setup and may not provide the same level of convenience as using a physical controller. However, it is still a viable option for accessing the Wii U settings without a gamepad.
Method 1: Using a Wii Remote
If you don’t have a Wii U Gamepad, but you have a Wii Remote, you can still access the Wii U settings. Here’s how:
1. Start by turning on your Wii U console.
2. Press the power button on the Wii Remote to turn it on.
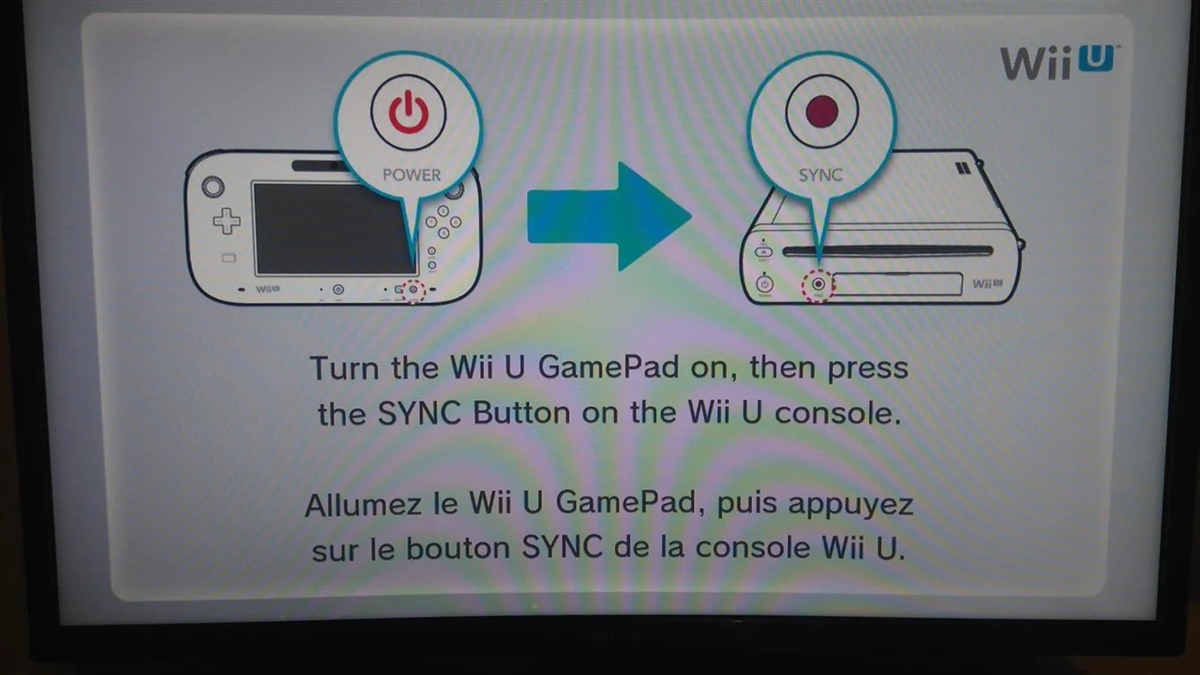
3. On the Wii U console, press the sync button. The sync button is the small red button located next to the SD card slot.
4. Now, on the Wii Remote, press the sync button as well. The sync button is usually located inside the battery cover.
5. Once the Wii Remote is synced with the console, press the Home button on the Wii Remote. This will bring up the Wii U menu.
6. Use the arrow keys on the Wii Remote to navigate to the “System Settings” option and press the A button to select it.
7. In the System Settings menu, you can make various adjustments and customizations to your Wii U console. Explore the different options to modify settings, such as internet connectivity, display, audio, and more.
8. When you’re finished making changes, simply press the Home button again to exit the System Settings menu and return to the Wii U menu.
That’s it! You can now access and modify the Wii U settings using just a Wii Remote. Remember, while some features may require the use of a Gamepad, you can still perform basic adjustments and configurations with a Wii Remote.
Method 2: Utilizing the Pro Controller
If you don’t have access to a Wii U Gamepad, don’t worry! You can still navigate through the Wii U system settings using a Pro Controller. The Pro Controller is a traditional gamepad that offers a more conventional gaming experience, similar to what you would find on other gaming consoles.
To get started, make sure your Pro Controller is synced to your Wii U console. You can do this by pressing the sync button on the controller, located on the back near the charging port. Once the sync button is pressed, the lights on the Pro Controller will start flashing.
Next, turn on your Wii U console and wait for it to boot up. Keep your Pro Controller nearby as you’ll need it to navigate through the system settings. Once the console is on, press the “Home” button on the Pro Controller to access the Wii U menu.
- Use the left joystick on the Pro Controller to navigate to the “System Settings” icon, which is represented by a wrench icon.
- Press the “A” button to select the “System Settings” option.
- Now, you can use the Pro Controller to move through the various options and menus in the Wii U settings, just like you would with a Wii U Gamepad.
Remember, the Pro Controller may not have all the features and functionalities of the Wii U Gamepad, such as the touch screen and built-in microphone. However, it still allows you to access and adjust the important settings of your Wii U console.
Once you have made the desired changes to your Wii U settings, you can either power off your console or continue using the Pro Controller to play your favorite games. Just keep in mind that certain games may require the use of a Wii U Gamepad for specific gameplay features.
So, if you find yourself without a Wii U Gamepad, don’t worry! The Pro Controller is here to save the day. With its simple setup and familiar layout, you can easily navigate through the Wii U settings and make any necessary adjustments to enhance your gaming experience.
Method 3: Employing a Wii U Gamepad Substitute
If you find yourself without a Wii U Gamepad but still need to access the Wii U settings, don’t worry! There is a workaround that allows you to use a substitute as a temporary solution. Here are the steps to follow:
1. Obtain a compatible substitute: To begin, you’ll need to find a suitable replacement for the Wii U Gamepad. This can include options such as a tablet, smartphone, or another device that supports the necessary controls.
2. Download a Wii U Gamepad Emulator app: To simulate the functionality of the Gamepad, you’ll need to download and install a Wii U Gamepad Emulator app on your chosen substitute device. These apps are available on various app stores, so make sure to choose one that is well-reviewed and reliable.
3. Connect the substitute device to the Wii U console: Once you have the emulator app installed on your substitute device, you’ll need to connect it to the Wii U console. Ensure that both devices are connected to the same Wi-Fi network for seamless communication.
4. Launch the emulator app: Open the Wii U Gamepad Emulator app on your substitute device. It should provide on-screen controls that mimic the layout and functionality of the original Wii U Gamepad.
5. Navigate to the Wii U settings: Use the on-screen controls of the emulator app to navigate to the Wii U settings. The app should function similarly to the Gamepad, allowing you to access and modify various settings on your console.
6. Adjust the settings as needed: Once you have accessed the Wii U settings, you can make any necessary adjustments or changes to suit your requirements. Whether it’s updating network settings, managing user profiles, or adjusting audio and video preferences, the emulator app should provide you with the necessary tools.
7. Disconnect and return to the original controller: After you’ve finished making the desired changes in the Wii U settings, you can disconnect the substitute device and return to using the original controller. Keep in mind that this method is a temporary solution and should not be considered a permanent replacement for the Wii U Gamepad.
By following these steps, you can utilize a Wii U Gamepad substitute to access and modify the settings on your Wii U console, even without the original Gamepad. However, it’s important to remember that this method may not provide the same level of functionality or control as the dedicated Gamepad. Therefore, it’s recommended to obtain a replacement Gamepad as soon as possible for the best gaming and console experience.
Conclusion
Accessing the Wii U settings without a Gamepad may initially seem challenging, but with the right methods, it can be accomplished. Whether you’ve misplaced your Gamepad or need to navigate the settings without it, the techniques we’ve discussed provide a helpful solution.
Using a compatible controller, such as the Wii U Pro Controller or a Wii Remote, allows you to access various settings and adjust configurations on your Wii U console. Additionally, utilizing the Wii U Gamepad Emulator on a computer or mobile device provides a convenient alternative for accessing the settings.
Remember, it’s important to familiarize yourself with the available options and make any necessary adjustments according to your preferences. By exploring the Wii U settings, you can customize your gaming experience, manage network connections, and much more.
So, whether you’re a seasoned Wii U player or just starting out, don’t let the absence of a Gamepad hinder your ability to access the console’s settings. Use the methods and alternative controllers we’ve discussed, and enjoy a fully customizable and immersive gaming experience on your Wii U.
FAQs
Q: Can I access the Wii U settings without using the gamepad?
Yes, it is possible to access the Wii U settings without the gamepad. There are alternative methods that you can use to navigate the system settings and make adjustments.
Q: What are the alternative methods to access Wii U settings?
There are a couple of ways to access the Wii U settings without using the gamepad. One option is to use a Wii U Pro Controller if you have one. Another option is to use the Nintendo Wii Remote Plus, which comes with additional buttons and motion-sensing capabilities.
Q: How do I access the Wii U settings with a Wii U Pro Controller?
To access the Wii U settings with a Wii U Pro Controller, simply sync it with your Wii U console. Once synced, press the “Home” button on the controller to bring up the quick menu. From there, you can navigate to the “System Settings” option and make the necessary adjustments.
Q: Can I connect a keyboard to the Wii U console to access the settings?
Unfortunately, the Wii U console does not have built-in support for connecting a keyboard. Therefore, you won’t be able to access the settings directly using a keyboard. However, there may be third-party adapters or software solutions available that allow you to connect a keyboard to the Wii U console for specific purposes.
Q: Are there any other methods to access the Wii U settings without a gamepad or controller?
If you don’t have a gamepad or controller available, it becomes more challenging to access the Wii U settings. In such cases, your best option would be to borrow a gamepad or controller from a friend or consider purchasing a used one. Alternatively, you can explore online forums or local gaming communities to see if anyone is offering gamepad rentals or lending programs.