
The Wii U Gamepad is a popular and versatile gaming accessory that provides an immersive gaming experience. However, if you find that the analog stick on your Wii U Gamepad is not working properly, it can be quite frustrating. The analog stick is responsible for controlling character movement and can greatly impact your gameplay. Fortunately, there are several steps you can take to fix the Wii U Gamepad analog stick and get back to enjoying your gaming sessions. In this article, we will dive into the common issues that can cause problems with the analog stick and provide step-by-step instructions on how to troubleshoot and fix them. Whether your analog stick is unresponsive, drifting, or sticking, we’ve got you covered with effective solutions to get your Wii U Gamepad working like new again.
Inside This Article
- Causes of Analog Stick Issues
- Tools Needed to Fix Wii U Gamepad Analog Stick
- Steps to Disassemble the Wii U Gamepad
- Steps to Replace the Analog Stick
- Conclusion
- FAQs
Causes of Analog Stick Issues
The analog stick on the Wii U Gamepad is prone to develop issues over time. These issues can be frustrating and hinder your gaming experience. Understanding the possible causes behind analog stick problems can help you diagnose and fix the issue.
1. Wear and Tear: One of the most common causes of analog stick issues is wear and tear. Continued use of the stick can lead to the deterioration of its internal components, resulting in a loss of responsiveness or inaccurate movement.
2. Accumulated Dust and Debris: Another cause of analog stick issues is the accumulation of dust and debris around the stick mechanism. This can interfere with the smooth movement of the stick, causing it to stick or move erratically.
3. Liquid Damage: Accidental spills or exposure to liquid can cause damage to the analog stick. Liquid can seep into the internal mechanism and affect the electrical connections, resulting in malfunctioning or non-responsive analog stick.
4. Incorrect Calibration: Sometimes, analog stick issues can be attributed to incorrect calibration. If the stick is not calibrated properly, it may not register the full range of movement or may become unresponsive altogether.
5. Manufacturing Defects: In some cases, analog stick issues may be caused by manufacturing defects. These defects can range from improper assembly to subpar materials used in the construction of the analog stick, leading to premature failure or performance issues.
It is worth noting that these causes are not exhaustive, and there may be other factors that contribute to analog stick issues. However, understanding these common causes can help you troubleshoot and address the problem effectively.
Tools Needed to Fix Wii U Gamepad Analog Stick
When it comes to fixing the Wii U Gamepad analog stick, having the right tools is essential. Here is a list of tools you’ll need to successfully complete the repair:
1. Tri-wing screwdriver: This specialized screwdriver is necessary to remove the screws holding the Wii U Gamepad together. It has a tri-wing-shaped head that fits perfectly into the screws, ensuring a secure grip and preventing damage to the screws.
2. Small Phillips screwdriver: You’ll need this screwdriver to remove smaller screws, such as those holding the analog stick assembly in place. Make sure to choose a size that fits snugly into the screws to avoid stripping them.
3. Plastic opening tools: These non-metallic tools are critical for prying open the Wii U Gamepad without damaging the plastic casing. They allow you to safely separate the front and back panels of the Gamepad by gently prying them apart.
4. Clean cloth: A soft, lint-free cloth will come in handy when cleaning the internal components of the Wii U Gamepad. It’s important to remove any debris, dust, or grease that may have accumulated over time.
5. Replacement analog stick: To fix the issue with the Wii U Gamepad analog stick, you’ll need a new replacement analog stick. Ensure that the replacement is compatible with the Wii U Gamepad and matches the specifications of the original analog stick.
6. Adhesive: Depending on the replacement analog stick, you may need an adhesive to secure it firmly into place. Look for a strong adhesive that is safe for electronics and provides a reliable bond.
7. Tweezers or small needle-nose pliers: These tools are handy for handling small screws, connectors, or delicate components during the repair process. They allow for precise manipulation and can help avoid accidental damage.
8. Patience and a steady hand: While not physical tools, these traits are essential to successfully fix the Wii U Gamepad analog stick. Take your time during the repair, follow the steps carefully, and work methodically to ensure a successful outcome.
With these tools in hand, you’ll be well-prepared to tackle the task of fixing the Wii U Gamepad analog stick. Remember to take your time, follow the instructions carefully, and exercise caution to avoid any further damage to the Gamepad.
Steps to Disassemble the Wii U Gamepad
Disassembling the Wii U Gamepad requires careful handling and attention to detail. Follow these steps to safely take apart the Gamepad:
1. Power off the Gamepad: Make sure the Gamepad is turned off before beginning the disassembly process.
2. Gather the necessary tools: You’ll need a small Phillips head screwdriver, a plastic pry tool or a spudger, and a clean workspace to place and organize the screws.
3. Remove the battery cover and battery: Slide the battery cover off the back of the Gamepad and carefully lift out the battery to expose the screws.
4. Remove the back plate: Take the small screwdriver and remove the screws holding the back plate in place. Keep the screws in a safe location and set the back plate aside.
5. Pry off the front panel: Use the plastic pry tool or spudger to gently separate the front panel from the rest of the Gamepad. Start at one corner and work your way around, being careful not to damage the delicate plastic clips holding the panel in place.
6. Disconnect the ribbon cables: Locate the ribbon cables that connect the front panel to the circuit board. Carefully detach these cables by gently lifting the securing tabs and pulling the connectors out of their sockets. Take note of the orientation of the cables for reassembly.
7. Remove the screws on the circuit board: Use the screwdriver to remove the screws that secure the circuit board in place. Keep track of the different screw lengths as you will need to put them back in their correct locations during reassembly.
8. Lift out the circuit board: Gently lift the circuit board out of the Gamepad, being mindful of any remaining connectors or flex cables that may still be attached. Carefully disconnect these cables to fully remove the circuit board.
9. Separate the analog stick assembly: Locate the analog stick assembly, which is connected to the front panel. Carefully separate it from the panel by loosening any screws or clips holding it in place, taking care not to damage any of the delicate components.
Following these steps will allow you to successfully disassemble the Wii U Gamepad and access the analog stick for further troubleshooting or replacement. Remember to keep track of all the components and screws to ensure a smooth reassembly process.
Steps to Replace the Analog Stick
If you’re experiencing issues with your Wii U Gamepad’s analog stick, replacing it may be the solution. Here are the steps to follow to replace the analog stick:
-
Gather the necessary tools: Before you begin, make sure you have all the tools you need. You’ll need a small Phillips screwdriver, a spudger or plastic opening tool, and a replacement analog stick.
-
Power down the Wii U Gamepad: Make sure the Wii U Gamepad is turned off before you start the replacement process.
-
Remove the battery: Open the back cover of the Wii U Gamepad and remove the battery to prevent any accidental power-on during the replacement process.
-
Disassemble the Gamepad: Use a small Phillips screwdriver to remove all the screws holding the Gamepad’s back cover in place. Once the screws are removed, carefully pry open the back cover using a spudger or plastic opening tool.
-
Detach the ribbon cables: Inside the Gamepad, you’ll find ribbon cables connecting the front and back halves. Gently detach these cables using a spudger or plastic opening tool to separate the two halves.
-
Expose the analog stick: With the Gamepad opened up, you’ll be able to access the analog stick module. It’s usually located on the front half of the Gamepad.
-
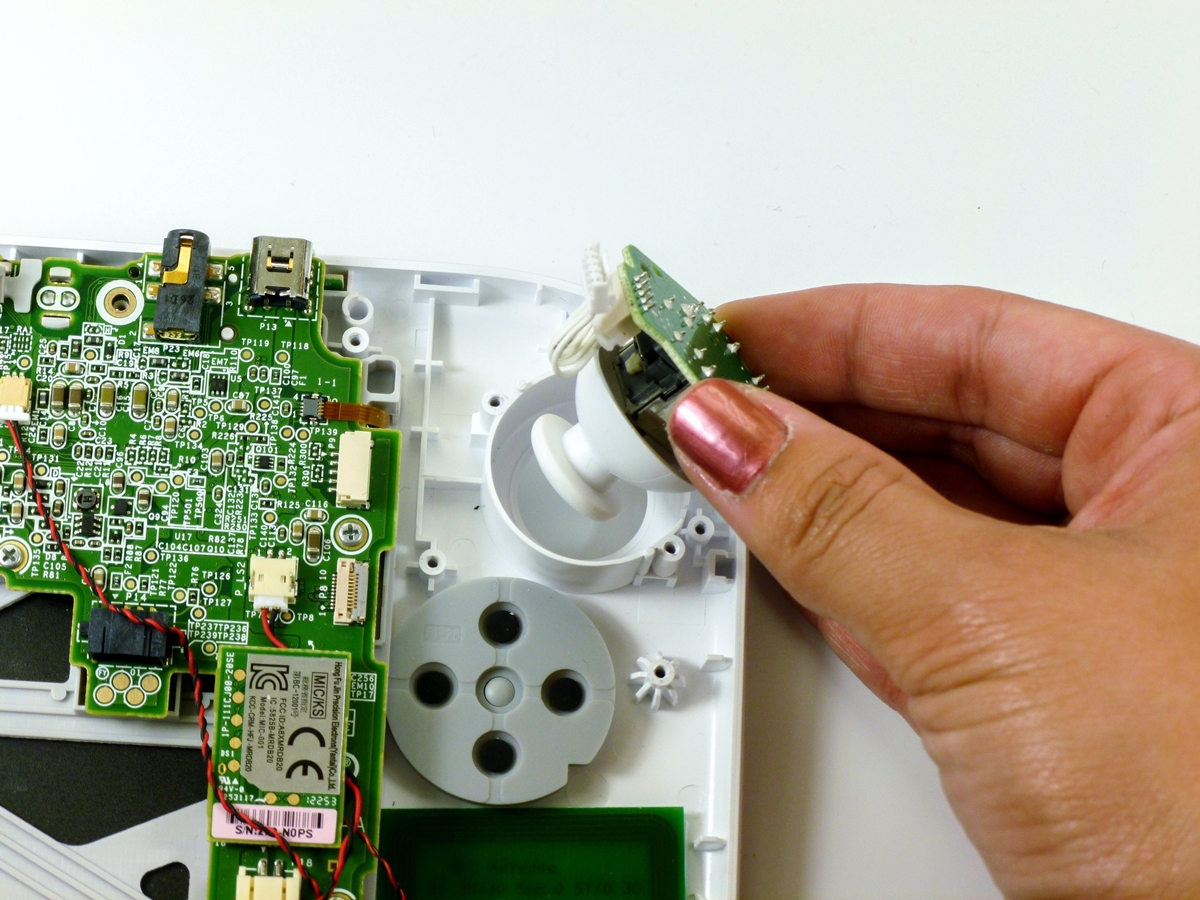
Disconnect the old analog stick: Carefully disconnect the cables or connectors attached to the old analog stick. Make sure to note the placement and orientation of the cables for reassembly.
-
Remove the old analog stick: Unscrew or unclip the old analog stick module from the Gamepad. Take note of how it is secured in place, as you’ll need to do the same when installing the new analog stick.
-
Install the new analog stick: Securely attach the new analog stick module in the same manner as the old one. Connect the cables or connectors to the new analog stick, ensuring they are properly aligned.
-
Reassemble the Gamepad: Carefully put the Gamepad back together, reattaching the ribbon cables and closing the back cover. Make sure all the screws are securely tightened.
-
Test the new analog stick: Once the Gamepad is reassembled, power it back on and test the new analog stick. Move it in different directions to make sure it is functioning correctly.
-
Replace the battery and back cover: Insert the battery back into the Gamepad and close the back cover. Ensure it snaps into place properly.
Follow these steps carefully, and you should be able to successfully replace the analog stick of your Wii U Gamepad. If you’re not confident in performing these steps yourself, it’s always a good idea to seek professional assistance.
Conclusion
In conclusion, the Wii U Gamepad analog stick is an essential component that allows gamers to control their gameplay with precision and accuracy. However, problems with the analog stick can arise over time, resulting in issues such as drifting or unresponsive movements.
Fortunately, there are various troubleshooting steps and solutions available to address these problems. By following the steps outlined in this article, gamers can effectively fix their Wii U Gamepad analog stick issues and enjoy a smooth and immersive gaming experience once again.
Remember to assess the situation and start with the simplest fixes, such as recalibrating the analog stick or cleaning it. If these steps don’t work, more advanced troubleshooting options, like replacing the analog stick module, may be required.
By taking the time to troubleshoot and fix the Wii U Gamepad analog stick, gamers can prolong the lifespan of their controller and continue to enjoy their favorite games without any disruptions caused by analog stick issues.
FAQs
Q: My Wii U Gamepad’s analog stick is not working properly. How can I fix it?
A: If you are experiencing issues with your Wii U Gamepad’s analog stick, there are a few troubleshooting steps you can try to fix the problem.
Q: Can I fix my Wii U Gamepad’s analog stick without professional help?
A: In some cases, you may be able to fix the analog stick issue on your Wii U Gamepad without professional help. However, if the problem persists or if you are uncomfortable with opening up the Gamepad, it is recommended to seek professional assistance.
Q: How do I recalibrate the analog stick on my Wii U Gamepad?
A: To recalibrate the analog stick on your Wii U Gamepad, go to the System Settings on your Wii U console. From there, access the “Controller” settings and select the option to calibrate the Gamepad’s controls. Follow the on-screen instructions to recalibrate the analog stick.
Q: What if recalibrating the analog stick doesn’t solve the problem?
A: If recalibrating the analog stick doesn’t resolve the issue, you can try cleaning the analog stick and its surrounding area. Dust or debris may be causing interference with the stick’s movements. Gently clean the area using a microfiber cloth or a cotton swab dipped in rubbing alcohol.
Q: Should I consider replacing the analog stick on my Wii U Gamepad?
A: If all else fails and the analog stick continues to malfunction, you may need to consider replacing it. You can purchase replacement analog sticks for the Wii U Gamepad online or contact the official Nintendo support for assistance.