
Have you ever wanted to create your own lanyard with fabric? Whether you need a lanyard for practical purposes or as a stylish accessory, making one yourself can be a fun and rewarding project. Not only will you have a unique lanyard that reflects your personal style, but you’ll also have the satisfaction of knowing that you made it with your own hands. In this article, we’ll guide you through the step-by-step process of making a lanyard with fabric. From choosing the right materials to mastering the essential techniques, you’ll gain the knowledge and skills needed to create a beautiful and functional lanyard. So, let’s dive in and explore the wonderful world of lanyard making!
Inside This Article
- Materials Needed
- Step 1: Measure and Cut the Fabric
- Step 2: Fold and Press the Fabric – Fold the fabric lengthwise with the right sides facing together – Use an iron to press the fold, creating a crisp edge
- Step 3: Sew the Fabric
- Step 4: Attach the Hook or Keyring – Insert the lanyard hook or keyring into the opening of the fabric tube – Sew the opening securely closed, ensuring the hook or keyring is tightly secured
- Step 5: Finishing Touches – Trim any excess threads – Double-check the stitching for strength and durability
- Conclusion
- FAQs
Materials Needed
When it comes to making a lanyard with fabric, you’ll need a few essential materials to get started. Whether you’re a seasoned DIY enthusiast or a beginner looking to try your hand at crafting, here’s what you’ll need:
Fabric: Choose a fabric that suits your personal style and preferences. Consider the desired width and pattern of the lanyard when selecting the fabric.
Scissors: A good pair of fabric scissors is essential for cutting the fabric with precision. Make sure they are sharp and have a comfortable grip for ease of use.
Sewing machine or needle and thread: Depending on your preference and skill level, you can use a sewing machine or a needle and thread. A sewing machine provides a faster and more efficient way to sew, while using a needle and thread allows for more control and a more personalized touch.
Lanyard hook or keyring: To complete your lanyard, you’ll need a lanyard hook or keyring to attach your keys, ID badge, or other items. Make sure to choose a sturdy hook or ring that can withstand regular use.
Step 1: Measure and Cut the Fabric
Determining the desired length and width of the lanyard is the first step in making a fabric lanyard. The length will depend on your personal preference and how you plan to use the lanyard. If you want to wear it around your neck, measure a length that is comfortable for you. If you want to use it as a wrist strap, measure a shorter length accordingly.
Once you have decided on the length, use a measuring tape or ruler to accurately measure and mark the fabric. Make sure to add a few extra inches to account for any seams or folds. This will ensure that the finished lanyard is the perfect length.
Next, determine the desired width of the lanyard. The width is mostly a matter of personal preference and can vary depending on the intended use. A wider lanyard may provide more stability and support for heavier accessories, while a narrower lanyard may be more lightweight and comfortable to wear.
After determining the length and width, you can proceed to cut the fabric. Carefully use a pair of sharp scissors to cut along the marked lines, ensuring a clean and straight edge. Take your time and make precise cuts to achieve the desired measurements.
Remember, measuring and cutting the fabric accurately is crucial for creating a well-made and visually appealing lanyard. So take your time, double-check your measurements, and make precise cuts for the best results.
Step 2: Fold and Press the Fabric – Fold the fabric lengthwise with the right sides facing together – Use an iron to press the fold, creating a crisp edge
Once you have measured and cut your fabric according to the desired length and width for your lanyard, it’s time to move on to the next step: folding and pressing the fabric. This step is crucial for creating a neat and professional-looking lanyard.
Start by taking your fabric and folding it lengthwise, ensuring that the right sides of the fabric are facing each other. This will help create a clean and finished edge once the lanyard is complete. Align the edges of the fabric as evenly as possible before moving on to the next step.
With the fabric folded and aligned, it’s time to press the fold. Using an iron set to the appropriate temperature for your fabric type, gently press the folded edge. The heat from the iron will help create a crisp fold, making it easier to sew and giving your lanyard a professional look.
Make sure to press the fold along the entire length of the fabric, ensuring that it is straight and even. Take your time during this step to ensure that the fabric is adequately pressed, as any wrinkles or unevenness may affect the overall appearance of the lanyard.
Once you have pressed the fold, carefully unfold the fabric to check that the crease is well-defined and that the edges are aligned. If needed, you can re-fold and re-press the fabric to achieve a better result.
Remember, the process of folding and pressing the fabric is essential in creating a high-quality lanyard. It not only gives the lanyard a professional finish but also provides a sturdy base for the sewing process in the next steps.
Step 3: Sew the Fabric
Sewing the fabric is the next crucial step in creating your lanyard. By following these instructions, you’ll be able to achieve a professional finish for your homemade accessory.
Here’s how to sew the fabric for your lanyard:
- Sew along the long edge of the fabric: With the right sides of the fabric facing together, use a sewing machine or a needle and thread to sew along the long edge of the fabric. Make sure to leave a small opening at one end for turning the fabric right side out later.
- Turn the fabric tube right side out: Once you have sewn the long edge, gently turn the fabric tube right side out through the opening you left. Be careful not to twist or distort the fabric as you do this. You can use a pencil or the rounded end of a chopstick to help push the fabric through completely.
- Press the fabric again: After turning the fabric right side out, it’s important to press it once more to ensure a smooth and crisp look. Use an iron on a low heat setting and press the fabric, paying special attention to the seams and edges. This will help give your lanyard a professional finish.
By following these simple steps, you can sew the fabric for your lanyard with ease. Just remember to sew along the long edge, leave a small opening for turning, and press the fabric for a polished look.
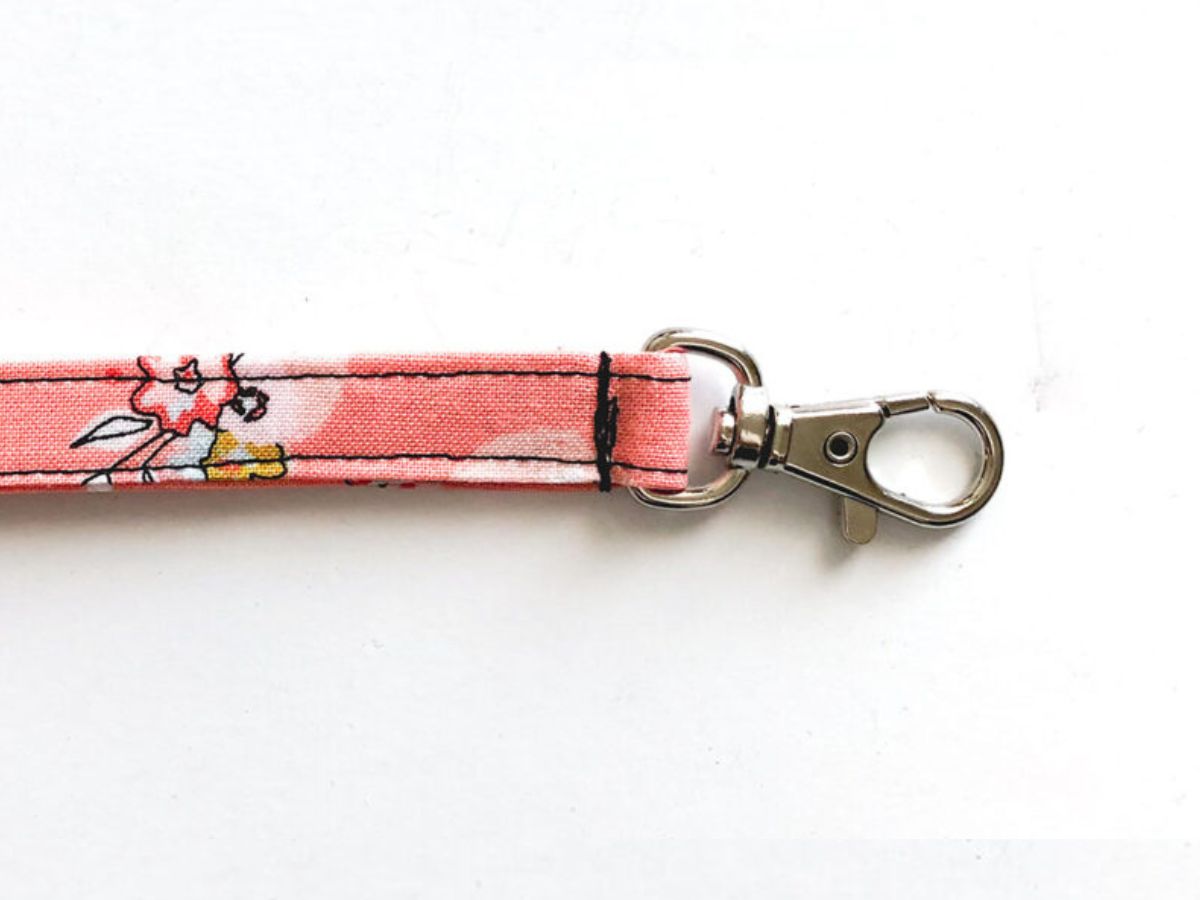
Step 4: Attach the Hook or Keyring – Insert the lanyard hook or keyring into the opening of the fabric tube – Sew the opening securely closed, ensuring the hook or keyring is tightly secured
Once you have sewn the fabric tube and turned it right side out, it’s time to attach the hook or keyring to complete your lanyard. This step is crucial as it ensures that your lanyard is functional and can securely hold items like keys or ID badges.
To begin, locate the opening at one end of the fabric tube that you left unstitched. This will be the entry point for inserting the hook or keyring. The size of the opening should be large enough to accommodate the attachment securely.
Next, take your lanyard hook or keyring and insert it into the opening of the fabric tube. Push it through until it reaches the opposite end of the lanyard. Make sure to position it in the center of the fabric to maintain balance and stability.
Once the hook or keyring is inserted, it’s time to secure it in place. This can be accomplished by stitching the opening closed. Thread your sewing needle or set up your sewing machine and choose a thread color that matches or complements the fabric.
With your needle and thread, make a few small stitches at the opening, ensuring that you catch both sides of the fabric. This will prevent the hook or keyring from slipping out of the lanyard. Then, continue sewing the opening closed with a straight stitch, making sure to maintain tension and keep the stitches neat and even.
As you sew, take extra care around the area where the hook or keyring is positioned. Sewing over the attachment several times will provide additional reinforcement and ensure it remains securely fastened to the lanyard.
Once the opening is completely sewn closed, tie off your thread with a double knot and trim any excess. Take a moment to inspect your work, making sure the hook or keyring is tightly secured and cannot be easily detached. Give it a gentle tug to test its strength and durability.
Congratulations! You have successfully attached the hook or keyring to your fabric lanyard. This finishing touch completes the lanyard and makes it ready for use. Now you can confidently wear your lanyard and keep your essentials within easy reach.
Step 5: Finishing Touches – Trim any excess threads – Double-check the stitching for strength and durability
Once you have completed sewing your lanyard and attaching the hook or keyring, it’s time to add the final touches to ensure a polished and professional look. This step involves trimming any excess threads and double-checking the stitching for strength and durability.
Trimming any excess threads is important to give your lanyard a clean and neat appearance. Use a pair of scissors to carefully snip off any loose threads that may be sticking out of the fabric. Be sure to do this with caution to avoid cutting the fabric or any of the stitching that holds the lanyard together.
After trimming the threads, it is crucial to double-check the stitching for strength and durability. Carefully inspect the entire length of the lanyard, paying close attention to the seams and the area where the hook or keyring is attached. Look for any loose stitches, gaps, or signs of weakness.
If you notice any areas of concern, you will need to reinforce the stitching to ensure the lanyard is strong and will withstand regular use. Depending on the initial method used to sew the fabric, you may choose to use a sewing machine or a needle and thread for this step.
If using a sewing machine, select a matching thread color and stitch over any weak or loose areas, reinforcing the original stitches. Be sure to backstitch at the beginning and end of each new section to secure the thread in place. This will help prevent future unraveling or fraying.
If you are hand sewing, simply thread your needle with a matching thread color and carefully stitch over any areas of concern using a sturdy backstitch. This will provide extra strength and durability to those parts of the lanyard. Knot the thread securely at the beginning and end to prevent it from coming undone.
Once you have reinforced any weak spots in the stitching, give the lanyard a final once-over to ensure it is in top shape. Check for any remaining loose threads or imperfections, and trim them away if necessary.
By trimming any excess threads and double-checking the stitching, you can be confident that your lanyard is not only visually appealing but also durable and ready to use. Taking the time to add these finishing touches ensures that your homemade lanyard will stand the test of time, serving its purpose effectively.
Now that you have completed all the steps, your fabric lanyard is ready to be used. Enjoy wearing your personalized lanyard or gift it to someone special!
Conclusion
Creating a lanyard with fabric is a fun and practical DIY project that allows you to customize your own stylish accessories. It’s a versatile craft that can be easily personalized to match your individual style or meet specific needs. Whether you want to make a lanyard for your keys, ID badge, or even as a trendy fashion statement, the possibilities are endless.
By following simple steps and using basic materials and tools, you can transform a piece of fabric into a fashionable and functional lanyard. Whether you prefer a basic design or want to get creative with patterns, colors, and embellishments, the process is simple and rewarding.
So why not give it a try? Making your own lanyard with fabric not only allows you to express your creativity but also provides a practical solution for keeping your essentials within reach. Start making your custom lanyards today and enjoy the satisfaction of wearing something handmade!
FAQs
1. What is a lanyard?
A lanyard is a cord or strap worn around the neck, shoulder, or wrist to carry items such as badges, keys, or identification cards. It is commonly used in workplaces, schools, conferences, and events for easy access and identification.
2. How do I make a lanyard with fabric?
To make a lanyard with fabric, you will need the following materials:
- Fabric
- Scissors
- Ruler
- Lobster claw or swivel hook
- Sewing machine or needle and thread
Here’s a step-by-step guide:
- Measure and cut a strip of fabric to your desired length and width (usually around 1 inch wide and 36 inches long).
- Fold the fabric in half lengthwise, with the right sides facing each other, and pin to secure.
- Sew along the long edge of the fabric, leaving the short ends open.
- Turn the fabric right side out by pushing one end through the opening.
- Attach the lobster claw or swivel hook to one end of the lanyard, folding the end over and sewing it to secure.
- Your fabric lanyard is now ready to use!
3. Can I customize my fabric lanyard?
Absolutely! One of the great things about making a lanyard with fabric is the endless customization options. You can choose fabric in different colors, patterns, and textures to suit your style. You can also add embellishments like beads, buttons, or embroidery to make it even more unique.
4. How do I care for my fabric lanyard?
To keep your fabric lanyard looking its best, follow these care instructions:
- Hand wash or machine wash on a gentle cycle using cold water.
- Use a mild detergent and avoid bleach.
- Lay the lanyard flat to air dry or hang it up to prevent stretching.
- Avoid ironing or using high heat as it may damage the fabric.
5. Where can I use a fabric lanyard?
A fabric lanyard can be used in various settings and situations. Some common places where a fabric lanyard comes in handy include workplaces, schools, conferences, trade shows, festivals, sporting events, and theme parks. It is a practical accessory that helps keep your belongings secure and easily accessible.