
In today’s digital age, where data storage is crucial, hard drives have become an essential component of our lives. Whether you use a desktop computer or a laptop, a properly functioning SATA (Serial ATA) connector is essential for the smooth operation of your hard drive. However, like any other electronic component, the SATA connector can sometimes become damaged or loose over time.
If you’re experiencing issues with your hard drive, such as intermittent connectivity or data transfer errors, a faulty SATA connector could be the culprit. But fret not! In this article, we will guide you through the process of repairing the SATA connector on your hard drive, saving you the cost and hassle of replacing the entire drive.
So, if you’re ready to roll up your sleeves and delve into a bit of DIY computer repair, let’s get started on fixing that problematic SATA connector!
Inside This Article
- Understanding the SATA Connector
- Tools and Materials Needed
- Step-by-Step Guide to Repairing SATA Connector on a Hard Drive
- Conclusion
- FAQs
Understanding the SATA Connector
The SATA (Serial Advanced Technology Attachment) connector is an essential component of modern hard drives. It serves as the interface between the hard drive and the motherboard, allowing data to be transferred between the two. SATA connectors have replaced older IDE (Integrated Drive Electronics) connectors due to their faster data transfer rates and smaller form factor.
The SATA connector is a small rectangular-shaped socket located on the back of the hard drive. It consists of a series of pins that make a secure electrical connection with the corresponding pins on the motherboard. These pins transmit data signals, as well as power signals for the hard drive to operate.
One of the key advantages of the SATA connector is its hot-swappability feature. This means that you can connect or disconnect a SATA drive while the computer is powered on without needing to restart the system. This makes it easy to add or replace hard drives without interrupting the workflow.
SATA connectors come in different versions, such as SATA I, SATA II, SATA III, and the newer SATA Express. Each version offers different maximum data transfer speeds and features. The most commonly used SATA version today is SATA III, which supports a maximum data transfer rate of 6 Gbps (gigabits per second).
Understanding the SATA connector is crucial for anyone looking to repair or upgrade their hard drive. By knowing how it functions and connects to the motherboard, you can easily identify and troubleshoot any issues that may arise, such as loose connections or damaged pins.
In the next section, we will discuss the tools and materials needed for repairing a SATA connector on a hard drive.
Tools and Materials Needed
When it comes to repairing a SATA connector on a hard drive, you’ll need a few essential tools and materials to ensure a successful repair. Here is a rundown of what you’ll need:
- Replacement SATA Connector: In order to repair a faulty or damaged SATA connector, you’ll need a new one as a replacement. Make sure to obtain the correct SATA connector that matches your hard drive’s specifications.
- Screwdriver Set: You’ll need a set of precision screwdrivers to safely remove the screws holding the hard drive together. This will allow access to the internal components, including the SATA connector.
- Tweezers: Tweezers come in handy when dealing with small and delicate components. They can be used to carefully handle and position the replacement SATA connector during the repair process.
- Anti-static Wrist Strap: To prevent any damage caused by static electricity, it’s essential to wear an anti-static wrist strap. This helps to discharge static energy and protect the sensitive electronic components of the hard drive.
- Isopropyl Alcohol and Cotton Swabs: Cleaning the affected area before and after the repair is crucial to ensure a proper connection. Isopropyl alcohol and cotton swabs help to remove any dirt, dust, or debris from the SATA connector and the connecting ports.
- Heat Gun or Soldering Iron: Depending on the type of repair needed, you may require a heat gun or soldering iron. These tools are used to heat and reflow the solder on the connections, allowing for a secure and reliable connection.
- Heat-resistant Tape: Heat-resistant tape is used to secure the connections and provide insulation. This helps to prevent any accidental contact between the SATA connector and other components or conductive surfaces.
- Magnifying Glass or Optics: A magnifying glass or optics, such as a microscope, can be helpful for inspecting small and intricate details during the repair process. It aids in identifying any critical issues and ensures a precise repair.
Having these tools and materials readily available will make the process of repairing a SATA connector on a hard drive much smoother and minimize the risk of any further damage. Now that you’re equipped with the necessary tools, it’s time to move on to the step-by-step guide for repairing the SATA connector.
Step-by-Step Guide to Repairing SATA Connector on a Hard Drive
If you’re experiencing connectivity issues with your hard drive or notice a loose SATA connector, don’t panic. Instead of rushing out to buy a new drive, you can try repairing the SATA connector yourself. With a few tools and some careful steps, you may be able to fix the problem and save yourself some money.
Before we begin, it’s important to note that repairing a SATA connector requires some technical knowledge and skill. If you’re uncomfortable working with electronics or are unsure about any step, it’s best to seek professional assistance. Now, let’s get started with the step-by-step guide:
- Gather the necessary tools and materials: You’ll need a screwdriver set with small and medium-sized Phillips and flathead bits, tweezers, a soldering iron, soldering wire, heat shrink tubing, and a heat gun or lighter.
- Power down your computer: Before working on any internal components, it’s crucial to shut down your computer and unplug it from the power source. This ensures your safety and prevents any accidental damage.
- Open your computer case: Depending on your computer model, you may need to remove a side panel or the entire cover. Refer to your computer’s manual or search online for specific instructions on opening your particular model.
- Locate the hard drive: Once the case is open, find the hard drive that has the loose or damaged SATA connector. It’s typically a rectangular-shaped component connected to a power cable and data cable.
- Disconnect the cables: Carefully unplug the power cable and data cable from the hard drive. If necessary, use the tweezers to gently remove any connectors or clips holding the cables in place.
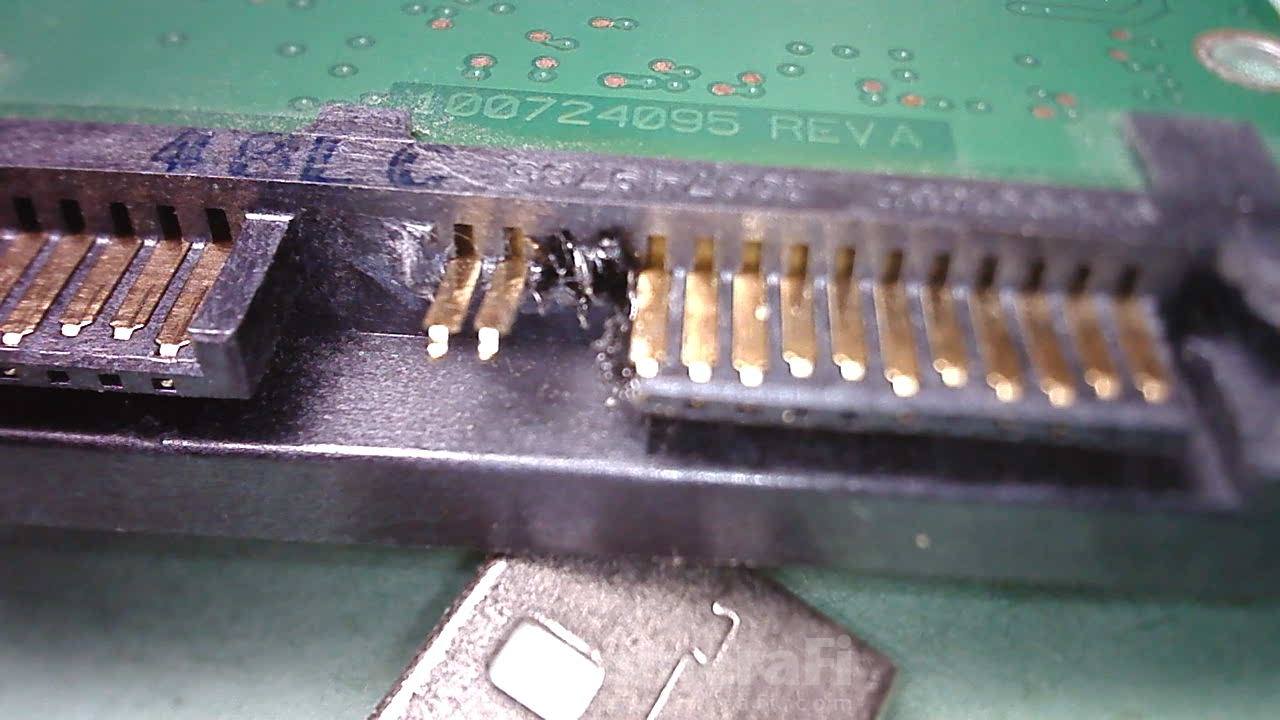
- Inspect the SATA connector: Take a close look at the SATA connector on the hard drive. Look for any bent or broken pins, loose connections, or signs of damage or corrosion.
- Repair or replace the SATA connector: If you notice any bent or broken pins, you may be able to carefully straighten them using the tweezers. However, if the connector is severely damaged, it’s best to replace it with a new one. This may require some soldering skills.
- Solder the new connector: If you need to replace the SATA connector, use the soldering iron to remove the old connector. Then, solder the new connector onto the circuit board of the hard drive. Be sure to follow proper soldering techniques and avoid overheating the board.
- Apply heat shrink tubing: Once the new connector is securely soldered, slide a small piece of heat shrink tubing over the connection. Use a heat gun or lighter to apply heat evenly to the tubing, shrinking it and providing insulation for the solder joint.
- Reconnect the cables: Finally, carefully reconnect the power cable and data cable to the hard drive. Ensure they are fully inserted and securely connected.
- Close the computer case: Once you’ve completed the repair and verified that the connections are secure, carefully close your computer case. Make sure all screws are tight and that there are no loose components inside.
- Test your hard drive: After everything is back in place, power on your computer and test the hard drive. Check if the SATA connector is functioning properly and if your computer recognizes the drive. If everything works as expected, you’ve successfully repaired the SATA connector!
Repairing a SATA connector on a hard drive can be a delicate process, but with the right tools, knowledge, and caution, it is possible to fix the issue yourself. Remember to take your time, follow the steps carefully, and seek professional help if needed. By doing so, you can save money and extend the life of your hard drive.
Conclusion
Repairing a SATA connector on a hard drive can be a daunting task, especially for those who are not experienced in electronics or computer hardware. However, with a little patience and the right tools, it is possible to fix a damaged SATA connector and restore the functionality of your hard drive.
Remember to take all necessary precautions when working with delicate electronic components and always ensure that you have disconnected the power source before attempting any repairs. If you are not confident in your abilities or are unsure about any step of the process, it is best to seek professional help to avoid further damage.
SATA connectors are vital for the proper functioning of a hard drive, and any issues with these connectors can severely impact the performance or usability of your computer system. By following the steps outlined in this article and using the appropriate tools, you can potentially save yourself the cost of purchasing a new hard drive and restore your existing one to working condition.
Remember, if you encounter any difficulties or are unsure about any aspect of the repair process, it is always recommended to consult with a professional technician or seek assistance from an experienced individual. With the right guidance and care, you can successfully repair a SATA connector and extend the lifespan of your hard drive.
FAQs
1. Why is it important to repair a broken SATA connector on a hard drive?
A broken SATA connector can render your hard drive useless, preventing you from accessing your data or using it for storage. Repairing the connector allows you to regain functionality and save valuable files.
2. Can I repair a SATA connector on a hard drive myself, or should I seek professional help?
Repairing a SATA connector on a hard drive requires technical knowledge and skills. If you have experience working with electronics and feel confident in your abilities, you can attempt the repair yourself. However, it is recommended to seek professional assistance to ensure the repair is done accurately and to prevent further damage to the hard drive.
3. What tools do I need to repair a broken SATA connector?
To repair a broken SATA connector on a hard drive, you will typically need a soldering iron, solder wire, heat shrink tubing, a heat gun or lighter, and a pair of tweezers. Additionally, you may need screwdrivers or other tools to open the hard drive casing and access the connector.
4. Are there any risks involved in repairing a broken SATA connector?
Yes, there are inherent risks when attempting to repair a broken SATA connector. Mishandling the delicate components or using incorrect techniques can further damage the hard drive or even cause it to become permanently non-functional. It is essential to exercise caution and follow proper repair procedures to minimize these risks.
5. If I cannot repair the SATA connector, can I still retrieve my data from the hard drive?
If you are unable to repair the SATA connector, there is still a possibility to retrieve your data. You can take your hard drive to a professional data recovery service. These experts have specialized tools and expertise to extract data even from damaged storage devices. However, data recovery services can be quite expensive, so it is important to weigh the cost versus the value of the data you want to recover.