
When it comes to car maintenance, one component that often goes overlooked is the car battery connector. While the battery itself is important, the connector plays a crucial role in ensuring a stable and reliable connection between the battery and the rest of the car’s electrical system. Over time, the battery connector can become corroded or damaged, leading to poor electrical conductivity and potential problems with starting the car or powering the various electrical components.
In this article, we will guide you through the process of replacing a car battery connector. Whether you are a seasoned DIY enthusiast or a beginner looking to learn more about car maintenance, this step-by-step guide will provide you with the necessary information to tackle this task with confidence. So, let’s dive in and discover how you can replace your car battery connector to ensure optimal performance and reliability for your vehicle.
Inside This Article
- Tools and materials needed
- Step 1: Safety Precautions
- Step 2: Removing the old battery connector
- Step 3: Cleaning the battery terminals
- Step 4: Installing the new battery connector
- Step 5: Securing and testing the new connection
- Conclusion
- FAQs
Tools and materials needed
When replacing a car battery connector, you will need a few essential tools and materials to ensure a successful installation. Here is a list of what you’ll need:
- Wrench or pliers: You’ll need a wrench or pliers to loosen and tighten the nuts and bolts that secure the battery terminals.
- New battery connector: It’s important to have a replacement battery connector that is compatible with your car’s battery terminals. Be sure to get one that matches the size and type required for your vehicle.
- Baking soda or battery terminal cleaner: This will be used to clean the battery terminals and remove any corrosion or buildup that may be present.
- Wire brush or sandpaper: You’ll need a wire brush or sandpaper to scrub off any rust or corrosion from the battery terminals, ensuring a clean and reliable connection.
- Protective gloves and eye goggles: Safety should always be a priority when working with car batteries. Wear protective gloves and eye goggles to protect yourself from any potential hazards.
- Rag or paper towels: These will come in handy for wiping away any dirt, debris, or residue from the battery terminals and surrounding area.
- Battery terminal spray or grease: Applying a small amount of battery terminal spray or grease after installation can help prevent future corrosion and ensure a longer-lasting connection.
Having these tools and materials on hand before starting the battery connector replacement process will make the task much easier and more efficient. It’s always better to be prepared and have everything you need at your fingertips.
Step 1: Safety Precautions
When replacing a car battery connector, it is important to prioritize safety. Batteries contain corrosive chemicals and produce electrical energy, making them potentially hazardous. By following a few simple safety precautions, you can minimize the risk of accidents and ensure your well-being during the process.
Here are some safety tips to keep in mind:
- Turn off the engine: Before starting any work on the battery, make sure the car’s engine is completely turned off. This will prevent any accidental starts or electrical surges.
- Put on safety gloves and goggles: Battery acid and corrosion can cause harm to your skin and eyes. Wearing protective gloves and goggles will protect you from any potential contact.
- Remove metal jewelry: It’s important to remove any metal jewelry, such as rings or bracelets, before working on the battery. Metal can conduct electricity and increase the risk of injury.
- Keep sparks and flames away: Batteries produce hydrogen gas, which is highly flammable. Avoid smoking or exposing the battery to any sparks or open flames during the replacement process.
- Work in a well-ventilated area: Battery acid emits toxic fumes, so it’s essential to carry out the replacement in a well-ventilated area, preferably outdoors or in a garage with the doors open.
- Use insulated tools: To avoid any electrical shocks, use insulated tools specifically designed for battery work. This will help prevent accidental contact with live electrical parts of the battery.
- Follow the manufacturer’s instructions: Always refer to the car manufacturer’s manual or the battery manufacturer’s instructions for specific precautions or guidelines for your particular vehicle model.
By taking these safety precautions, you can ensure a safer and smoother process when replacing your car battery connector. Remember, safety should always be your top priority when working with any vehicle maintenance tasks.
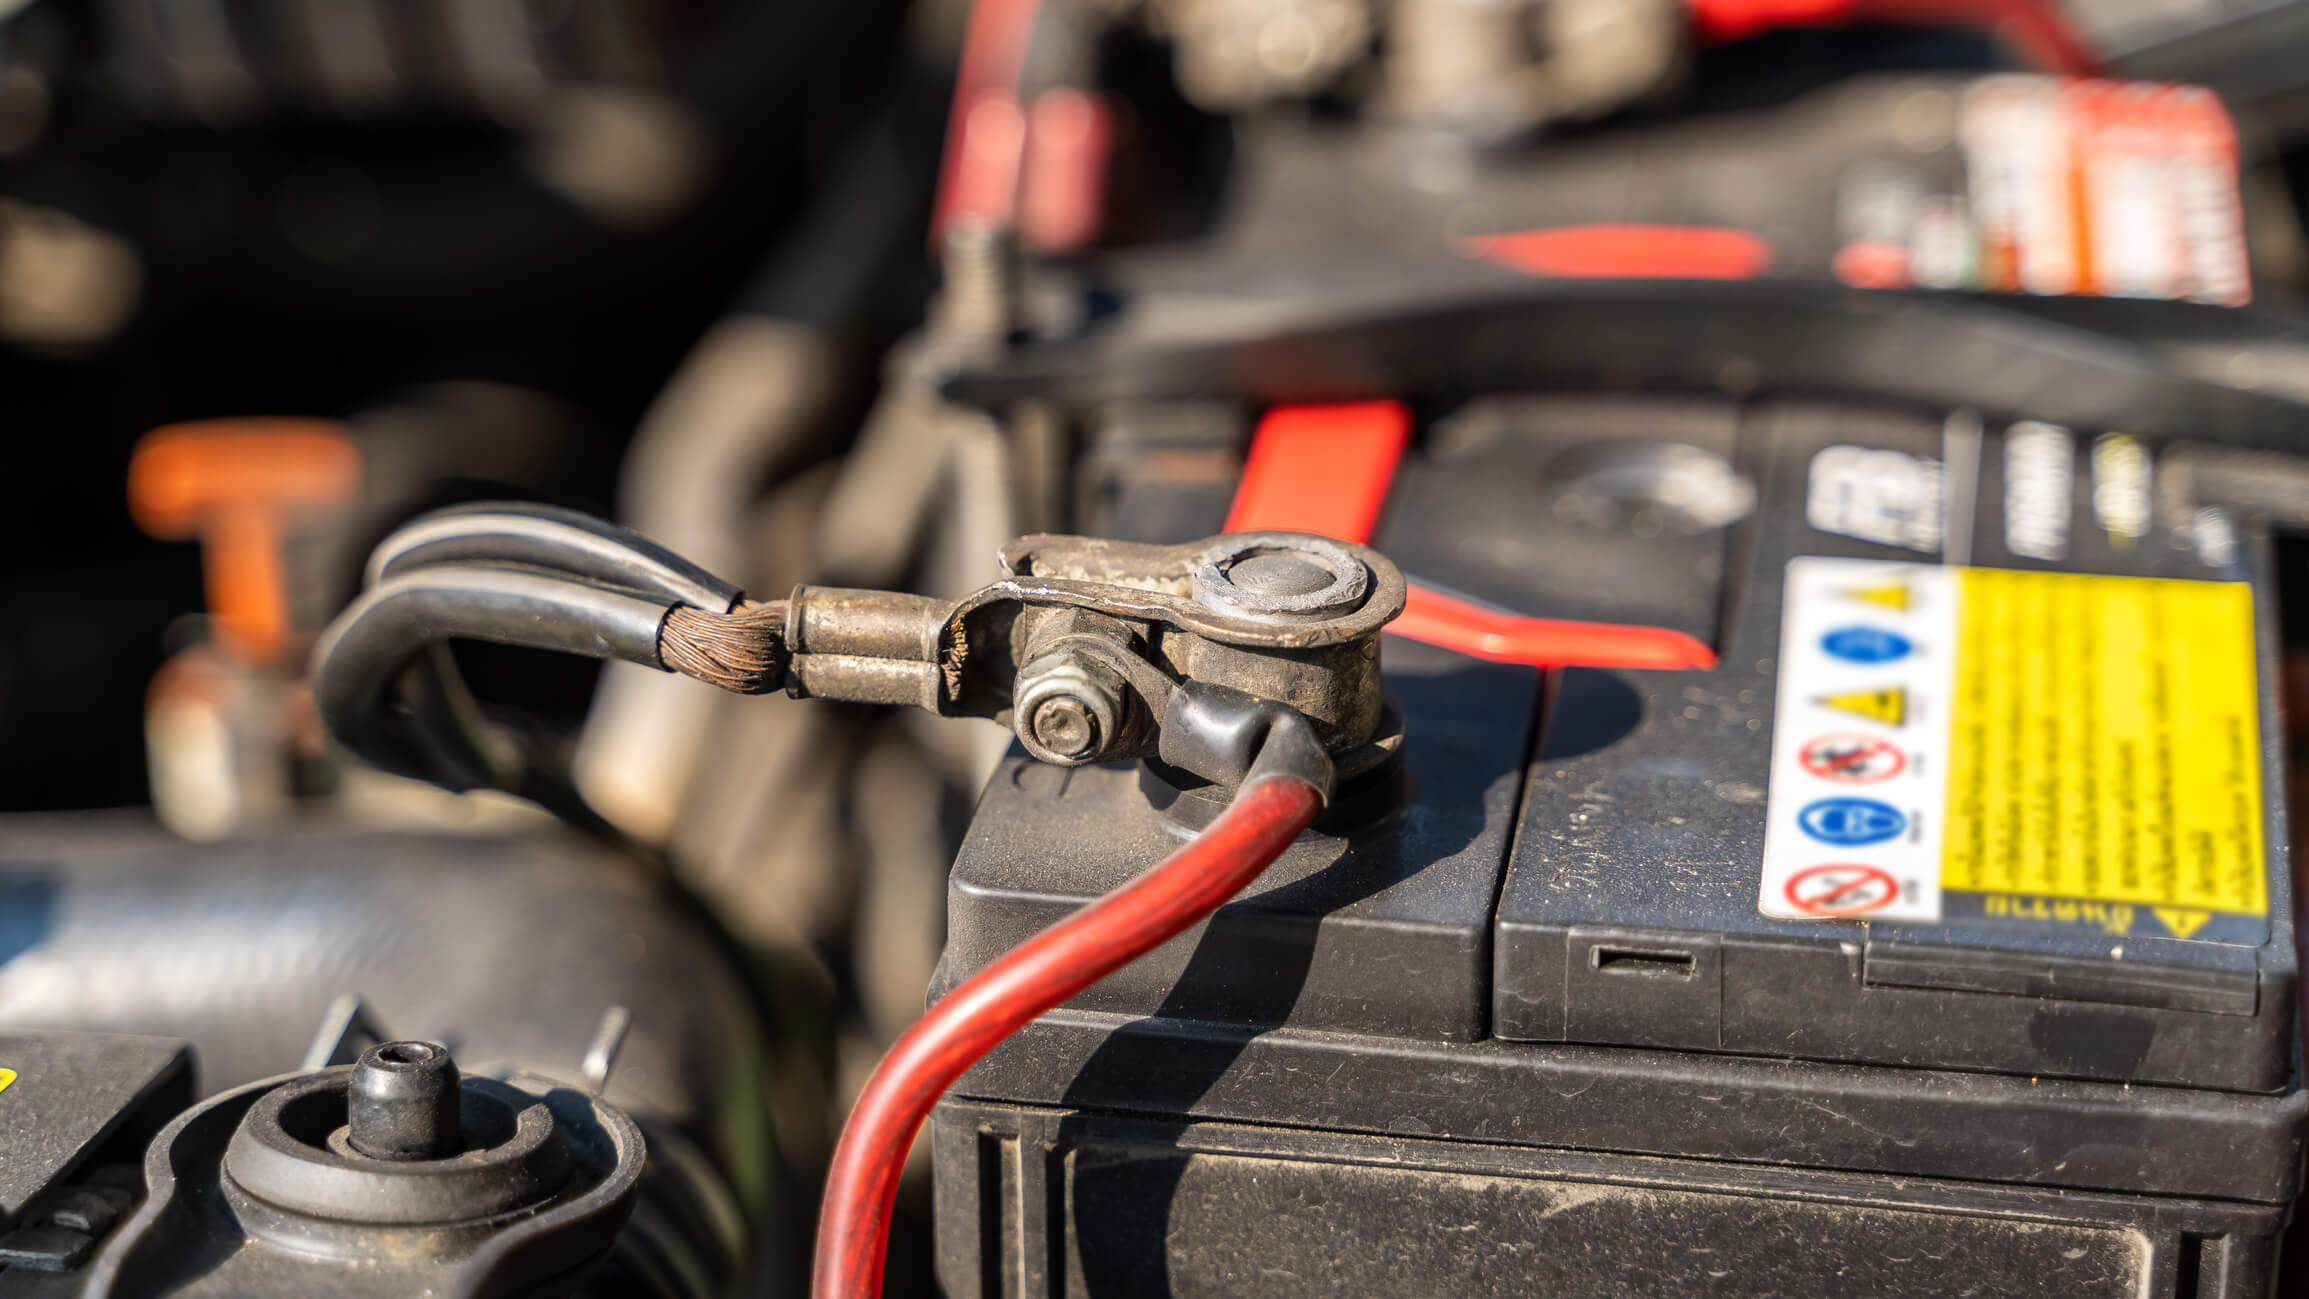
Step 2: Removing the old battery connector
When replacing a car battery connector, the first step is to remove the old one. This is necessary to ensure a clean and secure connection with the new connector. Follow these straightforward steps to remove the old battery connector safely.
1. Start by locating the battery terminals. They are typically found under the hood of your car. The positive terminal is usually marked with a “+” symbol, while the negative terminal is marked with a “-” symbol. Identify which connector you need to replace.
2. Before proceeding, it’s essential to take safety precautions. Make sure the car engine is turned off, and the keys are removed from the ignition. Wearing gloves and safety glasses is recommended to protect your hands and eyes during the process.
3. Using a wrench or pliers, loosen the nuts that secure the battery connector in place. Most battery connectors have two nuts, one for the positive terminal and one for the negative terminal. Loosen the nuts counterclockwise to detach the connector from the terminal posts.
4. Once the nuts are loosened, gently wiggle the battery connector back and forth. This will help break any remaining seal or corrosion between the connector and the terminal. Be careful not to apply too much force, as you don’t want to damage the terminal or the connector.
5. After wiggling the connector, it should come off easily. If it’s still stuck, you can use a flathead screwdriver to pry it off gently. Avoid using excessive force to prevent any damage.
6. With the old battery connector removed, inspect the terminal post for any signs of corrosion or damage. Clean the terminal if necessary using a battery terminal cleaner or a mixture of baking soda and water. This will ensure a good connection with the new battery connector.
Now that you have successfully removed the old battery connector, you are ready to proceed to the next step: cleaning the battery terminals.
Step 3: Cleaning the battery terminals
When replacing a car battery connector, it is essential to clean the battery terminals before installing the new connector. Over time, corrosion and buildup can accumulate on the terminals, hindering the proper flow of electricity. By cleaning the terminals, you ensure a secure and reliable connection between the battery and the connector.
Here are the steps to clean the battery terminals:
- Start by wearing protective gloves and safety goggles to protect yourself from any corrosive substances.
- Open the car’s hood and locate the battery. Most batteries are located either in the engine bay or in the trunk.
- Identify the positive and negative terminals on the battery. The positive terminal is usually marked with a “+” symbol and is connected to the red cable. The negative terminal is marked with a “-” symbol and is connected to the black cable.
- Using a wrench or pliers, loosen and remove the nut or bolt securing the cables to the terminals. Start with the negative terminal first to minimize the risk of accidental short circuits.
- Once the cables are disconnected, inspect the terminals for any signs of corrosion or buildup. Corrosion appears as a white or greenish powdery substance on the metal surfaces.
- Prepare a solution of baking soda and water. Mix one tablespoon of baking soda with one cup of warm water in a small container.
- Dip an old toothbrush or a wire brush into the baking soda solution and scrub the terminals vigorously. Pay close attention to removing any corrosion or buildup.
- Rinse the terminals with clean water to remove any residue from the cleaning solution.
- Dry the terminals thoroughly using a clean cloth or a compressed air blower. Ensure that no moisture remains on the terminals.
- Reattach the cables to the appropriate terminals. Start with the positive terminal (red cable) and then connect the negative terminal (black cable).
- Tighten the nuts or bolts securely to ensure a solid connection between the cables and the terminals.
Cleaning the battery terminals is a crucial step in replacing a car battery connector. It helps to maintain a strong and reliable electrical connection, which is essential for the proper functioning of the vehicle. By following these steps, you can ensure a clean and secure connection between the battery and the new connector, prolonging the lifespan of your car battery.
Step 4: Installing the new battery connector
After successfully removing the old battery connector and cleaning the terminals, it’s time to move on to installing the new battery connector. This step is crucial as it ensures a solid and secure connection between the battery and the vehicle’s electrical system. Follow the detailed instructions below to complete this process smoothly.
1. Begin by positioning the new battery connector near the terminals, ensuring that it matches the correct orientation. Most battery connectors have polarity markings, such as (+) and (-), to indicate the correct alignment.
2. Take the positive battery cable (usually red) and connect it to the positive terminal of the battery. Make sure it fits snugly and securely onto the terminal. If the connector has a bolt or clamp, tighten it firmly using the appropriate tool.
3. Next, take the negative battery cable (usually black) and connect it to the negative terminal of the battery. Again, ensure a tight and secure fit onto the terminal. Tighten any bolts or clamps as necessary.
4. Double-check that both connections are properly in place and secure. Stability is essential to prevent any potential electrical issues or disruptions in the vehicle’s operation.
5. If your new battery connector comes with additional components or accessories, such as protective covers or insulation, make sure to install them according to the manufacturer’s instructions. These accessories provide added protection and prolong the lifespan of the connector.
6. Once you have completed the installation, visually inspect the battery connectors and cables to confirm that everything is properly aligned and properly tightened. Any loose connections could lead to electrical problems or cause the battery to drain unnecessarily.
7. Finally, give the new battery connector a gentle tug to confirm its firmness. It should not come loose or move easily. This step provides peace of mind that the connection is secure and reliable.
Congratulations! You have successfully installed the new battery connector on your car. Your vehicle’s electrical system should now function optimally, ensuring smooth operations and reliable power distribution.
Step 5: Securing and testing the new connection
After installing the new battery connector, it’s crucial to ensure that it is securely in place and functioning properly. Here are the steps to secure and test the new connection:
1. Tighten the connector: Use a wrench or pliers to tighten the nuts or bolts that secure the connector to the battery terminals. Make sure they are snug but not overly tightened, as excessive force can damage the battery or connector.
2. Check for stability: Gently wiggle the connector to ensure it is securely attached to the battery terminals. It should not move or feel loose. If there is any movement, re-tighten the nuts or bolts until the connection is stable.
3. Inspect for proper alignment: Verify that the connector is properly aligned with the battery terminals. The positive connector should be attached to the positive (+) terminal, and the negative connector to the negative (-) terminal. Ensure there are no obstructions or misalignments that could hinder the connection.
4. Test for continuity: Use a multimeter or a battery tester to check for continuity in the connection. Set the multimeter to the DC voltage setting and touch the positive probe to the positive connector and the negative probe to the negative connector. A reading close to or equal to the battery’s voltage indicates a good connection.
5. Start the vehicle: Once the new connection is secured and tested, start the car to verify that it starts smoothly and there are no issues with the electrical system. Monitor the dashboard for any warning lights or abnormal behavior.
6. Double-check the connection: After running the vehicle for a few minutes, turn it off and inspect the battery connector again. Ensure that it is still tight and there is no sign of looseness or corrosion. If any issues are detected, repeat the earlier steps to rectify them.
By following these steps, you can ensure that the new battery connector is securely attached and functioning properly. If you encounter any difficulties during the process or notice any abnormalities after installation, consult with a professional automotive technician for further assistance.
Conclusion
Replacing a car battery connector is a relatively simple task that can be done with a few basic tools. It is important to regularly inspect and maintain your car’s battery connectors to ensure a reliable electrical connection and prevent any potential issues. By following the step-by-step process outlined in this article, you can confidently replace a faulty battery connector and restore power to your vehicle.
Remember to exercise caution when working with car batteries, as they contain corrosive substances and can deliver a dangerous electrical shock. If you are unsure or uncomfortable performing the replacement yourself, it is recommended to seek the assistance of a professional mechanic. With proper knowledge and attention, you can keep your car’s battery connectors in good condition and avoid any unexpected breakdowns on the road.
FAQs
Q: Why would I need to replace my car battery connector?
A: There are several reasons why you may need to replace your car battery connector. Over time, the connectors can become corroded or damaged, leading to poor electrical connections. This can result in starting issues, electrical malfunctions, or even battery failure. Replacing the connector can help ensure a reliable electrical connection and optimal performance of your car’s battery system.
Q: How can I tell if my car battery connector needs to be replaced?
A: There are a few signs that may indicate a problem with your car battery connector. If you notice corrosion or damage on the connector terminals, difficulty starting your vehicle, flickering lights, or intermittent electrical issues, it is likely time to replace the connector. Additionally, a visual inspection of the connector can help identify any visible signs of wear or damage.
Q: Can I replace the battery connector myself?
A: Yes, it is possible to replace the car battery connector yourself. However, it is important to exercise caution and follow proper safety procedures when working with car batteries. Before attempting to replace the connector, make sure to disconnect the battery and wear protective gloves and eyewear. If you are unsure or uncomfortable with the process, it is always recommended to seek professional assistance.
Q: What tools do I need to replace the car battery connector?
A: The tools required to replace the car battery connector may vary depending on the specific vehicle and connector type. However, some common tools needed for this task include a wrench or pliers to loosen and remove the old connector, a wire brush to clean the terminals, and a battery terminal cleaner or anti-corrosion spray. It is always a good idea to consult your vehicle’s manual or seek guidance from an automotive professional for the appropriate tools and procedures.
Q: Are all car battery connectors the same?
A: No, car battery connectors can differ in type and size, depending on the make and model of your vehicle. It is crucial to ensure that you select the correct connector that is compatible with your car’s battery and electrical system. Consider consulting your vehicle’s manual or seeking advice from a trusted automotive expert to ensure you choose the right connector for your specific vehicle.