
If you’ve ever worked on a car’s airbag system, you may have encountered the need to remove the airbag connector. Whether you’re replacing the steering wheel or performing repairs on other components, detaching the airbag connector is an essential step to ensure safety. However, for those who are unfamiliar with this process, it can be a bit confusing. That is why in this article, we will guide you through the steps necessary to remove an airbag connector safely and effectively. We’ll cover the tools you’ll need, the precautions to take, and the step-by-step instructions to follow. By the end of this guide, you’ll have the knowledge and confidence to tackle this task with ease.
Inside This Article
- Overview
- Tools and Materials Needed
- Step by Step Instructions
- Additional Tips and Warnings
- Conclusion
- FAQs
Overview
Removing the airbag connector is a crucial step when working on your car’s airbag system. Whether you’re replacing a faulty airbag or performing maintenance on other components, disconnecting the airbag connector is necessary to ensure your safety. This connector is responsible for providing power to the airbag module, and removing it correctly is essential to avoid any accidental deployment.
In this article, we will guide you through the process of removing the airbag connector. We’ll provide you with step-by-step instructions, list the tools and materials you’ll need, and offer additional tips and warnings to ensure a smooth and safe procedure.
It’s important to note that working with the airbag system can be dangerous. If you’re not confident in your abilities or unfamiliar with working on car airbags, it’s highly recommended to seek professional assistance. Safety should always be the top priority when dealing with any automotive system, especially ones related to airbags.
With that said, if you feel comfortable and have the necessary knowledge and tools, let’s dive into the process of removing the airbag connector.
Tools and Materials Needed
Before you begin the process of removing the airbag connector, it is important to gather the necessary tools and materials. Here is a list of items you will need:
1. Safety Glasses: It is essential to protect your eyes while working with any automotive components.
2. Latex Gloves: Wearing gloves will help keep your hands clean and protect you from potential allergens or contaminants.
3. Flathead Screwdriver: This tool will be useful for prying open the plastic coverings or clips holding the airbag connector in place.
4. Torx or Allen Key Set: Depending on the make and model of your vehicle, you may need a specific type of tool to remove the bolts securing the airbag connector.
5. Trim Panel Removal Tool: These tools have a thin, flat edge that allows you to safely and easily remove plastic trim panels without damaging them.
6. Electrical Tape: This will come in handy if you need to temporarily secure any loose wires or connectors.
7. Plastic Bag: Use a plastic bag to store any small components or screws to prevent them from getting lost during the process.
8. Owner’s Manual: Refer to your vehicle’s owner’s manual for specific instructions or precautions related to airbag removal.
Make sure to have all these tools and materials ready before you begin removing the airbag connector. Having the proper equipment on hand will help ensure a smooth and successful process.
Step by Step Instructions
If you need to remove the airbag connector in your vehicle, it’s important to do it correctly and safely. Here are step-by-step instructions to guide you through the process:
Step 1: Safety First
Before you start, ensure that the vehicle is parked on a level surface and the engine is turned off. Put on safety glasses and protective gloves to prevent any injuries.
Step 2: Locate the Airbag Connector
The airbag connector is typically located behind the steering wheel, dashboard, or side panels. Consult your vehicle’s manual or research online to find the exact location of the connector.
Step 3: Disconnect the Battery
Prior to working on the airbag system, it’s essential to disconnect the battery. Locate the battery in the engine bay and remove the negative terminal connector. This will prevent any electrical current from flowing through the airbag system.
Step 4: Remove the Panels or Covers
If necessary, remove any panels or covers that are obstructing access to the airbag connector. This may require using a screwdriver or trim removal tools to gently pry them off.
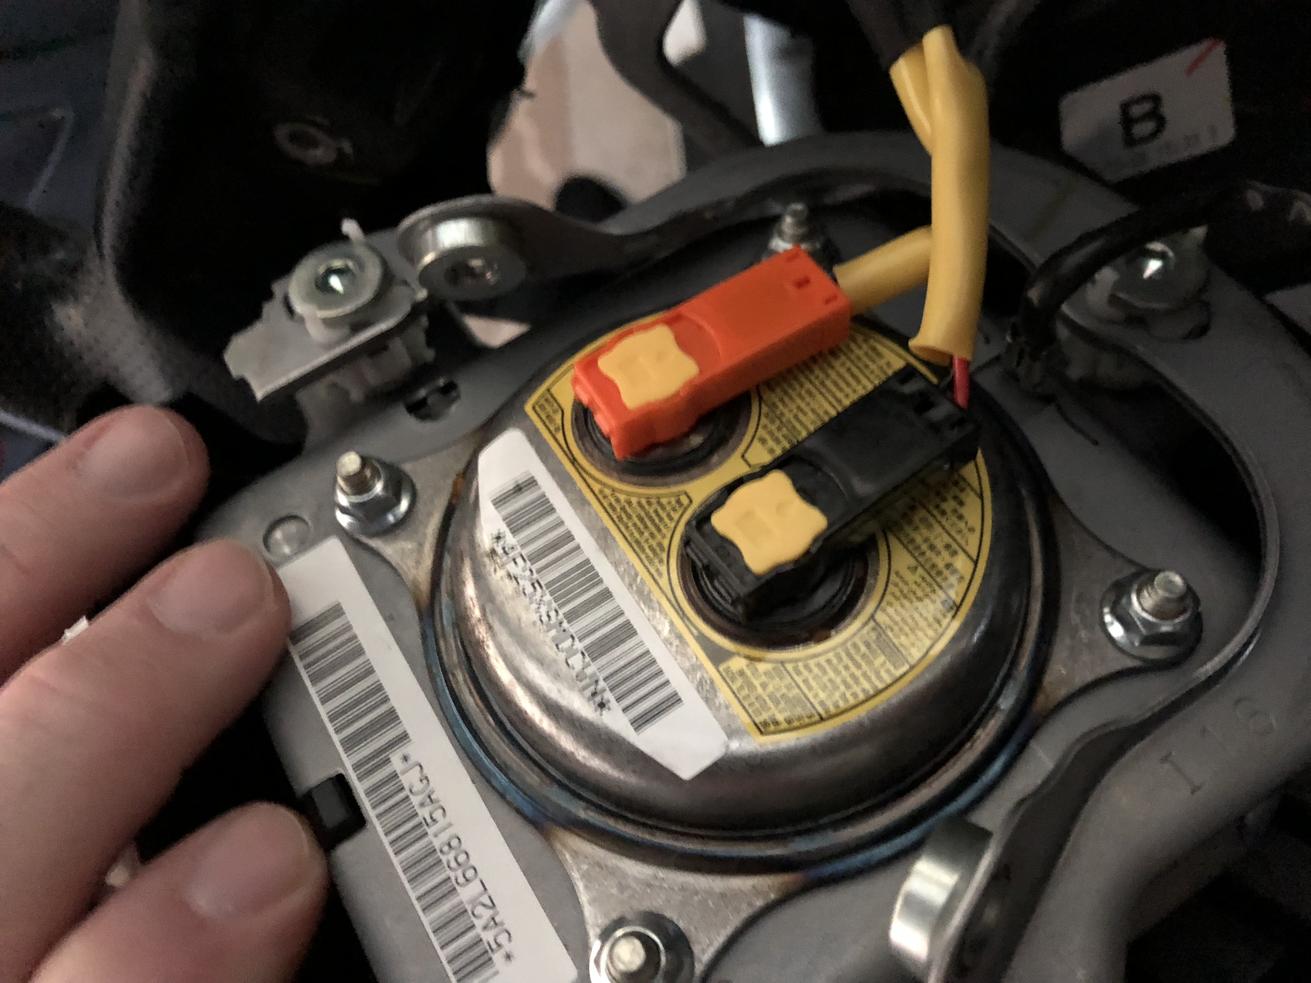
Step 5: Identify the Locking Mechanism
Inspect the airbag connector to determine the type of locking mechanism used. It could be a tab, latch, or a release button.
Step 6: Unlock the Connector
Depending on the locking mechanism, press the tab, release the latch, or press the release button to unlock the airbag connector. Be sure to handle it with care to avoid any damage.
Step 7: Disconnect the Connector
Once the connector is unlocked, gently pull it apart to disconnect the airbag. Avoid applying excessive force or pulling on the wires, as this can cause damage.
Step 8: Inspect and Clean
After removing the connector, take a moment to inspect it for any signs of damage or corrosion. If necessary, clean the connector using an appropriate electrical cleaner and a soft brush.
Step 9: Reassembly
If you need to reconnect the airbag or install a new one, follow the reverse steps to reassemble the connector and ensure it is securely locked in place.
Step 10: Reconnect the Battery
Before testing the airbag system, remember to reconnect the battery by securing the negative terminal connector back in place.
Step 11: Test and Verify
Once everything is reconnected, turn on the ignition and test the airbag system to verify that it is functioning properly. Pay attention to any warning lights or error codes that may indicate a problem.
Step 12: Dispose of the Old Airbag Properly
If you have replaced the airbag or are removing it for other reasons, it’s crucial to dispose of it properly. Check with your local authorities or auto repair shops for information on how to handle and dispose of airbags safely.
Remember, if you are unsure or uncomfortable performing this procedure on your own, it’s always best to consult a professional mechanic or take your vehicle to a trusted service center. Safety should be your top priority when working with any elements of the airbag system in your vehicle.
Additional Tips and Warnings
When it comes to removing an airbag connector, there are a few additional tips and warnings that you should keep in mind to ensure a safe and successful process. Below, we’ve compiled some important information to consider:
1. Safety First: Safety should always be your top priority when working with airbags or any other electrical component of your vehicle. Make sure to wear appropriate protective gear, such as goggles and gloves, and follow proper safety procedures to avoid any accidents.
2. Disconnect the Battery: Before attempting to remove the airbag connector, it is crucial to disconnect the vehicle’s battery to prevent any accidental deployment of the airbag. This step is essential in ensuring your safety during the removal process.
3. Be Gentle: Airbag connectors can be delicate, so it’s important to handle them with care. Avoid applying excessive force or pulling on the wires, as this can cause damage to the connector or other components of the airbag system.
4. Use Proper Tools: To ensure a smooth removal process, make sure to use the appropriate tools for the job. A small flat-head screwdriver or a specialized airbag tool can help you safely disconnect the connector without causing any damage.
5. Follow Manufacturer’s Guidelines: Every vehicle and airbag system may have specific requirements and guidelines for disconnecting the airbag connector. It is essential to consult the manufacturer’s manual or seek professional advice for the specific steps and precautions for your make and model.
6. Seek Professional Assistance: If you are unsure or uncomfortable with removing the airbag connector on your own, it is best to seek professional assistance. An experienced mechanic or automotive technician will have the expertise and knowledge to perform the task safely and efficiently.
7. Understand Legal Obligations: In some regions or countries, it may be illegal to tamper with or remove an airbag connector without proper authorization. Make sure to familiarize yourself with the legal obligations and requirements in your area before attempting any removal procedures.
8. Double Check Your Work: After removing the airbag connector, it is important to visually inspect the connections and ensure that everything is properly secured. Double-checking your work will give you peace of mind and reduce the risk of any potential malfunctions or issues down the road.
By keeping these additional tips and warnings in mind, you can safely and effectively remove an airbag connector from your vehicle. Remember to prioritize safety, follow proper procedures, and seek professional help if needed.
Conclusion
Removing the airbag connector is an important task that may be necessary for various reasons, such as repairs or replacement of the airbag unit. However, it is vital to approach this process with caution and adhere to safety guidelines to prevent any accidents or injuries.
By carefully following the steps outlined in this guide, you can confidently remove the airbag connector without any hassle. Remember to disconnect the battery, handle the connector with care, and use the appropriate tools. Safety should always be the top priority when working with airbag systems.
Now that you have a clear understanding of how to remove the airbag connector, you can tackle this task with confidence. However, if you are unsure or uncomfortable with performing this procedure yourself, it is always recommended to seek professional assistance. Your safety is paramount, and trained technicians can ensure the job is done correctly and efficiently.
With the right knowledge and precautions, removing the airbag connector can be a straightforward process. Whether you are a DIY enthusiast or a professional in the automotive industry, this guide serves as a valuable resource to help you complete this task effectively and safely.
FAQs
Q: Why do I need to remove the airbag connector?
A: There are several reasons to remove the airbag connector, such as performing maintenance or repairs on the airbag system, replacing a faulty airbag, or disconnecting the airbag for safety reasons during other repairs or modifications.
Q: Is it safe to remove the airbag connector?
A: Removing the airbag connector can be potentially dangerous if not done properly. It is crucial to follow the manufacturer’s instructions and safety precautions to ensure that the airbag does not accidentally deploy while removing or reconnecting the connector.
Q: How do I remove the airbag connector?
A: The process of removing the airbag connector varies depending on the make and model of your vehicle. However, in general, it usually involves locating the airbag module, disconnecting the battery, removing the trim or panel covering the airbag, and then unplugging the connector from the module. Always consult the vehicle’s manual or seek professional assistance for specific instructions.
Q: Can I reconnect the airbag connector myself?
A: Reconnecting the airbag connector should be done by a professional or someone with extensive knowledge and experience working with airbag systems. It is crucial to ensure proper reconnection to avoid any potential safety hazards, such as accidental deployment of the airbag.
Q: What precautions should I take when removing the airbag connector?
A: When removing the airbag connector, some important precautions to consider include disconnecting the battery and waiting for at least 15 minutes to allow any residual power to discharge, wearing protective gloves and eyewear, and following all safety guidelines provided by the vehicle manufacturer or professional mechanic.