
Are you a proud owner of a smartwatch that you use in conjunction with your Android smartphone? One of the key features of a smartwatch is the ability to sync and access your contacts on the go. By syncing your contacts to your smartwatch, you can easily make calls, send messages, and stay connected with just a quick glance at your wrist.
In this article, we’ll guide you through the process of syncing your contacts from your Android phone to your smartwatch. Whether you’re using a popular smartwatch like an Apple Watch or a Samsung Gear, or any other Android-compatible smartwatch, we’ve got you covered. So grab your Android phone and let’s get started on syncing your contacts to your smartwatch!
Inside This Article
- Overview
- Step 1: Pair your smartwatch with your Android phone
- Step 2: Enable contact syncing on your smartwatch
- Step 3: Enable contact permissions on your Android phone
- Step 4: Select the contacts you want to sync
- Step 5: Initiate the contact sync
- Troubleshooting tips
- Conclusion
- FAQs
Overview
Syncing your contacts to your smartwatch from your Android phone is a great way to have all your important contact information at your fingertips. With this feature, you can easily make calls, send messages, and access contact details directly from your wrist. In this article, we will guide you through the steps to sync your contacts to your smartwatch and ensure that you never miss an important call or message again.
Syncing contacts to your smartwatch allows you to have a convenient and quick way to access your contacts on the go. Whether you’re out for a run, in a meeting, or simply don’t have your phone nearby, having your contacts synced to your smartwatch ensures that you can still stay connected and reach out to your contacts with ease.
By following a few simple steps, you can easily sync your contacts from your Android phone to your smartwatch. We will walk you through the process of pairing your smartwatch with your phone, enabling contact syncing on your smartwatch, and granting contact permissions on your Android phone to initiate the sync.
Once the sync is complete, you can select the specific contacts you want to be synced to your smartwatch. This gives you control over which contacts are accessible on your wrist, allowing you to keep your smartwatch organized and only have the contacts that are most important to you readily available.
Whether you have a fitness-focused smartwatch or a stylish everyday wearable, syncing your contacts to your smartwatch adds another layer of convenience and functionality to your device. With just a few simple steps, you can unlock the full potential of your smartwatch and stay connected in a more seamless way.
Step 1: Pair your smartwatch with your Android phone
Before you can begin syncing your contacts to your smartwatch, you need to ensure that your smartwatch is paired with your Android phone. Follow these steps to successfully pair your devices:
- Turn on your smartwatch and make sure it is in pairing mode. Refer to the user manual for your specific smartwatch model to learn how to activate pairing mode.
- On your Android phone, go to the Settings menu and select “Bluetooth.”
- Toggle Bluetooth on, and your phone will start scanning for nearby devices.
- In the list of available devices, you should see your smartwatch’s name or model number. Tap on it to initiate the pairing process.
- Follow the on-screen prompts to complete the pairing. This may involve entering a PIN or confirming a code on both your phone and smartwatch.
- Once the pairing is successful, you will receive a notification on both your phone and smartwatch.
Congratulations! Your smartwatch is now paired with your Android phone, and you can proceed to the next step to begin syncing your contacts.
Step 2: Enable contact syncing on your smartwatch
Once you have successfully paired your smartwatch with your Android phone, the next step is to enable contact syncing on your smartwatch. By doing this, you can have access to all your important contacts right on your wrist, without the need to constantly reach for your phone.
The process of enabling contact syncing may vary slightly depending on the brand and model of your smartwatch. However, the general steps provided here should give you a good idea of how to enable this feature.
Here are the steps:
- On your smartwatch, navigate to the main menu or settings.
- Look for the “Sync” or “Connections” option and tap on it.
- Within the sync settings, you will find an option for “Contacts.” Enable this option by tapping on the toggle switch next to it.
- If prompted, grant any necessary permissions for your smartwatch to access and sync your contacts.
- Once contact syncing is enabled, your smartwatch will start syncing your contacts from your Android phone in the background. This may take a few minutes, depending on the size of your contact list.
It is important to note that not all smartwatches support contact syncing. Therefore, it is advisable to check the user manual or the manufacturer’s website for your specific smartwatch model to ensure that this feature is available.
By enabling contact syncing on your smartwatch, you can conveniently access your contacts directly from your wrist, making it easier to make calls, send messages, or view contact information on the go. Keep in mind that any changes you make to your contacts on either your smartwatch or your Android phone will automatically synchronize and reflect on both devices.
Step 3: Enable contact permissions on your Android phone
After pairing your smartwatch with your Android phone, the next step is to enable contact permissions on your phone. This will allow the smartwatch to access your contacts and sync them seamlessly.
To enable contact permissions, follow these simple steps:
- Go to the settings app on your Android phone.
- Scroll down and find the “Apps” or “Applications” option and tap on it.
- From the list of installed apps, locate and tap on the app that is responsible for syncing contacts with your smartwatch. Typically, this app will be the one that came pre-installed on your phone or one that you downloaded specifically for this purpose.
- Once you’re in the app settings, look for the “Permissions” option and tap on it.
- You will now see a list of permissions that the app requires. Find “Contacts” or “Address Book” in the list and make sure the toggle switch is turned on.
- Exit the app settings and make sure to save any changes made.
By enabling the contact permissions, you are allowing the app to access your contacts and sync them with your smartwatch. This will ensure that all your important contacts are readily available on your wrist.
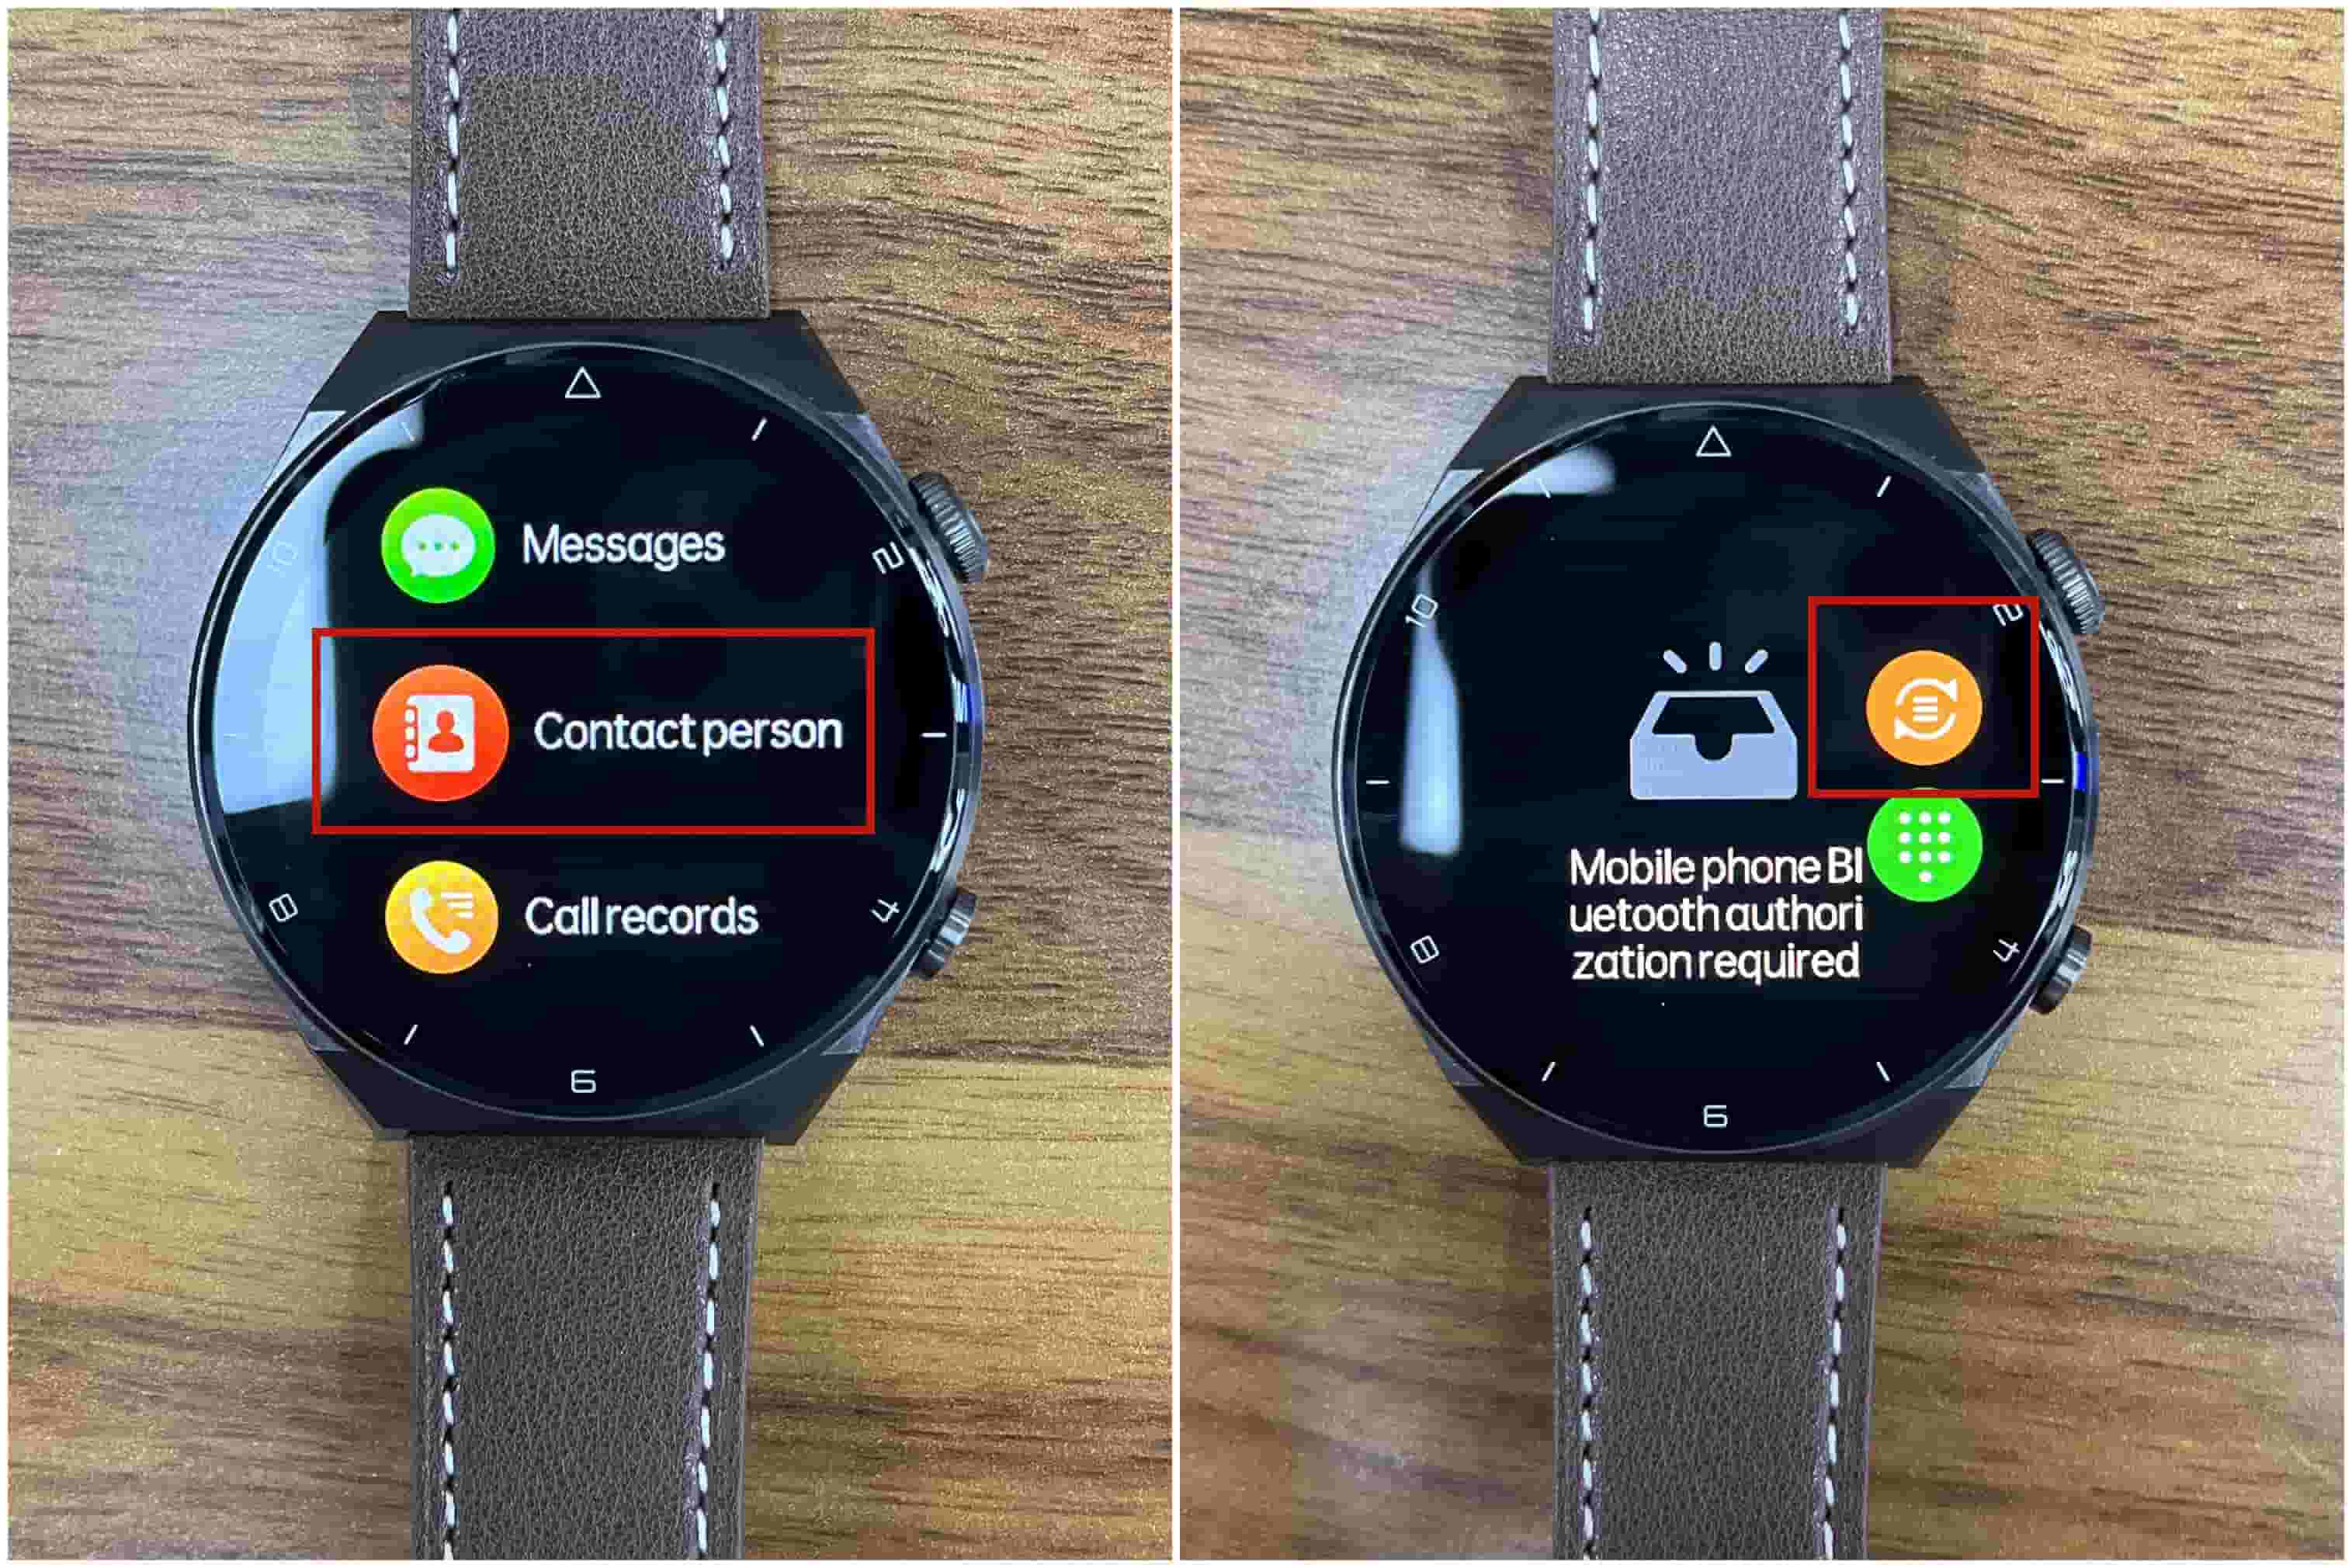
Step 4: Select the contacts you want to sync
Now that your smartwatch is paired with your Android phone and you have enabled contact syncing, it’s time to choose which contacts you want to sync to your smartwatch. This step allows you to personalize your smartwatch experience by selecting specific contacts to have readily available on your wrist.
To select which contacts you want to sync, follow these simple steps:
- On your Android phone, open the wearable app that is used to manage your smartwatch.
- Navigate to the “Contacts” or “Sync” section within the app.
- You should see a list of contacts that are available to sync. This list may include all of your phone contacts or there may be an option to select certain contact groups.
- Scroll through the list and mark the contacts that you want to sync by checking the corresponding boxes or tapping on them.
- If you prefer to sync all of your contacts, there may be an option to select “Sync all” or a similar choice.
- Once you have selected the contacts you want to sync, tap on the “Sync” button or a similar option to initiate the syncing process.
It’s worth noting that some smartwatch models may have a limit on the number of contacts that can be synced. If you exceed this limit, you may need to deselect some contacts or consider syncing only your most important contacts.
Choosing the right contacts to sync can help you stay connected, especially when you don’t have your phone within reach. By selecting your most frequently contacted friends, family members, and colleagues, you’ll have their information easily accessible whenever you need it.
Now that you’ve successfully selected the contacts you want to sync, it’s time to move on to the next step and initiate the contact sync process.
Step 5: Initiate the contact sync
Once you have successfully paired your smartwatch with your Android phone and enabled contact syncing, it’s time to initiate the contact sync. Follow these simple steps to ensure your contacts are seamlessly transferred to your smartwatch:
- On your smartwatch, navigate to the Settings menu.
- Look for the option labeled “Sync Contacts” or something similar. This option may be located under the “Connectivity” or “Accounts” section.
- Tap on “Sync Contacts” to begin the syncing process.
- Your smartwatch will now start syncing with your Android phone’s contacts database. The time it takes to complete the sync will depend on the number of contacts you have.
- Once the sync is complete, you will receive a notification or confirmation message on your smartwatch.
It’s important to note that some smartwatches may have slightly different navigation or interface. If you can’t find the specific “Sync Contacts” option, refer to your smartwatch’s user manual or check the manufacturer’s support website for detailed instructions.
After initiating the contact sync, you can now access your contacts directly from your smartwatch. This means you can make calls, send messages, or access contact information without needing to take out your phone.
Remember that the contact sync process may take some time, especially if you have a large number of contacts. Hence, it’s recommended to connect your smartwatch to a stable internet connection and ensure your devices are in close proximity during the sync.
If you encounter any issues during the contact sync process, refer to the troubleshooting tips section or reach out to the smartwatch manufacturer’s customer support for assistance.
Troubleshooting tips
Even though the process of syncing your contacts to your smartwatch from your Android phone is typically straightforward, you may encounter some issues along the way. Don’t worry, though; we’ve got you covered with a few troubleshooting tips to ensure a smooth syncing experience.
1. Ensure Bluetooth connectivity: First and foremost, make sure that your smartwatch and Android phone are properly paired and connected via Bluetooth. Poor or intermittent Bluetooth connectivity can hinder the contact syncing process. Check the Bluetooth settings on both devices and ensure they are turned on and discoverable.
2. Update software versions: Outdated software versions on either your smartwatch or Android phone can occasionally cause compatibility issues. Check for any available software updates and install them on both devices. This can help resolve any syncing problems caused by outdated software.
3. Clear cache and data: If you are still facing issues, try clearing the cache and data of both the Bluetooth and contacts apps on your Android phone. This can help eliminate any temporary files or corrupt data that may be affecting the syncing process. Go to your phone’s Settings, find the Apps or Applications section, locate the Bluetooth and Contacts apps, and clear their cache and data.
4. Restart devices: Sometimes, a simple restart can solve many connectivity issues. Restart both your smartwatch and Android phone, then attempt the contact syncing process again. This can often reset any temporary glitches or conflicts that may have occurred.
5. Check contact permissions: Ensure that you have granted the necessary contact permissions to the apps involved in the syncing process. Go to your Android phone’s Settings, find the Apps or Applications section, and locate the Bluetooth and Contacts apps. Check if the permissions for accessing contacts are enabled. Enable them if they are not already.
6. Reset smartwatch: If all else fails, you may need to reset your smartwatch to its factory settings. Keep in mind that this will delete all data on your smartwatch, so make sure you have backed up any important information. Refer to the user manual or the manufacturer’s website for instructions on how to perform a factory reset on your specific smartwatch model.
By following these troubleshooting tips, you should be able to overcome any obstacles you encounter while syncing your contacts to your smartwatch from your Android phone. Remember to consult the user manual or seek support from the manufacturer if you need further assistance specific to your smartwatch.
In conclusion, syncing contacts to a smartwatch from an Android phone is a simple and convenient process that allows you to have all your important contacts at your fingertips. With just a few steps, you can easily transfer your contacts to your smartwatch, ensuring that you never miss an important call or message while on the go.
Whether you’re using a Samsung, Fitbit, Apple, or any other smartwatch, the syncing process is generally similar. By using the companion app and following the instructions, you can effortlessly sync your contacts in no time.
Having your contacts synced to your smartwatch not only improves accessibility but also enhances the overall functionality of your device. With all your contacts readily available on your wrist, you can make calls, send messages, and schedule meetings with ease.
So, if you want to stay connected and organized, don’t forget to sync your contacts to your smartwatch. Enjoy the convenience and efficiency of having all your important information right on your wrist!
FAQs
1. Can I sync my contacts from my Android phone to a smartwatch?
Yes, you can sync your contacts from your Android phone to a compatible smartwatch. Most smartwatches have built-in features or companion apps that allow you to sync your contacts seamlessly.
2. How do I sync my contacts to a smartwatch from an Android phone?
The process of syncing contacts to a smartwatch from an Android phone may vary depending on the model and brand of your smartwatch. However, the general steps include:
– Ensure that your smartwatch is paired or connected to your Android phone via Bluetooth.
– Open the companion app on your Android phone that is designed for your specific smartwatch.
– Look for the contact sync option within the app and follow the on-screen instructions.
– Choose the contact syncing method, such as selecting specific contacts or syncing all contacts.
– Wait for the sync process to complete, which may take a few moments depending on the number of contacts.
3. Are there any third-party apps to sync contacts to a smartwatch?
Yes, apart from the built-in features or companion apps, there are also third-party apps available on the Google Play Store that can help you sync contacts to your smartwatch. These apps offer additional customization options and compatibility with a wider range of smartwatch brands and models. Some popular third-party apps for contact sync include Sync for iCloud Contacts, My Contacts Backup, and Wear Contacts Transfer.
4. Will syncing my contacts affect the battery life of my smartwatch?
Syncing your contacts to a smartwatch may have a slight impact on the battery life, as it requires the smartwatch to constantly update and display the contact information. However, the impact is usually minimal and should not significantly affect the overall battery performance of your smartwatch. It is recommended to keep your smartwatch charged regularly to ensure optimal usage.
5. Can I make calls directly from my synced contacts on a smartwatch?
Yes, once your contacts are successfully synced to your smartwatch, you can make calls directly from your smartwatch. Depending on the features and capabilities of your smartwatch, you can initiate calls by selecting a contact from the synced list and using the built-in speaker or connected Bluetooth earphones for communication.