
Are you struggling with a stubborn shark bite connector that just won’t let go? Fear not! In this comprehensive guide, we will walk you through the step-by-step process of undoing a shark bite connector with ease. Whether you’re a DIY enthusiast or a professional plumber, dealing with these tricky fittings can be frustrating. But with the right technique and tools, you can finally bid farewell to your plumbing woes. From understanding the anatomy of a shark bite connector to utilizing effective removal methods, we will cover everything you need to know. So sit back, grab your wrench, and let’s dive into the fascinating world of undoing shark bite connectors.
Inside This Article
- Understanding Shark Bite Connectors
- Tools and Materials Needed
- Step-by-Step Guide to Undoing a Shark Bite Connector
- Troubleshooting Tips
- Conclusion
- FAQs
Understanding Shark Bite Connectors
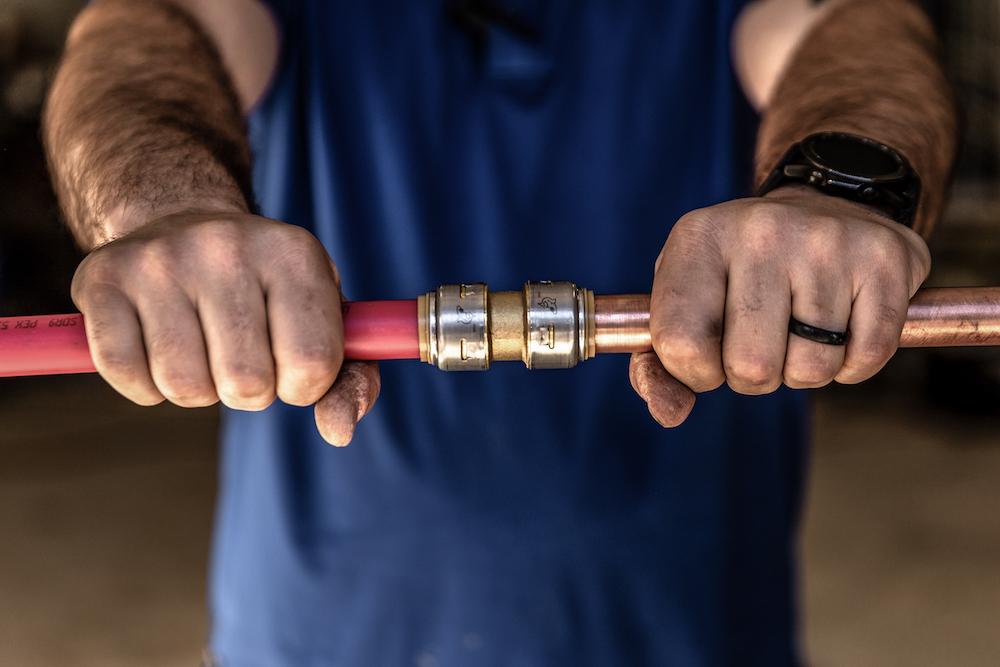
Shark Bite connectors have revolutionized the way plumbing connections are made. They are a popular choice for both professional plumbers and DIY enthusiasts due to their convenience, efficiency, and ease of use. These connectors feature a push-to-connect mechanism that allows for quick and secure installations without the need for any specialized tools or soldering. Whether you’re tackling a small plumbing project or a larger installation, having a good understanding of Shark Bite connectors is essential to ensure successful and leak-free connections.
Shark Bite connectors are made of high-quality materials, such as brass and PEX tubing, that are known for their durability and resistance to corrosion. They are designed to work with a wide range of pipe materials, including copper, CPVC, and PEX, making them a versatile choice for various plumbing applications. The unique design of these connectors ensures a tight seal and prevents any water leakage when properly installed.
One of the key features of Shark Bite connectors is their simplicity. They are incredibly easy to use, even for those with little to no plumbing experience. To make a connection, you simply need to push the Shark Bite connector onto the pipe until you hear a click, indicating that it’s securely in place. This eliminates the need for complex tools or the use of glue or tape, saving you time and effort during your plumbing projects.
Shark Bite connectors also offer the advantage of being reusable. Unlike traditional soldered connections, which require cutting and replacing pipes, you can easily remove a Shark Bite connector by using a disconnect clip. This allows for easy modifications or repairs without damaging the pipes or the connector itself.
It’s important to note that while Shark Bite connectors are generally reliable, proper installation is crucial to avoid any potential issues. Carefully follow the manufacturer’s instructions and ensure that the pipe ends are clean, smooth, and free from any imperfections that may hinder a proper seal.
Tools and Materials Needed
When it comes to undoing a Shark Bite connector, having the right tools and materials at your disposal is crucial. Here is a list of items you will need to successfully complete the task:
1. Adjustable wrench: This versatile tool will help you loosen and remove the Shark Bite connector from the pipe.
2. Pipe cutter: In some cases, you might need to cut the pipe to remove the Shark Bite connector. A pipe cutter will allow you to make clean and precise cuts.
3. Deburring tool: After cutting the pipe, it’s essential to remove any burrs or rough edges. A deburring tool will help you smooth out the cut end of the pipe.
4. Pipe joint compound: To ensure a secure and leak-free connection, having pipe joint compound is essential. Apply a small amount to the threads of the pipe before reconnecting the fittings.
5. Safety gloves and goggles: When working with plumbing fittings, it’s always a good idea to protect your hands and eyes. Safety gloves and goggles will safeguard you from any potential hazards.
6. Pipe wrench: In some instances, a pipe wrench might be required to provide extra leverage while detaching the Shark Bite connector.
7. Towels or rags: Having towels or rags nearby will help you clean up any water or spills that may occur during the removal process.
By gathering all the necessary tools and materials beforehand, you can undertake the task of undoing a Shark Bite connector with confidence and efficiency. Remember to follow safety guidelines and instructions provided by the manufacturer throughout the process.
Step-by-Step Guide to Undoing a Shark Bite Connector
Undoing a Shark Bite connector may seem challenging, but with the right tools and techniques, it can be a straightforward process. Follow this step-by-step guide to successfully remove a Shark Bite connector:
1. Turn Off the Water Supply: Before you begin, make sure to turn off the water supply to the pipe connected to the Shark Bite connector. This will help prevent any leakage or water damage while working on the connector.
2. Prepare the Work Area: Clear the area around the Shark Bite connector and remove any nearby obstructions that may hinder your access. Having a clean and organized work area will make the process much easier.
3. Identify the Locking Mechanism: Examine the Shark Bite connector to determine the type of locking mechanism it has. There are two common types: the push-to-connect and the twist-to-lock. Understanding the locking mechanism will help you proceed with the proper removal technique.
4. Release the Locking Mechanism: For push-to-connect connectors, locate the release collar. Use an adjustable wrench or a pair of pliers to grip and depress the release collar firmly. This will allow you to pull the pipe away from the connector. For twist-to-lock connectors, rotate the connector counterclockwise to release the lock.
5. Apply Gentle Pressure: Once the locking mechanism is released, gently pull the pipe away from the Shark Bite connector. Apply slight back-and-forth or twisting motion while pulling to loosen the connection. Avoid exerting excessive pressure to prevent any damage to the pipe or connector.
6. Inspect and Clean the Components: After disconnecting the Shark Bite connector, inspect both the connector and the pipe for any signs of damage or debris. Clean any dirt or residue from the connector to ensure a smooth reconnection later.
7. Prepare for Reconnection: If you plan to reconnect the pipe to the same Shark Bite connector or replace it with a new one, make sure to prepare the pipe end accordingly. Remove any burrs or rough edges, and ensure the pipe end is clean and smooth to facilitate a secure and leak-free connection.
8. Reconnect or Replace: Depending on your needs, you can either reconnect the pipe to the same Shark Bite connector or replace it with a new one. Follow the manufacturer’s instructions for proper installation, whether it’s a push-to-connect or twist-to-lock connector.
Remember, it’s crucial to always follow proper safety precautions and instructions provided by the manufacturer when working with Shark Bite connectors. If you encounter any difficulties or have any doubts, consult a professional plumber for assistance.
Troubleshooting Tips
Despite their convenience and ease of use, Shark Bite connectors may encounter occasional issues that require troubleshooting. Here are some helpful tips to tackle common problems that may arise:
1. Leaking: If you notice a leak around the connection point, the first step is to ensure that the pipe and fitting are thoroughly clean and free from any debris or contaminants. Use a clean cloth or rag to wipe away any dirt or moisture. Next, check for any damage or wear on the O-ring or the teeth of the connector. If necessary, replace the O-ring or consider tightening the connector using an adjustable wrench or pliers, but be cautious not to over-tighten.
2. Difficulty Disconnecting: In some cases, you may encounter difficulty disconnecting a Shark Bite connector. This can occur when the grip ring inside the connector becomes stuck or when the pipes have shifted and created tension. To resolve this issue, try using a disconnect tool specifically designed for Shark Bite connectors. Insert the tool into the gap between the pipe and the connector, applying gentle pressure to release the grip ring. If the connector is still stubborn, you may need to carefully cut and remove the affected section of the pipe.
3. Improper Fit: If you find that the Shark Bite connector does not fit properly onto the pipe, check if the connector is the correct size for the pipe. Double-check the pipe measurements and compare them with the connector’s specifications. It’s important to note that Shark Bite connectors are designed for use with specific pipe materials, such as copper, PEX, or CPVC. Using a connector that is not compatible with the pipe can lead to a faulty connection.
4. Corrosion or Scale Build-up: Over time, corrosion or scale build-up can affect the performance of Shark Bite connectors. If you notice any discoloration or build-up around the connection, gently clean the affected area using a soft brush or a cloth soaked in vinegar. Avoid using abrasive materials or harsh chemicals, as they can damage the connector. Regular maintenance and inspection can help prevent or catch such issues before they become problematic.
5. Uneven or Damaged Pipes: Uneven or damaged pipes can pose a challenge when attempting to connect Shark Bite connectors. It’s essential to ensure that the pipe ends are smooth, clean, and free from any nicks or dents. If the pipe end is damaged, you may need to trim or deburr it to achieve a proper fit. Additionally, if the pipes are not aligned correctly, you may need to use fittings that allow for flexibility, such as Shark Bite flex connectors, to accommodate the misalignment.
Remember, if you encounter persistent issues or are uncertain about how to troubleshoot a problem with your Shark Bite connector, it’s always a good idea to consult a professional plumber or seek guidance from the manufacturer for further assistance.
In conclusion, understanding how to undo a Shark Bite connector is an essential skill for any DIY enthusiast or homeowner. This versatile and convenient plumbing connector is designed to provide a secure and quick connection, but situations may arise where disconnection is necessary. By following the step-by-step instructions outlined in this article and using the appropriate tools, you can confidently and safely remove a Shark Bite connector. Remember to exercise caution and be mindful of potential water leakage when dealing with plumbing connections. With the knowledge gained from this guide, you can now confidently tackle your plumbing projects and make necessary adjustments or repairs as needed. Happy plumbing!
FAQs
1. What is a shark bite connector?
A shark bite connector is a type of plumbing fitting that allows you to easily connect or disconnect pipes without the need for soldering or glue. It is often used in residential plumbing applications and is known for its simplicity and effectiveness.
2. How do I undo a shark bite connector?
To undo a shark bite connector, follow these steps:
- Turn off the water supply.
- Locate the shark bite connector on the pipe.
- Use a disconnecting clip or shark bite removal tool to release the connector by inserting it into the small gap between the pipe and the connector.
- Push the tool towards the fitting and pull on the pipe to release it from the connector.
- Repeat the process for any additional shark bite connectors, if necessary.
3. What tools do I need to undo a shark bite connector?
To undo a shark bite connector, you will need the following tools:
- Disconnecting clip or shark bite removal tool: This tool is specifically designed to release shark bite connectors.
- Adjustable wrench or pliers: These tools can be used to provide additional leverage when removing stubborn connectors.
- Teflon tape: This can be used to reseal the pipe threads after removing the connector.
4. Can I reuse a shark bite connector after undoing it?
In most cases, shark bite connectors can be reused. However, it is essential to carefully inspect the connector for any signs of damage or wear before reusing it. If the connector appears to be in good condition, you can clean it with a brush and soap, rinse it thoroughly, and then re-install it on the pipe. However, if there are any visible signs of damage or if the connector does not securely fit on the pipe, it is recommended to replace it with a new one.
5. Are shark bite connectors as reliable as traditional plumbing fittings?
Shark bite connectors are widely used and considered to be reliable in most residential plumbing applications. They are designed to create a secure and watertight connection, and many professionals trust them for their durability and ease of installation. However, it is important to note that shark bite connectors may not be recommended for certain high-pressure or high-temperature applications. In such cases, it is best to consult with a professional plumber to determine the most suitable fitting for your specific needs.