
Are you curious about the elevation of a particular location? If you’re an iPhone user, you’re in luck! With the advanced technology packed into Apple’s devices, checking elevation is just a few taps away. Whether you’re planning a hiking trip, curious about the altitude of your current location, or simply interested in learning more about the world around you, the iPhone can provide you with the information you need.
In this article, we’ll explore the various methods you can use to check elevation on your iPhone. From built-in features to third-party apps, we’ll cover everything you need to know. So, let’s jump right in and discover how to unlock the elevation data at your fingertips!
Inside This Article
- Method 1: Using the Compass App
- Method 2: Using a GPS Elevation App
- Method 3: Using a Maps App
- Method 4: Using a Third-Party Elevation Website
- Conclusion
- FAQs
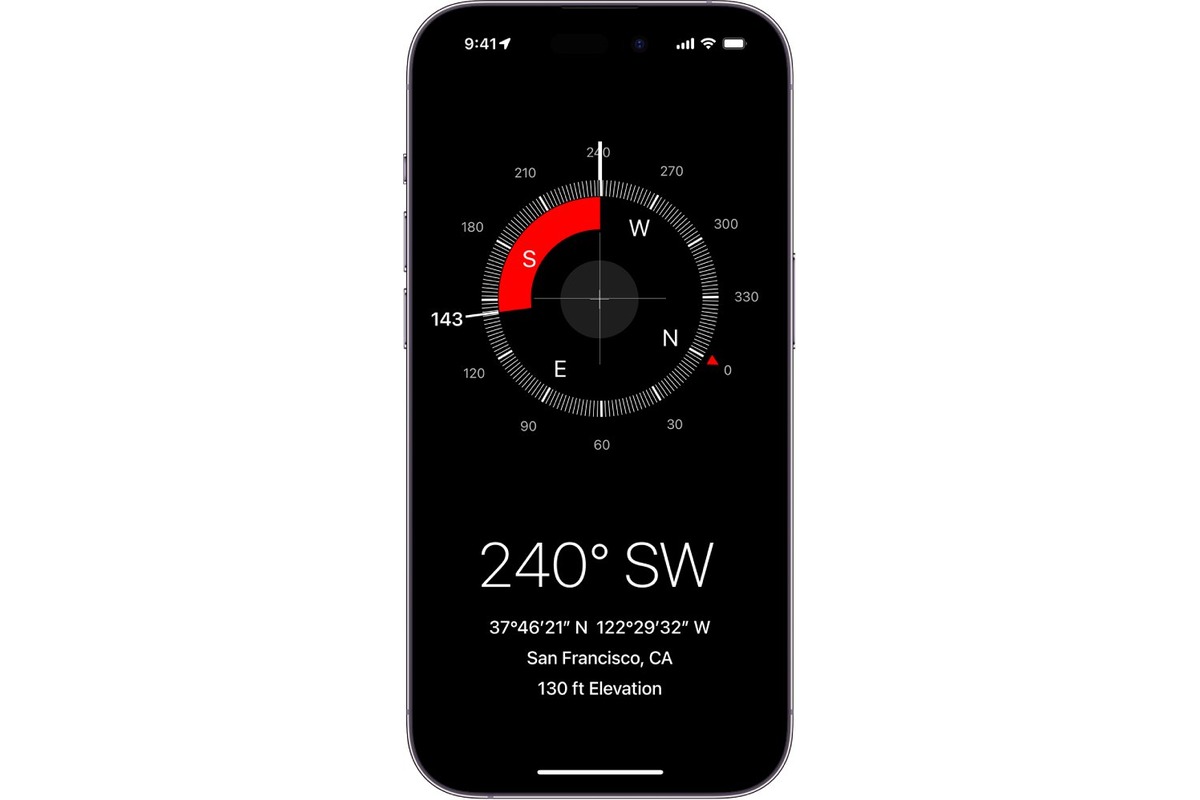
Method 1: Using the Compass App
One of the easiest ways to check elevation on your iPhone is by using the built-in Compass app. Here’s how:
- Open the Compass app on your iPhone. You can find it by swiping down on the Home screen and typing “Compass” in the search bar.
- Hold your iPhone in a horizontal position, parallel to the ground.
- Look for the compass needle on the screen. It should point towards the magnetic north.
- Swipe left on the screen to reveal the additional compass features.
- Tap on the “Elevation” button. It will display your current elevation in feet or meters.
The compass app uses your iPhone’s built-in sensors, including the GPS and barometer, to determine your elevation. Keep in mind that the accuracy may vary depending on your location and signal strength.
It’s worth noting that not all iPhone models have a built-in barometer, which means the elevation feature may not be available on older devices. If you’re using an older iPhone and want to check elevation, you may need to consider other methods, such as using a dedicated elevation app or website.
Now that you know how to check elevation using the Compass app on your iPhone, you can easily find out the height above sea level and enhance your outdoor experiences.
Method 2: Using a GPS Elevation App
If you’re looking for a more accurate and precise way to check elevation on your iPhone, you can utilize a GPS elevation app. These apps make use of GPS technology to determine your precise location and provide you with the elevation data.
There are several GPS elevation apps available on the App Store, each with its own unique features and interface. To get started, you can search for “GPS elevation” or “elevation app” in the App Store and choose the one that best fits your needs.
Once you’ve selected and downloaded a GPS elevation app, open it on your iPhone. Most of these apps will require you to enable location services and grant them access to your device’s GPS. Make sure to grant the necessary permissions for the app to function properly.
After granting the required permissions, you’ll typically find a “Get Elevation” or similar button. Tap on this button to initiate the elevation measurement process. The app will then use your device’s GPS to determine your current location and display the corresponding elevation.
These GPS elevation apps often provide additional features such as the ability to save and track elevation data, view elevation profiles, and even share your findings with others. Explore the app’s settings and options to discover the full range of features available.
Keep in mind that the accuracy of GPS elevation apps can vary depending on the quality of your device’s GPS signal and other environmental factors. For optimal results, it is recommended to use these apps in open areas with a clear view of the sky.
Using a GPS elevation app on your iPhone is a convenient and reliable way to check elevation when you’re out and about. Whether you’re hiking, biking, or simply curious about the elevation of a certain location, these apps can provide you with the data you need.
Method 3: Using a Maps App
If you want to quickly check the elevation on your iPhone without the need for any additional apps, you can simply use the built-in Maps app. Here’s how you can do it:
1. Open the Maps app on your iPhone. You can easily find it by searching for “Maps” in the search bar or by locating the Maps icon on your home screen.
2. Once the Maps app is open, type in the location or address for which you want to check the elevation. You can do this by tapping on the search bar at the top of the screen and entering the desired location.
3. After you have entered the location, tap on the search result that corresponds to it. This will bring up the map of the location on your screen.
4. To check the elevation at a specific point on the map, simply press and hold on that location. A red pin will appear, along with a small information box at the bottom of the screen.
5. In the information box, you will see various details about the location, including its name, address, and coordinates. Scroll down in the information box until you find the section labeled “Elevation.” The elevation value will be displayed in meters or feet, depending on your preferred unit of measurement.
By following these steps, you can easily access the elevation information for any location using the Maps app on your iPhone. Whether you’re planning a hiking trip, mountain biking adventure, or simply curious about the elevation of your surroundings, this method provides a quick and convenient way to check the elevation using a built-in feature of your iPhone.
Method 4: Using a Third-Party Elevation Website
If you’re looking for an alternative to using the built-in apps on your iPhone to check the elevation, you can turn to third-party elevation websites. These websites provide accurate elevation data based on geographical coordinates. Here’s how you can use a third-party elevation website to check the elevation on your iPhone:
- Open a web browser on your iPhone.
- Search for a reliable third-party elevation website. Some popular options include “Elevation Finder” or “Elevation Calculator”.
- Once you’ve found a suitable website, navigate to the elevation tool or search bar.
- Enter the specific location or coordinates for which you want to check the elevation.
- Click on the “Search” or “Get Elevation” button to retrieve the elevation data.
- The website will display the exact elevation of the given location on your screen.
This method allows you to quickly and easily check the elevation of any location using your iPhone’s web browser. It is a convenient option if you don’t want to rely on the pre-installed apps or if you need more accurate or detailed elevation data.
Keep in mind that different third-party elevation websites may have slight variations in user interface and features. Experiment with a few different options until you find one that suits your needs and preferences. Some websites may also offer additional features like elevation profiles, charts, or the ability to save and share elevation data.
It’s important to select a reputable and reliable third-party elevation website to ensure accurate and up-to-date data. Pay attention to user reviews and ratings to determine the credibility of the website before relying on it for elevation information.
Conclusion
Checking the elevation on your iPhone has become easier than ever with the help of various apps and built-in features. Whether you want to track your hiking route, monitor altitude changes during a flight, or simply satisfy your curiosity about the height of a location, your iPhone can provide the information you need.
By using the Compass app, Apple Maps, or third-party apps like Spyglass and Altimeter, you can get accurate elevation data with just a few taps on your phone. These tools not only offer elevation information but also provide additional features such as navigation, mapping, and compass functionality.
With the knowledge gained from this article, you can now confidently explore new heights and effectively utilize the elevation tracking capabilities of your iPhone. So go ahead, embark on your next adventure, and let your iPhone be your guide to discovering the world from a whole new perspective.
FAQs
Here are some frequently asked questions about checking elevation on iPhone:
1. Can I check the elevation on my iPhone?
Yes, you can check the elevation on your iPhone by using the built-in Compass app. This app uses your iPhone’s accelerometer and GPS to provide accurate elevation data.
2. How do I check the elevation using the Compass app?
To check the elevation using the Compass app, follow these steps:
- Open the Compass app on your iPhone.
- Swipe left to access the level feature.
- Hold your iPhone flat, and the app will display the current elevation.
3. Is the elevation data provided by the Compass app accurate?
The elevation data provided by the Compass app is generally accurate. However, it may vary slightly depending on factors like GPS signal strength and surrounding obstacles. It’s always a good idea to cross-check the elevation data from multiple sources for greater accuracy.
4. Are there any third-party apps available for checking elevation on iPhone?
Yes, there are several third-party apps available on the App Store that provide additional functionality and features for checking elevation on iPhone. Some popular options include “Elevate – Workout Tracker,” “PeakFinder AR,” and “Topo Maps+.”
5. Can I check the elevation of a specific location using the Maps app?
Yes, you can check the elevation of a specific location using the Maps app on your iPhone. Simply search for the desired location in the Maps app, tap and hold the location marker, and a pop-up will appear displaying the elevation.