
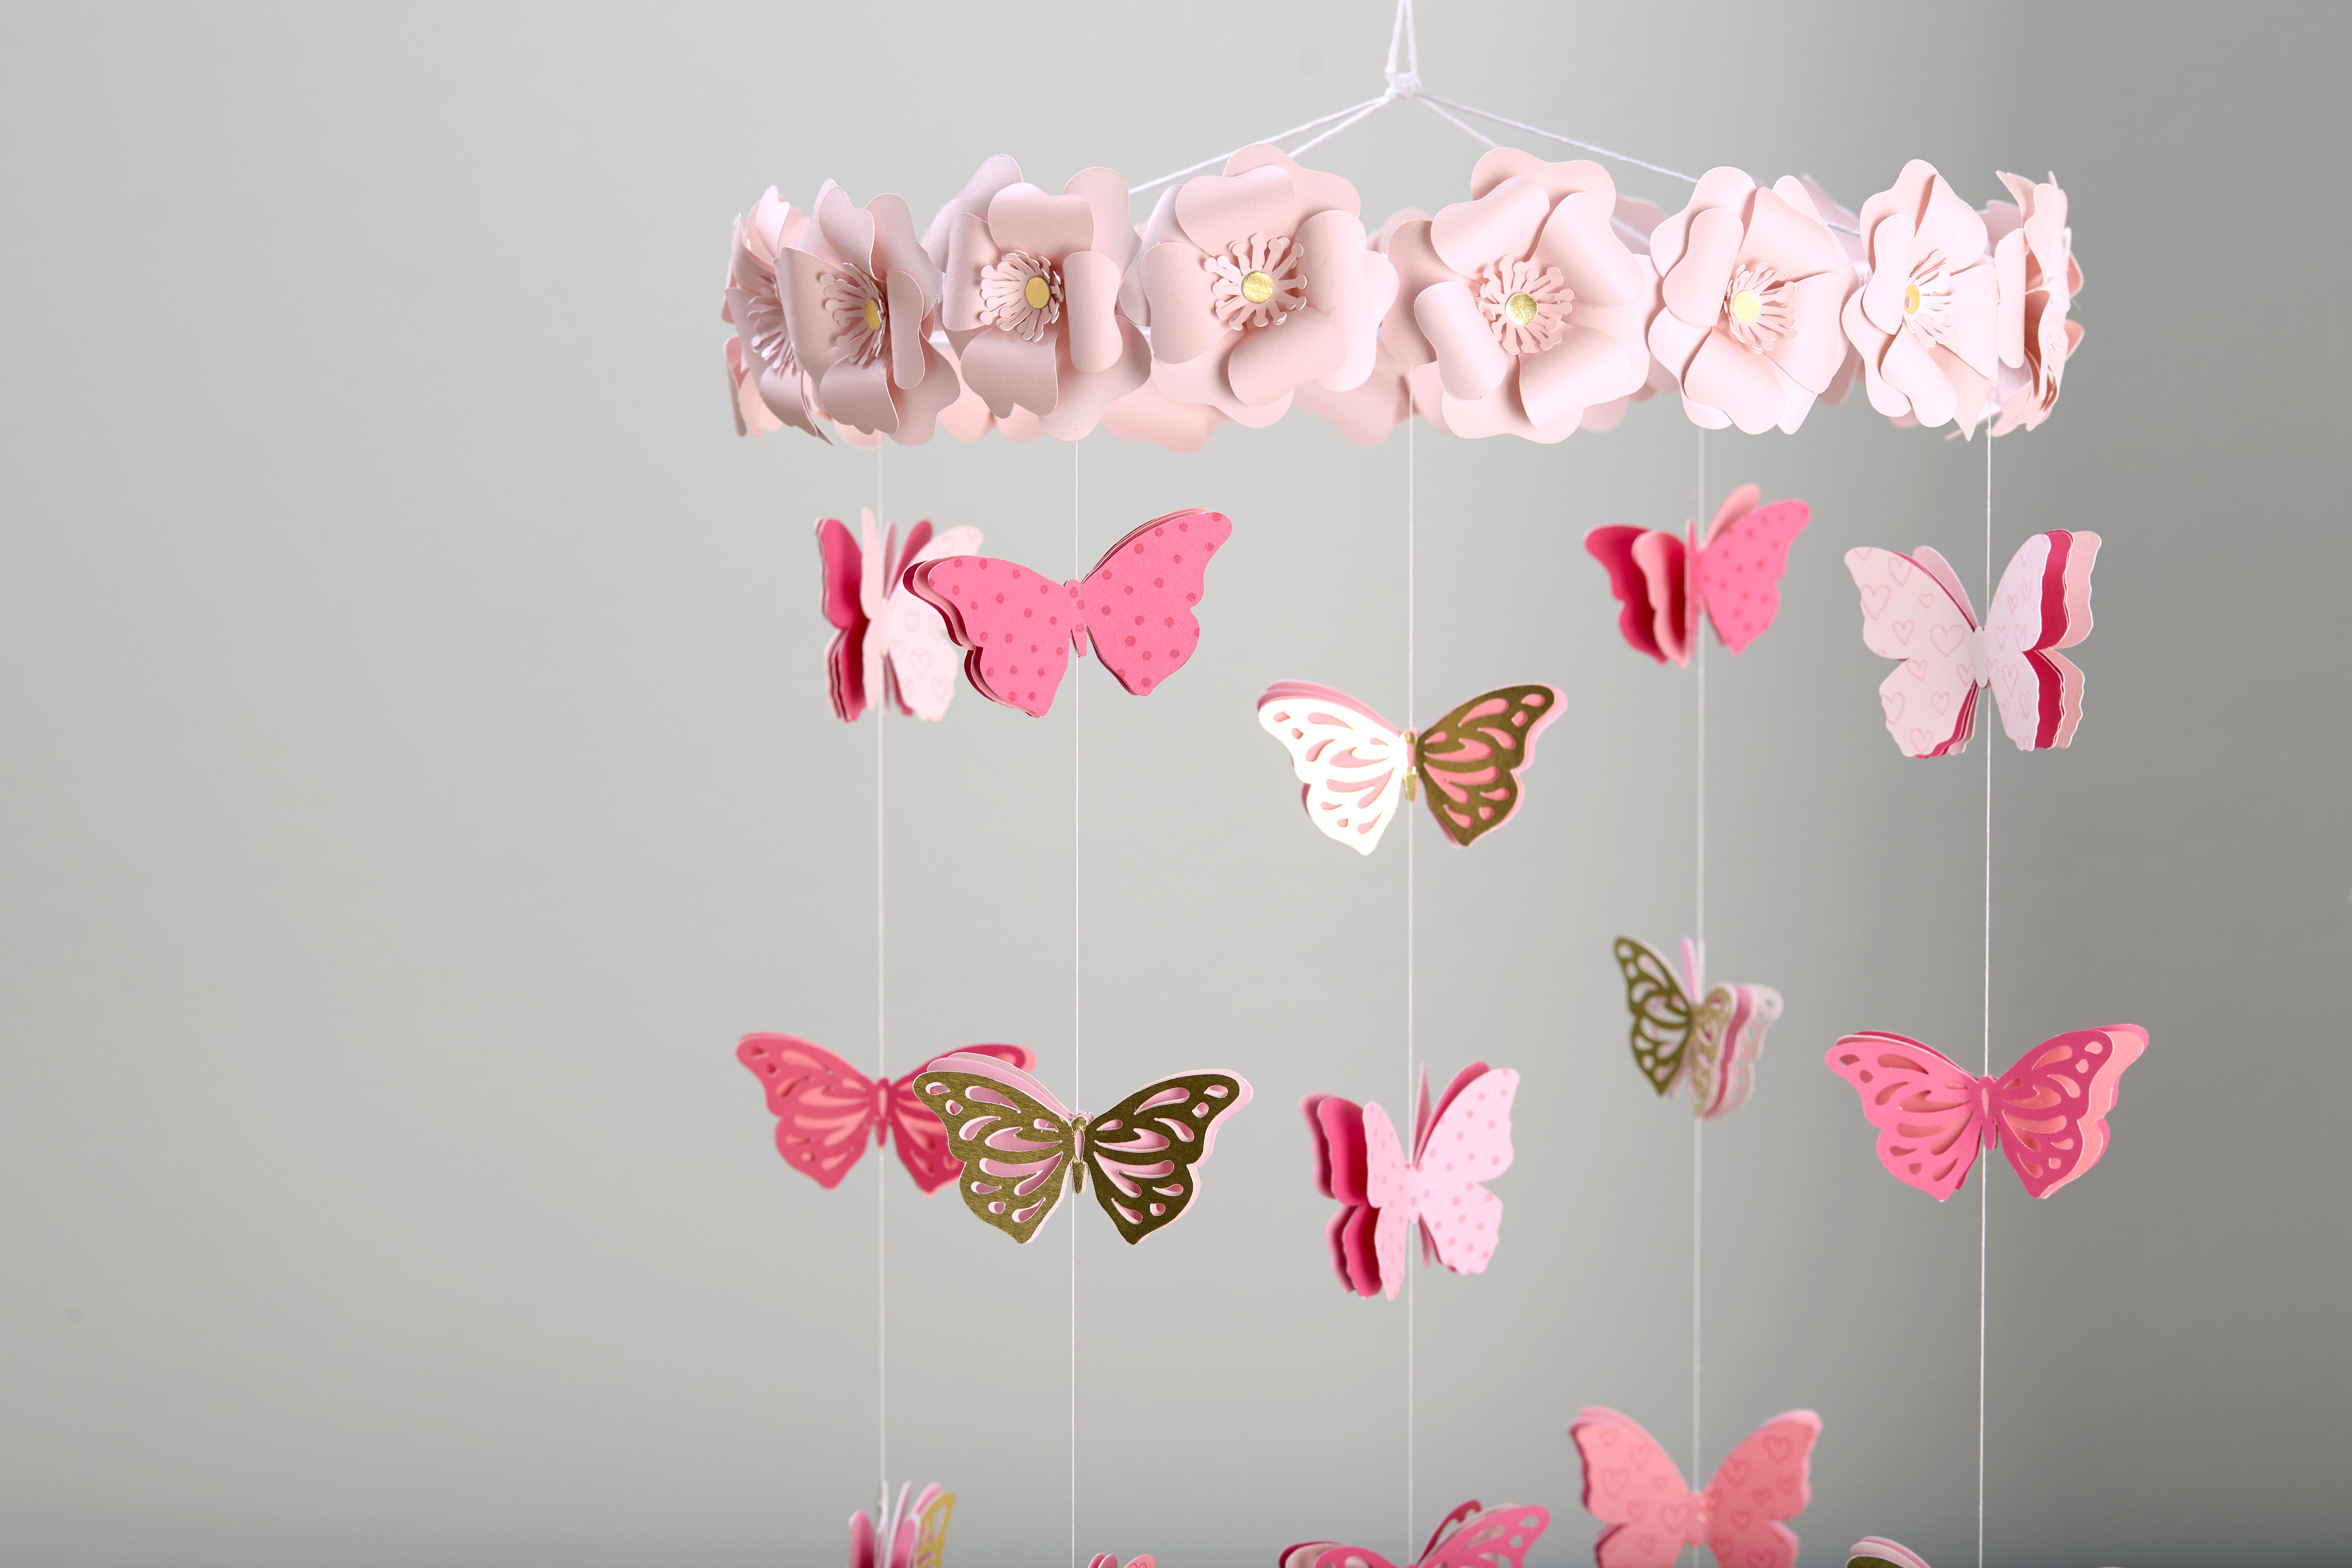
Are you looking for a fun and creative DIY project that will add a touch of whimsy to any space? Look no further! In this article, we will show you how to make a beautiful paper butterfly mobile. This charming decoration will brighten up nurseries, bedrooms, or any room in your home. Not only is it a delightful piece of art, but it’s also an excellent way to showcase your crafting skills. Whether you’re a seasoned DIY enthusiast or new to crafting, this project is perfect for all skill levels. So grab some colorful paper, scissors, and string, and let’s get started on creating a stunning paper butterfly mobile that will mesmerize everyone who sees it!
Inside This Article
- Materials Needed
- Step 1: Cutting Out the Butterflies
- Step 2: Decorating the Butterflies
- Step 3: Attaching the Butterflies to the Strings
- Step 4: Creating the Mobile Frame
- Conclusion
- FAQs
Materials Needed
Creating a paper butterfly mobile is a fun and engaging craft project that can be enjoyed by people of all ages. To get started, gather the following materials:
- Colorful construction paper or cardstock
- Scissors
- String or thread
- Markers, colored pencils, or crayons
- Glue or adhesive tape
- A metal or wooden hoop (optional)
- Decorative elements like beads, ribbons, or glitter (optional)
These materials will provide you with everything you need to bring your paper butterfly mobile to life. You can find construction paper in various colors at any craft store, or you can even use recycled materials like old magazines or newspapers.
Scissors are essential for cutting out the butterfly shapes, so make sure you have a pair of sharp ones on hand. String or thread is used to hang the butterflies from the mobile, and you can choose any color that complements your design.
To add a personal touch to your butterflies, use markers, colored pencils, or crayons to decorate them. Let your creativity shine as you color each butterfly with vibrant hues and intricate patterns.
If you prefer a more secure attachment, you can use glue or adhesive tape to stick the butterflies to the strings. This will ensure that they stay in place and don’t come loose over time.
For those who want to take their mobile to the next level, consider adding a metal or wooden hoop as the mobile frame. This will provide a sturdy base and add an extra dimension to your creation.
Lastly, if you want to embellish your mobile further, gather decorative elements like beads, ribbons, or glitter. These can be attached to the strings or used to adorn the mobile frame, making it even more eye-catching and unique.
Now that you have all the necessary materials, it’s time to dive into the steps of creating your very own paper butterfly mobile. Let your imagination soar as you bring beauty and movement to any space with this delightful craft project.
Step 1: Cutting Out the Butterflies
Creating a paper butterfly mobile is a fun and engaging craft project that can be enjoyed by adults and children alike. The first step in making a paper butterfly mobile is cutting out the butterflies themselves.
To begin, gather the materials needed for this step, including colorful paper or cardstock, scissors, and a butterfly template or stencil. You can find butterfly templates online, or you can draw your own if you’re feeling artistic.
Once you have your materials ready, place the butterfly template or stencil on top of the paper and secure it in place with tape or weights to prevent it from shifting as you cut. This will ensure that each butterfly is cut out with precision and uniformity.
Now, carefully trace around the outline of the butterfly onto the paper using a pencil or a pen. Take your time to ensure that the lines are clear and defined. Be sure to trace as many butterflies as desired, depending on the size and fullness of your mobile.
After tracing the butterflies, carefully remove the stencil or template from the paper. Now, it’s time to cut out the butterflies. Follow the traced lines with your scissors, making precise and smooth cuts to create beautifully shaped butterflies.
As you cut, consider personalizing your butterflies by experimenting with different sizes, shapes, and colors of paper. You can also add decorative elements such as glitter or stickers to make each butterfly unique and eye-catching.
Continue cutting out butterflies until you have enough to fill your mobile. Aim for a variety of sizes and colors to create visual interest and balance. Remember, the number of butterflies you cut will depend on the length and density of your mobile’s strings.
Once all the butterflies are cut out, set them aside and proceed to the next step of the mobile-making process: decorating the butterflies.
Step 2: Decorating the Butterflies
Decorating the butterflies is an important step in making a beautiful paper butterfly mobile. This is where you can let your creativity shine and customize the butterflies to your liking.
Here are some ideas for decorating the butterflies:
- Coloring: You can use colored pencils, markers, or even watercolors to add vibrant colors to the butterflies. Experiment with different color combinations to create a visually appealing mobile.
- Patterns: If you want to add more detail to the butterflies, consider adding patterns. You can use stencils or freehand draw patterns like polka dots, stripes, or floral designs.
- Glitter: For a touch of sparkle, try adding glitter to the wings or body of the butterflies. You can use glue and sprinkle the glitter over it, or use glitter glue pens for a more controlled application.
- Collage: Another creative option is to create a collage on the butterfly wings. Cut out small pieces of colorful paper or magazine cutouts and glue them onto the wings to create a unique and textured look.
- Embellishments: To add some extra flair, consider using small embellishments like sequins, beads, or rhinestones. You can attach them to the body or wings of the butterflies for a more glamorous touch.
Remember to let your imagination run wild and have fun with the decorating process. The more personalized and unique the butterflies are, the more eye-catching your paper butterfly mobile will be.
Step 3: Attaching the Butterflies to the Strings
With the butterflies decorated and ready to go, it’s time to attach them to the strings and create a beautiful mobile. Follow these steps to complete this crucial stage of the process:
- Take one end of a string and tie a small knot at the end. This will prevent the butterfly from sliding off the string.
- Thread the knotted end of the string through the hole at the center of one butterfly. Make sure the string is securely in place and the butterfly is balanced on the string.
- Slide the butterfly up the string to the desired position. You can adjust the spacing between butterflies based on your preference.
- Repeat the process with the remaining butterflies. Remember to tie a knot at the end of each string to secure the butterflies in place.
- Once all the butterflies are attached to the strings, gather the loose ends of the strings together.
- Create a loop at the top by tying all the loose ends of the strings together. This will serve as the attachment point for hanging the mobile.
- Ensure that the strings are evenly spaced around the loop, so the mobile hangs symmetrically.
By attaching the butterflies to the strings in this way, you not only create a visual masterpiece but also allow the mobile to move gracefully with the slightest breeze. The floating butterflies will captivate anyone who lays their eyes on the mobile.
Step 4: Creating the Mobile Frame
Now that you’ve completed the steps to cut out the butterflies, decorate them, and attach them to the strings, it’s time to create the frame that will hold your beautiful paper butterfly mobile together. The frame will provide support and stability, allowing your mobile to hang and spin gracefully.
Here’s how you can create the mobile frame:
- Choose a sturdy material for the frame, such as a wooden dowel or a metal rod. You want something that can withstand the weight of the butterflies and the movement of the mobile.
- Determine the length of the frame based on the desired size of your mobile. Measure and mark the length on the chosen material.
- Cut the material to the desired length using a saw or other appropriate cutting tool.
- If you’re using a wooden dowel, smooth out any rough edges with sandpaper.
- Decide how many strings you want your mobile to have, keeping in mind the balance and visual appeal. Mark the spots on the frame where the strings will be attached.
- Using a drill or a hammer and nails, create small holes or hooks at the marked spots. Make sure they are secure and can hold the weight of the strings and butterflies.
- If you prefer a more decorative touch, consider painting or staining the frame to match your desired aesthetic.
- Allow the paint or stain to dry completely before moving on to the next step.
- Once the frame is dry, attach the strings to the holes or hooks on the frame. Make sure they are securely fastened and evenly spaced.
- Now, it’s time to attach the butterflies to the strings. Remember to vary the length of the strings to create a visually appealing arrangement.
- Check the balance of the mobile by gently holding it up. Make adjustments as necessary to ensure that it hangs evenly and spins freely.
And there you have it – a completed mobile frame for your paper butterfly mobile! With the frame in place, your mobile is now ready to be displayed and admired. Hang it up in a sunny corner of a room or outdoors, where the gentle breeze can make the butterflies come alive.
Enjoy the beauty and tranquility that your homemade paper butterfly mobile brings to your space. It’s a simple and creative project that will surely be a delight to the eyes and a source of inspiration. Happy crafting!
Conclusion
Creating a paper butterfly mobile is a fun and engaging craft that can be enjoyed by people of all ages. This DIY project not only allows you to showcase your creativity but also adds a touch of whimsy and charm to any space. By following the step-by-step instructions and using simple materials, you can easily make a stunning butterfly mobile that will bring a sense of joy and beauty to your surroundings.
Whether you hang it in a nursery, bedroom, or even in your office, the fluttering butterflies will create a mesmerizing display as they sway gracefully in the air. So gather your supplies, unleash your imagination, and get ready to make a paper butterfly mobile that will be a delightful centerpiece in any room.
Remember, the possibilities are endless when it comes to choosing colors, sizes, and patterns for your butterflies. You can even experiment with different materials to add texture and dimension to your mobile. So let your creativity soar and have fun crafting your very own paper butterfly mobile!
FAQs
1. Can you make a paper butterfly mobile without any special tools or materials?
Yes, absolutely! Making a paper butterfly mobile is a simple and fun craft project that can be done using basic materials readily available at home, such as colored paper, scissors, string, and a needle. No special tools or equipment are required.
2. How long does it take to make a paper butterfly mobile?
The time required to make a paper butterfly mobile can vary depending on the complexity and size of the mobile, as well as your skill level. However, on average, it can take anywhere from 1 to 3 hours to complete the project.
3. Are there any specific instructions or templates available for making a paper butterfly mobile?
Yes, there are many tutorials and templates available online that provide step-by-step instructions and printable templates for making a paper butterfly mobile. These resources can be a great help in guiding you through the process and ensuring successful results.
4. Can I customize the design and colors of my paper butterfly mobile?
Definitely! One of the best things about making a paper butterfly mobile is the ability to customize it according to your preferences. You can choose different colors, patterns, and sizes for the butterflies, as well as experiment with various arrangements and hanging methods to create a unique and personalized mobile.
5. Can kids participate in making a paper butterfly mobile?
Absolutely! Making a paper butterfly mobile is a great craft activity for kids of all ages. It allows them to explore their creativity, improve their fine motor skills, and engage in a fun and rewarding project. However, adult supervision may be required for younger children to ensure their safety when handling scissors and needles.