
The Apple Watch is not just a smartwatch; it’s a companion that keeps you connected even when you’re away from your iPhone. With the cellular feature, you can make calls, send messages, stream music, and access your favorite apps directly from your Apple Watch, without needing to have your iPhone nearby.
Setting up cellular connectivity on your Apple Watch is a simple process that allows you to enjoy the freedom and convenience of staying connected wherever you go. In this article, we will guide you through the step-by-step process of setting up your Apple Watch to cellular, ensuring that you can make the most out of this fantastic feature.
Whether you’re heading out for a run, leaving your iPhone at home, or simply want the peace of mind that comes with having a cellular connection on your wrist, we’ve got you covered. Let’s dive into the world of cellular connectivity on the Apple Watch!
Inside This Article
- Step 1: Check Compatibility
- Step 2: Ensure Cellular Plan
- Step 3: Update iPhone and Apple Watch
- Step 4: Set Up Cellular on Apple Watch
- Step 5: Pair Apple Watch with iPhone
- Step 6: Configure Cellular Settings
- Step 7: Test Cellular Connectivity
- Step 8: Troubleshooting Tips
- Conclusion
- FAQs
Step 1: Check Compatibility
Before setting up cellular on your Apple Watch, it’s essential to ensure that your device is compatible. Not all Apple Watch models have cellular capabilities, so it’s important to confirm this before proceeding.
The Apple Watch Series 3 and later models offer cellular connectivity, allowing you to make calls, send messages, and access the internet without needing your iPhone nearby. However, the Apple Watch Series 1 and Series 2 do not have built-in cellular capabilities and rely on your iPhone’s connection.
To check if your Apple Watch supports cellular, you can go to the Apple website or consult the user manual that came with your device. The website provides detailed specifications for each Apple Watch model, including whether or not it has cellular functionality.
If your Apple Watch is not cellular-compatible, don’t worry! You can still enjoy many of the device’s features by connecting it to your iPhone via Bluetooth and Wi-Fi. Cellular connectivity simply offers an added convenience for those who want to use their Apple Watch independently.
Step 2: Ensure Cellular Plan
Before setting up your Apple Watch with cellular capabilities, it’s crucial to ensure that you have an appropriate cellular plan. A cellular plan enables your Apple Watch to connect to the internet and make phone calls, even when your iPhone is out of range.
Here are a few things to consider when choosing a cellular plan for your Apple Watch:
1. Compatibility: Make sure your cellular provider supports Apple Watch cellular service. Not all carriers offer this feature, so it’s important to check with your provider beforehand.
2. Data Plans: Different carriers offer various data plans for Apple Watch. Look for a plan that suits your usage needs, whether you need unlimited data or a specific data limit.
3. Costs: Cellular plans for Apple Watch may incur additional charges, so be sure to review the pricing details with your carrier. Some carriers may require an activation fee or monthly service fee for the added convenience of cellular connectivity.
4. Activation Process: Familiarize yourself with the activation process for the cellular plan. It may involve contacting your carrier or following specific steps through their website or app.
Once you have selected the right cellular plan for your Apple Watch, you can proceed with the setup process and enjoy the freedom of staying connected even when your iPhone is not nearby.
Step 3: Update iPhone and Apple Watch
Before setting up cellular connectivity on your Apple Watch, it is crucial to ensure that both your iPhone and Apple Watch are running on the latest software versions. Updating the software on both devices ensures compatibility and a seamless connection between them.
To update your iPhone, go to the Settings app and tap on “General”. Then, tap on “Software Update” to check for any available updates. If an update is available, download and install it on your device. Make sure your iPhone is connected to a stable Wi-Fi network and has sufficient battery life to complete the update process.
Once your iPhone is updated, it is time to update your Apple Watch. Connect your Apple Watch to its charger and ensure it has at least 50% battery life. On your iPhone, open the Apple Watch app, and navigate to the “My Watch” tab. From there, tap on “General” and then tap on “Software Update”. If an update is available, tap on “Download and Install”. Follow the on-screen instructions to complete the update.
During the update process, it is essential to keep both your iPhone and Apple Watch in close proximity to maintain a stable connection. Ensure that both devices remain connected to a stable Wi-Fi network to facilitate a smooth and speedy update.
Updating your devices not only ensures compatibility for cellular connectivity but also introduces new features, bug fixes, and performance improvements. By keeping your iPhone and Apple Watch up to date, you can experience the best possible performance and have access to the latest features and enhancements.
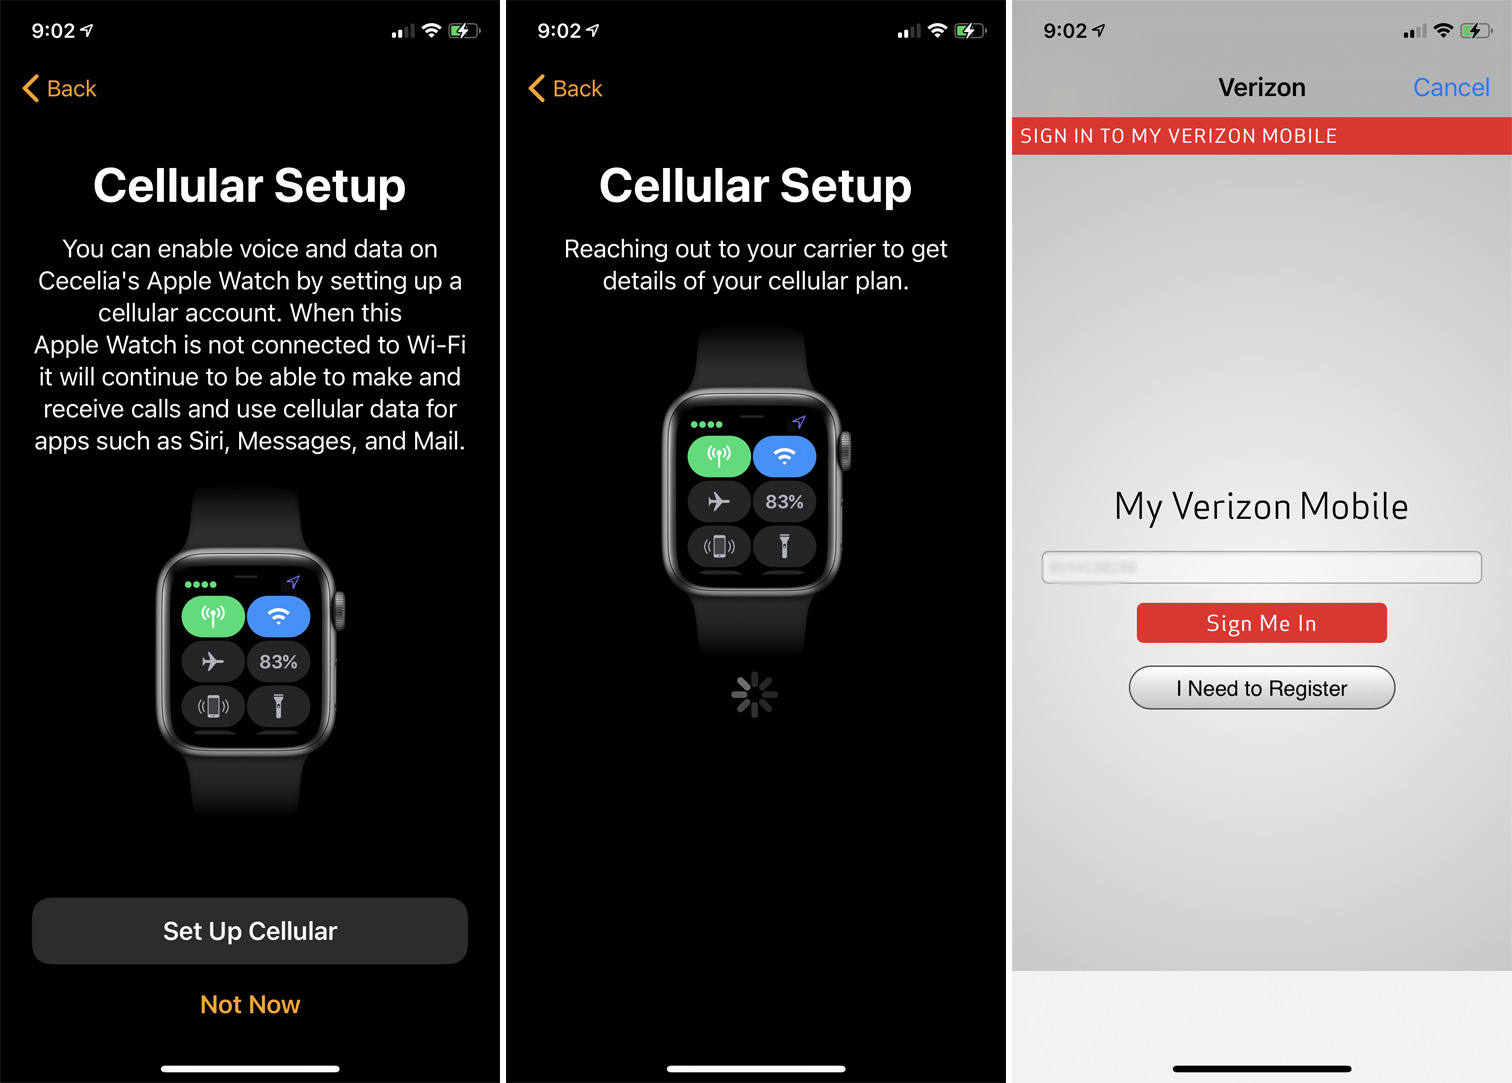
Step 4: Set Up Cellular on Apple Watch
Setting up cellular connectivity on your Apple Watch allows you to stay connected even when you’re away from your iPhone. With cellular capability, you can make calls, send messages, stream music, and access your favorite apps directly from your wrist. Follow the steps below to set up cellular on your Apple Watch:
1. Ensure that your Apple Watch is charged and within range of your iPhone.
2. Open the Apple Watch app on your iPhone.
3. Tap on the “My Watch” tab at the bottom of the screen.
4. Select “Cellular” from the list of options.
5. Tap on “Set Up Cellular” to begin the setup process.
6. Follow the prompts to choose your cellular provider and select a cellular plan that is compatible with your Apple Watch.
7. If your cellular plan requires, you may need to contact your carrier to add your Apple Watch to your plan or to purchase a separate plan for your watch.
8. Once you’ve selected your cellular plan, your iPhone will sync the plan details to your Apple Watch. This process may take a few minutes.
9. After the syncing process is complete, you’ll receive a notification on your Apple Watch confirming that cellular is set up and ready to use.
10. Enjoy the freedom of using your Apple Watch with cellular connectivity, even when you’re not near your iPhone!
Setting up cellular on your Apple Watch is a simple process that can greatly enhance the functionality and versatility of your device. With cellular connectivity, you can leave your iPhone behind and still stay connected wherever you go.
Step 5: Pair Apple Watch with iPhone
Once you have set up the cellular capabilities on your Apple Watch, the next step is to pair it with your iPhone. This will enable seamless communication between the two devices, allowing you to access and control your Apple Watch directly from your iPhone.
To pair your Apple Watch with your iPhone, follow these simple steps:
- Make sure your Apple Watch and iPhone are in close proximity.
- On your iPhone, open the Apple Watch app.
- Tap on the “Start Pairing” button.
- Aim your iPhone’s camera at the watch face to scan the pattern displayed on your Apple Watch.
- Follow the on-screen instructions on your iPhone to complete the pairing process.
- If prompted, enter the passcode displayed on your Apple Watch into your iPhone to confirm the pairing.
- Your iPhone will now begin the process of syncing data and settings with your Apple Watch. This may take a few minutes, so be patient.
- Once the pairing process is complete, your Apple Watch will display a “Pairing Complete” message, and you’ll be ready to use your watch with your iPhone.
Keep in mind that your Apple Watch needs to be within Bluetooth range of your iPhone to maintain a connection. If they are separated by too far of a distance, the connection will be lost and you will need to re-pair them.
Pairing your Apple Watch with your iPhone is an essential step in unlocking all the features and functionality that comes with your watch. Now that they are paired, you can enjoy the convenience and flexibility of managing your Apple Watch directly from your iPhone.
Step 6: Configure Cellular Settings
Now that you have successfully paired your Apple Watch with your iPhone, it’s time to configure the cellular settings. This will ensure that your Apple Watch can connect to cellular networks and use data independently without relying on your iPhone.
To configure the cellular settings, follow these simple steps:
- Open the Apple Watch app on your iPhone.
- Navigate to the “My Watch” tab.
- Tap on “Cellular”.
- Click on “Set Up Cellular”.
At this point, your iPhone will scan for available cellular providers in your area. Once the list of providers appears, you can proceed with the following steps:
- Select your preferred cellular provider from the available options.
- If prompted, you may need to enter your carrier account information, such as your phone number or login credentials.
After you have entered the necessary information, your cellular provider will activate the cellular service for your Apple Watch. This process may take a few minutes, so be patient.
Once the activation is complete, your Apple Watch will display a “Congratulations” message. Now, you can start using your Apple Watch with cellular connectivity. You will be able to make calls, send messages, access the internet, and use various apps directly from your wrist, even when your iPhone is not nearby.
It’s important to note that some cellular settings can be customized to suit your preferences. To access these settings, follow these steps:
- Open the Apple Watch app on your iPhone.
- Navigate to the “My Watch” tab.
- Tap on “Cellular”.
From here, you can manage the following settings:
- Enable or disable the “Cellular” feature for your Apple Watch.
- Choose which apps can access cellular data.
- Manage your data plan and check your data usage.
- Set up and manage an emergency SOS feature.
By customizing these settings, you can optimize your Apple Watch’s cellular experience based on your needs and preferences.
Now that you have successfully configured the cellular settings on your Apple Watch, you are ready to enjoy the freedom and convenience of using your watch independently, even without your iPhone nearby.
Step 7: Test Cellular Connectivity
Once you have set up cellular on your Apple Watch and configured the necessary settings, it’s time to test the cellular connectivity to ensure that your watch is properly connected to the cellular network. Testing the cellular connectivity is an important step in ensuring that you can make calls, send messages, and use data on your Apple Watch without relying on your iPhone.
To test the cellular connectivity on your Apple Watch, follow these steps:
- First, make sure that your Apple Watch is within range of your iPhone.
- On your Apple Watch, swipe up from the watch face to access the Control Center.
- Look for the cellular icon (represented by bars) in the Control Center. If you see the icon, it means that your Apple Watch is connected to the cellular network.
- If the cellular icon is not visible, try restarting your Apple Watch and ensuring that the cellular service is enabled.
- If the issue persists, navigate to the Settings app on your Apple Watch.
- Tap on “Cellular” and check if the “Cellular Data” toggle switch is turned on.
- If cellular data is enabled but you still can’t see the cellular icon, try toggling the “Airplane Mode” switch on and off.
- If none of these steps resolve the issue, contact your cellular service provider for further assistance.
Testing cellular connectivity on your Apple Watch is crucial to ensure that you have a seamless and reliable experience when using your watch away from your iPhone. By following these steps and troubleshooting any connectivity issues, you can enjoy the freedom and convenience that a cellular-enabled Apple Watch provides.
Step 8: Troubleshooting Tips
Even though setting up cellular on Apple Watch is a straightforward process, you might encounter some issues along the way. Don’t worry! Here are some troubleshooting tips to help you out:
1. Ensure Cellular Plan: Double-check that your cellular plan supports Apple Watch connectivity. Contact your service provider to confirm compatibility and troubleshoot any plan-related issues.
2. Check Signal Strength: Weak cellular reception can lead to connectivity problems. Make sure you are within range of a reliable cellular network and check the signal strength indicator on your Apple Watch.
3. Restart iPhone and Apple Watch: A simple restart can often resolve minor connectivity issues. Restart both your iPhone and Apple Watch by turning them off, waiting a few seconds, and then turning them back on again.
4. Update Software: Keeping your devices up to date is crucial for optimal performance. Ensure that both your iPhone and Apple Watch are running the latest software versions. Go to “Settings” > “General” > “Software Update” on your devices to check for updates.
5. Reset Network Settings: If other devices are working on your cellular network but not your Apple Watch, try resetting the network settings on your iPhone. Go to “Settings” > “General” > “Reset” > “Reset Network Settings”. Remember, this will remove your Wi-Fi passwords, so make sure to have them handy.
6. Re-pair Apple Watch: If none of the above steps have resolved the issue, you may need to unpair and re-pair your Apple Watch. Open the Apple Watch app on your iPhone, navigate to “My Watch,” tap on your watch, and select “Unpair Apple Watch.” Follow the instructions to re-pair it with your iPhone.
7. Contact Apple Support: If the problem persists, it’s best to reach out to Apple Support for further assistance. They have knowledgeable experts who can guide you through troubleshooting steps specific to your situation.
By following these troubleshooting tips, you can overcome common issues that may arise during the setup of cellular connectivity on your Apple Watch. Enjoy the convenience of staying connected even when away from your iPhone!
Conclusion
Setting up your Apple Watch to work with cellular connectivity provides a whole new level of freedom and convenience. With the ability to make calls, send messages, stream music, and access key apps without your iPhone nearby, your Apple Watch becomes an even more versatile and independent device.
By following the step-by-step guide in this article, you can easily set up your Apple Watch for cellular service and unlock its full potential. Remember to check with your carrier for availability, plans, and fees related to cellular service for Apple Watch.
Whether you’re going for a run, attending a meeting, or simply don’t want to be weighed down by your iPhone, having cellular connectivity on your Apple Watch allows you to stay connected and stay in control wherever you go.
So go ahead, set up your Apple Watch to cellular and experience the freedom of untethered communication and functionality.
FAQs
1. Can any Apple Watch be set up with cellular connectivity?
Yes, only certain models of the Apple Watch support cellular connectivity. Make sure to check the specifications of the Apple Watch model you are interested in to confirm if it has the capability to connect to cellular networks.
2. Do I need a separate cellular plan for my Apple Watch?
Yes, you will need a separate cellular plan for your Apple Watch if you want to use its cellular capabilities. Most cellular carriers offer specific plans for Apple Watch connectivity, which can be added to your existing mobile plan or purchased separately.
3. How do I set up cellular connectivity on my Apple Watch?
To set up cellular connectivity on your Apple Watch, you need to follow these steps:
- Make sure your iPhone is running the latest version of iOS and your Apple Watch is running the latest version of watchOS.
- Open the Apple Watch app on your iPhone.
- Tap on “My Watch” at the bottom of the screen.
- Tap on “Cellular” and then select “Set Up Cellular.”
- Follow the on-screen instructions to choose your carrier, select a plan, and activate cellular connectivity on your Apple Watch.
4. Can I make phone calls and send texts with my Apple Watch using cellular connectivity?
Yes, with cellular connectivity enabled, you can make phone calls and send texts directly from your Apple Watch without needing to have your iPhone nearby. This allows you to stay connected even when you don’t have your iPhone with you.
5. How does the Apple Watch connect to cellular networks?
The Apple Watch connects to cellular networks using an eSIM (embedded SIM) technology. This allows the SIM card to be embedded directly into the Apple Watch, eliminating the need for a physical SIM card. The eSIM is activated by your cellular carrier, and you can manage your cellular plan directly from your iPhone using the Apple Watch app.