
Are you looking to remove the cellular plan from your Apple Watch? Whether you’re switching carriers, upgrading your device, or simply no longer need the added feature, removing the cellular plan from your Apple Watch is a straightforward process. In this article, we’ll guide you through the steps to seamlessly remove the cellular plan from your Apple Watch, ensuring that you can continue enjoying your device without the added expense or unnecessary features. Whether you have an Apple Watch Series 6, SE, or an older model, we’ve got you covered. So, let’s dive in and learn how to remove the cellular plan from your Apple Watch.
Inside This Article
- Step 1: Access the Watch app on your iPhone
- Step 2: Disconnect your Apple Watch from the cellular plan
- Step 3: Remove the cellular plan from your iPhone
- Step 4: Verify the removal of the Apple Watch cellular plan
- Conclusion
- FAQs
Step 1: Access the Watch app on your iPhone
Before you can remove the cellular plan from your Apple Watch, you need to access the Watch app on your iPhone. This app allows you to manage and customize various settings for your Apple Watch, including the cellular plan.
To access the Watch app, simply locate and tap on the Watch icon on your iPhone’s home screen. The Watch app has a distinctive icon that resembles an outline of an Apple Watch. Once you tap on the icon, the app will open, and you’ll be able to proceed with the removal process.
If you can’t find the Watch app on your iPhone’s home screen, don’t panic. It’s possible that the app may have been accidentally moved to a different location or placed within a folder. In such cases, you can use the iPhone’s search feature by swiping down on the home screen and typing “Watch” in the search bar. This will help you locate the app quickly.
Once you have successfully accessed the Watch app on your iPhone, you are ready to move on to the next step and disconnect your Apple Watch from the cellular plan.
Step 2: Disconnect your Apple Watch from the cellular plan
Once you’ve accessed the Watch app on your iPhone, it’s time to disconnect your Apple Watch from the cellular plan. Follow these steps to complete the process:
1. In the Watch app on your iPhone, navigate to the “My Watch” tab located at the bottom of the screen.
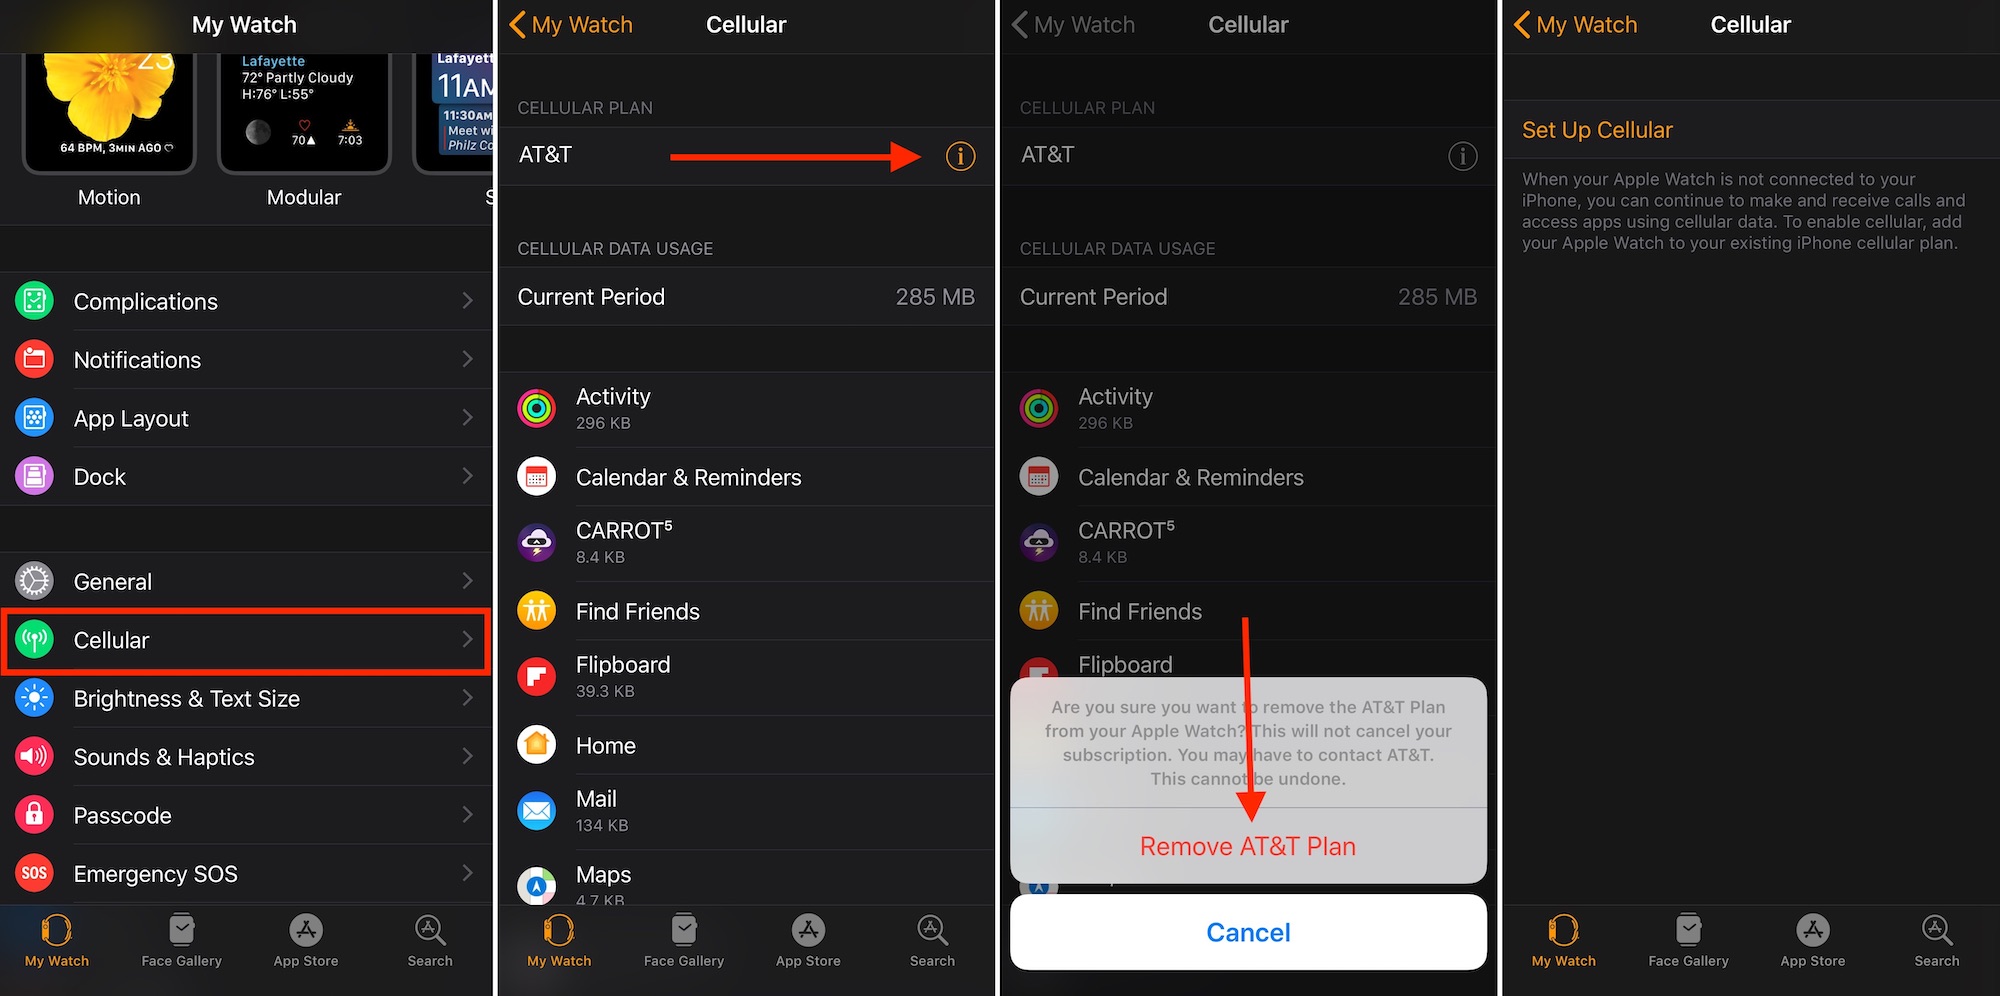
2. Scroll down and tap on “Cellular.” This will take you to the cellular settings page for your Apple Watch.
3. Here, you will see information about your current cellular plan for the Apple Watch. To remove the plan, tap on the “Remove [Carrier Name] Plan” option.
4. You may be prompted to enter your Apple ID password to confirm the removal of the cellular plan. Provide the necessary information and tap on “Remove” to proceed.
5. Once you have removed the cellular plan, your Apple Watch will no longer be connected to a cellular network. It will revert to using Wi-Fi or Bluetooth for connectivity, depending on the available options.
It’s worth noting that disconnecting your Apple Watch from the cellular plan will not affect its other functionalities. You will still be able to use it for fitness tracking, receiving notifications, making calls via your iPhone’s cellular connection, and accessing apps that don’t require an active cellular connection.
However, without a cellular plan, your Apple Watch will not have independent cellular connectivity. This means that you won’t be able to make or receive calls directly from your watch or use mobile data when you’re away from your iPhone.
By following these simple steps, you can easily disconnect your Apple Watch from the cellular plan and continue using it with your iPhone’s Wi-Fi or Bluetooth connectivity. This can be especially useful if you want to save on cellular plan costs or if you prefer to only use your Apple Watch as an extension of your iPhone.
Step 3: Remove the cellular plan from your iPhone
Now that you have disconnected your Apple Watch from the cellular plan, the next step is to remove the plan from your iPhone. This will ensure that your iPhone is no longer associated with the Apple Watch cellular connectivity. Follow the simple steps below to complete this process:
1. Open the Settings app on your iPhone. You can find the icon on your home screen, usually represented by a gear or cog symbol.
2. Scroll down and tap on “Cellular.” This option is usually located towards the top of the Settings menu.
3. On the Cellular page, look for the section titled “Cellular Plans” or “Carrier.” Tap on it to access your cellular plan settings.
4. In the “Cellular Plans” or “Carrier” section, you should see a list of your active cellular plans. Locate the plan that is associated with your Apple Watch.
5. Tap on the cellular plan that corresponds to your Apple Watch. This will take you to the plan details page.
6. On the plan details page, you should see an option to “Remove” or “Delete” the plan. Tap on this option to initiate the removal process.
7. A confirmation prompt will appear, asking if you want to remove the cellular plan from your iPhone. Confirm your decision by tapping on “Remove” or “Delete” again.
8. Once you have successfully removed the cellular plan, you will no longer have access to cellular connectivity on your Apple Watch through your iPhone.
9. It is recommended to restart both your iPhone and Apple Watch to ensure that the changes take effect. Simply power off both devices, wait for a few seconds, and then power them back on.
By following these steps, you will be able to remove the cellular plan from your iPhone and ensure that your Apple Watch is no longer connected to cellular networks. This will help you save on monthly costs and manage your devices more efficiently.
Step 4: Verify the removal of the Apple Watch cellular plan
After completing the steps to remove the cellular plan from your Apple Watch, it’s important to verify that the removal was successful. This will ensure that your Apple Watch is no longer associated with a cellular network and will now function solely as a Bluetooth accessory to your iPhone.
To verify the removal of the Apple Watch cellular plan, follow these steps:
- Make sure that your Apple Watch is connected to your iPhone via Bluetooth.
- Open the Watch app on your iPhone.
- Navigate to the “My Watch” tab at the bottom of the screen.
- Scroll down and tap on “Cellular” (or “Mobile Data” depending on your region).
- If you see an option to set up cellular service or an option to add a cellular plan, it means that the cellular plan has been successfully removed from your Apple Watch.
- Alternatively, if you see a message that says “No cellular plan”, it also indicates that the removal was successful.
If you encounter any difficulties during this verification process, double-check that you have followed the previous steps correctly. If the issue persists, it is recommended to contact your network carrier or visit an Apple store for further assistance.
By verifying the removal of the Apple Watch cellular plan, you can be confident that your device will no longer connect to a cellular network and will operate solely as a Bluetooth accessory. This step is crucial if you no longer wish to use cellular service on your Apple Watch and want to avoid any unnecessary charges or network usage.
Conclusion
In conclusion, removing an Apple Watch cellular plan is a straightforward process that can be done with just a few steps. Whether you want to cancel your plan temporarily, switch carriers, or simply no longer need the cellular functionality on your Apple Watch, the methods mentioned in this article can guide you through the process.
Remember to check with your carrier or refer to your device’s user manual for specific instructions, as the steps may vary depending on your location and carrier. By following the appropriate steps and ensuring proper communication with your carrier, you can easily remove the cellular plan from your Apple Watch and continue enjoying its features without the added cost or commitment of a cellular connection.
So, if you find yourself looking to detach your Apple Watch from a cellular plan, fear not! With the tips and techniques provided, you’ll be able to navigate the process smoothly and seamlessly.
FAQs
Q: Can I remove the cellular plan from my Apple Watch?
A: Yes, you can remove the cellular plan from your Apple Watch. The process may vary slightly depending on your carrier, but generally, you can do it through the Apple Watch app on your paired iPhone.
Q: Why would I want to remove the cellular plan from my Apple Watch?
A: There could be several reasons why you might want to remove the cellular plan from your Apple Watch. If you no longer want to pay the additional fees associated with the cellular plan or if you primarily use your Apple Watch in close proximity to your iPhone, removing the cellular plan can save you money and simplify your device setup.
Q: Will removing the cellular plan affect any of my Apple Watch’s functionality?
A: Removing the cellular plan will not impact the basic functionality of your Apple Watch. You will still be able to use your watch for various tasks like receiving notifications, tracking your fitness activities, controlling music playback, and more. However, without a cellular plan, you will be reliant on a paired iPhone for internet connectivity and certain features that require cellular data.
Q: How do I remove the cellular plan from my Apple Watch?
A: To remove the cellular plan from your Apple Watch, open the Apple Watch app on your paired iPhone. Go to the “Cellular” or “Mobile Data” section and look for the option to manage your cellular plan. Follow the on-screen instructions to remove the plan. Keep in mind that you may need to contact your carrier for assistance if you encounter any issues during the process.
Q: Can I add the cellular plan back to my Apple Watch in the future?
A: Yes, if you change your mind or if you find that you need the added convenience and functionality of a cellular plan, you can always add it back to your Apple Watch later. Simply follow the steps provided by your carrier or consult the Apple support documentation for instructions on adding a cellular plan to your device.