
Do you ever find yourself gazing up at the night sky, captivated by the beauty of the stars? If so, you’re not alone. Many people are drawn to the wonder and mystery of the cosmos, seeking to capture its breathtaking allure through photography. In the past, taking stunning photos of stars required expensive and complex equipment. However, with the advancements in mobile phone technology, specifically the iPhone, it is now possible to capture mesmerizing images of the night sky with just a few taps on your screen. In this article, we will explore the techniques and tips that will help you unlock the secrets to taking incredible photos of stars using your iPhone. So, grab your iPhone, head outside, and let’s dive into the world of astrophotography like never before!
Inside This Article
- Setting Up Your iPhone for Astrophotography
- Choosing the Right Location for Star Photography
- Mastering the Settings for Star Photography on iPhone
- Techniques for Capturing Stunning Star Photos on iPhone
- Conclusion
- FAQs
Setting Up Your iPhone for Astrophotography
Are you fascinated by the beauty of the night sky and eager to capture stunning photos of stars on your iPhone? Look no further! With a few simple steps, you can transform your iPhone into a powerful tool for astrophotography. Here’s how to set up your iPhone for capturing mesmerizing star photos:
1. Choose a Dark Location: Before you start shooting, find a location away from city lights, where the night sky is clear and dark. Light pollution hinders the visibility of stars, so aim for remote areas or seek out designated dark sky locations in your region.
2. Use a Tripod: Stability is crucial when photographing stars, as even the slightest camera shake can result in blurry images. Invest in a sturdy tripod to keep your iPhone steady during long exposures. This will ensure crisp and sharp images of the starry night sky.
3. Enable Night Mode: If you have an iPhone 11 or newer model, take advantage of the Night Mode feature. Night Mode enhances the low-light capabilities of your iPhone, automatically adjusting exposure and reducing noise. This will greatly improve your chances of capturing detailed and well-exposed star photos.
4. Adjust Camera Settings: To further optimize your iPhone for astrophotography, manually adjust the camera settings. Open the Camera app and tap on the “A” (Auto) symbol. Slide the exposure slider downwards to darken the image and bring out the details of the stars. Experiment with different exposure settings to find the perfect balance for your desired result.
5. Use a Remote Shutter or Self-Timer: As you venture into capturing long-exposure shots of the night sky, minimize camera shake by using a remote shutter or the self-timer feature of your iPhone. This will help avoid any movement caused by pressing the shutter button and give you a greater chance of capturing stunning star trails.
6. Experiment with Apps: There are several apps available that can assist you in your astrophotography journey. Apps like NightCap and ProCamera offer advanced features, such as manual controls, time-lapse options, and even star tracking. Explore these apps and find the ones that suit your preferences and shooting style.
7. Post-Processing: Once you have captured your star-filled images, take them to the next level by utilizing post-processing techniques. Apps like Adobe Lightroom or Snapseed allow you to enhance the colors, increase the contrast, and fine-tune the overall look of your astrophotographs. Remember to maintain a natural and realistic look, highlighting the beauty of the night sky.
By following these setup steps, you can unlock the full potential of your iPhone for astrophotography and capture breathtaking photos of the starry skies. So, get out there, explore the cosmos, and let your iPhone be your guide to mesmerizing star photography!
Choosing the Right Location for Star Photography
When it comes to capturing stunning star photos on your iPhone, choosing the right location plays a crucial role in determining the success of your shots. The ideal spot should have minimal light pollution and clear skies. Here are some essential factors to consider when selecting a location for star photography:
1. Light Pollution: One of the biggest challenges in astrophotography is light pollution. It can significantly degrade the quality of your star photos. To minimize its impact, look for locations away from cities and towns, where artificial lights are minimal. National parks, remote areas, or rural countryside are excellent choices for shooting the stars.
2. Horizon Line: Take into account the visibility of the horizon when scouting for a location. Having a clear and unobstructed view of the horizon will allow you to capture a more expansive night sky. Avoid areas with tall buildings, mountains, or trees blocking your sightlines.
3. Weather Conditions: Keep an eye on the weather forecast before heading out for a night of star photography. Clear skies are essential for capturing sharp and detailed star images. Cloudy or hazy conditions can obstruct visibility and make it challenging to capture those awe-inspiring shots you’re after.
4. Natural Landscapes: Adding a beautiful foreground can enhance the overall aesthetics of your star photos. Look for interesting natural elements like mountains, lakes, or trees that can complement the night sky. Experiment with different compositions to create visually captivating images.
5. Safety: While it’s essential to find an optimal location for star photography, don’t forget about safety. Make sure you choose a secure area that is easily accessible and free from any potential dangers. It’s also a good idea to inform someone about your plans or go in a group for added security.
By considering these factors and choosing the right location for star photography, you’ll be one step closer to capturing breathtaking images of the night sky with your iPhone.
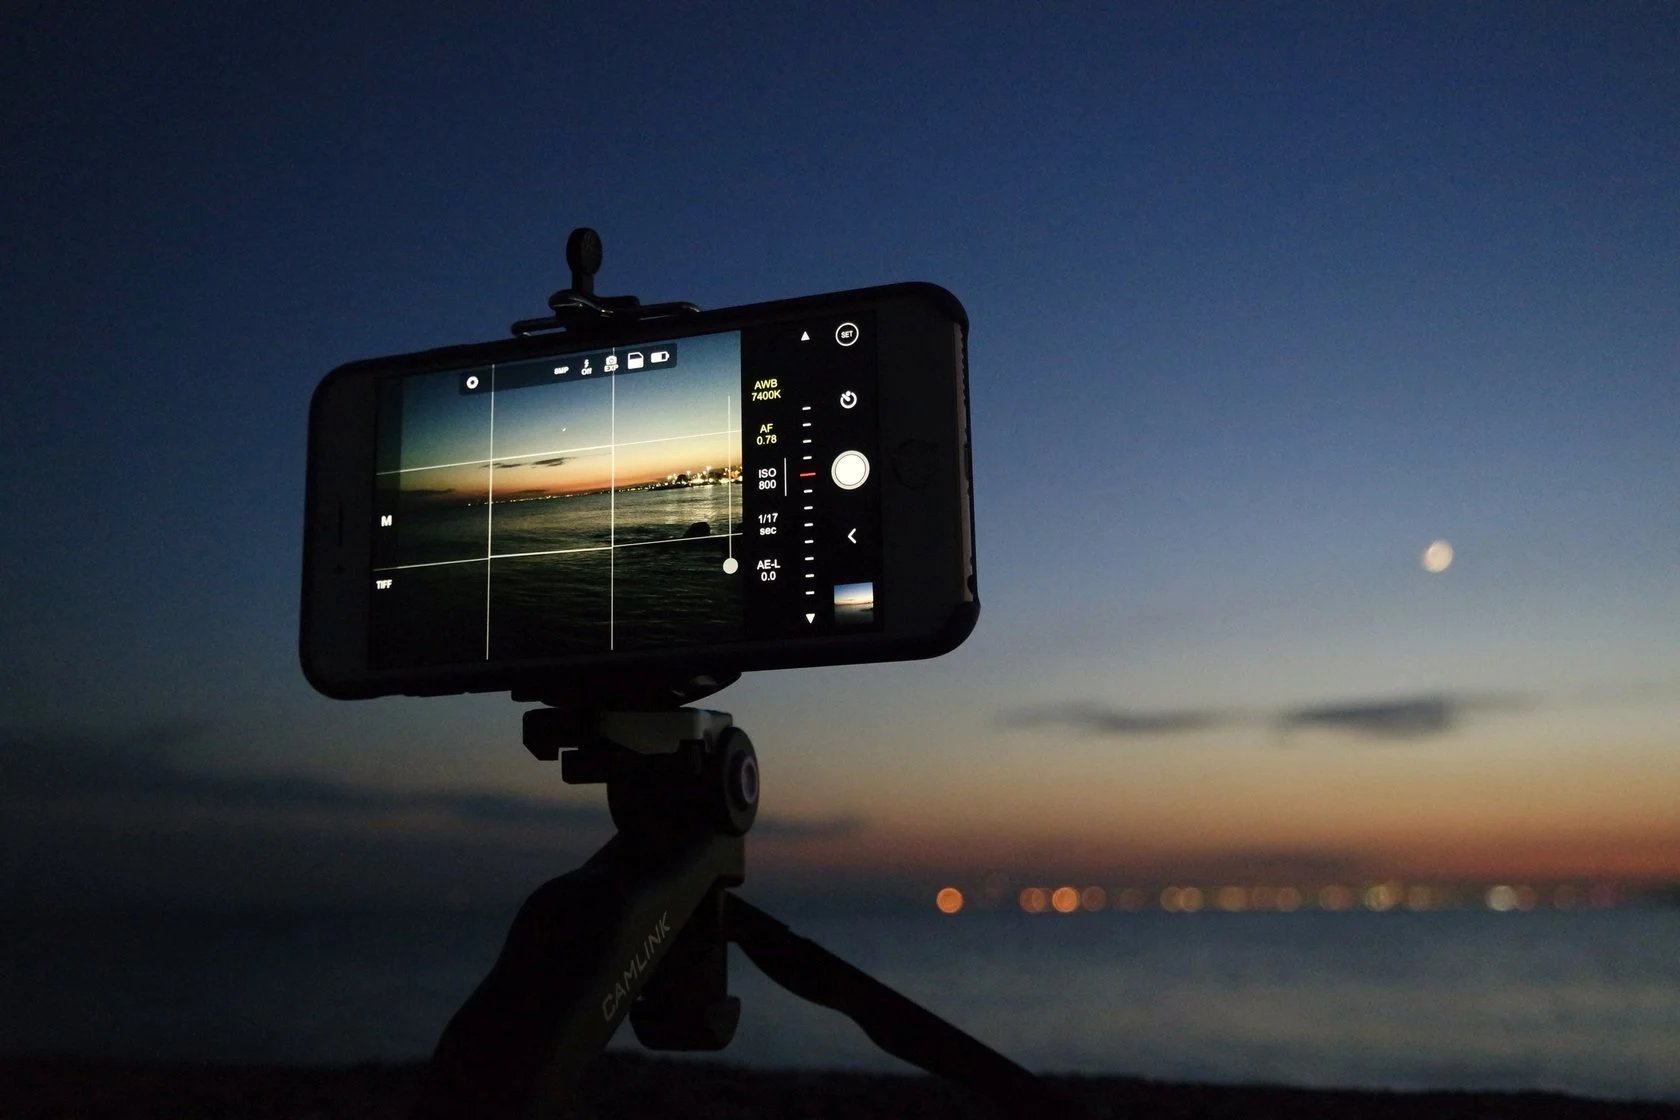
Mastering the Settings for Star Photography on iPhone
When it comes to capturing stunning photos of stars on your iPhone, understanding and mastering the camera settings is essential. With the right settings, you can capture the beauty of the night sky and create breathtaking astrophotography images. Here are several key settings to consider:
1. Night Mode: The Night Mode feature on newer iPhone models, such as the iPhone 11 and iPhone 12, is ideal for astrophotography. It enhances low-light performance and reduces noise, allowing you to capture clearer and more detailed star photos. To activate Night Mode, simply tap on the moon icon that appears when shooting in low-light conditions.
2. Exposure Time: Adjusting the exposure time is crucial for star photography. Longer exposure times allow more light to enter the camera sensor, resulting in brighter and more visible stars. You can manually adjust the exposure time by using a third-party camera app that offers manual control or by using the built-in camera app’s exposure settings.
3. ISO: ISO determines the sensitivity of your iPhone’s camera sensor to light. Lower ISO settings produce less noise but require longer exposure times. Higher ISO settings can brighten the stars but may introduce more noise. Experimenting with different ISO settings will help you find the perfect balance between brightness and noise levels.
4. Focus: Achieving sharp focus is crucial for capturing detailed star photos. While iPhone cameras have autofocus capabilities, it can be challenging for them to focus on stars. Consider using an app with manual focus control, such as ProCamera or Camera+ 2, to achieve precise focus on the night sky.
5. Live View: Using the live view feature can be helpful for composing your shot and adjusting the settings in real-time. The live view allows you to see how the exposure, ISO, and other settings impact the image before you take the shot. This can save you time and help you achieve your desired results more effectively.
6. Composition: While camera settings are essential, composing your shot is equally important. Consider using the rule of thirds to create a balanced and visually appealing composition. Experiment with different angles, foreground elements, and framing techniques to add depth and interest to your star photos.
By mastering these camera settings and techniques, you can capture stunning photos of stars on your iPhone. Remember to experiment, be patient, and embrace the magic of the night sky. With practice and creativity, you can create astrophotography images that truly shine.
Techniques for Capturing Stunning Star Photos on iPhone
Capturing stunning star photos on your iPhone can seem like a daunting task, but with the right techniques, you can achieve incredible results. Whether you’re an amateur photographer or a seasoned pro, these tips will help you take your astrophotography skills to the next level.
1. Find a Dark Location:
The first and most important step in capturing stunning star photos is finding a dark location. Light pollution from cities can hinder your ability to see and capture stars effectively. Look for areas with minimal light pollution, such as national parks, remote countryside, or beaches.
2. Use a Tripod:
Stability is crucial in astrophotography. To capture sharp, detailed images of stars, make sure to use a tripod to eliminate camera shake caused by handholding the iPhone. This will result in clearer and more detailed star images.
3. Enable Night Mode:
Most modern iPhones come equipped with a Night Mode feature that allows you to capture stunning low-light and star photography. Enable Night Mode in the camera settings to automatically adjust exposure and capture more light, preserving details and reducing noise.
4. Experiment with the Exposure:
Adjusting the exposure can make a significant difference in star photography. Start with a longer exposure to capture more starlight, and then adjust accordingly. Experiment with different exposure settings to find the perfect balance that highlights the stars while maintaining a well-exposed foreground.
5. Manual Focus:
In astrophotography, achieving a sharp focus is crucial. Switch your iPhone to manual focus mode and use the focus peaking feature to ensure the stars are in sharp focus. If your iPhone doesn’t have a manual focus feature, you can utilize third-party camera apps that offer manual focus control.
6. Use a Remote Shutter Release:
To minimize camera shake even further, use a remote shutter release or the timer function on your iPhone. This will prevent any unnecessary movement or vibrations when capturing star photos.
7. Experiment with Different Compositions:
Don’t be afraid to experiment with different compositions when capturing star photos. Try including interesting foreground elements, such as trees, mountains, or water bodies, to add depth and interest to your images.
8. Edit and Enhance:
Once you’ve captured your star photos, don’t forget to edit and enhance them. There are several editing apps available, both free and paid, that can help you bring out the best in your starry images. Adjust the contrast, brightness, and sharpness to accentuate the stars and make them pop.
By following these techniques, you’ll be able to capture stunning star photos on your iPhone. Remember to experiment, be patient, and enjoy the process. Astrophotography is a unique and rewarding genre, allowing you to capture the beauty of the night sky in all its glory.
Conclusion
In conclusion, capturing stunning photos of stars on your iPhone is not only possible but also easily achievable with a few simple tips and tricks. By following the steps outlined in this guide, you can overcome the challenges of low-light photography and capture the beauty of the night sky in all its glory.
Remember to find a suitable location away from light pollution, use a sturdy tripod for stability, adjust your camera settings accordingly, and have patience while waiting for the perfect shot. Experiment with different techniques such as long exposures and using third-party apps to enhance your results.
With practice, you’ll soon master the art of astrophotography on your iPhone and be able to create breathtaking images of the stars. So grab your iPhone, venture into the darkness of the night, and let your creativity soar as you capture the beauty of the cosmos.
FAQs
1. Can I take photos of stars on my iPhone?
Yes, you can take photos of stars on your iPhone. With advancements in technology, the iPhone camera has become increasingly capable of capturing stunning night sky photographs.
2. Do I need any additional accessories to take photos of stars on my iPhone?
While not necessary, using certain accessories can greatly enhance your ability to capture clear and detailed photos of stars. Consider investing in a tripod to stabilize your iPhone and reduce camera shake, and a telephoto lens attachment to magnify distant celestial objects.
3. What camera settings should I use for star photography on my iPhone?
To capture beautiful starry skies on your iPhone, it’s important to adjust your camera settings. Start by using the “Night Mode” on newer iPhone models, which automatically optimizes exposure and reduces noise in low-light conditions. You can also experiment with manual settings, such as adjusting the exposure time and ISO, to achieve different effects.
4. Where is the best location to take photos of stars with my iPhone?
Finding a location with minimal light pollution is essential for successful star photography. Ideally, choose a spot away from city lights, such as a remote countryside, a beach, or a mountain top. These locations will provide a darker sky, allowing the stars to shine brightly in your photos.
5. What techniques can I use to improve my star photography on an iPhone?
To improve your star photography on an iPhone, follow these tips:
– Use a tripod or stabilize your iPhone to avoid camera shake.
– Experiment with different camera settings and shooting modes.
– Take advantage of photo editing apps to enhance your photos.
– Capture star trails by using longer exposure times.
– Shoot during the golden hour and align the stars with interesting foreground elements for added visual interest.