
In this day and age, smartphones have become an essential part of our daily lives. With technological advancements, mobile phones are now equipped with a plethora of features to enhance user experience. One such feature is Night Mode, which has gained significant popularity among iPhone users. Whether you’re a night owl or find yourself frequently in low-light situations, Night Mode can greatly improve your photography and readability on your iPhone. In this article, we will explore what Night Mode is, how to activate it on your iPhone, and how to make the most out of this incredible feature. So, grab your iPhone and let’s dive into the fascinating world of Night Mode!
Inside This Article
- Enable Night Mode on iPhone
- Adjust Night Mode brightness on iPhone
- Schedule Night Mode on iPhone
- Customize Night Mode settings on iPhone
- Conclusion
- FAQs
Enable Night Mode on iPhone
Are you tired of straining your eyes while using your iPhone in dark environments? Night Mode can be a game-changer for you. This feature, available on newer iPhone models (such as the iPhone 11, iPhone 12, and beyond), is designed to reduce eye strain and improve visibility in low-light conditions.
To enable Night Mode on your iPhone, follow these simple steps:
- Open the “Settings” app on your iPhone.
- Scroll down and tap on “Display & Brightness”.
- In the “Appearance” section, select “Dark” or “Automatic” depending on your preference.
- If you choose “Automatic”, your iPhone will automatically switch to Night Mode when the ambient lighting is low.
- If you choose “Dark”, Night Mode will be enabled all the time.
- Exit the settings, and you’re ready to enjoy the benefits of Night Mode.
With Night Mode activated, your iPhone’s interface will adopt a darker color scheme, making it easier on the eyes in dimly lit environments. This feature not only reduces eye strain but can also help preserve battery life on OLED models.
So, whether you’re browsing the web, using social media, or reading an e-book, enabling Night Mode on your iPhone can significantly enhance your nighttime mobile experience.
Adjust Night Mode brightness on iPhone
One of the great features of the iPhone is the Night Mode, which helps you take stunning low-light photos. With Night Mode, your iPhone camera captures more light and reduces noise, resulting in clearer and more detailed images. However, you may find that the brightness level of Night Mode photos isn’t always perfect. Luckily, you can easily adjust the Night Mode brightness on your iPhone to get the desired results.
To adjust the Night Mode brightness on your iPhone, follow these simple steps:
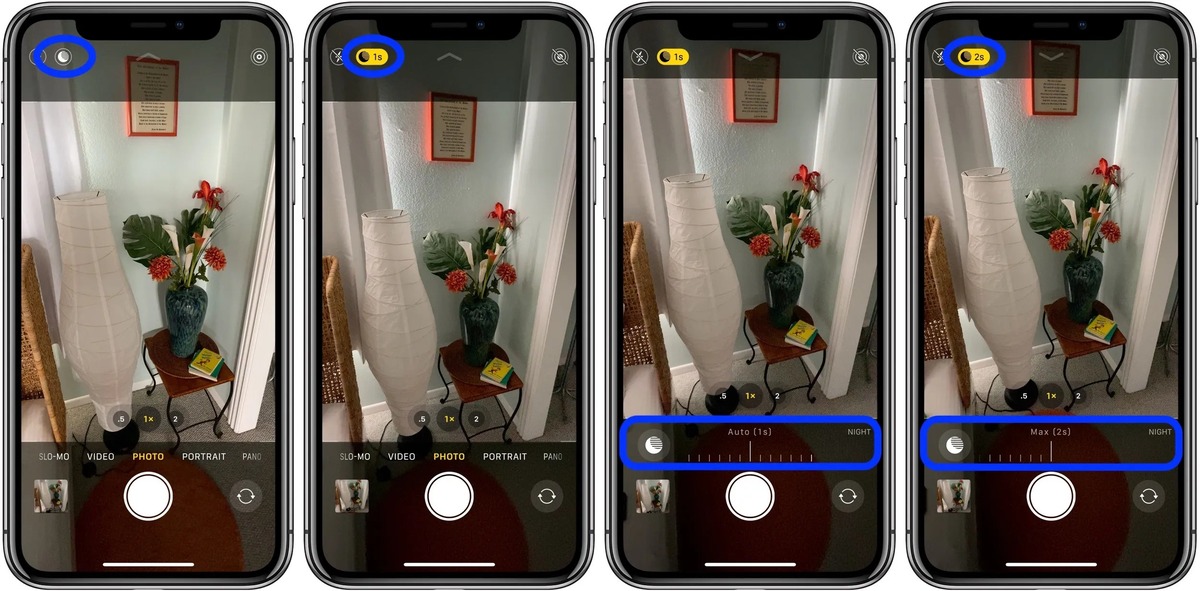
- Open the Camera app on your iPhone.
- Swipe to the Night Mode option, which is indicated by a moon symbol.
- Tap on the Night Mode icon to activate it.
- Now, you will see a slider on the screen, representing the Night Mode brightness control.
- Drag the slider to the left to decrease the brightness or to the right to increase it. You can preview the changes in real-time on the screen.
- Once you have adjusted the brightness to your liking, tap on the shutter button to capture the photo with the modified Night Mode brightness.
It’s important to note that the Night Mode brightness adjustment is available only when using the Night Mode feature in the Camera app. If you’re taking photos in regular mode or using a third-party camera app, the brightness adjustment may not be available.
With the ability to adjust Night Mode brightness, you have more control over the lighting in your low-light photos. Whether you want to enhance the darkness or bring more brightness to the scene, you can now fine-tune the Night Mode on your iPhone to achieve the desired effect.
Experiment with different brightness levels to find the perfect balance for your photos. Play around with the slider and observe how it affects the overall image. Keep in mind that too much brightness adjustment may result in overexposed images, while too little adjustment may make the scene appear too dark. Aim for a natural and realistic look while maintaining the details and clarity that Night Mode offers.
Remember to adjust the Night Mode brightness based on the specific lighting conditions and the desired artistic effect you want to achieve. By utilizing the Night Mode brightness control on your iPhone, you can elevate the quality of your low-light photography and capture stunning moments even in the darkest settings.
Schedule Night Mode on iPhone
Do you find yourself constantly toggling Night Mode on your iPhone at specific times of the day? The good news is that you can now schedule Night Mode so that it automatically turns on and off according to your preferred time settings. This feature not only saves you the hassle of manually enabling Night Mode, but it also ensures that your eyes are protected from harsh blue light during the appropriate hours.
To schedule Night Mode on your iPhone, follow these simple steps:
- Open the Settings app on your iPhone
- Scroll down and tap on “Display & Brightness”
- Under the Night Mode section, you’ll find the “Schedule” option. Tap on it.
- Toggle on the “Scheduled” switch to enable Night Mode scheduling.
- Next, you’ll see two options: “From” and “To.” Tap on each option to set the start and end times for Night Mode.
- Select the desired start and end times by adjusting the hour and minute sliders.
- Once you’ve set the schedule, exit the Settings app. Night Mode will now automatically activate and deactivate according to your chosen time settings.
By scheduling Night Mode on your iPhone, you can ensure that your device’s display adjusts to a warmer color temperature, reducing eye strain and promoting better sleep. Whether you typically use your iPhone during the evening hours or find yourself browsing before bed, scheduling Night Mode can provide a more comfortable viewing experience.
Note: It’s important to remember that Night Mode only affects the display of your iPhone and does not impact the functionality of other apps or features. If you need to use your iPhone in a well-lit environment, you can manually disable Night Mode by following the same steps mentioned above and toggling off the “Scheduled” switch.
Take advantage of the scheduling feature and let Night Mode automatically adapt to your daily routine on your iPhone. Say goodbye to manually enabling Night Mode and enjoy a more relaxing and visually pleasing experience on your device.
Customize Night Mode settings on iPhone
Night Mode on iPhone is a fantastic feature that automatically adjusts the display to reduce eye strain and improve visibility in low-light conditions. However, did you know that you can customize the Night Mode settings on your iPhone to suit your preferences? Whether you want to fine-tune the brightness or change the duration of Night Mode, Apple provides a range of options for you to personalize your experience. Let’s explore how you can customize Night Mode settings on your iPhone.
To access the Night Mode settings on your iPhone, follow these simple steps:
- Open the “Settings” app on your iPhone.
- Scroll down and tap on “Display & Brightness”.
- Under the “Appearance” section, you will see the “Night” option.
- Tap on “Night” to access the Night Mode settings.
Once you’re in the Night Mode settings, you can customize various aspects to suit your preferences. Here are some of the key customizations you can make:
- Brightness: Adjust the brightness level of Night Mode to your desired comfort level. You can make it brighter or dimmer based on your preference.
- Duration: Choose the duration for which Night Mode will remain active on your iPhone. You can set it to turn on automatically at sunset and turn off at sunrise, or you can set a specific start and end time.
- Color Temperature: Alter the color temperature of Night Mode to a warmer or cooler tone. This allows you to find the perfect balance between reducing blue light and maintaining visual clarity.
- Automatic Activation: Enable or disable the automatic activation of Night Mode. When enabled, Night Mode will turn on and off based on your selected schedule. If disabled, you will need to manually activate and deactivate Night Mode.
By customizing these Night Mode settings, you can create an optimized viewing experience that is tailored to your preferences and needs. So, go ahead and explore the Night Mode settings on your iPhone to make the most of this fantastic feature!
As technology continues to advance, the ability to use Night Mode on iPhones has become a game-changer for smartphone users. Not only does it reduce eye strain and improve readability in low-light environments, but it also captures stunning photos in the darkness with enhanced details and reduced noise. By following the simple steps outlined in this article, you can easily enable and customize Night Mode on your iPhone, ensuring a seamless and enjoyable user experience.
Whether you’re a night owl who loves capturing the magic of the night through photography or someone who simply wants to comfortably browse their iPhone in the dark, Night Mode is a feature that you’ll quickly come to appreciate. So, get ready to take your iPhone usage to the next level with the power of Night Mode!
FAQs
FAQ 1: What is Night Mode on iPhone?
Night Mode is a feature available on newer iPhone models that enhances low-light photography. It allows you to capture stunning photos even in dimly lit environments by automatically adjusting exposure and optimizing image quality.
FAQ 2: How do I activate Night Mode?
To activate Night Mode on your iPhone, simply open the Camera app and switch to either the Photo or Portrait mode. If your iPhone supports Night Mode, you will see a moon-shaped icon at the top of the screen. The phone will automatically enable Night Mode when it detects low light conditions, or you can manually turn it on or off by tapping the moon icon.
FAQ 3: Can I use Night Mode with the front-facing camera?
Yes, you can use Night Mode with the front-facing (selfie) camera on supported iPhone models. Simply open the Camera app, switch to the front-facing camera, and follow the same steps to activate Night Mode as mentioned above.
FAQ 4: Can I adjust the duration of Night Mode?
No, the duration of Night Mode is automatically determined by your iPhone. It calculates the optimal exposure time based on the lighting conditions and the stability of your hold. The length of time may vary depending on the scene and other factors, but the iPhone will provide an on-screen countdown to indicate the duration of the capture.
FAQ 5: Are there any tips for capturing better photos in Night Mode?
Absolutely! Here are a few tips to help you capture amazing photos in Night Mode:
- Use a tripod or stable surface to minimize camera shake.
- Avoid bright light sources that may cause overexposure.
- Experiment with different compositions and angles to get creative with your shots.
- Tap on the screen to manually adjust the focus and exposure point.
- Try using the Night Mode portrait feature for stunning low-light portrait shots.