
Live Photos are a fascinating feature on iPhones that capture snippets of motion and sound along with a still image. While they can bring your memories to life, adding filters to Live Photos can take them to the next level by adding a touch of creativity and personalization. Whether you want to enhance the colors, give it a vintage look, or experiment with artistic effects, adding filters to Live Photos can completely transform the visual appeal.
In this article, we will guide you on how to add filters to Live Photos on your iPhone. We will explore native iOS tools, as well as third-party apps, that can help you achieve stunning effects. From adjusting saturation and contrast to experimenting with different styles and moods, you’ll discover a range of options to customize your Live Photos and make them truly memorable.
Inside This Article
- Live Photos on iPhone: An Overview
- Why Use Filters with Live Photos?
- Adding Filters to Live Photos on iPhone
- Exploring the New Filter Options in the 2023 Update
- Conclusion
- FAQs
Live Photos on iPhone: An Overview
Live Photos is a captivating feature available on iPhones that allows users to capture a 3-second moving image with sound. Introduced with the iPhone 6s, Live Photos brings your still photographs to life, adding a touch of magic and nostalgia to your memories.
When you take a Live Photo, your iPhone records 1.5 seconds of video before and after the moment the shutter button is pressed. This creates a mini-movie that adds motion and context to your pictures. Even the sound around you at the time of capture is preserved, making Live Photos incredibly immersive.
To view a Live Photo, simply tap and hold on the image in your Photos app on your iPhone. The photo will come to life, animating the still image and playing the associated audio. It’s like stepping back in time and experiencing the moment all over again.
Live Photos are not only a delightful way to relive your memories, but they also offer opportunities for creativity and personalization. One such way to enhance your Live Photos is by adding filters.
Why Use Filters with Live Photos?
Live Photos are a unique feature on iPhones that capture a few seconds of video along with the photo. They bring your precious memories to life by preserving the moments just before and after the shot. While Live Photos in their raw form are captivating, adding filters to them can take them to a whole new level.
Filters are like digital lenses that enhance and transform your photos by adjusting the color, tone, and mood. With the ability to apply filters to Live Photos, you can instantly give them a professional touch, making them more visually appealing and engaging.
Here are a few reasons why using filters with Live Photos on your iPhone is a great idea:
- Enhance the Aesthetic Appeal: Filters can immediately add a creative touch to your Live Photos. They can make the colors pop, add a vintage or retro vibe, or create a dramatic and moody atmosphere. Using filters allows you to customize the look and feel of your Live Photos to match your artistic vision.
- Create a Consistent Visual Theme: If you’re sharing a series of Live Photos, applying the same filter to each image can help create a cohesive visual theme. It brings uniformity to the collection and gives it a professional and polished look.
- Correct Imperfections: Sometimes, a Live Photo may not have the ideal lighting or the colors may appear dull. Applying the right filter can correct these imperfections and make your photos more vibrant and eye-catching.
- Express Emotions and Moods: Filters can be a powerful tool for expressing emotions and setting the mood in your Live Photos. A warm-toned filter can evoke feelings of nostalgia, while a cool-toned filter can create a sense of calmness or serenity.
By utilizing filters with Live Photos, you have the opportunity to take your photography skills to the next level and add that extra wow factor to your images. It’s a simple and effective way to enhance the visual aesthetics and evoke emotions in your Live Photos.
Adding Filters to Live Photos on iPhone
Adding filters to your Live Photos on iPhone is a simple and fun way to enhance the visual appeal and mood of your captured moments. Whether you want to add a touch of nostalgia with a vintage filter or make your photos pop with vibrant colors, the built-in Photos app on your iPhone offers a range of filter options to choose from.
To get started, follow these steps:
- Open the Photos app on your iPhone and navigate to the Live Photo you want to edit.
- Tap on the photo to open it in full-screen view.
- Swipe up on the photo to reveal the editing options.
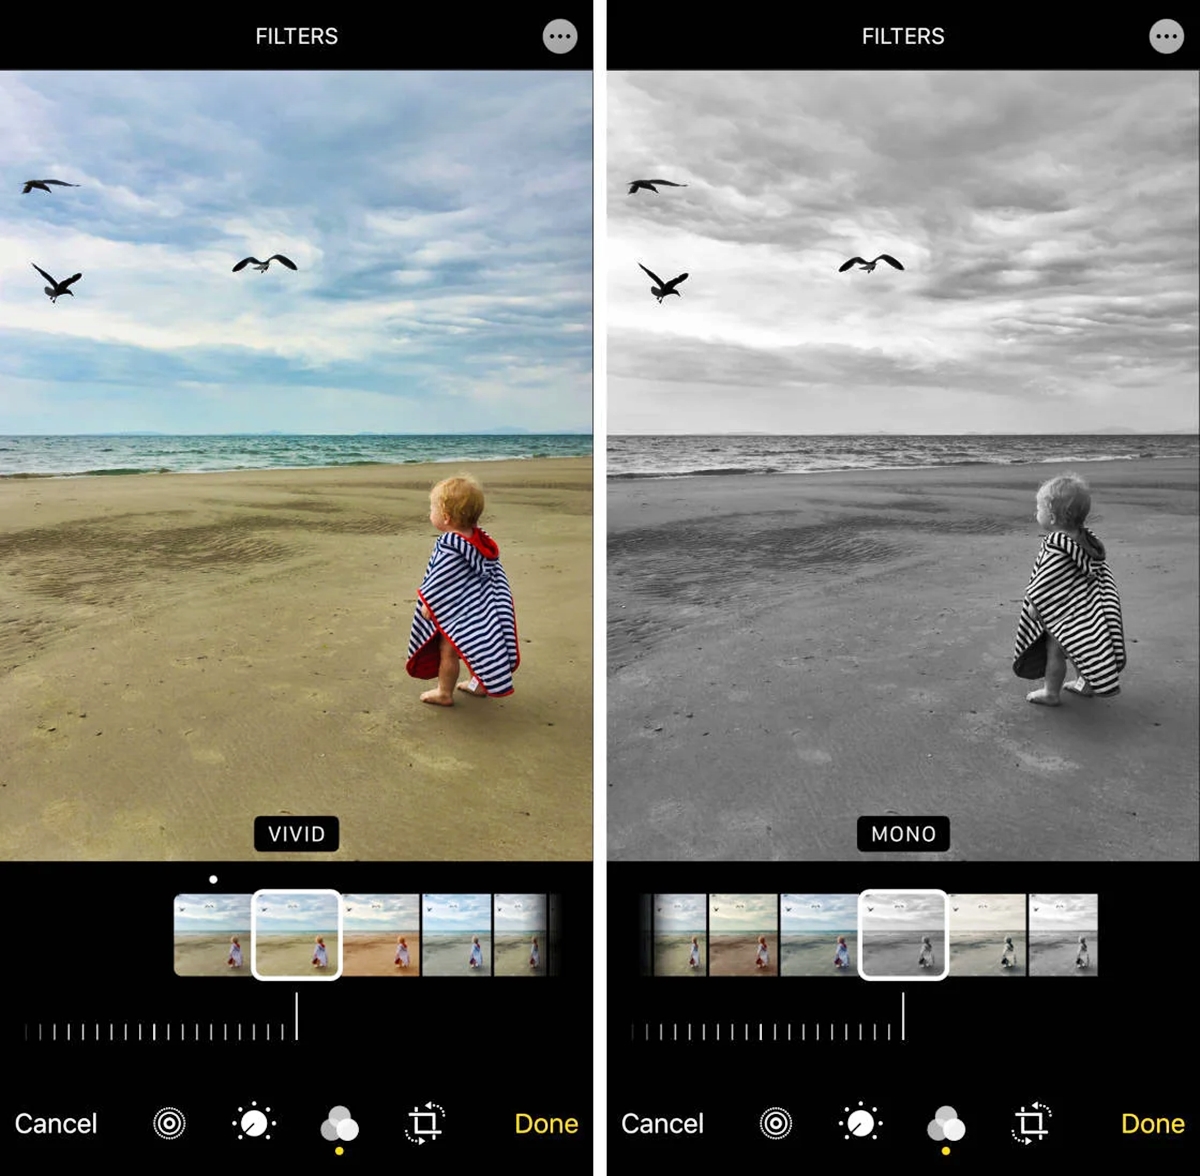
- At the bottom of the screen, you’ll see a row of editing tools. Tap on the three overlapping circles icon to access the Filters menu.
- Once you’re in the Filters menu, you can swipe left or right to preview different filters in real-time. Each filter applies unique adjustments to the photo, such as color saturation, contrast, and tone.
- Take your time to browse through the available filters and choose the one that best suits the mood and style you want to convey.
- When you find the perfect filter, simply tap on it to apply it to your Live Photo.
- After applying the filter, you can further adjust its intensity by using the slider that appears below the filter options.
- Once you’re satisfied with the result, tap “Done” to save the edited Live Photo with the applied filter.
It’s worth mentioning that adding filters to Live Photos on iPhone is non-destructive, meaning the original photo remains untouched. This gives you the flexibility to experiment with different filters and revert back to the original version at any time.
So, don’t be afraid to get creative and have fun with filters to make your Live Photos truly stand out. With just a few taps, you can transform ordinary moments into something extraordinary.
Exploring the New Filter Options in the 2023 Update
With the release of the 2023 update for iPhone, Apple has introduced exciting new filter options to enhance your Live Photos. These new filters provide a range of creative possibilities, allowing you to customize and transform your Live Photos with just a few taps. Let’s take a closer look at some of these new filter options and how you can make the most of them.
1. Vibrant: The Vibrant filter adds a punch of color to your Live Photos, making them more vibrant and lively. It enhances the saturation and contrast, giving your photos a more dynamic and eye-catching appearance. Whether you’re capturing a breathtaking landscape or a joyful moment with friends, the Vibrant filter will make your Live Photos truly pop.
2. Dramatic: If you want to add a touch of drama to your Live Photos, the Dramatic filter is the perfect choice. This filter enhances the shadows and highlights, creating a more intense and moody atmosphere. It’s ideal for capturing powerful portraits or capturing the beauty of a sunset. With the Dramatic filter, your Live Photos will evoke emotions and tell compelling stories.
3. Black and White: Sometimes, a black and white filter can add a timeless and classic feel to your Live Photos. The new Black and White filter option in the 2023 update allows you to easily convert your Live Photos to monochrome. It removes the color and emphasizes texture and contrast, giving your photos a sophisticated and artistic look.
4. Vintage: The Vintage filter option in the 2023 update takes you back in time with its nostalgic and retro aesthetic. It adds a warm and faded tone to your Live Photos, simulating the look of old film cameras. Whether you’re capturing a vintage-inspired portrait or preserving memories of a special occasion, the Vintage filter will give your Live Photos a delightful old-world charm.
5. Matte: The Matte filter option provides a matte finish to your Live Photos, giving them a soft and velvety look. It reduces the overall contrast and saturation, creating a more subdued and elegant appearance. This filter is perfect for creating a dreamy and ethereal atmosphere, ideal for capturing scenic landscapes or intimate moments.
Adding filters to your Live Photos in the 2023 update is incredibly easy. Simply open the Live Photo you want to edit, tap on the “Edit” button, and then select the “Filters” icon. From there, you can explore and experiment with the various filter options until you find the perfect look for your Live Photo.
So, whether you want to make your Live Photos more vibrant, dramatic, or timeless, the new filter options in the 2023 update give you the power to unleash your creativity and elevate your photography skills. Explore the possibilities and have fun creating stunning and captivating Live Photos that will impress your friends and family.
Adding filters to Live Photos on your iPhone is a fun and creative way to enhance your captured moments. With just a few simple steps, you can transform ordinary snapshots into stunning works of art. Whether you want to add a vintage touch, a dramatic flair, or a pop of vibrant colors, the built-in filters on your iPhone allow you to effortlessly customize your Live Photos.
By accessing the editing tools in the Photos app, you can tap into a world of creative possibilities. Experiment with different filters, adjust their intensity, and preview the changes in real-time. Once you have found the perfect filter to complement your Live Photo, you can easily save and share your masterpiece with friends and family.
So, don’t miss out on the opportunity to take your Live Photos to the next level. Start exploring the filter options on your iPhone today and unlock a whole new realm of creativity.
FAQs
1. How do I add filters to Live Photos on iPhone?
To add filters to Live Photos on your iPhone, simply follow these steps:
1. Open the Photos app on your iPhone.
2. Find the Live Photo you want to edit and tap on it.
3. Tap on the Edit button at the top right corner of the screen.
4. Swipe left or right to browse through the available filters.
5. Tap on a filter to apply it to your Live Photo.
6. Adjust the intensity of the filter using the slider at the bottom of the screen if needed.
7. Once you’re satisfied with the result, tap on Done to save the edited Live Photo with the filter applied.
2. Can I remove a filter from a Live Photo on iPhone?
Yes, you can remove a filter from a Live Photo on your iPhone by following these steps:
1. Open the Photos app and locate the Live Photo with the applied filter.
2. Tap on Edit to enter the editing mode.
3. Swipe to the filter that is currently applied to the Live Photo.
4. Tap on None at the beginning of the filter list to remove the applied filter.
5. Tap on Done to save the changes and revert the Live Photo to its original state, without any filter.
3. Can I change the filter intensity on a Live Photo?
Yes, you can change the filter intensity for a Live Photo on your iPhone. Follow these steps:
1. Open the Photos app and select the Live Photo you want to edit.
2. Tap on Edit to enter the editing mode.
3. Swipe left or right to find the filter that is currently applied to the Live Photo.
4. Once you find the filter, tap on it to access the adjustment slider.
5. Slide the intensity bar left or right to increase or decrease the filter effect.
6. When you’re satisfied with the intensity, tap on Done to save the changes and apply the adjusted filter to the Live Photo.
4. Are the filters on Live Photos permanent?
No, the filters applied to Live Photos on iPhone are not permanent. You can change or remove the filters at any time. The original Live Photo remains untouched, and the filters are only applied when viewing or sharing the edited version of the Live Photo. This gives you the flexibility to experiment with different filters and revert to the original photo if desired.
5. Can I add filters to Live Photos taken by other devices?
The ability to add filters to Live Photos is primarily available on Apple devices running iOS. If you have Live Photos taken with a different device or platform, you may need to transfer them to an iOS device to access the filter options. Once on an iOS device, you can use the Photos app to edit and apply filters to Live Photos as described earlier in this article.