
Have you recently purchased a new mobile phone and are excited to set it up? One of the first tasks you may encounter is wiring a phone jack with 6 wires. While it may sound daunting, with the right knowledge and a few simple steps, you can easily connect your phone jack and start enjoying your new device. In this article, we will guide you through the process of wiring a phone jack with 6 wires, providing you with step-by-step instructions and helpful tips along the way. So, whether you are a tech-savvy individual or a beginner, by the end of this article, you will have all the information you need to successfully wire your phone jack and be ready to make calls in no time.
Inside This Article
- Choosing the Right Phone Jack
- Understanding the 6 Wires
- Step-by-Step Wiring Process
- Testing the Connection
- Conclusion
- FAQs
Choosing the Right Phone Jack
When it comes to wiring a phone jack with 6 wires, it’s crucial to start with the right phone jack. Choosing the correct phone jack will ensure a seamless and reliable connection for your telephone line. Here are some factors to consider when selecting the right phone jack:
1. Compatibility: Make sure the phone jack you choose is compatible with your telephone system. Different phone jacks support different wiring configurations, so it’s important to choose one that works with your specific setup. Check the compatibility specifications of the phone jack before making a purchase.
2. Wiring Layout: Consider the wiring layout of your phone system. Some phone jacks are designed for single-line applications, while others are suitable for multi-line systems. Determine the number of lines you need to support and choose a phone jack that accommodates the required wiring configuration.
3. Quality and Durability: Look for a phone jack that is made of high-quality materials and offers durability. The phone jack should be able to withstand regular use and provide a long-lasting connection. Read reviews and choose a reputable brand to ensure reliability and longevity.
4. Additional Features: Consider any additional features or capabilities you may want in a phone jack. Some phone jacks offer features like surge protection, noise reduction, or modular design for easy installation. Assess your specific needs and choose a phone jack that provides the desired features.
5. Price: Finally, consider your budget while choosing a phone jack. While it’s important to prioritize quality and functionality, you should also find a phone jack that fits within your budget. Compare prices and features of different options to find the best balance between affordability and quality.
By considering these factors, you can make an informed decision and choose the right phone jack for wiring your 6-wire telephone system. Remember to consult the manufacturer’s instructions and follow proper installation procedures for a successful wiring process.
Understanding the 6 Wires
When it comes to wiring a phone jack with 6 wires, it’s essential to have a clear understanding of the purpose and function of each wire. Each wire has a specific role in transmitting signals and ensuring a stable connection. By familiarizing yourself with the 6 wires, you’ll be better equipped to troubleshoot any issues and successfully wire your phone jack.
1. Red Wire: The red wire is known as the tip wire and carries the audio signal from the phone to the jack. It’s crucial for ensuring clear and uninterrupted sound transmission.
2. Green Wire: The green wire, also known as the ring wire, is responsible for connecting the phone’s signaling circuit to the jack. It helps facilitate the signaling between the phone and the telephone line.
3. Black Wire: The black wire, also called the ground wire, provides an electrical path for excess current to dissipate. It plays a crucial role in grounding and preventing electrical malfunctions.
4. Yellow Wire: The yellow wire is the secondary tip wire and is used when multiple lines are present. It is typically used for additional phone lines or for special features such as fax machines or modems.
5. White/Orange Wire: The white/orange wire is responsible for transmitting the A ring signal, which is necessary for certain phone systems and configurations.
6. Blue/White Wire: The blue/white wire transmits the B ring signal, which is also necessary for specific phone configurations and systems.
Understanding these 6 wires and their roles is crucial for successfully wiring your phone jack with 6 wires. It’s important to double-check the color-coding of the wires and ensure they are correctly connected for a reliable and functional phone connection.
Step-by-Step Wiring Process
Wiring a phone jack with 6 wires may seem daunting at first, but with the right guidance, it can be a simple and straightforward process. Here is a step-by-step guide to help you through the wiring process:
1. Start by gathering all the necessary tools and materials. You will need a phone jack, six-wire cables (usually color-coded), a screwdriver, wire strippers, and wire connectors.
2. Identify the six wires and their corresponding colors. The standard color-coding for the six wires is usually red, green, yellow, black, white, and blue. Make sure to double-check the color-coding on your specific cables.
3. Strip the outer sheath of the six-wire cable to expose the individual wires. Use your wire strippers carefully to remove the outer insulation, ensuring not to damage the wires inside.
4. Once the wires are exposed, you will notice that each wire has multiple smaller strands. Carefully twist these strands together to ensure a secure connection.
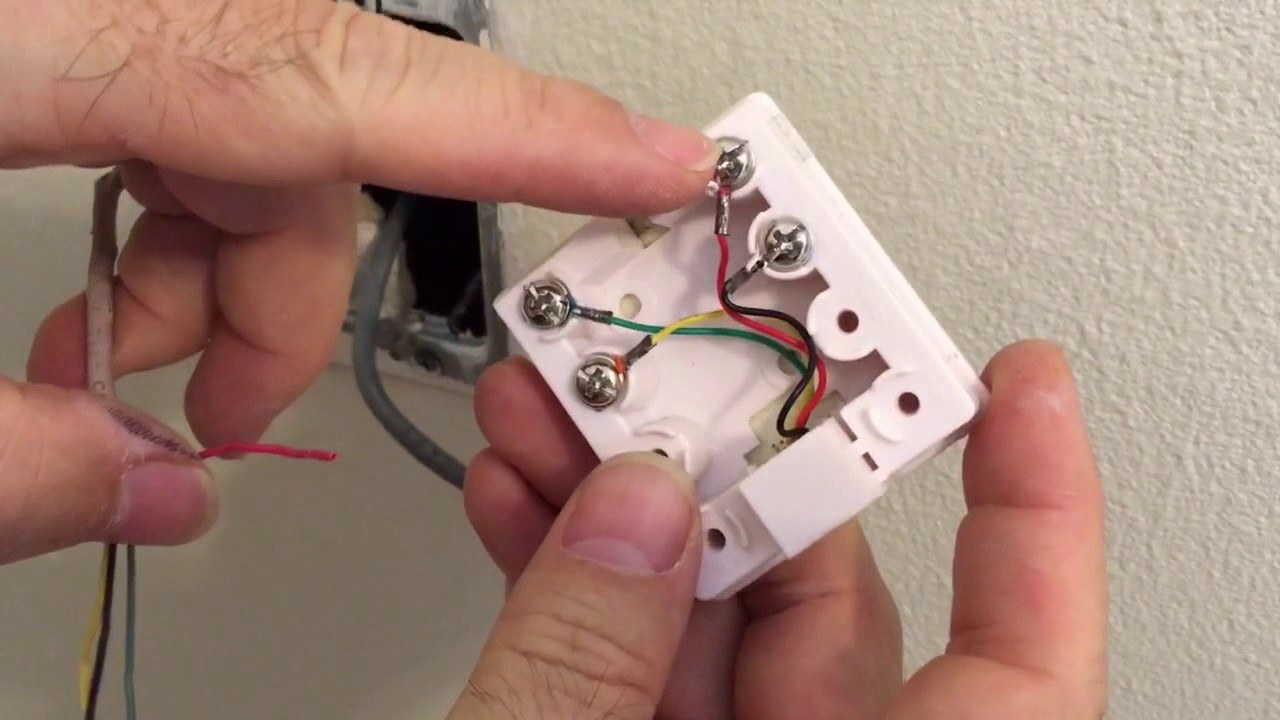
5. Next, it’s time to connect the wires to the phone jack. You will find six terminals on the phone jack, each corresponding to one of the wires. Loosen the screws on the terminals with your screwdriver.
6. Starting with the red wire, insert it into the corresponding terminal on the phone jack and tighten the screw to secure the connection. Repeat this step for each wire, ensuring that each connection is secure.
7. Once all the wires are connected, it’s time to test the connection. Plug a phone into the newly wired jack and check for a dial tone. If you hear a dial tone, congratulations, you have successfully wired the phone jack!
8. In case you don’t hear a dial tone, double-check your wiring connections to make sure they are secure. You may also want to test the phone line from another jack to rule out any issues with the phone line itself.
9. If you’re still encountering issues, it may be helpful to refer to the instructions provided with your specific phone jack or consult an expert for further assistance.
By following these step-by-step instructions, you can wire a phone jack with 6 wires confidently. It’s important to take your time, double-check your connections, and test the line to ensure a successful installation.
Testing the Connection
Once you have successfully wired the phone jack with the 6 wires, it is crucial to test the connection to ensure that everything is working properly. Testing the connection will help you identify any potential issues and make necessary adjustments if needed.
Here are some steps to follow to test the connection:
- Plug in a telephone or a phone line tester into the phone jack that you have wired.
- Pick up the phone receiver and listen for a dial tone. If you hear a dial tone, it means the connection is good, and you have successfully wired the phone jack. Congratulations!
- If you don’t hear a dial tone, double-check the wiring connections to ensure that they are secure and correctly connected. Pay attention to the color coding and make sure each wire is inserted into the appropriate slot.
- If the wiring connections appear to be correct but you still don’t hear a dial tone, check if the phone line tester indicates any issues. The tester will usually have LED lights that indicate the status of the connection. Refer to the user manual of the tester to understand what each light signifies.
- If there are any issues indicated by the tester or you still can’t hear a dial tone, you may need to troubleshoot the wiring. One common issue could be a loose connection or a faulty wire. Carefully inspect each wire connection and reattach them if necessary.
- In case you are using multiple phone jacks in your house or office, repeat the testing process for each jack to ensure that the entire phone line network is functioning correctly.
- Lastly, make a test call to confirm that the phone jack is working perfectly. Dial a number and check if you can hear the other person on the line and if they can hear you clearly. If there are any audio issues, it might be due to an unrelated problem with your phone service provider.
By thoroughly testing the connection and addressing any issues that arise, you can ensure that your newly wired phone jack with 6 wires functions optimally and provides reliable communication.
Conclusion
Wiring a phone jack with 6 wires can be a daunting task, but with the right tools and knowledge, it can be accomplished successfully. By following the step-by-step instructions provided in this article, you can wire a phone jack with 6 wires and ensure a stable and reliable connection for your telephone devices.
Remember to always practice safety precautions when working with electrical wiring and consult a professional if you are unsure about any steps. With proper planning and execution, you can have a properly wired phone jack that allows you to enjoy uninterrupted communication in your home or office.
So, roll up your sleeves, gather your tools, and get ready to wire that phone jack like a pro!
FAQs
1. What types of wires are used in phone jack wiring?
The most common types of wires used in phone jack wiring are Cat5e (Category 5e) and Cat6 (Category 6) cables. These cables are capable of transmitting both data and voice signals.
2. How do I identify the different wires in a phone jack?
In a phone jack with six wires, you can identify the wires by their color coding. Typically, the wires are color coded as follows: white/blue, blue, white/orange, orange, white/green, and green. However, it’s always a good idea to check the manufacturer’s documentation or use a wire tester to be sure.
3. What is the purpose of each wire in a phone jack?
In a phone jack with six wires, the white/blue wire and the blue wire are used for the first phone line, the white/orange wire and the orange wire are used for the second phone line, and the white/green wire and the green wire are used for the third phone line. These wires carry the voice signals to and from the telephone.
4. How do I wire a phone jack with six wires?
To wire a phone jack with six wires, you need to follow the color coding standards. Strip the outer insulation of the cable, separate the individual wires, and use a punch-down tool or a screwdriver to connect the wires to their corresponding terminals on the phone jack. Remember to use the correct color coding for each wire to ensure proper connection.
5. Can I use a phone jack with six wires for other purposes?
Yes, you can use a phone jack with six wires for other purposes besides traditional telephone connections. These wires can also be used for data networking, such as connecting a computer or other network devices. However, you will need to make sure that the wiring is compatible with the specific requirements of the device or system you are connecting.