
Have you ever encountered an old phone jack in your home that you no longer use? Perhaps you’ve upgraded to a new phone system or switched to a wireless setup, leaving that old phone jack obsolete. If you’re wondering how to remove that outdated phone jack, you’ve come to the right place. In this article, we will guide you through the process of removing an old phone jack, whether it’s a wall-mounted jack or a surface-mounted one. We’ll provide step-by-step instructions and offer some tips to make the removal process as smooth as possible. So, let’s dive in and reclaim that wall space or clear up any electrical clutter by saying goodbye to that ancient phone jack.
Inside This Article
- Preparing for Removal
- Disconnecting the Phone Jack
- Removing the Wall Plate
- Patching the Wall
- Conclusion
- FAQs
Preparing for Removal
Before you embark on removing an old phone jack, it’s important to take the necessary steps to ensure a smooth and successful process. Here are a few things you need to do to prepare for the removal:
- Identify the phone jack: Locate the phone jack that you wish to remove. Typically, phone jacks are found on walls, usually near electrical outlets. Take note of its position and surroundings to avoid any damage during the removal process.
- Gather the necessary tools: To remove a phone jack, you’ll need a few basic tools. Make sure you have a screwdriver, needle-nose pliers, wire strippers, and masking tape handy. These tools will help you disconnect the wires and remove the wall plate.
- Switch off the power: Phone jacks are often connected to electrical lines, so it’s crucial to turn off the power before removing them. Locate the right circuit breaker in your home’s electrical panel and flip the switch corresponding to the area where the phone jack is located.
- Take precautionary measures: While removing a phone jack is generally safe, it’s always advisable to take precautions. Consider wearing protective gloves to avoid potential injuries from any sharp edges or wires. Additionally, protective eyewear can prevent any debris from entering your eyes while working on the removal.
- Prepare a workspace: Clear the area around the phone jack, removing any obstructions or items that could get in the way. This will make it easier for you to access the phone jack and work efficiently. It’s also recommended to have a clean and well-lit workspace to ensure visibility during the removal process.
By following these preparatory steps, you’ll be well-equipped to tackle the removal of the old phone jack with ease and minimal disruption.
Disconnecting the Phone Jack
Disconnecting a phone jack may seem a bit daunting, but with the right steps and precautions, it can be a simple process. Follow the steps below to safely disconnect the phone jack:
1. Locate the phone jack: The phone jack is usually mounted on the wall or baseboard. It is typically a small rectangular box with a cover plate that may be screwed or snapped in place. Take note of any wires connected to the jack.
2. Turn off the power: Before working on the phone jack, it is crucial to turn off the power to avoid any electrical mishaps. Locate the circuit breaker or fuse box and switch off the circuit that supplies power to the phone jack.
3. Access the inside wiring: Once the power is turned off, you can remove the cover plate of the phone jack. Carefully unscrew or detach the plate to expose the wiring inside.
4. Identify the wires: Take a moment to identify the different wires connected to the phone jack. Typically, there will be colored wires such as red, green, yellow, and black. Each wire serves a specific purpose, so it’s essential to keep track.
5. Disconnect the wires: Using a screwdriver or pliers, loosen the screws or clips holding the wires in place. Gently pull the wires away from the phone jack one at a time, ensuring that they are fully disconnected.
6. Test for dial tone: After disconnecting the wires, it’s a good idea to test the phone line for a dial tone. Connect a phone to another jack in your home and check if you can make or receive calls. If there is no dial tone or any issues, you may need to troubleshoot or contact a professional to resolve the problem.
7. Secure the wires: If you plan on reusing the phone jack or connecting a new one, it’s important to secure the loose wires. Use wire nuts or electrical tape to prevent the wires from touching or causing any electrical hazards.
8. Reinstall the cover plate: Once the wires are properly secured, reinstall the cover plate on the phone jack. Ensure that it is securely fastened to the wall or baseboard.
By following these steps, you can safely disconnect a phone jack without any hassle. Remember to exercise caution, turn off the power, and seek professional help if you encounter any difficulties or uncertainties during the process.
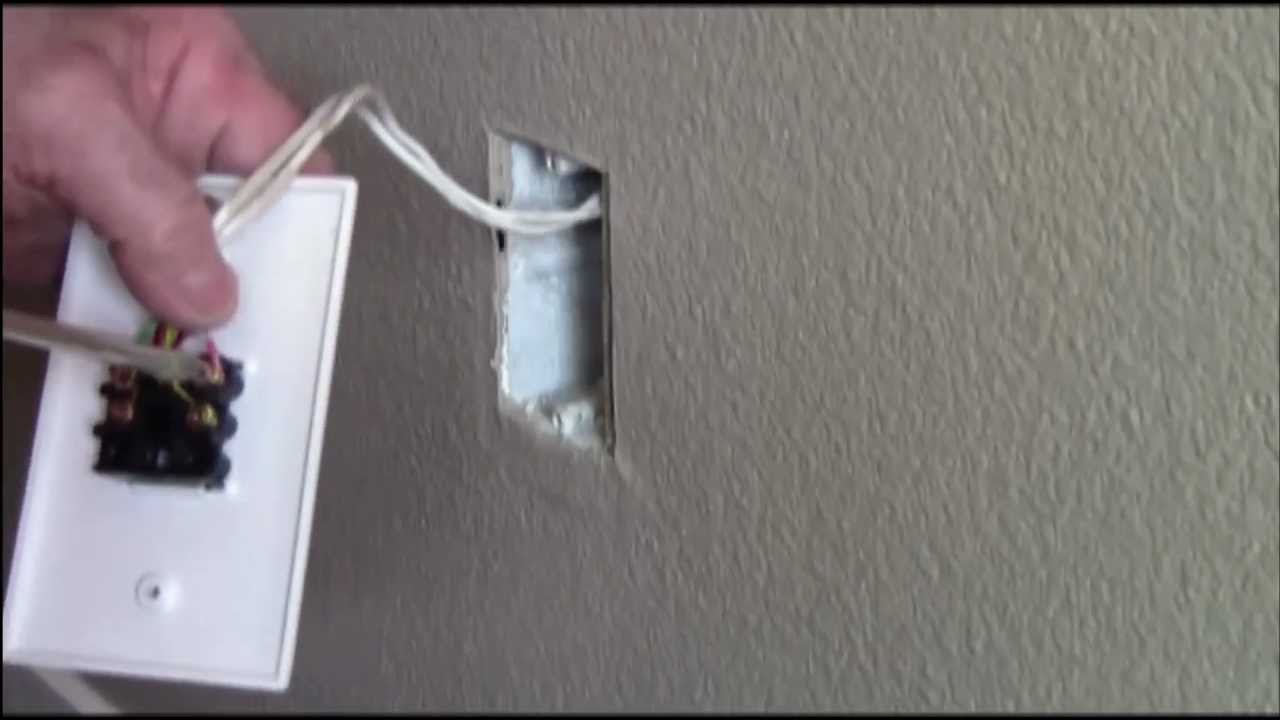
Removing the Wall Plate
Once you have successfully disconnected the phone jack, the next step is to remove the wall plate. To do this, follow these simple steps:
- Gather the necessary tools: Before you begin, make sure you have the right tools for the job. You will need a screwdriver, preferably a flathead or Phillips head depending on the type of screws holding the wall plate in place.
- Inspect the wall plate: Take a close look at the wall plate to determine how it is attached to the wall. Most commonly, wall plates are secured with screws in the corners or along the edges. Some wall plates may also be attached with adhesive.
- Remove the screws: If the wall plate is secured with screws, use your screwdriver to carefully unscrew them. Turn the screws counterclockwise until they are fully removed. Place the screws in a safe spot to avoid losing them.
- Detach the wall plate: After removing the screws, gently pull the wall plate away from the wall. Be cautious not to apply too much force to avoid damaging the wall or the wire connections behind the plate.
- Disconnect any remaining wires: Once the wall plate is detached from the wall, you may need to disconnect any wires still attached to it. Use a small pair of pliers to loosen any wire connectors and carefully remove the wires.
- Inspect the wires: Take a moment to inspect the wires for any signs of damage or wear. If any wires appear to be frayed or damaged, it is important to address the issue before proceeding with patching the wall.
- Store the wall plate and screws: Keep the wall plate and screws in a safe place, especially if you plan on reusing them in the future. It’s always good to have spare parts on hand.
Removing the wall plate is an essential step in the process of removing an old phone jack. By following these steps carefully, you can successfully remove the wall plate without causing any damage and prepare the wall for patching.
Patching the Wall
After removing the old phone jack and disconnecting all the wires, it’s time to patch up the wall beautifully. This step is crucial to ensure a seamless finish and restore the aesthetic appeal of your room.
Here’s a step-by-step guide to patching the wall after removing an old phone jack:
- Beging by inspecting the wall for any cracks, holes, or damage. If you find any, use a putty knife to scrape away any loose debris or flaking paint.
- Next, fill the cracks or holes with a lightweight spackling compound. Apply the compound using a putty knife, making sure to smooth it out evenly. Allow the compound to dry completely, following the manufacturer’s instructions.
- Once the spackling compound is dry, sand the patched area gently with fine-grit sandpaper. This will create a smooth surface and help blend the patch with the rest of the wall.
- Clean the area with a damp cloth to remove any dust or debris left from sanding.
- If necessary, apply a primer to the patched area. This will help the paint adhere better and ensure an even finish.
- Finally, apply paint to the patched area, matching the color and finish of the surrounding wall. Use a small brush or roller for precision, ensuring that the paint is applied evenly and smoothly. Allow the paint to dry completely before touching or hanging anything on the wall.
And there you have it! Your wall should now be beautifully patched and ready to go. Take a step back and admire your handiwork, knowing that you’ve successfully removed an old phone jack and left your wall looking pristine.
Remember, if you’re not confident in your patching skills, it’s always a good idea to consult a professional. They will have the expertise and tools necessary to ensure a flawless finish and protect the integrity of your wall.
Conclusion
In conclusion, removing an old phone jack can be a straightforward process with the right tools and knowledge. By following the steps outlined in this article, you can safely and effectively remove an outdated phone jack from your home or office wall.
Remember, it is always important to exercise caution when working with electrical components. If you are unsure or uncomfortable with performing the removal yourself, it is recommended to seek the assistance of a professional.
By removing old phone jacks, you can not only declutter your space but also make way for modern telecommunications technologies. Whether you are transitioning to a wireless phone system or simply no longer need a landline, removing old phone jacks can help streamline your communication setup.
So, don’t let those outdated and unused phone jacks take up valuable wall space. Take the necessary steps to remove them and enjoy a cleaner and more efficient living or working environment.
FAQs
1. Can I remove an old phone jack myself?
Yes, you can remove an old phone jack yourself with some basic tools and knowledge. Disconnect the line from the telephone network interface and unscrew the mounting screws to detach the jack from the wall. Remember to turn off the power and use caution when working with electrical wiring.
2. What tools do I need to remove an old phone jack?
To remove an old phone jack, you will need a screwdriver (usually a Phillips head), wire strippers, needle-nose pliers, and a voltage tester. These tools will help you safely disconnect the wires and remove the mounting screws.
3. Should I turn off the power before removing an old phone jack?
Yes, it is essential to turn off the power before removing an old phone jack. Phone jacks are often connected to electrical wiring, so shutting off the power will prevent any potential electrical hazards while you work on removing the jack.
4. Can removing an old phone jack cause any damage to the wall?
When done carefully, removing an old phone jack should not cause any significant damage to the wall. However, there may be small holes left behind from the mounting screws and wiring. These holes can easily be patched and painted over for a seamless finish.
5. What should I do with the wires after removing the old phone jack?
After removing the old phone jack, you can either disconnect the wires completely or cap them off if you plan to install a new phone jack later. If you are unsure about working with the wires, it is recommended to consult a professional electrician.