
Are you struggling to install a wireless adapter on your desktop computer? Well, you’ve come to the right place! In this article, we will provide you with a comprehensive guide on how to install a wireless adapter on your desktop and get you connected to the internet in no time. Whether you’re upgrading an older desktop or building a new one, a wireless adapter is essential for a wireless internet connection. We understand that the installation process can be confusing and overwhelming, but fear not! We will break it down into simple and easy-to-follow steps, ensuring that even the least tech-savvy individuals can successfully install a wireless adapter. So, let’s dive in and get your desktop wirelessly connected!
Inside This Article
- Overview of Wireless Adapters
- Step 1: Checking the Compatibility
- Step 2: Preparation and Gathering of Resources
- Step 3: Opening the Desktop Tower
- Step 4: Identifying the PCI Slot
- Step 5: Installing the Wireless Adapter
- Step 6: Securing the Adapter
- Step 7: Closing the Desktop Tower
- Troubleshooting Tips
- Conclusion
- FAQs
Overview of Wireless Adapters
Wireless adapters are devices that enable wireless connectivity on desktop computers. They eliminate the need for cumbersome Ethernet cables and allow users to connect to the internet or other wireless devices effortlessly.
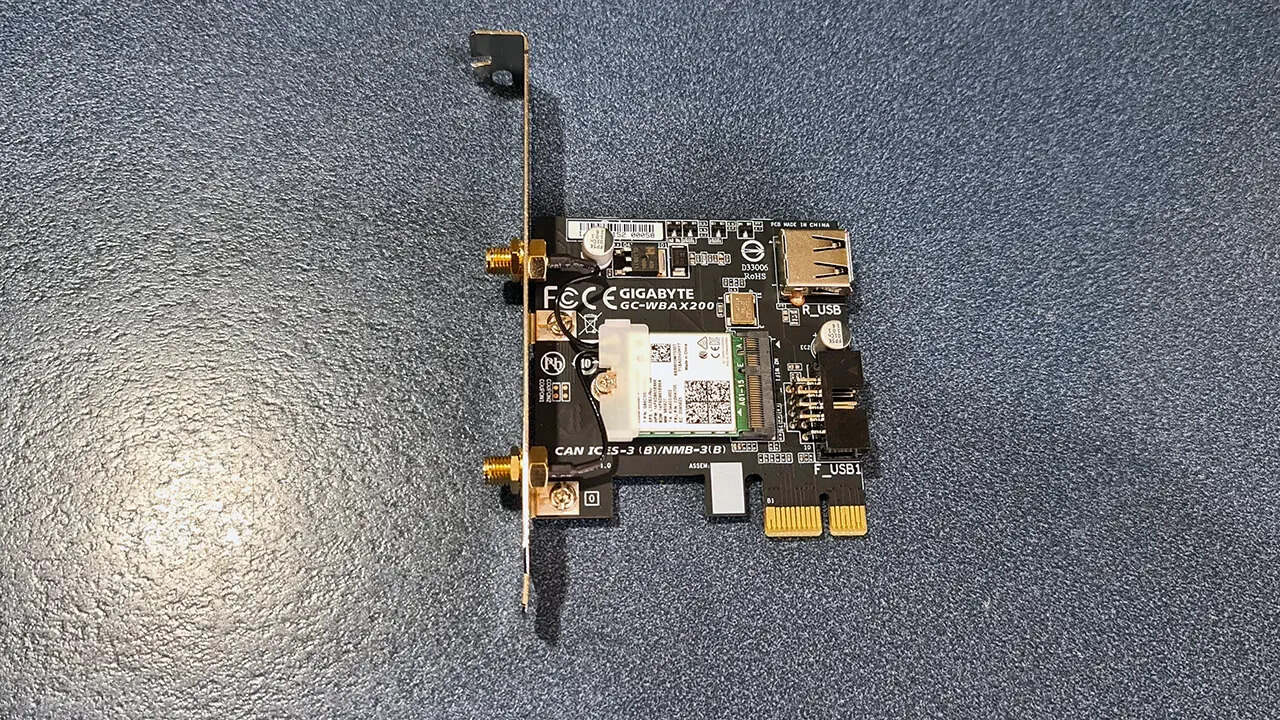
Wireless adapters come in various forms, including USB dongles, PCI cards, and PCIe cards. USB dongles are the most common type and are easy to install and use. PCI and PCIe cards, on the other hand, require opening up the desktop tower and physically installing the adapter into an available slot.
These adapters use wireless technology such as Wi-Fi to connect to networks or devices. They work by picking up signals from Wi-Fi routers and transmitting them to the computer or vice versa. This allows users to browse the internet, stream media, and connect to other devices wirelessly.
Wireless adapters also come with different specifications, such as signal strength, frequency bands, and data transfer speeds. It is important to choose an adapter that is compatible with your desktop’s operating system and meets your specific needs.
When selecting a wireless adapter, consider the range required to cover your workspace or home. Adapters with longer range capabilities are ideal for larger areas, while those with shorter range are suited for smaller spaces.
Furthermore, it is worth noting that wireless adapters now support the latest Wi-Fi standards, such as 802.11ac and 802.11ax, which offer faster and more reliable connections. It’s important to choose an adapter that supports the latest standards to ensure optimal performance.
Step 1: Checking the Compatibility
Before diving into the installation process, it’s crucial to ensure that the wireless adapter you have is compatible with your desktop. Compatibility plays a vital role in guaranteeing a smooth and successful installation.
Firstly, you need to determine the type of wireless adapter that is compatible with your desktop. Check if your desktop supports a PCI, PCIe, or USB wireless adapter. This information can usually be found in the specifications of your desktop or motherboard manual.
Next, it’s important to verify the operating system compatibility. Make sure that the wireless adapter you have is compatible with the version of the operating system running on your desktop. Double-check the system requirements mentioned by the manufacturer to avoid any compatibility issues.
Furthermore, take into consideration the wireless standards supported by your desktop and the wireless adapter. The most common wireless standards are 802.11a, 802.11b, 802.11g, 802.11n, and 802.11ac. Ensure that the wireless adapter you have is compatible with the same wireless standard or higher supported by your desktop.
Lastly, consider the antenna requirements. Some wireless adapters come with external antennas, while others have internal antennas. Ensure that your desktop has the necessary antenna connectors or enough space to accommodate the wireless adapter with its antenna.
By thoroughly checking the compatibility of your wireless adapter with your desktop, you can save time, effort, and avoid any potential installation issues that may arise due to incompatibility.
Step 2: Preparation and Gathering of Resources
Before you start the installation process, it’s important to properly prepare and gather all the necessary resources. This will ensure a smooth and convenient installation of the wireless adapter on your desktop. Here are the key steps to follow:
1. Read the instructions: Begin by reading the instructions that came with your wireless adapter. This will give you a better understanding of the installation process and any specific requirements.
2. Check for compatibility: Ensure that the wireless adapter you have is compatible with your desktop computer. Look for the appropriate specifications, such as the compatible operating systems and connection types.
3. Collect the necessary tools: Gather the tools that you will need for installation. This may include a screwdriver, antistatic wristband (optional but recommended), and any other specific tools mentioned in the instructions.
4. Download the drivers: Visit the manufacturer’s website to download the latest drivers for your wireless adapter. This will ensure that you have the most up-to-date software for optimal performance.
5. Disable the internal wireless: If your desktop already has an internal wireless adapter, it’s advisable to disable it before installing the new adapter. This can prevent any conflicts or interference between the two devices.
6. Choose a suitable location: Decide on the best location to install the wireless adapter within the desktop tower. Consider factors such as proximity to the antenna, accessibility, and interference from other components.
7. Prepare the workspace: Clear a suitable workspace and ensure that it is clean and free from static electricity. This will minimize the risk of damaging any components during the installation process.
8. Ground yourself: To prevent static electricity from damaging electronic components, wear an antistatic wristband or periodically touch a grounded metal object while installing the wireless adapter.
9. Take necessary precautions: Before proceeding with the installation, ensure that the desktop computer is turned off and unplugged from the power source. This will eliminate any risk of electric shock or damage to the equipment.
By adequately preparing and gathering all the necessary resources, you will be well-equipped to tackle the next steps of the wireless adapter installation process with confidence.
Step 3: Opening the Desktop Tower
Opening the desktop tower is an essential step in installing a wireless adapter. This allows you to access the internal components of your computer and locate the appropriate slot for inserting the adapter. Before you begin this process, it’s crucial to ensure your computer is turned off and unplugged from the power source to prevent any accidents or damage.
Start by locating the screws or latches that hold the side panel of your desktop tower in place. These are typically located on the back or side of the tower. Use a screwdriver or release the latches to remove the panel carefully.
Once the panel is removed, you will have a clear view of the internal components of your computer. Take a moment to familiarize yourself with the layout, and identify the available expansion slots. The PCI slot, which is commonly used for wireless adapter installation, is typically located near the bottom of the tower.
Before proceeding further, it’s important to discharge any static electricity from your body to prevent any damage to the sensitive computer components. You can do this by touching a grounded metal object such as a doorknob or a metal surface.
Now that you have the panel removed and discharged any static electricity, you can proceed with installing the wireless adapter into the PCI slot. Ensure to handle the adapter carefully, avoiding any excessive force or bending of the components.
In some cases, you may need to remove a metal bracket covering the slot before inserting the adapter. Use a screwdriver or your fingers, depending on the design, to remove the bracket carefully. Set it aside in a safe place, as you may need it if you ever decide to remove the wireless adapter in the future.
With the slot ready, align the wireless adapter with the PCI slot and gently slide it in. Ensure that the gold-colored edge of the adapter is fully inserted into the slot to establish a proper connection. Apply an even amount of pressure to ensure the adapter is secure.
Once the adapter is inserted, you can secure it in place by replacing the metal bracket if it was removed earlier. Use the screws or latches to reattach the side panel of your desktop tower, making sure it is snugly in place.
Now that you have successfully opened your desktop tower and installed the wireless adapter into the appropriate slot, you’re one step closer to enjoying a seamless and reliable wireless connection. In the next step, we will guide you through the process of securing the adapter and completing the installation.
Step 4: Identifying the PCI Slot
Identifying the PCI slot for installing your wireless adapter is a crucial step in the installation process. The PCI slot is a standardized slot found on the motherboard of your desktop computer. It allows you to easily connect various expansion cards, including wireless adapters.
To locate the PCI slot, you’ll need to open your desktop tower case. Ensure that your computer is powered off and unplugged before proceeding. Remove the side panel of the tower by unscrewing the screws or sliding a latch, depending on the case design.
Once the case is open, you’ll be able to see all the components inside. Locate the motherboard, which is the large circuit board that houses various vital components of your computer. Look for the expansion slots on the motherboard. They are typically located towards the bottom of the motherboard and will be arranged horizontally.
The PCI slots are usually white or sometimes brown in color and have a series of small metal contacts inside. These contacts are where the wireless adapter will be inserted. Take a moment to familiarize yourself with the layout of the slots and identify the available empty slot where you’ll be installing the wireless adapter.
If you’re unsure which slot is the PCI slot, consult your computer’s user manual or refer to the manufacturer’s website for guidance. They usually provide detailed information and diagrams that can help you identify the PCI slot more easily.
Once you’ve identified the PCI slot, you’re ready to move on to the next step of the installation process – installing the wireless adapter.
Step 5: Installing the Wireless Adapter
Now that you have identified the PCI slot in your desktop tower, it’s time to move on to the next step: installing the wireless adapter. This process is relatively straightforward, but it’s important to follow the instructions carefully to ensure a successful installation. Here’s a step-by-step guide to help you through the process:
1. Start by handling the wireless adapter carefully. Hold it by the edges to avoid any damage to the delicate components.
2. Align the PCI connector of the wireless adapter with the PCI slot you identified earlier. Make sure the metal contacts on the bottom of the adapter are facing down towards the slot.
3. Gently insert the wireless adapter into the PCI slot. Apply firm and even pressure until the adapter is fully seated in the slot. Be cautious and avoid using excessive force, as it can cause damage to the motherboard or the adapter itself.
4. Once the adapter is inserted, you will need to secure it in place. Locate the small screw hole on the wireless adapter and align it with the corresponding hole on the bracket of the PCI slot.
5. Use a screwdriver to carefully attach the screw and tighten it. Make sure the adapter is securely fastened to prevent any movement or disconnection during use.
6. Double-check all the connections and ensure that the wireless adapter is properly seated and secured in the PCI slot.
7. After verifying everything is in place, close the desktop tower by putting the side panel back on and tightening any screws or latches.
That’s it! You have successfully installed the wireless adapter in your desktop. Now you can enjoy the benefits of wireless connectivity without the need for cumbersome cables.
Keep in mind that if the wireless adapter came with any software or drivers, you may need to install them before the device can function properly. Be sure to check the manufacturer’s instructions for any additional setup steps or software installation requirements.
Step 6: Securing the Adapter
Now that you have successfully installed the wireless adapter into the PCI slot of your desktop, it’s time to securely attach it to ensure proper functionality. Securing the adapter is essential to prevent any accidental disconnection or movement that could lead to poor signal reception or even damage to the device.
Here are a few simple steps to follow in order to securely attach your wireless adapter:
- Locate the mounting bracket: Most wireless adapters come with a small metal bracket that is designed to hold the device firmly in place. This bracket typically has screw holes for attaching it to the back of your desktop tower.
- Align the adapter with the bracket: Place the wireless adapter onto the mounting bracket in the appropriate position. Make sure that the connectors on the adapter align with the corresponding slots on the bracket.
- Secure the adapter with screws: Once the adapter is aligned with the bracket, use the provided screws to fasten it securely. Insert the screws into the screw holes on the bracket and tighten them gently using a screwdriver. Be careful not to overtighten, as it may cause damage to the adapter or the bracket.
- Check for stability: After securing the adapter, give it a gentle wiggle to ensure it is firmly attached. If you notice any loose movement, double-check the screws and tighten them if necessary.
By following these steps, you can ensure that your wireless adapter stays securely in place, allowing it to function optimally and provide you with a reliable wireless connection for your desktop. This way, you can enjoy seamless internet connectivity without any worrying about the adapter coming loose.
Step 7: Closing the Desktop Tower
After successfully installing the wireless adapter in your desktop tower, it’s time to bring everything to a close. This step involves securely closing the tower to ensure that all components are properly aligned and protected.
Here are the key steps to follow when closing your desktop tower:
- Gently place the tower cover back on: Carefully align the cover with the edges of the tower chassis. Ensure that all clips or screws are properly aligned with the corresponding holes.
- Secure the cover: Once the cover is aligned, use the provided screws or clips to secure it in place. Make sure to tighten the screws adequately, but avoid overtightening as it may damage the housing or components inside.
- Double-check for loose connections: Before finalizing the closure, take a moment to inspect all the connections inside the tower. Make sure that the wires, cables, and components are properly connected and secured. This will help prevent any potential issues down the line.
- Power on your desktop: Once you’re confident that everything is in place, plug in the power cord and press the power button to turn on your desktop. Check if the wireless adapter is recognized and working correctly.
It’s important to note that closing the desktop tower is a delicate process. Take your time, be gentle, and double-check everything to ensure a secure and proper closure.
If you encounter any difficulties or have concerns about closing the tower, consult your desktop’s user manual or seek the assistance of a professional technician. Remember, it’s better to be safe than sorry when it comes to handling your valuable equipment.
Troubleshooting Tips
If you encounter any issues while installing or using your wireless adapter on your desktop, don’t panic! There are several troubleshooting tips you can follow to resolve them. Here are some common problems and their solutions:
1. No Internet Connection: If you’ve successfully installed the wireless adapter but still can’t connect to the internet, ensure that your router is turned on. Check if other devices are connected to the internet and try resetting your router. Also, make sure that you’ve entered the correct password for your network.
2. Weak Signal or Low Range: If you’re experiencing a weak signal or limited range, try moving closer to the router. Wi-Fi signals can be obstructed by walls or other objects, so positioning your desktop in a more open area may improve the signal strength. You can also try adjusting the position and orientation of the antennas on the wireless adapter.
3. Driver Issues: Sometimes, driver conflicts or outdated drivers can cause connectivity problems. Check the manufacturer’s website for the latest driver updates for your wireless adapter model. Download and install the updated drivers, then restart your computer to see if it resolves the issue.
4. Interference from Other Devices: Other electronic devices in close proximity to your desktop could interfere with the wireless signal. Devices such as cordless phones, microwaves, and baby monitors can disrupt the Wi-Fi connection. Try relocating your desktop away from these devices or switch to a different wireless channel on your router to minimize interference.
5. Incorrect Network Configuration: Double-check your network settings to ensure that they are configured correctly. Make sure you have assigned the correct IP address, DNS server, and gateway. If you’re unsure about any of these settings, you can contact your internet service provider or refer to the router’s user manual for guidance.
6. Antivirus or Firewall Restrictions: Some antivirus programs or firewalls may block certain network connections, including Wi-Fi. Temporarily disable your antivirus software or firewall to see if it resolves the issue. If it does, you can adjust the settings to allow the necessary network connections for your wireless adapter.
7. Resetting the Adapter: As a last resort, you can try resetting the wireless adapter. Turn off your desktop, unplug the power source, remove the wireless adapter, wait for a few minutes, then plug the adapter back in and power on your computer. This will reset the adapter and its settings, potentially resolving any persistent issues.
Remember, troubleshooting steps may vary depending on the specific wireless adapter and operating system you’re using. Always refer to the manufacturer’s documentation and support resources for detailed troubleshooting instructions tailored to your device.
By following these troubleshooting tips, you’ll be better equipped to overcome any obstacles you may encounter while installing or using your wireless adapter on your desktop. And before you know it, you’ll be enjoying hassle-free wireless connectivity!
Conclusion
Installing a wireless adapter on your desktop is a convenient and efficient way to add wireless connectivity to your device. By following the step-by-step instructions provided in this article, you can easily set up a wireless adapter and enjoy the wireless freedom it provides.
Remember to choose a compatible wireless adapter, ensure that you have the necessary drivers, and follow the installation process correctly. With a wireless adapter, you can connect to Wi-Fi networks, enjoy faster internet speeds, and eliminate the need for cumbersome wired connections.
Having a wireless connection opens up a whole new world of possibilities, allowing you to stream media, play online games, and connect with ease. So, don’t let the lack of built-in Wi-Fi on your desktop limit your connectivity options. Upgrade your device with a wireless adapter and experience the convenience and flexibility of wireless networking.
FAQs
1. How do I install a wireless adapter on my desktop?
2. Do I need to install drivers for a wireless adapter?
3. Can I install a wireless adapter on any desktop computer?
4. What are the benefits of using a wireless adapter on my desktop?
5. How do I troubleshoot common issues with a wireless adapter on my desktop?