
Are you having trouble turning on the wireless capability on your Windows 7 computer? Don’t worry, you’re not alone. Many users struggle with enabling the wireless feature on their laptops or desktops running Windows 7. Whether you need to connect to a Wi-Fi network or troubleshoot a network issue, having wireless capability is essential.
In this article, we’ll guide you through the step-by-step process of turning on the wireless capability in Windows 7. We’ll provide you with easy-to-follow instructions and troubleshooting tips so that you can get your wireless connection up and running in no time.
So, let’s get started and learn how to activate the wireless capability on your Windows 7 device!
Inside This Article
- Understanding Wireless Capability
- Turning on Wireless Capability in Windows 7
- Troubleshooting Wireless Capability Issues in Windows 7
- Conclusion
- FAQs
Understanding Wireless Capability
Wireless capability is an essential feature in modern devices that allows them to connect to wireless networks for internet access, file sharing, and other network-dependent tasks. In the context of Windows 7, wireless capability refers to the ability of a device to connect to and communicate with Wi-Fi networks.
Wireless capability is facilitated by a network adapter, typically in the form of a wireless card or module, which is installed in the device. This network adapter enables the device to establish a wireless connection by transmitting and receiving data signals through the airwaves.
Wireless capability offers numerous advantages, including mobility, convenience, and flexibility. With this feature, you can connect to wireless networks in various locations, such as your home, office, coffee shops, or airports, without the need for physical cables or wires.
It is worth noting that wireless capability is not limited to laptops or computers. Many other devices, such as smartphones, tablets, gaming consoles, and smart TVs, also have built-in wireless adapters to enable Wi-Fi connectivity. This ensures that you can stay connected and access the internet on the go.
With an understanding of wireless capability, you are now ready to learn how to turn on this feature in Windows 7. This will allow you to harness the power of wireless networks and fully enjoy the benefits they offer.
Turning on Wireless Capability in Windows 7
Windows 7 is a popular operating system that provides seamless connectivity, allowing users to connect to wireless networks and browse the internet. However, if you’re facing issues with your wireless capability and need to turn it on, fret not! In this article, we’ll walk you through the step-by-step process of enabling wireless capability in Windows 7.
Before we dive into the instructions, it’s essential to understand what wireless capability means. In simple terms, wireless capability refers to the ability of your device to connect to wireless networks. This is especially crucial for laptops, as it allows users to access the internet without the need for physical cables.
To turn on the wireless capability in Windows 7, follow these easy steps:
- Click on the Start button located at the bottom left corner of your screen.
- Select Control Panel from the Start menu.
- In the Control Panel window, click on the Network and Internet option.
- Next, click on the Network and Sharing Center.
- Within the Network and Sharing Center, you’ll find the option for Change Adapter Settings. Click on it.
- Look for the wireless network adapter icon, which usually displays as Wi-Fi or Wireless Network Connection.
- Right-click on the wireless network adapter icon and select Enable.
- Once enabled, your wireless capability should now be turned on, allowing you to connect to available networks.
It’s worth noting that some laptops have a physical switch or button to turn on or off the wireless capability. If this is the case, make sure the switch is in the “on” position to enable wireless connectivity.
If you’re still encountering issues with your wireless capability, here are a few troubleshooting tips:
- Update your wireless network driver by visiting the manufacturer’s website and downloading the latest driver for your specific laptop model.
- Restart your wireless router by unplugging it from the power source, waiting for a few seconds, and then plugging it back in.
- Disable and enable the wireless network adapter in the Device Manager. Right-click on the adapter, select Disable, wait for a few seconds, and then select Enable.
- Check if the Wi-Fi switch on your laptop is turned on. Some laptops have a physical switch that needs to be in the “on” position for wireless connectivity.
By following these steps and troubleshooting tips, you should be able to turn on the wireless capability in Windows 7 successfully. Enjoy seamless internet connectivity and stay connected wherever you go!
Troubleshooting Wireless Capability Issues in Windows 7
If you’re experiencing issues with your wireless capability in Windows 7, don’t worry – you’re not alone. Many users encounter problems with connecting to Wi-Fi or Bluetooth devices in this operating system. Fortunately, there are several troubleshooting steps you can take to resolve these issues and get your wireless capability back up and running. In this article, we will guide you through the process of troubleshooting wireless capability problems in Windows 7.
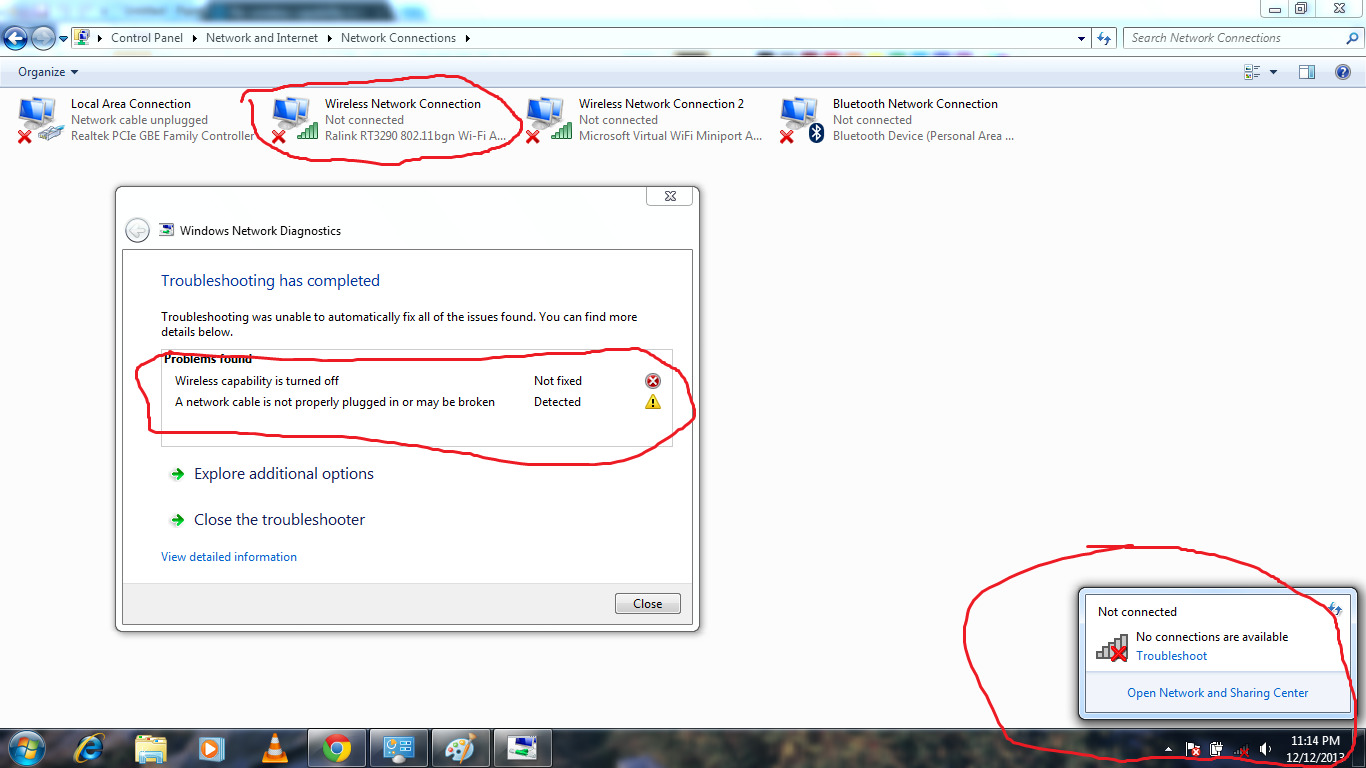
1. Check if wireless capability is enabled: The first step is to ensure that your wireless capability is enabled. You can do this by pressing the Wi-Fi or wireless button on your device, or by going into the Network and Sharing Center in the Control Panel and checking the status of your wireless adapter.
2. Update or reinstall wireless drivers: Outdated or corrupt wireless drivers can cause wireless capability issues. To fix this, you can update your wireless drivers by going to the manufacturer’s website and downloading the latest drivers for your device. If updating the drivers doesn’t work, you can try uninstalling the existing drivers and reinstalling them.
3. Restart the wireless service: Sometimes, the wireless service may stop running, preventing your device from connecting to Wi-Fi or Bluetooth devices. To restart the service, go to the Start menu, type “services.msc” in the search box, and press Enter. In the Services window, locate the “Wireless Zero Configuration” service, right-click on it, and select Restart.
4. Check for interference: Wireless signals can be affected by interference from other devices or objects. Make sure there are no obstructions, such as walls or large objects, between your device and the wireless router or Bluetooth device. Additionally, try moving closer to the router to see if that improves the connection.
5. Disable power saving mode: Some devices have power saving settings that can affect the wireless capability. To disable power saving mode, go to the Control Panel, click on Power Options, and select the High performance plan. This will ensure that your device is not limiting the power sent to the wireless adapter.
6. Reset network settings: If none of the above steps work, you can try resetting the network settings on your device. To do this, go to the Control Panel, click on Network and Internet, and select Network and Sharing Center. From there, click on “Change adapter settings,” right-click on your wireless adapter, and select Disable. After a few seconds, right-click on the adapter again and select Enable.
7. Contact technical support: If you have tried all the troubleshooting steps and are still experiencing wireless capability issues, it may be time to contact technical support. They can provide further assistance and help you resolve the problem.
By following these troubleshooting steps, you should be able to fix any wireless capability issues you’re facing in Windows 7. Remember to always check if your wireless capability is enabled, update or reinstall your wireless drivers, restart the wireless service, check for interference, disable power saving mode, and reset network settings. If all else fails, don’t hesitate to reach out to technical support for further assistance. Happy wireless computing!
Conclusion
In conclusion, turning on the wireless capability in Windows 7 is a fairly simple process that can greatly enhance your connectivity options. By following the steps outlined in this article, you can quickly enable wireless functionality on your device and enjoy the convenience of wireless networks.
Having a reliable and efficient wireless connection is essential in today’s digital age, enabling us to stay connected, work remotely, and access the vast resources of the internet. Whether you’re using a laptop, desktop, or tablet with Windows 7, it’s important to know how to activate the wireless capability to make the most out of your device.
We hope this article has provided you with valuable insights and step-by-step instructions on how to turn on wireless capability in Windows 7. Remember to consult your device’s user manual or contact the manufacturer for any specific troubleshooting instructions or further assistance you may need.
Now, go ahead and enjoy the freedom and convenience of wireless connectivity on your Windows 7 device!
FAQs
Q: How do I turn on wireless capability in Windows 7?
A: To turn on wireless capability in Windows 7, you can follow these steps:
- Click on the “Start” button and navigate to the “Control Panel.”
- In the Control Panel, select “Network and Sharing Center.”
- Click on “Change adapter settings” on the left-hand side of the window.
- Right-click on the wireless network adapter you want to enable and select “Enable” from the context menu.
Q: How can I check if my wireless capability is already enabled in Windows 7?
A: To check if your wireless capability is enabled in Windows 7, follow these steps:
- Click on the wireless network icon in the system tray, located at the bottom right corner of the screen.
- If the wireless capability is already turned on, you should see a list of available wireless networks.
Q: What do I do if I don’t have a wireless network adapter installed in my Windows 7 computer?
A: If your Windows 7 computer does not have a wireless network adapter installed, you have a few options:
- Check if your computer has an available USB port. If it does, you can purchase a USB wireless network adapter and plug it into the USB port to add wireless capability to your computer.
- If your computer has an available expansion slot, such as a PCI or PCIe slot, you can buy and install an internal wireless network adapter.
- Alternatively, you can use a wired Ethernet connection or connect to the internet through a separate device, such as a Wi-Fi router, using an Ethernet cable.
Q: Does turning on wireless capability drain the battery of my Windows 7 laptop?
A: Enabling wireless capability on a Windows 7 laptop does require some power, as it enables the wireless network adapter to search for and connect to available networks. However, the power consumption is typically minimal and should not significantly impact the battery life of your laptop.
Q: How can I troubleshoot if my wireless capability is not working in Windows 7?
A: If your wireless capability is not working in Windows 7, you can try the following troubleshooting steps:
- Ensure that your wireless network adapter is enabled. You can do this by following the steps mentioned in the first FAQ.
- Check if there are any physical switches or keys on your laptop that control the wireless functionality. Make sure the wireless switch is in the “On” position.
- Restart your computer and wireless router.
- Update the drivers for your wireless network adapter by visiting the manufacturer’s website or using Windows Update.
- Disable and re-enable the wireless network adapter in the device manager.
- If none of the above steps work, you may need to contact your computer manufacturer or a professional technician for further assistance.