
Are you struggling to install a wireless adapter on your device without an internet connection? Don’t worry, we’re here to help! In today’s tech-driven world, having a stable and reliable internet connection is crucial. However, there are instances when we need to install a wireless adapter on a device that doesn’t currently have access to the internet. This can be a frustrating situation, especially if you’re not familiar with the installation process. But fear not! In this article, we will guide you step-by-step on how to install a wireless adapter without an internet connection. Whether you’re setting up a new device or troubleshooting connectivity issues, we’ve got you covered. So, let’s dive in and get your wireless adapter up and running in no time!
Inside This Article
- Overview
- Option 1: Using a USB Drive
- Option 2: Using a CD/DVD Drive
- Option 3: Using a Mobile Hotspot
- Option 4: Using an Ethernet Cable
- Troubleshooting Tips
- Conclusion
- FAQs
Overview
Installing a wireless adapter without an internet connection can be a challenging task, but with the right approach and tools, it is definitely achievable. Whether you are setting up a new computer or experiencing network connectivity issues, we will guide you through the process of installing a wireless adapter without internet access.
There are several options available to install a wireless adapter without an internet connection. You can use a USB drive, a CD/DVD drive, a mobile hotspot, or even an Ethernet cable. We will discuss each method in detail, providing step-by-step instructions to help you get your wireless adapter up and running.
Before diving into the installation process, it’s important to have the necessary drivers and software for your wireless adapter. Make sure you have downloaded the latest drivers from the manufacturer’s website and have them ready for the installation.
Now, let’s explore the different methods you can use to install a wireless adapter without an internet connection.
Option 1: Using a USB Drive
You can install a wireless adapter without an internet connection by using a USB drive. This method allows you to transfer the necessary drivers from a computer with internet access to the computer you want to install the wireless adapter on.
Here are the steps to follow:
- Step 1: On a computer with internet access, go to the manufacturer’s website and download the latest drivers for your specific wireless adapter model.
- Step 2: Insert a USB drive into the computer and transfer the downloaded driver files to the USB drive.
- Step 3: Remove the USB drive from the computer with internet access and insert it into the computer where you want to install the wireless adapter.
- Step 4: Open the USB drive and locate the driver files. Double-click on the driver installation file or right-click and select “Run” to start the installation process.
- Step 5: Follow the on-screen instructions to complete the driver installation. Once the installation is complete, the wireless adapter should be recognized by your computer.
It’s worth noting that some wireless adapter manufacturers provide a driver installation wizard on the USB drive itself. In such cases, simply insert the USB drive into the computer and follow the instructions provided by the wizard.
If you encounter any issues during the installation process, refer to the troubleshooting tips section or visit the manufacturer’s support website for further assistance.
Option 2: Using a CD/DVD Drive
If you have a CD or DVD drive on your computer, you can use it to install the wireless adapter drivers without needing an internet connection. Here’s how:
1. Insert the installation CD or DVD that came with your wireless adapter into the CD/DVD drive.
2. Open “My Computer” or “This PC” on your computer and navigate to the CD/DVD drive.
3. Double-click on the CD/DVD drive icon to open it.
4. Look for a file named “Setup” or “Install” and double-click on it to start the installation process. If there are multiple files, look for one with a .exe extension.
5. Follow the on-screen instructions to complete the installation. The wizard will guide you through the process, and you may need to click “Next” or “Install” to proceed.
6. Once the installation is complete, restart your computer.
7. After the computer restarts, the wireless adapter should be recognized, and the necessary drivers should be installed.
8. Check the device manager to ensure that the wireless adapter is listed and functioning correctly. You can access the device manager by right-clicking on “My Computer” or “This PC,” selecting “Manage,” and then navigating to “Device Manager.”
9. If the wireless adapter is listed without any warning signs or error symbols, then the installation was successful.
10. You can now configure and connect to a wireless network using the settings and software provided by the wireless adapter.
Note: It’s important to ensure that you’re using the correct installation disk or DVD that corresponds to your wireless adapter model. Using the wrong disk may result in incompatible drivers being installed.
Option 3: Using a Mobile Hotspot
If you don’t have access to a USB or CD/DVD drive, using a mobile hotspot is another convenient way to install a wireless adapter on your device without an internet connection. A mobile hotspot allows you to share your mobile data connection with other devices, effectively creating a Wi-Fi network.
Here’s how you can use a mobile hotspot to install a wireless adapter:
- Ensure that your smartphone or mobile device has mobile data connectivity.
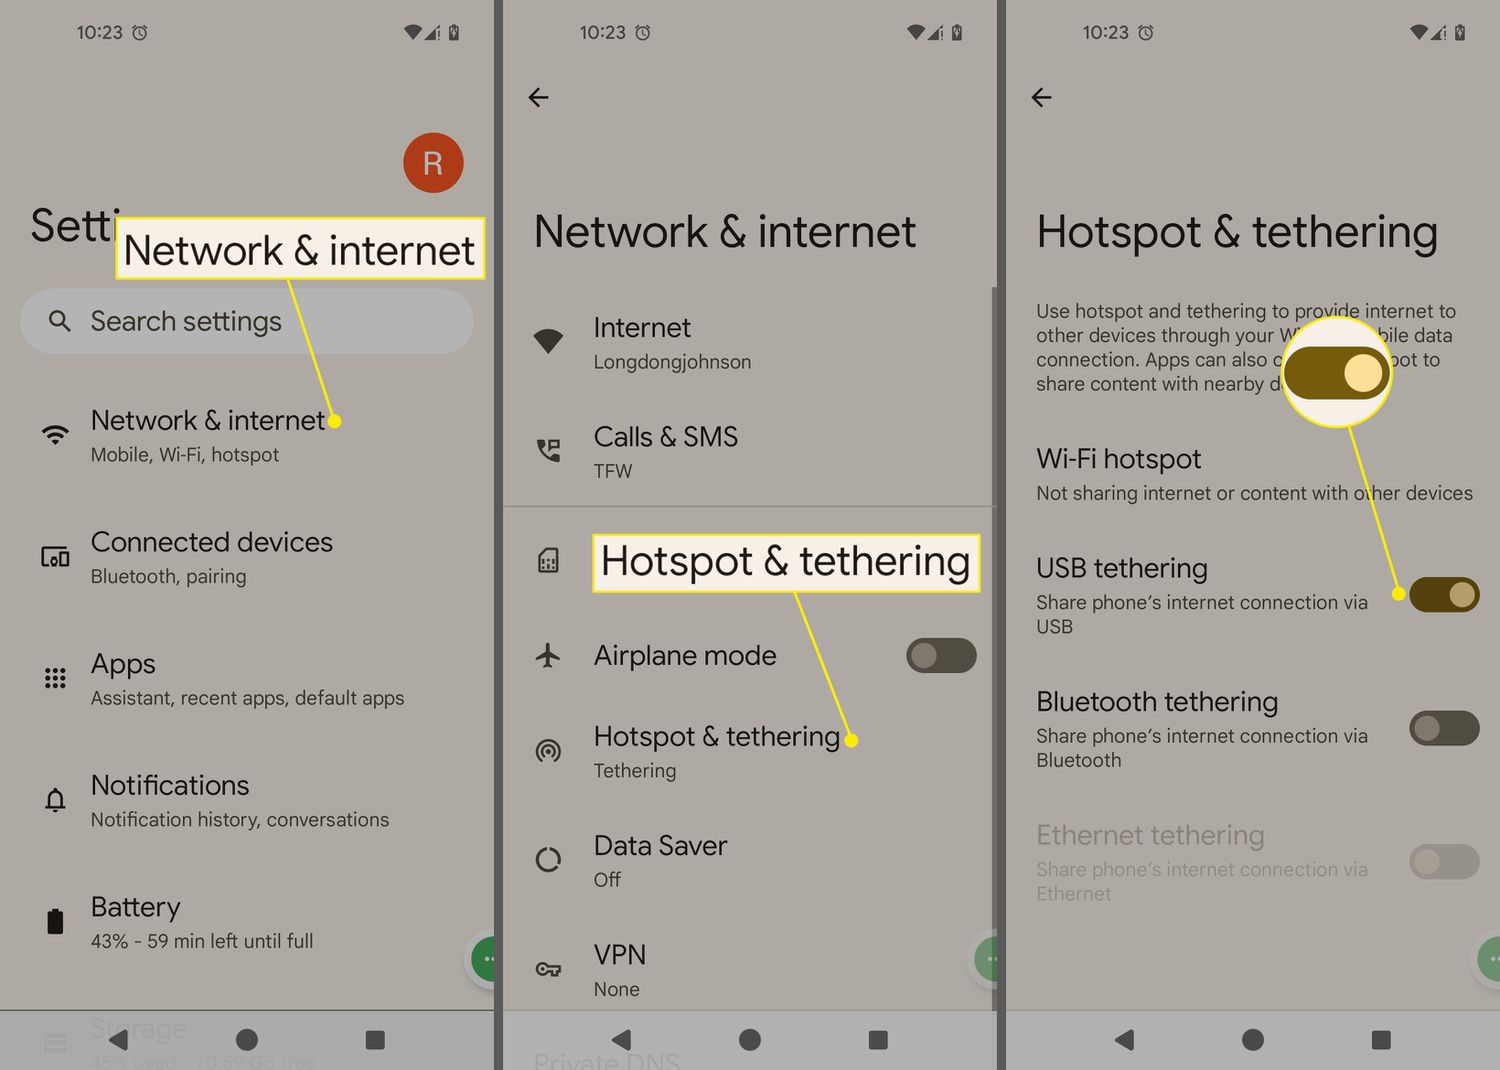
- Go to the settings on your mobile device and look for the “Mobile Hotspot” or “Tethering” option.
- Enable the mobile hotspot feature and set a secure password for your hotspot network.
- On your computer, go to the network settings and look for available Wi-Fi networks.
- Select your mobile hotspot network from the list of available networks.
- Enter the password you set for your hotspot network when prompted.
- Once connected to the mobile hotspot, your computer will have internet access.
- Now you can proceed with the installation of the wireless adapter software.
Note that using a mobile hotspot to install a wireless adapter may consume mobile data, so it’s advisable to have a data plan with sufficient allowance. Additionally, make sure to secure your hotspot network with a strong password to prevent unauthorized access.
If you encounter any issues while using a mobile hotspot, such as slow internet connection or difficulty in connecting to the network, try the following troubleshooting tips:
- Restart your smartphone or mobile device and try again.
- Move closer to your mobile device to ensure a stronger signal reception.
- Check if there are any updates available for your device’s operating system or hotspot software.
- If possible, try connecting to a different mobile network provider.
- Contact your mobile network provider for further assistance.
Using a mobile hotspot is a convenient option to install a wireless adapter without an internet connection. Just make sure to have a reliable data plan and follow the steps mentioned above. With a mobile hotspot, you can quickly get your wireless adapter up and running on your device and enjoy wireless internet connectivity.
Option 4: Using an Ethernet Cable
If you find yourself without a wireless adapter but have access to an Ethernet cable, don’t worry! You can still get your device connected to the internet. Using an Ethernet cable provides a reliable and fast connection, ensuring that you can go online without any interruptions.
Here’s how you can use an Ethernet cable to get your device connected:
- Check for an available Ethernet port: Locate the Ethernet port on your device, which is typically labeled as “LAN” or “Ethernet.” It is usually located on the side or back of your computer or laptop.
- Connect the Ethernet cable: Once you’ve located the Ethernet port, simply plug one end of the Ethernet cable into the port on your device.
- Connect the other end: Take the other end of the Ethernet cable and plug it into a working Ethernet port on your router or modem.
- Configure the connection: In most cases, your device will automatically detect the Ethernet connection and establish the connection for you. If not, you may need to open your device’s settings and manually configure the connection.
- Enjoy your wired internet connection: Once the connection is established, you can enjoy a stable and fast internet connection on your device.
Using an Ethernet cable eliminates the need for additional drivers or software installation. It provides a direct and secure connection, making it a reliable option for getting online without a wireless adapter.
Keep in mind that using an Ethernet cable restricts your device’s mobility since you need to be within reach of the cable. However, if you’re working from home or in a fixed location, it can be a convenient solution.
So, if you ever find yourself without a wireless adapter, don’t worry! With an Ethernet cable, you can still stay connected and get your work done hassle-free.
Troubleshooting Tips
Even with the best wireless adapter installation methods, you may encounter certain issues or unexpected hiccups along the way. Don’t worry, troubleshooting these problems can help get your wireless adapter up and running smoothly. Here are some troubleshooting tips to help you out:
1. Double-check the drivers: Make sure that you have installed the correct drivers for your wireless adapter. Sometimes, outdated or incompatible drivers can cause connection issues. Visit the manufacturer’s website to download the latest drivers specific to your adapter model.
2. Check signal strength: If you’re experiencing a weak or intermittent connection, try moving closer to your Wi-Fi router. Thick walls or long distances can weaken the signal, leading to a poor connection. Alternatively, consider using a Wi-Fi range extender to boost the signal throughout your home.
3. Restart your devices: Sometimes, a simple restart can resolve connectivity issues. Turn off both your wireless adapter and your router, wait a few seconds, and then power them back on. This can help clear any temporary glitches or conflicts between the devices.
4. Update firmware: Just like drivers, firmware updates can improve the performance and stability of your wireless adapter. Check the manufacturer’s website for any available firmware updates and follow the instructions for updating your adapter’s firmware.
5. Disable power-saving mode: Some wireless adapters have a power-saving mode that can cause them to disconnect after a period of inactivity. Check your adapter’s settings and disable power-saving mode if necessary to ensure a continuous and stable connection.
6. Restart your router: If multiple devices are experiencing connection issues, it may be due to a problem with your router. Simply restart your router by unplugging it from power, waiting for a few minutes, and then plugging it back in. This can help refresh the router’s settings and resolve any temporary issues.
7. Check for interference: Other electronic devices, such as cordless phones or baby monitors, can interfere with your Wi-Fi signal. Make sure to keep your wireless adapter away from such devices to avoid signal interference and maintain a stable connection.
8. Reset network settings: If none of the above troubleshooting tips work, you can try resetting your network settings. This will essentially revert your network settings back to their default state, resolving any configuration issues that might be causing the wireless adapter problem. Keep in mind that resetting network settings will also remove any saved Wi-Fi passwords, so make sure you have them handy.
Remember, troubleshooting will often involve a bit of trial and error. If one method doesn’t solve your problem, try another until you find the solution that works for you. With a little patience and persistence, you’ll have your wireless adapter up and running smoothly in no time.
Conclusion
Installing a wireless adapter without internet access may seem like a daunting task, but with the right techniques and tools, it can be accomplished successfully. Whether you’re setting up a new computer or troubleshooting an existing one, there are a few steps you can follow to ensure a smooth installation process.
Start by identifying the type of wireless adapter you have and download the appropriate drivers onto a USB drive or other portable storage device. Then, physically insert the adapter into an available USB port on your computer. Follow the on-screen prompts to install the drivers, and once completed, restart your computer.
After the restart, your wireless adapter should be recognized by your operating system. Use the device settings or network options to connect to a Wi-Fi network and regain internet access. If any issues arise, refer to the troubleshooting guidelines provided by the manufacturer or seek assistance from an IT professional.
With these steps, you can overcome the challenge of installing a wireless adapter without internet and start enjoying wireless connectivity on your device.
FAQs
1. Can I install a wireless adapter without an internet connection?
Yes, you can install a wireless adapter without an internet connection. The wireless adapter is a hardware device that allows your computer to connect to a wireless network. However, to use the wireless adapter to connect to the internet, you will need to have an available Wi-Fi network or a mobile hotspot.
2. How do I install a wireless adapter without an internet connection?
To install a wireless adapter without an internet connection, follow these steps:
- Begin by inserting the wireless adapter into an available USB port on your computer.
- Next, insert the installation disc that came with the wireless adapter into your computer’s CD/DVD drive. If your computer doesn’t have a CD/DVD drive, you can download the drivers from the manufacturer’s website.
- The installation wizard should automatically launch. Follow the on-screen instructions to complete the installation process.
- Once the installation is complete, restart your computer to ensure the changes take effect.
3. Can I use a wireless adapter on a desktop computer?
Yes, you can use a wireless adapter on a desktop computer. The wireless adapter connects to your computer’s USB port and allows it to connect to a Wi-Fi network. This is especially useful for desktop computers that do not have built-in Wi-Fi capabilities.
4. Can I use a wireless adapter on a laptop?
Most laptops come with built-in Wi-Fi capabilities, so you generally do not need to use a wireless adapter on a laptop. However, if your laptop’s Wi-Fi adapter is not working properly or you want to upgrade to a faster or more advanced wireless adapter, you can use a wireless adapter on your laptop.
5. Are there different types of wireless adapters?
Yes, there are different types of wireless adapters available, including USB wireless adapters, PCI wireless adapters, and PCIe wireless adapters. USB wireless adapters are the most common type and can be easily plugged into an available USB port on your computer. PCI and PCIe wireless adapters are installed inside the computer case and offer better performance and stability.