
Are you struggling to upload your Dexcom G5 data from your iPhone? Look no further! In this comprehensive guide, we will walk you through the step-by-step process of uploading your blood glucose data from your Dexcom G5 Continuous Glucose Monitoring (CGM) system to your iPhone. Dexcom G5 is a popular device used by individuals with diabetes to monitor their blood sugar levels in real-time. By uploading your Dexcom G5 data from your iPhone, you can easily track and analyze your glucose levels over time, aiding in better diabetes management. So, whether you’re a Dexcom G5 user looking for guidance or someone new to the concept of CGM, this article is here to provide you with all the information you need to upload your Dexcom G5 data from your iPhone effortlessly.
Inside This Article
- Overview
- Step 1: Downloading the Dexcom G5 Mobile App
- Step 2: Pairing your Dexcom G5 with your iPhone
- Step 3: Uploading Dexcom G5 data to your iPhone
- Step 4: Viewing and analyzing your Dexcom G5 data on the app
- Conclusion
- FAQs
Overview
The Dexcom G5 is a popular continuous glucose monitoring (CGM) system that provides real-time glucose readings directly to your iPhone. With the Dexcom G5 Mobile app, you can conveniently track your blood sugar levels and make informed decisions about your diabetes management.
Whether you’re newly diagnosed with diabetes or have been managing it for years, having easy access to your glucose data is essential. By uploading your Dexcom G5 data to your iPhone, you can have a comprehensive view of your blood sugar trends, enabling you to better understand how your body responds to food, exercise, and medication.
With the unparalleled convenience of your iPhone, you can carry your glucose data in your pocket wherever you go. Gone are the days of manually tracking your readings in a logbook or relying solely on fingerstick tests. The Dexcom G5 Mobile app allows you to digitally manage your diabetes and provides insights to help you optimize your health.
In this article, we will guide you through the process of uploading your Dexcom G5 data to your iPhone. By following these steps, you’ll be able to enjoy the convenience and benefits of having your glucose data readily available at your fingertips.
Step 1: Downloading the Dexcom G5 Mobile App
The first step to uploading your Dexcom G5 data from your iPhone is to download the Dexcom G5 Mobile app. This app is available for free on the App Store, and it is specifically designed to work seamlessly with the Dexcom G5 Continuous Glucose Monitoring (CGM) system.
To get started, open the App Store on your iPhone and search for “Dexcom G5 Mobile.” Once you find the app, tap on the “Get” button to start the download. The app will install automatically, and once it’s finished, you’ll see the Dexcom G5 Mobile app icon on your home screen.
Before you proceed, make sure that your iPhone is connected to the internet either via Wi-Fi or cellular data. This is necessary for the app to download and install properly.
Once the Dexcom G5 Mobile app is installed on your iPhone, you are ready to move on to the next step: pairing your Dexcom G5 receiver with your iPhone.
Step 2: Pairing your Dexcom G5 with your iPhone
Pairing your Dexcom G5 continuous glucose monitor (CGM) with your iPhone is a crucial step in the process of uploading your CGM data. By pairing the devices, you enable seamless communication and transfer of glucose readings to your iPhone.
To begin the pairing process, make sure your Dexcom G5 is nearby and turned on. Ensure that your iPhone’s Bluetooth is enabled and functioning properly. Follow these simple steps to pair your Dexcom G5 with your iPhone:
Step 1: Open the Dexcom G5 Mobile app on your iPhone. If you haven’t installed the app yet, refer to “Step 1: Install the Dexcom G5 Mobile app” for instructions on downloading and setting up the app.
Step 2: In the app, tap on the “Settings” tab found at the bottom of the screen. Look for the “Add Dexcom CGM” option and select it. This will initiate the pairing process.
Step 3: On your Dexcom G5 device, navigate to the “Settings” menu. Depending on the version of the Dexcom G5 device you have, the specific menu option may be labeled differently, such as “Pair Device” or “Phone Connect.”
Step 4: Once you’re in the “Settings” menu on your Dexcom G5, choose the “Pair Device” or “Phone Connect” option. The device will then search for available Bluetooth connections.
Step 5: On your iPhone, you should see a list of available devices. Locate your Dexcom G5 device from the list and tap on it to begin the pairing process. The app will guide you through the remaining steps to complete the pairing.
Step 6: After successful pairing, you will see a confirmation message on your iPhone’s screen. This indicates that your Dexcom G5 is now paired and ready to upload data to your iPhone.
Congratulations! You have successfully paired your Dexcom G5 with your iPhone. Now you can proceed to the next step in the process, which is setting up data sharing permissions.
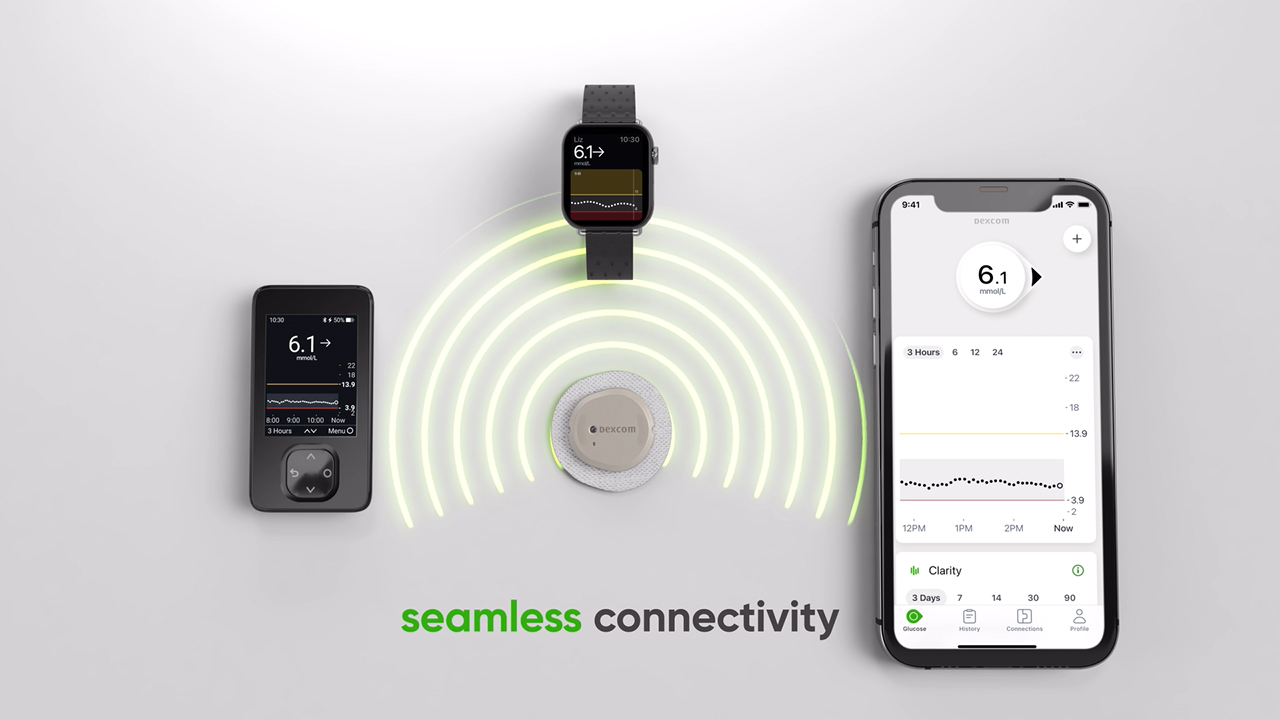
Step 3: Uploading Dexcom G5 data to your iPhone
Once you have installed the Dexcom G5 Mobile app on your iPhone and paired your Dexcom G5 glucose monitoring system with your phone, you are ready to start uploading your Dexcom G5 data. Uploading your data allows you to conveniently access and analyze your glucose levels on your iPhone, making it easier to manage your diabetes.
To upload your Dexcom G5 data to your iPhone, follow these simple steps:
- Open the Dexcom G5 Mobile app: Locate the app on your iPhone and tap on the icon to open it.
- Select the Upload option: Once inside the app, look for the Upload option. This may be represented by an arrow pointing upwards or a cloud icon. Tap on it to proceed.
- Wait for the data to transfer: After selecting the Upload option, the app will start transferring your Dexcom G5 data to your iPhone. Please be patient as this process may take a few moments depending on the amount of data being transferred.
- Verify successful upload: Once the data transfer is complete, the app will display a confirmation message to let you know that your Dexcom G5 data has been successfully uploaded to your iPhone.
It is important to note that the uploading process may vary slightly depending on the specific version of the Dexcom G5 Mobile app you are using. However, the basic steps outlined above should generally apply.
By regularly uploading your Dexcom G5 data to your iPhone, you can take advantage of the features and insights provided by the Dexcom G5 Mobile app. This includes detailed glucose trend information, customizable alerts and notifications, and the ability to share your data with healthcare professionals or loved ones.
If you encounter any issues during the data upload process, it is recommended to consult the Dexcom G5 Mobile app’s user guide or contact Dexcom support for assistance. They will be able to provide you with troubleshooting steps or answer any questions you may have.
Remember, uploading your Dexcom G5 data to your iPhone is a simple and convenient way to stay on top of your glucose levels and effectively manage your diabetes. Take advantage of this feature to gain valuable insights and improve your overall well-being.
Step 4: Viewing and analyzing your Dexcom G5 data on the app
Once you have successfully uploaded your Dexcom G5 data to your iPhone, you can easily view and analyze it using the Dexcom G5 Mobile app. Here’s how:
1. Launch the Dexcom G5 Mobile app on your iPhone. Ensure that your Dexcom G5 transmitter is within range and powered on.
2. On the app’s home screen, you will see your current glucose reading displayed prominently. Scroll down to access additional data points and features.
3. Tap on the “Trends” tab to view your glucose trends over time. This section provides a graphical representation of your glucose levels, allowing you to track your highs, lows, and overall patterns.
4. The “Day” view provides a detailed graph of your glucose readings throughout the day. You can customize the time range and zoom in or out to get a closer look at specific periods.
5. Switch to the “Week” view to see a wider overview of your glucose trends over the course of a week. This view can help you identify any recurring patterns or fluctuations.
6. The “Events” tab allows you to add notes and markers to your glucose data. You can record meals, exercise sessions, medication dosages, and other relevant information that may impact your glucose levels.
7. To access more advanced features and settings, tap on the menu icon located in the upper-left corner of the app. From here, you can customize your settings, set up alerts, and sync your data with other compatible devices and apps.
8. Use the Dexcom G5 Mobile app to gain insights into your glucose patterns, identify trends, and make informed decisions about managing your diabetes. Be sure to regularly review your data and consult with your healthcare team for personalized guidance.
Remember, the Dexcom G5 Mobile app is designed to provide you with a convenient and user-friendly interface to help you stay on top of your glucose management. Take advantage of the various features and tools available to make the most of your Dexcom G5 data.
Conclusion
In conclusion, uploading Dexcom G5 data from an iPhone is a seamless and convenient process that allows users to easily manage and monitor their glucose levels. With the help of the Dexcom Share app, users can effortlessly transfer their data to the cloud or share it with healthcare professionals, providing valuable insights for better diabetes management.
By following the step-by-step guide outlined in this article, you can confidently navigate the process of uploading Dexcom G5 data from your iPhone. Enjoy the benefits of real-time glucose monitoring and gain control over your diabetes with the help of this powerful technology.
Stay connected, stay informed, and stay in control of your health with the Dexcom G5 and its seamless data uploading capabilities.
FAQs
**Q: Can I upload Dexcom G5 data from my iPhone?**
Yes, you can! Uploading Dexcom G5 data from your iPhone is a convenient and straightforward process. By following a few simple steps, you’ll be able to view and analyze your glucose levels easily.
**Q: What do I need to upload Dexcom G5 data from my iPhone?**
To upload Dexcom G5 data from your iPhone, you will need the following:
1. Dexcom G5 Mobile App installed on your iPhone
2. Active Dexcom G5 CGM (Continuous Glucose Monitoring) system
3. A working internet connection on your iPhone
**Q: How do I upload Dexcom G5 data from my iPhone?**
To upload Dexcom G5 data from your iPhone, follow these steps:
1. Open the Dexcom G5 Mobile App on your iPhone.
2. Make sure your Dexcom G5 CGM system is connected to your iPhone via Bluetooth.
3. In the app, navigate to the “Settings” tab and select “Upload” or “Export Data.”
4. Choose the desired date range or select “Upload All Data” to upload all the available data.
5. Follow the on-screen prompts to complete the upload process.
6. Once uploaded, you can view your Dexcom G5 data and analyze your glucose levels using the various charts and features provided by the app.
**Q: Can I upload Dexcom G5 data to my computer instead of my iPhone?**
Yes, you can also upload Dexcom G5 data to your computer. Dexcom provides a web-based platform called Dexcom CLARITY, where you can sign in and view your data online. Simply visit the Dexcom CLARITY website and follow the instructions to upload and access your Dexcom G5 data on your computer.
**Q: Why is it important to upload Dexcom G5 data from my iPhone?**
Uploading Dexcom G5 data from your iPhone is essential for effectively managing your diabetes. By regularly uploading your data, you can track your glucose levels over time, identify trends, and make informed decisions about your diabetes management. It allows you and your healthcare provider to analyze your data and make necessary adjustments to your treatment plan.