
If you’re the proud owner of the latest iPhone model, the iPhone 13, you may find yourself needing to remove the SIM card for various reasons. Whether you want to switch carriers, upgrade your device, or troubleshoot network issues, knowing how to remove the SIM card on your iPhone 13 is essential. This small but crucial component holds your phone number, contacts, and data, making it necessary to handle with care. In this article, we’ll guide you through the step-by-step process of removing the SIM card on your iPhone 13, ensuring a smooth and hassle-free experience. So, let’s dive in and discover the simple yet important procedure to take out the SIM card on your beloved iPhone 13.
Inside This Article
- Precautions before removing SIM card
- Step-by-step guide to remove SIM card on iPhone 13
- Troubleshooting common issues when removing SIM card
- Tips for properly inserting a SIM card back into iPhone 13
- Conclusion
- FAQs
Precautions before removing SIM card
Before removing the SIM card from your iPhone 13, it’s important to take a few precautions to ensure a smooth and hassle-free process. Follow these guidelines to avoid any potential damage to your device or the SIM card itself:
1. Power off your iPhone: Before attempting to remove the SIM card, make sure to turn off your iPhone. This will prevent any accidental damage to the device and ensure the SIM card slot is not active.
2. Gather the necessary tools: To safely remove the SIM card, you’ll need a SIM card ejector tool or a small paperclip. These tools are usually provided with your iPhone or can be purchased separately.
3. Locate the SIM card slot: On the iPhone 13, the SIM card slot is typically located on the right side of the device. It may be covered by a small tray with a pinhole ejector. Look for the SIM card icon or check your device’s user manual for specific instructions.
4. Remove the case (if applicable): If your iPhone 13 is in a protective case, it’s best to remove it before attempting to remove the SIM card. This will provide better access to the SIM card slot and prevent accidental damage to the case or device.
5. Be gentle and patient: When removing the SIM card, it’s important to be gentle and patient. Avoid using excessive force or prying tools that could potentially damage the SIM card slot or the SIM card itself. Slowly and steadily insert the SIM card ejector tool into the pinhole and apply gentle pressure until the tray pops out.
6. Handle the SIM card with care: Once the SIM card tray is out, carefully remove the SIM card from the tray. Avoid touching the gold contacts on the SIM card, as any dirt or oil on your fingers could interfere with the card’s functionality.
7. Store the SIM card and tray safely: If you’re not immediately replacing the SIM card, make sure to store it and the tray in a safe and clean place. Keeping them together will help prevent misplacing or damaging either component.
By following these precautions, you can safely remove the SIM card from your iPhone 13 without any issues. Remember to handle the delicate components with care and be mindful of your device’s power status to avoid any unwanted accidents.
Step-by-step guide to remove SIM card on iPhone 13
Removing the SIM card from your iPhone 13 is a simple process that can be done in just a few steps. Here is a step-by-step guide to help you remove the SIM card from your iPhone 13:
- Before you begin, ensure that your iPhone 13 is powered off. This will help prevent any potential damage to the device or the SIM card.
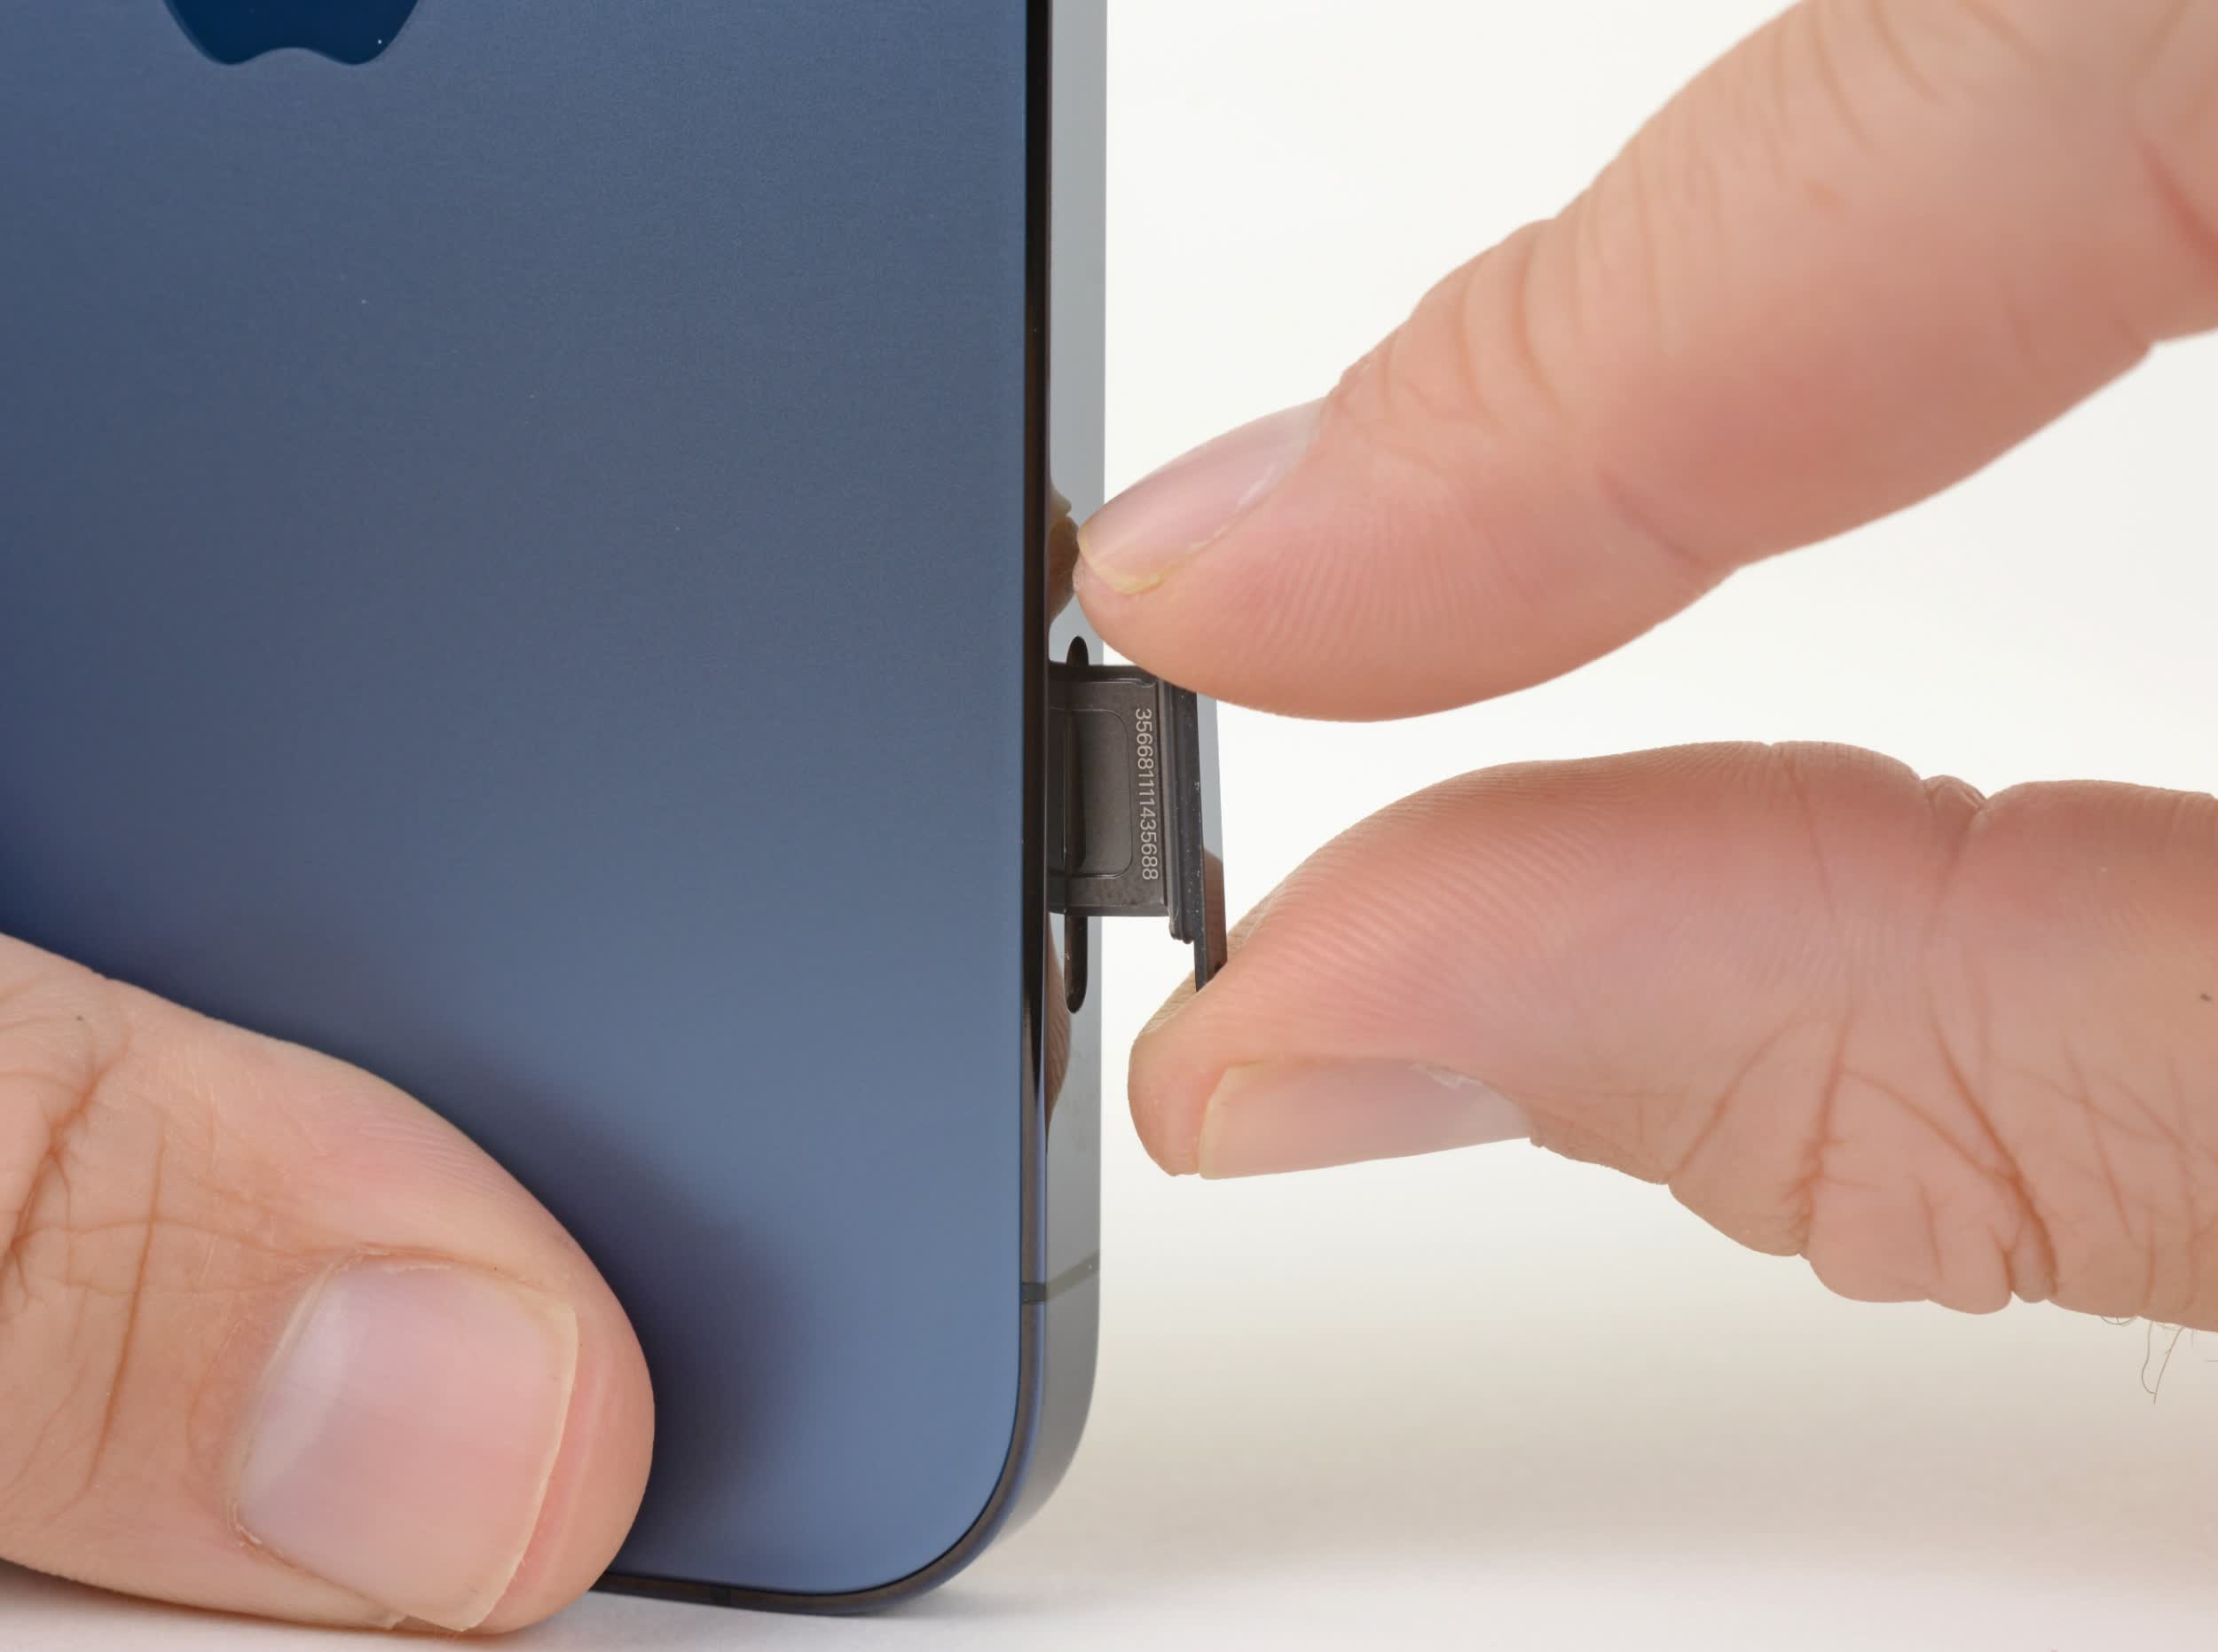
- Locate the SIM card tray on your iPhone 13. This can be found on the side of the device, typically on the right side.
- Take a SIM card ejector tool or a small paperclip and insert it into the small hole next to the SIM card tray. Apply gentle pressure until the tray pops out slightly.
- Gently pull the SIM card tray out of the iPhone 13 using your fingers.
- Once the SIM card tray is fully extended, carefully remove the SIM card from the tray. Be sure to handle the SIM card with care, avoiding any bending or damaging it.
- If you have a new SIM card that you would like to insert into your iPhone 13, make sure it is properly aligned with the tray and gently place it into the designated slot.
- Once the SIM card is securely in place, push the SIM card tray back into the iPhone 13 until it clicks into position.
- Power on your iPhone 13, and it should recognize the new or updated SIM card.
That’s it! You have successfully removed the SIM card from your iPhone 13. Remember to keep your SIM card and SIM card tray in a safe place, as they are essential for the proper functioning of your device.
It is important to note that removing the SIM card from your iPhone 13 may result in the loss of network connectivity. If you are planning to switch SIM cards or use a different network provider, make sure to transfer any necessary data or contacts before removing the SIM card.
Troubleshooting common issues when removing SIM card
Removing the SIM card from an iPhone 13 can be a relatively straightforward process. However, there are some common issues that users may encounter while attempting to remove the SIM card. Here are a few troubleshooting steps to help you overcome these issues:
1. SIM card not ejecting: If you’re having trouble ejecting the SIM card tray, make sure you’re using the correct tool (usually a SIM card ejector tool) and applying enough pressure to push it into the small pinhole on the side of the iPhone. If it still doesn’t eject, try using a paper clip or another small, straight object to gently push the tray out.
2. Tray getting stuck: Sometimes, the SIM card tray may get stuck or jammed while trying to remove it. In this case, it’s important to avoid using excessive force, as this can damage the tray or the iPhone. Instead, try gently wiggling the tray back and forth while pulling it out. If it’s still stuck, you may need to consult a professional for assistance.
3. SIM card not fitting properly: If you’re having trouble fitting the SIM card back into the tray, double-check that you’re aligning it correctly. The SIM card should fit snugly into the designated slot, with the metal contacts facing down. If it’s not fitting properly, remove the SIM card, wipe the contacts with a clean, dry cloth, and try reinserting it again.
4. No SIM card detected: After removing and reinserting the SIM card, if your iPhone still doesn’t detect it, there are a few things you can try. First, ensure that the SIM card is inserted correctly and securely. If that doesn’t work, try restarting your iPhone. If the issue persists, contact your carrier to ensure there are no network or account-related problems.
5. Damage to the SIM card or tray: If you notice any physical damage to the SIM card or the tray, such as a bent or broken pin, it’s important not to force anything. Continuing to use a damaged SIM card or tray can cause further issues and may require professional assistance to resolve.
Remember, if you’re unsure about removing or reinserting the SIM card on your iPhone 13, it’s always a good idea to consult the user manual or seek help from a certified technician to avoid any potential damage.
Tips for properly inserting a SIM card back into iPhone 13
After removing the SIM card from your iPhone 13, it is essential to ensure that you properly insert it back into the device. Follow these tips to ensure a smooth and successful SIM card insertion:
1. Align the SIM card properly: Before inserting the SIM card, make sure it is properly aligned with the SIM card slot on the iPhone 13. The notch on the SIM card should match the notch in the SIM card slot. This ensures that the SIM card is inserted correctly and prevents any potential damage.
2. Gently insert the SIM card: Insert the SIM card into the SIM card slot with gentle pressure. Avoid using excessive force or pushing it in too forcefully, as this could damage the SIM card or the SIM card slot. Be patient and take your time to ensure a proper fit.
3. Use the SIM eject tool: Apple provides a SIM eject tool with every iPhone. If you have misplaced the tool, you can use a small paperclip or a similar object that fits into the small pinhole next to the SIM card slot. Gently push the tool into the hole to eject the SIM card tray.
4. Insert the SIM card tray: After aligning the SIM card properly and using the appropriate tool to eject the tray, carefully insert the SIM card tray back into the iPhone 13. Make sure it fits securely and feels flush with the device.
5. Check for SIM card recognition: Once the SIM card tray is properly inserted, turn on your iPhone 13 and check if the device recognizes the SIM card. Go to the “Settings” app and navigate to “Mobile Data” or “Cellular” settings to check if your carrier is detected and if you have a proper cellular signal.
6. Restart your iPhone: If the SIM card is not recognized or if you are experiencing any issues with cellular connectivity, try restarting your iPhone. Sometimes, a simple restart can resolve any glitches in the software and help the device establish a connection with the SIM card.
7. Contact your carrier: If you have followed all the steps and are still encountering issues with your SIM card, it is recommended to reach out to your carrier for further assistance. They can troubleshoot any network-related problems and provide you with the necessary guidance to resolve the issue.
By following these tips, you can ensure a smooth and successful insertion of the SIM card back into your iPhone 13. Remember to handle the SIM card with care to prevent any damage, and always be cautious when manipulating the SIM card tray to avoid any mishaps. Enjoy uninterrupted connectivity on your iPhone 13!
Removing the SIM card on your iPhone 13 is a simple task that can be done in a few easy steps. By accessing the SIM tray and gently removing the SIM card, you can switch carriers or upgrade your device without any hassle.
Remember to power off your iPhone before removing the SIM card to avoid any potential damage. Keep your SIM card in a safe place when not in use and handle it with care to prevent any scratches or bending.
Whether you’re switching carriers, upgrading your device, or troubleshooting connectivity issues, knowing how to remove the SIM card on your iPhone 13 gives you the flexibility and convenience you need. With this knowledge, you can confidently navigate your device and make the necessary changes without any complications.
Now that you’re equipped with the steps to remove the SIM card on your iPhone 13, go ahead and explore the possibilities that lie ahead!
FAQs
Q: Why would I need to remove the SIM card on my iPhone 13?
A: There are a few reasons why you might need to remove the SIM card on your iPhone 13. For example, if you are switching carriers, upgrading to a new iPhone model, or troubleshooting network connectivity issues, removing the SIM card can be necessary.
Q: How do I know if I have an iPhone 13?
A: You can identify if you have an iPhone 13 by checking the model number on the back of your device. The iPhone 13 models have model numbers A2628, A2629, A2630, A2631, A2656, A2657, A2658, or A2659.
Q: Do I need any special tools to remove the SIM card on an iPhone 13?
A: No, you do not need any special tools to remove the SIM card on an iPhone 13. The process can be done using a SIM card removal tool or a small paperclip.
Q: Where is the SIM card tray located on the iPhone 13?
A: The SIM card tray on the iPhone 13 is located on the right side of the device. It is positioned just below the volume buttons.
Q: Can I remove the SIM card while the iPhone 13 is powered on?
A: It is recommended to power off your iPhone 13 before removing the SIM card. This helps prevent any potential damage to the device or disruption to the SIM card functionality.