
Are you struggling to figure out how to take the SIM card out of your iPhone 11? You’re not alone. Many iPhone users find themselves in a similar predicament, unsure of the correct method to remove their SIM card. The SIM card is a vital component of your phone, as it stores important data such as your phone number and contacts. Whether you’re looking to switch carriers or replace your SIM card, learning how to properly remove it is essential. In this article, we will guide you through the step-by-step process of taking the SIM card out of your iPhone 11, ensuring that you can do it with ease and confidence. So let’s get started and unlock the secrets of removing the SIM card from your iPhone 11!
Inside This Article
- Tools Required
- 1 Small Paperclip or SIM eject tool
- 2 Microfiber cloth (optional)
- Locate the SIM Card Tray
- 1 Identify the location of the SIM card tray on the iPhone 11
- 2 Differentiate between the SIM card tray and other ports
- Ejecting the SIM Card
- 1 Insert the small paperclip or SIM eject tool into the SIM card tray
- 2 Apply gentle pressure to release the tray
- 3 Remove the SIM card from the tray
- Reinserting the SIM Card
- 1 Align the SIM card with the tray
- 2 Slide the tray back into the iPhone until it clicks into place
- Conclusion
- FAQs
Tools Required
When it comes to removing the SIM card from an iPhone 11, you’ll need a couple of tools to get the job done smoothly. Here are the tools you’ll need:
- Small Paperclip or SIM eject tool: This tool is essential for ejecting the SIM card tray from the iPhone 11. You can use a small paperclip that has been unfolded or a SIM eject tool that often comes with the phone’s packaging. It’s important to have a thin and pointed object to access the SIM card tray easily.
- Microfiber cloth (optional): While not necessary, having a microfiber cloth handy can help clean the SIM card or the SIM card tray if there’s any dust or debris. It’s always a good idea to keep your SIM card and the area around it clean to ensure proper functioning.
Now that you have the necessary tools, let’s move on to the process of removing the SIM card from your iPhone 11.
1 Small Paperclip or SIM eject tool
When it’s time to remove your SIM card from your iPhone 11, you’ll need a small paperclip or a SIM eject tool. These tools are specifically designed to help you safely and easily remove the SIM card tray from your device. The SIM eject tool usually comes included in the box with your iPhone, but if you don’t have it, a small paperclip can do the job just as well.
The small paperclip or SIM eject tool is small and compact, making it easy to carry around with you wherever you go. Its primary purpose is to help you eject the SIM card tray without causing any damage to your iPhone. The tool fits perfectly into the small hole on the side or top of your iPhone 11, which is located near the SIM card tray.
Using the small paperclip or SIM eject tool is straightforward. Simply insert the tool into the hole and gently apply pressure until the SIM card tray pops out. Once the tray is released, you can easily remove the SIM card from the tray or insert a new SIM card if needed.
Having a small paperclip or SIM eject tool on hand is essential for anyone who frequently needs to switch or remove the SIM card from their iPhone 11. It saves you from the hassle of struggling to find a tool or improvising with other objects that may cause damage to your device. So, make sure you keep one handy whenever you need to work with your SIM card.
2 Microfiber cloth (optional)
In addition to the small paperclip or SIM eject tool, you may also want to consider using a microfiber cloth when removing the SIM card from your iPhone 11. While this step is optional, it can be helpful in ensuring that the SIM card and the SIM card tray are clean and free from any dust or debris.
A microfiber cloth is a soft and lint-free cloth that is specifically designed to be gentle on delicate surfaces, including the SIM card contacts. By using a microfiber cloth, you can safely and effectively wipe away any fingerprints, smudges, or dirt that may have accumulated on the SIM card or the SIM card tray.
To use a microfiber cloth, simply gently rub the cloth over the surface of the SIM card and the SIM card tray. The soft fibers of the cloth will help to remove any residue without scratching or damaging the components. This can help to ensure a proper connection between the SIM card and the iPhone’s internal SIM card reader.
Using a microfiber cloth is a simple and quick step that can help to maintain the performance and reliability of your iPhone 11. It is especially useful if you live in an environment where dust or dirt is prevalent, or if you frequently handle your phone with dirty or oily hands.
Remember, while using a microfiber cloth is optional, it is a good practice to clean the SIM card and the SIM card tray periodically to prevent any connectivity issues. By taking this extra step, you can ensure that your iPhone 11 continues to function optimally and that you have a smooth and hassle-free experience when using your phone.
Locate the SIM Card Tray
Before you can remove or insert a SIM card on your iPhone 11, you need to locate the SIM card tray. The SIM card tray is a small slot on the side of your iPhone that holds the SIM card securely in place.
To locate the SIM card tray on your iPhone 11:
-
Take a close look at the sides of your iPhone 11. The SIM card tray is typically located either on the right-hand side or the left-hand side, depending on the model.
-
Inspect the sides of your iPhone 11 for a small, rectangular-shaped opening. This opening is where you can insert the SIM card eject tool or a small paperclip to access the SIM card tray.
It’s important to note that the SIM card tray on the iPhone 11 is different from other ports and buttons on the device. The SIM card tray is specifically designed to hold the SIM card securely, preventing it from getting accidentally ejected or damaged.
Once you have located the SIM card tray on your iPhone 11, you can proceed with ejecting the SIM card from the device. The next section will guide you through the process of ejecting the SIM card using a small paperclip or the SIM eject tool.
1 Identify the location of the SIM card tray on the iPhone 11
The iPhone 11 is a sleek and modern device, known for its advanced features and stunning design. To access the SIM card slot on the iPhone 11, you need to locate the SIM card tray. The position of the SIM card tray may vary slightly depending on the model, but it is typically found on the right side of the device.
Look for a small, rectangular slot with a pin-sized hole next to it. This is the SIM card tray. It is usually located just below the power button on the right side of the iPhone 11. The hole next to the tray is used to eject the tray and remove or insert the SIM card.
When identifying the SIM card tray on your iPhone 11, make sure to differentiate it from other ports and buttons. The SIM card tray is typically the only opening on the right side of the device. The volume buttons and the mute switch are located on the left side, while the charging port and speakers are on the bottom.
2 Differentiate between the SIM card tray and other ports
When attempting to remove the SIM card from your iPhone 11, it’s crucial to be able to differentiate between the SIM card tray and the other ports on your device. This will prevent you from accidentally damaging any other components and ensure a smooth SIM card removal process.
The SIM card tray on the iPhone 11 is located on the right-hand side of the device, just below the power button. It is a small rectangular slot that can be accessed by using a SIM eject tool or a small paperclip. When examining your iPhone, you will notice several other ports and openings, including the charging port, headphone jack, and speaker grille. It’s important to avoid mistaking any of these ports for the SIM card tray.
To identify the SIM card tray, look for a small pinhole next to it. This is where you’ll insert the SIM eject tool or paperclip to release the tray. Keep in mind that the SIM card tray is the only one with a pinhole, distinguishing it from the other ports on your iPhone 11.
Additionally, the SIM card tray is slightly recessed compared to the other ports on the device. It sits flush with the side of the iPhone, creating a seamless design. In contrast, the charging port and headphone jack have a visible opening, allowing for easy insertion of a charging cable or headphones.
By understanding the difference between the SIM card tray and other ports on your iPhone 11, you can confidently locate the correct slot and avoid any potential damage to your device. Remember to exercise caution when inserting and removing the SIM card to ensure a successful and hassle-free process.
Ejecting the SIM Card
Now that you’ve located the SIM card tray on your iPhone 11, it’s time to eject the SIM card. Follow the steps below to safely remove the SIM card from your device:
1. Insert the small paperclip or SIM eject tool into the small hole next to the SIM card tray. Apply a small amount of pressure until the tray pops out slightly.
2. Gently pull the tray out using your fingers or the tool. Be careful not to apply too much force to avoid damaging the tray or the SIM card.
3. Once the tray is fully extended, carefully remove the SIM card from the tray. Take note of the orientation of the SIM card, as you’ll need to reinsert it in the correct position later.
4. Set the SIM card aside in a safe place to prevent any damage or loss.
That’s it! You’ve successfully ejected the SIM card from your iPhone 11. Now let’s move on to the next step of reinserting the SIM card.
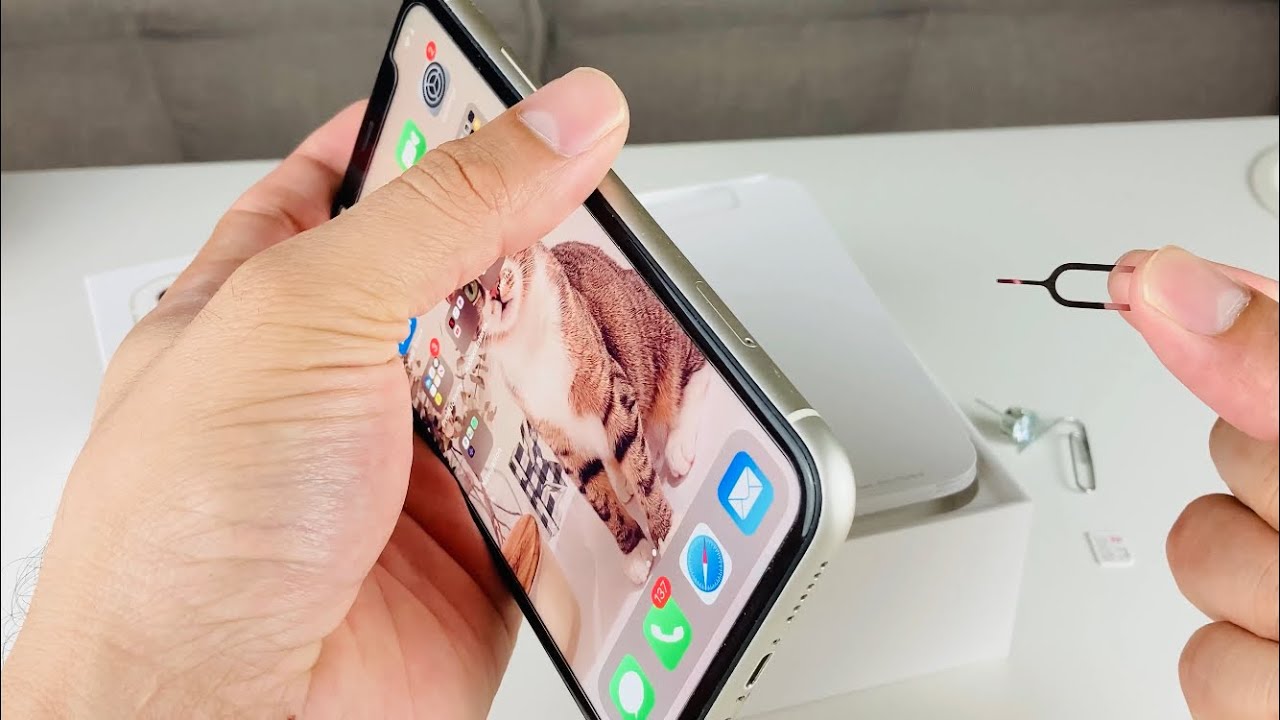
1 Insert the small paperclip or SIM eject tool into the SIM card tray
When it comes to removing the SIM card from an iPhone 11, you’ll need a small paperclip or a SIM eject tool. These tools are specifically designed to fit into the SIM card tray and effortlessly eject it from the phone. Here’s how you can use them:
1. Take your small paperclip or SIM eject tool and hold it firmly in your hand.
2. Examine the iPhone 11 carefully to locate the SIM card tray. On most iPhone models, including the iPhone 11, the tray is located on the side of the device.
3. Insert the small end of the paperclip or SIM eject tool into the small hole next to the SIM card tray. You will feel a slight resistance as you push the tool in.
4. Apply gentle pressure and push the tool in further until you feel a small click or the tray starts to pop out.
5. Once the tray pops out slightly, you can remove the paperclip or SIM eject tool from the hole, but hold onto the tray to prevent it from retracting back into the phone.
6. Slowly pull the SIM card tray out of the iPhone 11. It will come out smoothly, revealing the SIM card slot.
7. Carefully remove the SIM card from the tray. Take a moment to clean it with a microfiber cloth if necessary, ensuring that there is no dust or debris on the metal contact points.
Now that you’ve successfully removed the SIM card from your iPhone 11, you can either insert a new SIM card or reinsert the same one if you’re just doing a quick maintenance check. Follow the next section to learn how to reinsert the SIM card into the iPhone 11.
2 Apply gentle pressure to release the tray
Once you have inserted the small paperclip or SIM eject tool into the SIM card tray of your iPhone 11, it’s time to proceed with the next step. Apply gentle pressure to release the tray from its locked position.
Be careful not to use excessive force as it can cause damage to the tray or the phone itself. The key here is to apply just enough pressure to dislodge the tray and allow it to slide out smoothly.
While applying pressure, you may feel a slight resistance, but this is normal. Keep in mind that the tray is designed to fit snugly, ensuring that the SIM card stays securely in place. However, with a little bit of pressure, the tray should easily come loose.
As you apply the gentle pressure, make sure to hold the iPhone securely to prevent any accidental drops or slips. It is recommended to use both hands, one to hold the iPhone and the other to exert the pressure on the tray.
Remember, a steady and controlled application of pressure is crucial to prevent any damage to the tray, the SIM card, or the iPhone itself. Take your time and be patient throughout the process.
Once the tray starts to move, you will feel it slightly pop out of its locked position. At this point, you can pause for a moment and make sure that the tray is fully released before proceeding to remove it completely.
If the tray doesn’t release easily or feels stuck, do not force it. Take a moment to reassess and ensure that you are applying the pressure correctly. If you encounter any difficulties, it may be helpful to refer to the iPhone user manual or seek assistance from an expert.
With the tray released, you can now move on to the next step of removing the SIM card and reinserting it if needed.
3 Remove the SIM card from the tray
After successfully ejecting the SIM card tray from your iPhone 11, the next step is to carefully remove the SIM card from the tray. Follow these simple instructions to complete the process:
1. Gently hold the SIM card tray that you removed from the iPhone.
2. Look for the small slot on the tray where the SIM card is inserted.
3. Using your fingertips, carefully lift the SIM card out of the tray. Be sure to handle it with care to avoid any damage to the card or the tray.
4. Inspect the SIM card for any visible damage or debris. If you notice any, clean it gently with a microfiber cloth or a soft, lint-free cloth.
5. Once you have removed the SIM card, keep it in a safe place. It’s important to store it securely as you may need it again in the future.
Remember, the SIM card is a crucial component of your iPhone 11 and is required for proper cellular connectivity. By following these steps, you can safely and effortlessly remove the SIM card from your device.
Reinserting the SIM Card
After you have removed the SIM card from your iPhone 11, you may need to reinsert it at some point. Whether you were replacing it with a new SIM card or simply removing it temporarily, the process of reinserting the SIM card is relatively straightforward. Here’s a step-by-step guide:
1. Align the SIM card with the tray: Take a close look at the SIM card and the SIM card tray. There is a notch on one corner of the SIM card that should match up with the corresponding notch on the tray. Make sure to position the SIM card correctly before proceeding further.
2. Slide the tray back into the iPhone: Once the SIM card is properly aligned, gently slide the tray back into its original position on the side of the iPhone. Be sure to insert it in the right orientation, with the notch on the tray aligned with the notch on the iPhone. Apply gentle pressure until the tray clicks into place.
That’s it! Your SIM card has been successfully reinserted into your iPhone 11. You can now power on your device and use it as usual. It’s important to note that the SIM card must be inserted correctly for your iPhone to connect to your cellular network provider and make calls, send messages, and use mobile data.
If you encounter any issues or have difficulties inserting the SIM card, double-check that it is aligned properly and retry the process. If problems persist, it’s best to seek assistance from an authorized service provider or the Apple Support team.
Remember, the SIM card tray is delicate, so handle it with care to avoid any damage. If you accidentally bend or break the tray or damage the SIM card, it may prevent your iPhone from functioning properly.
Now that you know how to reinsert the SIM card, you can confidently switch between cards or replace them when necessary. Enjoy using your iPhone 11 with the peace of mind that you can easily manage your SIM cards whenever needed.
1 Align the SIM card with the tray
Once you have removed the SIM card from your iPhone 11, it’s important to align it properly before reinserting it into the SIM card tray. This ensures that the SIM card is inserted correctly and securely, allowing your phone to function properly.
To align the SIM card with the tray, carefully examine the shape and size of the SIM card. It should fit perfectly into the designated slot within the tray. Take note of the notched corner on the SIM card, as this will help you align it correctly.
Hold the SIM card with the metal contacts facing down and the notched corner pointing towards the designated corner of the SIM card tray. This helps to ensure that the SIM card is inserted in the correct orientation.
Gently place the SIM card into the tray, making sure that it fits snugly without any gaps. Be careful not to force or bend the SIM card, as this can cause damage to both the card and the tray.
Double-check that the SIM card is aligned properly by comparing it to the shape and size of the designated slot within the tray. It should fit seamlessly and sit flush with the tray.
Once you are satisfied that the SIM card is correctly aligned, you can proceed to reinsert the tray back into your iPhone 11.
Remember, proper alignment of the SIM card is crucial for ensuring optimal performance and functionality of your iPhone 11. Take your time to align the SIM card accurately, and avoid any undue force or mishandling.
Now that you have aligned the SIM card with the tray, let’s move on to the next step of inserting the tray back into your iPhone 11.
2 Slide the tray back into the iPhone until it clicks into place
Once you have removed the SIM card from the tray, it’s time to slide the tray back into the iPhone. This step is crucial to ensure that the SIM card is securely inserted and properly recognized by the phone.
First, take a moment to inspect the SIM card tray and make sure it is free from any dust or debris. Use a microfiber cloth to gently clean the tray if needed, ensuring a clean surface for the SIM card.
Next, hold the SIM card tray between your thumb and index finger, positioning it at the angle that aligns with the slot on the iPhone. Carefully insert the tray into the slot, making sure that it is inserted smoothly and evenly.
As you slide the tray into the iPhone, you may encounter some resistance. This is normal, and it is essential to apply gentle and consistent pressure to continue sliding the tray into the device.
Continue pushing the tray until you feel a slight click or resistance. This indicates that the SIM card tray is in place and locked securely within the iPhone.
Once the tray is fully inserted and clicked into place, give it a gentle shake to ensure it is secure and properly seated. This will help prevent any connectivity issues with your SIM card.
Now, your iPhone 11 is ready to be powered on and used with the newly reinserted SIM card. Enjoy your device and stay connected!
In conclusion, learning how to take the SIM card out of an iPhone 11 is a simple and straightforward process. By following the steps outlined in this guide, you can effortlessly remove and replace your SIM card whenever needed. Remember to power off your device and use the SIM card removal tool provided to safely extract the SIM tray. Whether you’re upgrading to a new device, switching carriers, or troubleshooting connectivity issues, being able to handle your SIM card with ease is an essential skill for any iPhone 11 user. With the knowledge and confidence gained from this guide, you can now navigate the world of SIM cards with ease and efficiency.
FAQs
1. How do I take the SIM card out of an iPhone 11?
To remove the SIM card from an iPhone 11, follow these steps:
1. Locate the SIM card tray on the side of your iPhone 11.
2. Insert a SIM card removal tool or a small paperclip into the SIM card tray’s eject hole.
3. Gently push the tool or paperclip inside until the tray pops out slightly.
4. Pull the tray out and remove the SIM card from it.
5. Reinsert the tray back into the iPhone 11 until it clicks into place.
2. Can I use any SIM card with an iPhone 11?
Yes, the iPhone 11 is typically sold unlocked and can be used with any compatible SIM card from any carrier. However, it is important to note that some iPhones may be carrier locked, which means they are tied to a specific network. In such cases, you may need to contact your carrier or the previous owner to unlock the device before using a different SIM card.
3. Do I need to turn off my iPhone 11 before removing the SIM card?
It is generally recommended to power off your iPhone 11 before removing the SIM card to prevent any potential damage. This ensures that the device is not actively using the SIM card and reduces the risk of accidentally triggering any changes or causing interruptions in your network connection.
4. What should I do if my SIM card gets stuck in the iPhone 11?
If your SIM card gets stuck in the iPhone 11, do not try to force it out as it may cause damage to the device or the SIM card. Instead, try the following steps:
1. Turn off your iPhone 11.
2. Use a small paperclip or SIM card removal tool to gently push the stuck SIM card further into the device.
3. While applying slight pressure, use another paperclip or tool to gently lift the SIM card and remove it.
If these steps do not work, it is recommended to visit an authorized service center or contact Apple support for assistance.
5. How do I insert a new SIM card into my iPhone 11?
To insert a new SIM card into your iPhone 11, follow these steps:
1. Locate the SIM card tray on the side of your iPhone 11.
2. Insert a SIM card removal tool or a small paperclip into the SIM card tray’s eject hole.
3. Gently push the tool or paperclip inside until the tray pops out slightly.
4. Take your new SIM card and place it in the tray, ensuring it aligns with the notched corner.
5. Reinsert the tray back into the iPhone 11 until it clicks into place.
Once you have inserted the new SIM card, you can power on your iPhone and follow the on-screen instructions to activate it.