
Sure, here is the introduction wrapped in the
tag:
Welcome to the ultimate guide on how to remove the battery from a Samsung Galaxy A. The Samsung Galaxy A series is known for its sleek design and advanced features, but when it comes to replacing the battery, many users are unsure of the process. Whether you’re looking to replace a worn-out battery or simply want to explore the internals of your device, this article will provide you with step-by-step instructions and essential tips to safely remove the battery from your Samsung Galaxy A smartphone. Let’s dive in and uncover the secrets of accessing the battery in your Samsung Galaxy A!
Inside This Article
- Preparing to Remove the Battery
- Removing the Back Cover
- Removing the Battery
- Reassembling the Device
- Conclusion
- FAQs
**
Preparing to Remove the Battery
**
Before you begin the process of removing the battery from your Samsung Galaxy A, it’s crucial to take some preparatory steps to ensure that the operation goes smoothly. Here are some essential preparations to make before you start:
1. Gather the Necessary Tools: Ensure that you have all the required tools at your disposal. You will need a small Phillips head screwdriver, a plastic opening tool, and a pair of tweezers. Having these tools ready will make the battery removal process much more manageable.
2. Create a Clean Workspace: Find a well-lit and clean workspace to carry out the battery removal process. A clutter-free environment will help prevent the loss of small components and make it easier to keep track of the screws and other parts you remove from the device.
3. Power Off the Device: Before you embark on removing the battery, power off your Samsung Galaxy A. This step is crucial for your safety and the safety of the device. To power off the device, press and hold the power button, then select “Power off” from the on-screen options.
4. Back Up Your Data: It’s always wise to back up your data before performing any hardware-related procedures on your smartphone. Ensure that your important files, photos, and other data are securely backed up to a computer or a cloud storage service to prevent any potential data loss.
Removing the Back Cover
Once you have prepared the necessary tools and workspace, it’s time to start the process of removing the back cover of your Samsung Galaxy A. The back cover of the Samsung Galaxy A is designed to be easily removable, allowing users to access the battery and other components of the device.
To begin, locate the small notch or groove on the side or bottom of the device. This is typically where you can start prying the back cover off. It’s important to use gentle but firm pressure to avoid damaging the cover or the device itself. You may also use a plastic opening tool to carefully pry the back cover away from the device.
As you work your way around the edges of the device, you’ll hear a series of clicks as the cover begins to detach from the main body of the phone. This is a normal part of the process and indicates that the cover is being released from its secure position. Continue applying pressure and gently prying until the back cover is completely separated from the device.
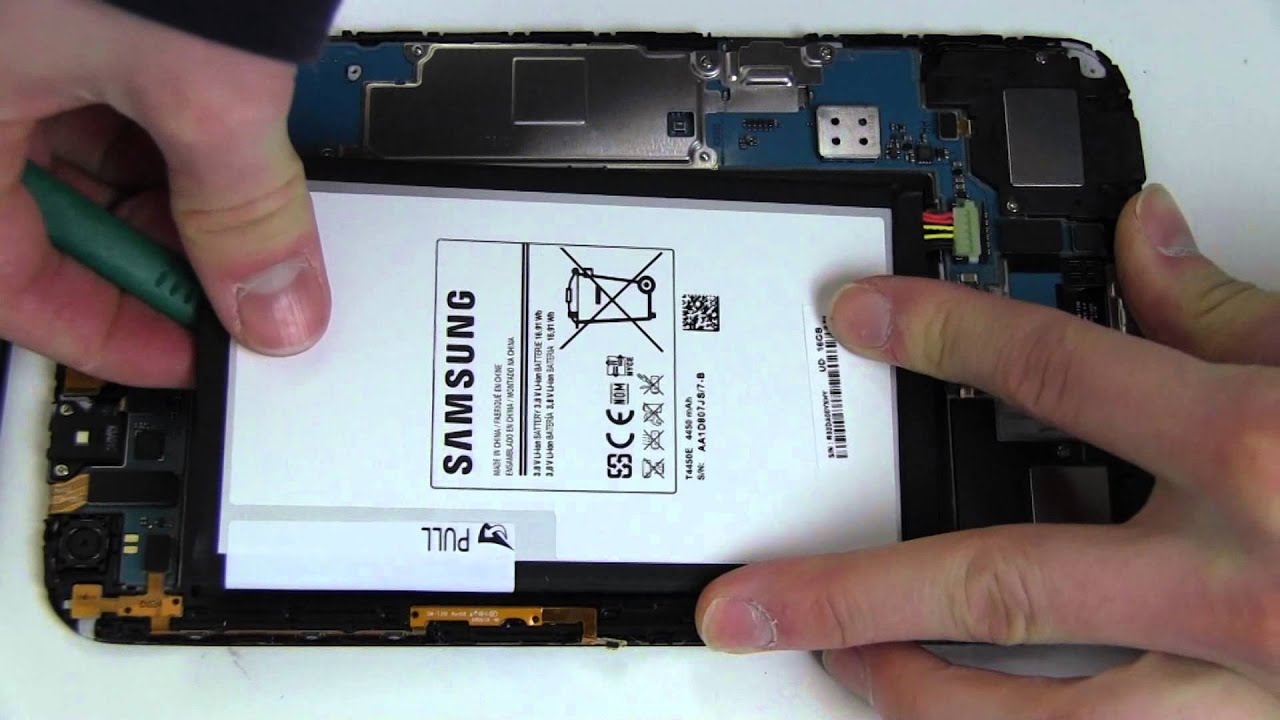
Removing the Battery
Now that you’ve successfully removed the back cover, it’s time to take out the battery from your Samsung Galaxy A. The battery is typically located beneath the back cover and is secured within the device.
Locate the battery, which is usually a rectangular or square-shaped component. It may have a tab or notch to assist with its removal. Gently lift the battery from its housing, taking care not to damage any of the surrounding components or connectors.
Once the battery is free from its compartment, carefully lift it out of the device. Be mindful of any adhesive or connectors that may still be attached to the battery. Ensure that you handle the battery with care, as it is a delicate component of your smartphone.
With the battery removed, you can proceed with any necessary maintenance, replacement, or troubleshooting for your Samsung Galaxy A. When handling the battery, it’s important to adhere to safety precautions and manufacturer guidelines to prevent any damage or injury.
Reassembling the Device
Now that you have successfully removed the battery and performed the necessary maintenance or replacement, it’s time to reassemble your Samsung Galaxy A. Follow these steps to put everything back together and ensure that your device functions properly:
1. Replace the Battery: Carefully place the battery back into its slot, ensuring that it fits snugly and securely. Ensure that the battery contacts align with the connectors in the device.
2. Reattach the Back Cover: Align the back cover with the edges of the device and gently press it into place. You should hear a series of clicks as the cover locks back into position.
3. Power On the Device: Once the back cover is securely in place, power on your Samsung Galaxy A by pressing and holding the power button. If the device powers on successfully, you have reassembled it correctly.
4. Test the Functionality: Check the functionality of the device to ensure that everything is working as it should. Test the screen, buttons, and all other features to confirm that the reassembly was successful.
5. Secure the Device: Finally, ensure that the device is securely closed and that there are no loose parts. This will prevent any issues or malfunctions due to improper reassembly.
By following these steps, you can safely and effectively reassemble your Samsung Galaxy A after removing the battery for maintenance or replacement.
Removing the battery from a Samsung Galaxy A is a straightforward process that requires careful attention to detail. Whether you’re replacing a worn-out battery or troubleshooting a device issue, it’s essential to follow the recommended guidelines to avoid any damage to your smartphone. By understanding the specific model of your Samsung Galaxy A and utilizing the appropriate tools, you can safely remove the battery and perform the necessary maintenance. Always remember to prioritize safety and precision when handling electronic devices, and if you encounter any challenges, seeking professional assistance is advisable. With the right approach, you can effectively manage your Samsung Galaxy A’s battery maintenance and ensure optimal performance for your device.
FAQs
Q: Can I remove the battery from a Samsung Galaxy A?
A: No, the Samsung Galaxy A series features non-removable batteries, ensuring a sleek and seamless design.
Q: Why would I need to remove the battery from a Samsung Galaxy A?
A: While the battery of a Samsung Galaxy A is not user-removable, there are instances where a device may need to be serviced by a professional technician, requiring the battery to be accessed and potentially replaced.
Q: Is it safe to attempt to remove the battery from a Samsung Galaxy A myself?
A: It is not recommended to attempt to remove the battery from a Samsung Galaxy A without proper training and tools. Doing so may result in damage to the device and potential safety hazards.
Q: How can I troubleshoot battery issues on my Samsung Galaxy A without removing the battery?
A: If you are experiencing battery-related issues with your Samsung Galaxy A, it is best to consult the device's user manual or seek assistance from authorized service providers or customer support for troubleshooting steps.
Q: Can a non-removable battery be replaced in a Samsung Galaxy A?
A: Yes, non-removable batteries in Samsung Galaxy A devices can be replaced by authorized technicians using specialized tools and procedures to ensure the safety and integrity of the device.