
Are you tired of dropping your phone on your face? Do you struggle to find a comfortable grip while using your mobile device? If so, you’re not alone. Many people face these challenges daily, but there’s a simple solution: Popsockets.
Popsockets have quickly become a popular mobile accessory due to their innovative and practical design. These small, collapsible grips adhere to the back of your phone or tablet, providing a secure grip and added convenience. But have you ever wondered how these handy accessories are created?
In this article, we will explore the fascinating process of creating a Popsocket. From the initial design concept to the final product, we’ll take a closer look at the steps involved in producing these versatile mobile accessories. So, if you’re curious about the inner workings of a Popsocket or considering creating one of your own, keep reading to discover the secrets behind this portable grip phenomenon.
Inside This Article
- What is a Popsocket?
- Materials Needed for Creating a Popsocket
- Step-by-Step Guide to Creating a Popsocket
- Tips and Tricks for Personalizing Your Popsocket
- Conclusion
- FAQs
What is a Popsocket?
Popsockets have become increasingly popular in recent years as a trendy and functional mobile accessory. But what exactly is a Popsocket? Simply put, a Popsocket is a small gadget that attaches to the back of a smartphone, providing a convenient grip and stand for the device.
These nifty little accessories consist of two main components: a collapsible plastic or metal disc and an extendable accordion-like grip. The disc attaches to the back of a phone or phone case using a strong adhesive, while the grip can be pulled out and collapsed as needed.
The primary purpose of a Popsocket is to improve the ergonomics of using your smartphone. By attaching a Popsocket to the back of your device, it creates a comfortable grip, preventing accidental drops and allowing you to hold your phone securely with just one hand.
But that’s not all a Popsocket can do. Thanks to its collapsible nature, it also serves as a convenient stand for your phone. By extending the grip and collapsing it halfway, you can prop up your device in either portrait or landscape orientation, making it perfect for watching videos, taking selfies, or video chatting.
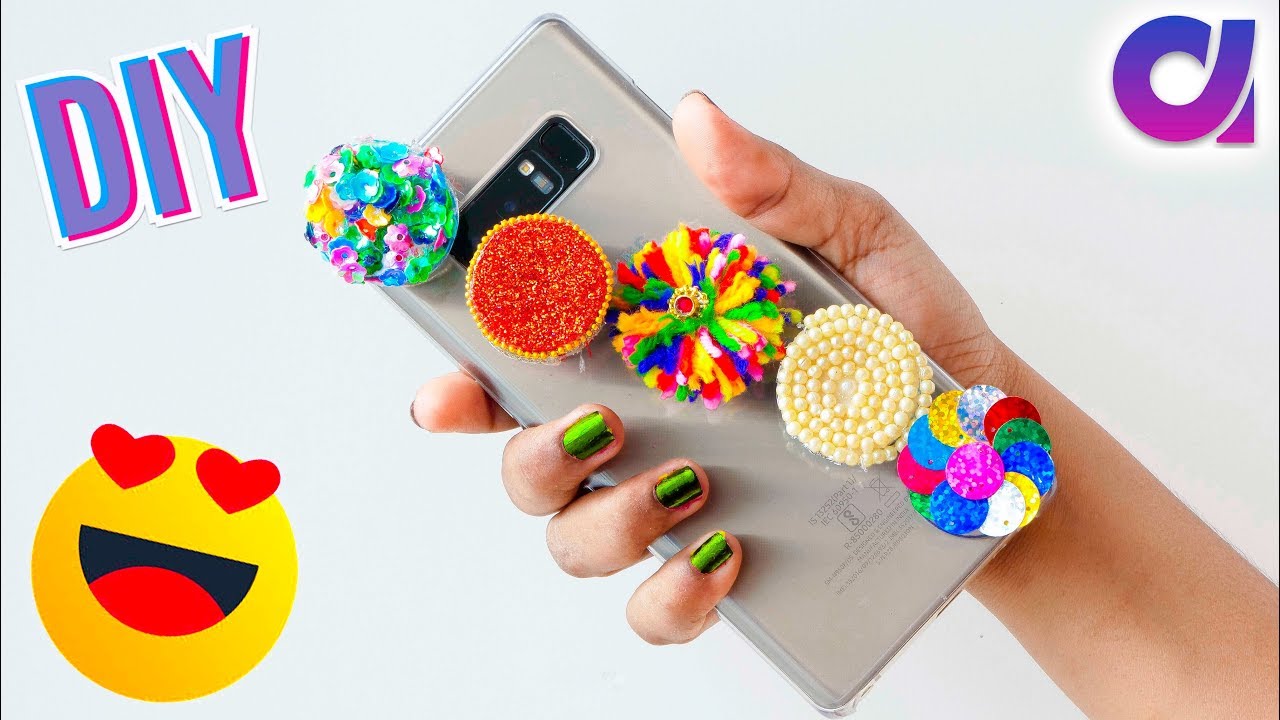
Another added benefit of Popsockets is their customizability. They come in a wide range of designs, colors, and patterns, allowing you to personalize your phone and showcase your style. Whether you prefer a sleek and understated look or a bold and vibrant design, there’s a Popsocket to suit every taste.
Popsockets have gained popularity not only for their practicality but also for their versatility. In addition to serving as a phone grip and stand, they can be used as cord wraps for earphones, credit card holders, or even car mounts with the use of additional accessories.
Now that you have a better understanding of what a Popsocket is and what it can do, let’s take a look at the materials you’ll need to create your own Popsocket.
Materials Needed for Creating a Popsocket
Creating a popsocket doesn’t require many materials, and you may even have most of them lying around your house. Here are the essential materials you’ll need:
- Base: You’ll need a base for your popsocket. This can be a small piece of plastic or a wooden disc, preferably with a diameter of around one inch.
- Grip: The grip is the part that attaches to the base and provides the functionality of the popsocket. You can use a variety of materials for this, such as a rubber finger grip, a small toy, or even a keychain ring.
- Adhesive: To ensure that your popsocket stays securely attached to your device, you’ll need a strong adhesive. A recommended option is double-sided adhesive tape, but you can also use hot glue or strong adhesive stickers.
- Decorative Elements: While not necessary, you may want to add some decorative elements to personalize your popsocket. This can include stickers, gems, paint, or any other creative materials you’d like to use.
- Scissors: You’ll need scissors to cut the adhesive tape or any other materials you use for your popsocket.
- Optional Tools: Depending on the materials you choose, you may need additional tools such as a drill, wire cutters, or sandpaper. These tools are optional and depend on your preferred design.
As you can see, the materials needed for creating a popsocket are easily accessible and can be customized based on your preferences and available resources. Once you have gathered all the necessary items, you can proceed to create your own unique and functional popsocket.
Step-by-Step Guide to Creating a Popsocket
Creating your own popsocket is a fun and easy project that allows you to express your creativity while adding a personal touch to your phone. Follow these step-by-step instructions to create your own unique popsocket:
- Gather the necessary materials: To create a popsocket, you will need the following materials:
- A plastic phone grip or base
- Decorative paper or fabric
- Mod Podge or adhesive glue
- A paintbrush or foam brush
- Scissors
- Optional: embellishments such as stickers, gems, or glitter
- Prepare the base: Start by cleaning the surface of the plastic phone grip to ensure that it is free from any dirt or oil. This will help the adhesive stick better.
- Measure and cut: Take your decorative paper or fabric and measure it to fit the surface of the phone grip. Cut the paper or fabric to the appropriate size, leaving a small margin on all sides. This will allow you to wrap the material around the grip.
- Apply adhesive: Using a paintbrush or foam brush, apply a thin layer of Mod Podge or adhesive glue to the surface of the phone grip. Make sure to cover the entire area evenly.
- Attach the decorative material: Carefully place the cut piece of paper or fabric onto the adhesive-covered surface of the phone grip. Smooth out any air bubbles or wrinkles using your fingers or a small roller.
- Seal the design: Once the decorative material is securely attached, apply another layer of Mod Podge or adhesive glue on top of it. This will help seal the design and provide a protective coating.
- Let it dry: Allow the popsocket to dry completely before using it. This may take a few hours, depending on the type of adhesive used.
- Add embellishments (optional): If desired, you can further personalize your popsocket by adding embellishments such as stickers, gems, or glitter. Apply these using additional glue or adhesive.
- Attach the popsocket to your phone: Once the popsocket is fully dry, it’s time to attach it to your phone. Peel off the adhesive backing on the base of the popsocket and firmly press it onto the desired spot on your phone case. Make sure to position it in a way that is comfortable for your hand.
- Enjoy your custom popsocket: Now that your popsocket is securely attached, you can enjoy using it to get a better grip on your phone, prop it up for hands-free viewing, or even wrap your earphones around it for easy storage. Best of all, you’ll have a unique accessory that reflects your personal style!
Tips and Tricks for Personalizing Your Popsocket
Once you have created your own popsocket, it’s time to let your creativity shine and personalize it to reflect your unique style. Here are some tips and tricks to help you make your popsocket truly yours:
- Choose the Right Design: Consider your personal preferences and interests when selecting a design for your popsocket. Whether it’s a favorite pattern, a photo of a loved one, or a logo of your favorite sports team, make sure it’s something that speaks to you.
- Use Decals and Stickers: If you want to add some extra flair to your popsocket, consider using decals or stickers. You can find a wide variety of designs online or even create your own using printable vinyl sheets. Just be sure to clean the surface of your popsocket before applying the decals for better adhesion.
- Get Crafty with Paint: If you’re feeling artistic, why not paint your popsocket? Use acrylic paint or paint markers to create unique and colorful designs. You can paint anything from abstract patterns to intricate illustrations. Just remember to let the paint dry completely before attaching it to your phone.
- Accessorize with Charms: Add some charm to your popsocket by attaching small charms or pendants to it. Choose charms that reflect your personality or interests. You can find a variety of charms online or even repurpose old jewelry to give your popsocket a personalized touch.
- Experiment with Fabric: If you’re into sewing or crafting, consider using fabric to personalize your popsocket. Cut a piece of fabric in the shape of your popsocket and use fabric glue to attach it. You can choose fabric with patterns, textures, or even customize it with embroidery to make it unique.
- Try Different Materials: Don’t limit yourself to traditional materials. Explore alternatives like leather, cork, or even wood to create a popsocket with a distinctive look and feel. Just make sure that the material is sturdy enough to hold your phone securely.
- Experiment with Sizes: Most popsockets come in standard sizes, but you can also find variations in size and shape. Consider trying different sizes to find the one that fits your phone and hand comfortably. You may even find that larger popsockets offer more room for creativity and customization.
- Swap Out Designs: One of the great things about popsockets is that they are easily interchangeable. If you want to change up your design or match your popsocket to different outfits or occasions, consider investing in multiple tops or adhesive discs. This way, you can switch them out whenever you want a fresh look.
Remember, personalizing your popsocket is all about expressing yourself and adding a touch of uniqueness to your phone. Don’t be afraid to get creative and have fun with it. Whether you prefer a minimalist design or a bold statement piece, your personalized popsocket is sure to turn heads and show off your style.
Conclusion
In conclusion, creating a Popsocket for your phone is a fun and customizable way to enhance your mobile experience. By following the steps provided in this article, you can quickly and easily design a unique accessory that reflects your personal style and adds functionality to your device.
Whether you want to show off your favorite design, promote your brand, or simply have a more secure grip on your phone, a Popsocket is the perfect solution. With a wide range of possibilities for customization and the ability to easily attach and remove it from your device, it’s no wonder that Popsockets have become so popular.
So why not get creative and start designing your own Popsocket today? You’ll not only have a practical and stylish accessory but also a great conversation starter. Don’t miss out on the opportunity to personalize your phone and make it stand out from the crowd with a one-of-a-kind Popsocket.
FAQs
1. What is a Popsocket and how does it work?
A Popsocket is a handy accessory that attaches to the back of your smartphone or tablet to provide a secure grip. It features a collapsible mechanism that allows you to expand and contract it as needed. By placing your fingers through the circular grip, you can hold your device comfortably, preventing accidental slips and drops.
2. How do you attach a Popsocket to your phone?
Attaching a Popsocket is simple. Start by cleaning the surface of your phone or phone case where you want to place it. Then, peel off the back of the adhesive disc on the Popsocket and firmly press it onto the desired location. It is recommended to position it in a spot that feels comfortable for your hand.
3. Can you remove and reposition a Popsocket?
Yes, Popsockets are designed to be reusable. If you want to remove or reposition your Popsocket, gently pull it upwards from the phone or case. The adhesive disc may lose some stickiness over time, so if you need to reposition it, it is advisable to use a new adhesive disc to ensure a secure hold.
4. Are Popsockets compatible with all phone cases?
Popsockets can be used with most phone cases, as long as the surface is smooth and non-porous. However, they may not adhere well to silicone, heavily textured, or waterproof cases. It’s always a good idea to check the compatibility of your phone case before attaching a Popsocket.
5. Can Popsockets be used with wireless charging?
Yes, Popsockets are typically thin enough to allow wireless charging. However, if you have a particularly thick Popsocket or if it obstructs the wireless charging coil on your device, you may need to remove it temporarily for wireless charging to work effectively.