
In today’s digital age, our smartphones have become an integral part of our daily lives. From communication to entertainment, our dependence on these handheld devices is undeniable. As a result, mobile accessories have soared in popularity, providing us with additional functionality and style. One such accessory that has gained significant traction is the Popsocket. These collapsible grips not only offer added convenience in holding our phones but also serve as a stand and a way to personalize our devices.
However, despite their popularity, there may come a time when you need to remove and reattach a Popsocket. Whether you want to change its position or use it on a different phone, putting a Popsocket back on can sometimes be a tricky task. But fear not! In this article, we will guide you through the step-by-step process of putting a Popsocket back on your phone securely, ensuring that you can continue to enjoy the benefits of this must-have mobile accessory.
Inside This Article
- Introduction
- Importance of Putting a Popsocket Back On
- How to Put a Popsocket Back On
- Tips and Tricks for Reattaching a Popsocket
- Conclusion
- Conclusion
- FAQs
Introduction
Popsockets have become a popular and trendy accessory for mobile phones. These versatile gadgets not only offer a secure grip on your device but also act as a stand, allowing for hands-free viewing. However, there may be instances where you need to remove and reattach your Popsocket. Whether you want to change the design, replace a worn-out Popsocket, or simply readjust its position, knowing how to put a Popsocket back on is essential. In this article, we will guide you through the step-by-step process of reattaching a Popsocket to your phone.
Before diving into the details, it’s important to note that the method of reattaching a Popsocket may vary depending on the type of phone you have and the surface material it has. The instructions provided below are general guidelines that should work for most phone models. However, it’s always a good idea to consult the specific instructions provided by the Popsocket manufacturer for your particular device.
So, without further ado, let’s begin the journey of rediscovering how to put a Popsocket back on!
Importance of Putting a Popsocket Back On
Popsockets have become a popular accessory for cell phones, offering both style and functionality. These clever little devices attach to the back of your phone and provide a secure grip, making it easier to hold and use your device. However, there may be times when you need to remove your Popsocket, whether it’s to change the design, clean your phone, or replace the adhesive. But it’s equally important to know how to put a Popsocket back on properly. Here’s why:
A secure grip: One of the primary reasons people use a Popsocket is to improve their grip on their phone. By reattaching the Popsocket correctly, you ensure that your device stays securely in your hand, reducing the risk of accidentally dropping it and causing any damage.
Preventing accidental drops: A Popsocket acts as a safety net to prevent your phone from slipping through your fingers. By putting it back on, you restore that added layer of security and minimize the chances of accidentally dropping your device.
Using your phone comfortably: A Popsocket also serves as a stand, allowing you to prop your phone up at an angle for comfortable viewing. By putting it back on properly, you can enjoy hands-free usage and make video calls, watch movies, or follow recipes with ease.
Protecting your phone: In addition to improving grip and stability, a Popsocket can also protect your phone from scratches and damage. When you reattach it correctly, you ensure that it’s working at optimum efficiency to keep your device safe from potential accidents or falls.
Preserving the adhesive: Popsockets use a strong adhesive to stick to your phone’s surface. By correctly putting it back on, you ensure that the adhesive reattaches properly and retains its strength, preventing the Popsocket from coming loose or falling off prematurely.
Knowing how to put a Popsocket back on is essential for maintaining the functionality and longevity of your device. By following the proper reattachment process, you can enjoy the benefits of your Popsocket while keeping your phone safe and secure.
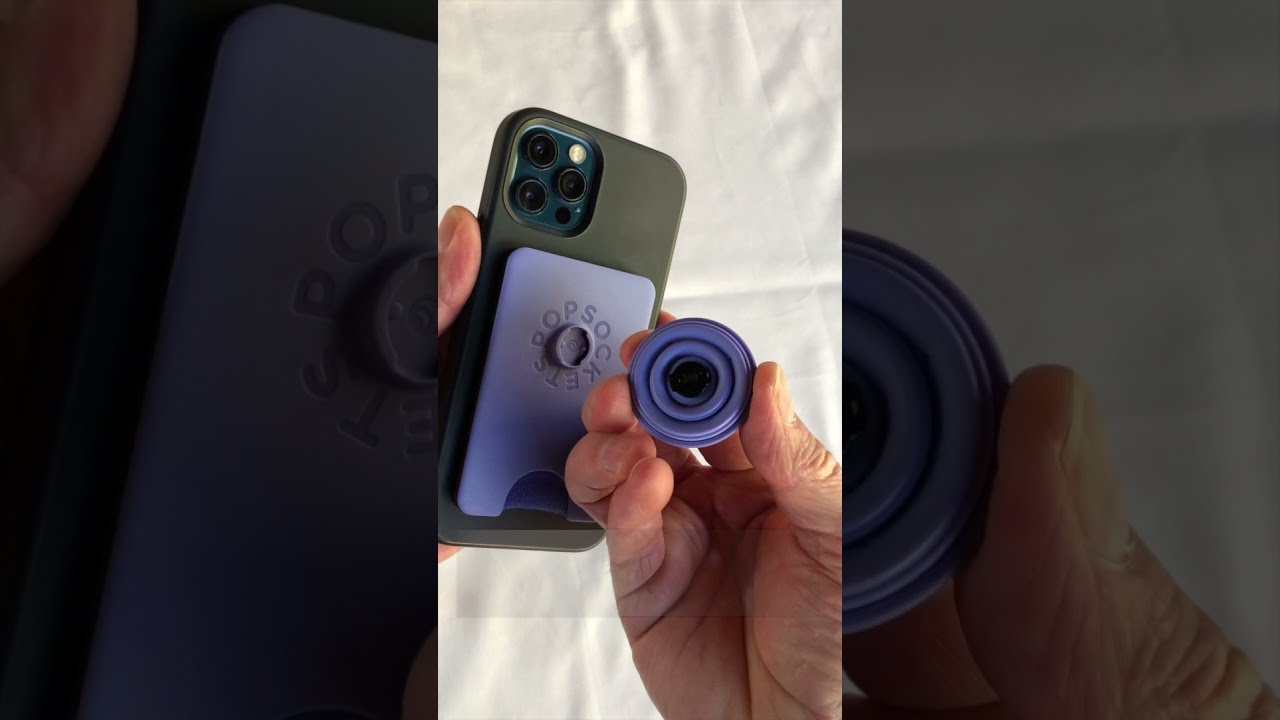
How to Put a Popsocket Back On
Popsockets have become incredibly popular accessories for mobile phones, providing both style and functionality. These handy little gadgets serve as a grip, stand, and even a cord holder for your device. However, there may come a time when your Popsocket needs to be reattached or replaced. In this article, we will guide you through the process of putting a Popsocket back on your phone, ensuring a secure and reliable attachment.
1. Remove the Existing Popsocket
If you already have a Popsocket attached to your phone but need to reposition it or replace it with a new one, start by gently peeling it off the surface. Be careful not to forcefully pull it as it may damage your phone or case. Slowly and steadily lift the Popsocket from the edge, gradually detaching it until it is completely removed.
2. Clean the Surface
Before reattaching your Popsocket, it is essential to clean the surface of your phone or case thoroughly. Use a mild cleaning solution and a microfiber cloth to remove any dirt, oil, or residue that may have accumulated. This will ensure a strong bond between the Popsocket and your device, preventing any slippage or detachment.
3. Position the Popsocket
Determine the desired placement of your Popsocket on your phone or case. Popsockets are typically attached towards the center of the device, making it easy to hold and support. However, you can experiment with different positions to find what works best for you. Once you have decided, hold the Popsocket between your fingertips, ready for the next step.
4. Apply Pressure
Now comes the crucial step of firmly attaching the Popsocket to your phone or case. With the adhesive side facing down, carefully align the base of the Popsocket with the desired position. Once aligned, press down firmly on the Popsocket, applying even pressure for approximately 15 seconds. This will ensure a strong adherence and a secure attachment.
And there you have it! Your Popsocket is successfully back on your phone, ready to provide you with a comfortable grip, convenient stand, and an easy way to manage your cords. Remember, if you ever need to reposition or replace your Popsocket again, follow these steps to ensure a hassle-free and reliable attachment.
Putting a Popsocket back on your phone is a simple process that can be done by anyone. By following these steps, you can enjoy the benefits of your Popsocket once again, keeping your phone secure and adding a touch of personal style to your device.
Tips and Tricks for Reattaching a Popsocket
Reattaching a Popsocket may seem like a simple task, but there are a few tips and tricks that can help make the process smoother and more effective. Here are some expert recommendations to ensure your Popsocket stays securely attached:
- Clean the surface: Before reattaching your Popsocket, it’s important to clean the surface of your device or case. Use a mild detergent or rubbing alcohol to remove any dirt, oil, or residue that may prevent the adhesive from sticking properly.
- Use adhesive primer: If you’re having trouble with the Popsocket staying in place, you can consider using an adhesive primer. These primers create a stronger bond between the Popsocket and the surface, providing extra hold and durability.
- Allow adhesive to cure: Once you’ve attached the Popsocket, it’s recommended to leave it undisturbed for at least 12 hours. This allows the adhesive to fully cure and provide a strong bond. Avoid applying excessive pressure or pulling on the Popsocket during this curing period.
- Positioning the Popsocket: When reattaching a Popsocket, the positioning is crucial for both functionality and aesthetics. Make sure to place it in a position that is comfortable for your grip and allows easy access to buttons and ports. Take a moment to visualize the placement before pressing it firmly onto the surface.
- Apply firm pressure: To ensure a secure attachment, press down on the Popsocket firmly for about 15 seconds. This helps the adhesive bond effectively to the surface. Applying even pressure across the entire surface of the Popsocket will help prevent any edges from lifting.
- Avoid frequent reattachments: While Popsockets are designed to be reusable, frequent reattachments can decrease their adhesive strength over time. If you need to switch devices or cases frequently, consider using additional adhesive discs or replacement adhesive to ensure a secure fit.
By following these tips and tricks, you can confidently reattach your Popsocket and enjoy its functionality and convenience. Whether you’re using it for a better grip or a handy stand, your Popsocket will stay securely in place, keeping your device safe and stylish.
Conclusion
Putting a Popsocket back on is a simple process that can ensure the continued functionality and style of your cell phone accessory. It is important to take the time to properly clean the surface, position the Popsocket correctly, and apply sufficient pressure for a secure fit. By following these steps and utilizing the tips and tricks provided, you can easily reattach your Popsocket and enjoy its benefits once again.
Remember, the Popsocket is not just a fashion statement; it also serves essential purposes like providing a secure grip, acting as a phone stand, and supporting wireless charging. By properly reattaching your Popsocket, you can ensure that it continues to fulfill these functions without any issues.
Whether you accidentally removed your Popsocket or simply want to switch it to a different device, the process of putting it back on is straightforward. Just make sure to clean the surface of your phone, align the Popsocket correctly, and give it a firm press to ensure a strong bond.
While Popsockets are known for their durability and longevity, it is always a good idea to periodically check the attachment and reapply if needed. This will help prevent any accidental drops or damage to your phone.
So, the next time you find yourself needing to put a Popsocket back on, don’t fret. Follow the steps and tips mentioned in this article, and you’ll have your Popsocket securely attached and ready to enhance your phone usage once again.
Conclusion
In conclusion, putting a Popsocket back on your phone is a simple and convenient process. By following the steps outlined in this article, you can easily reattach your Popsocket and enjoy the functionality and grip it provides. Remember to clean the adhesive base of the Popsocket and the surface of your phone before applying it to ensure a secure and long-lasting attachment.
Additionally, it’s essential to take proper care of your Popsocket to prolong its lifespan. Avoid exposing it to excessive heat or moisture, as these can weaken the adhesive. If your Popsocket loses its stickiness over time, you can rejuvenate the adhesive by rinsing it with water and letting it air dry before reattaching it to your phone.
With the information and tips provided in this article, you can confidently put a Popsocket back on your phone and enjoy the improved grip and convenience it offers. So go ahead, grab your Popsocket, follow the instructions, and give your phone the support and style it deserves!
FAQs
1. How do I put a PopSocket back on my phone?
If you want to put your PopSocket back on your phone, follow these simple steps:
- Remove the adhesive backing from the base of the PopSocket.
- Place the adhesive side of the PopSocket firmly onto the back of your phone, ensuring it is centered and aligned properly.
- Press down on the PopSocket for about 15 seconds to ensure a strong bond.
- Wait for at least an hour before using the PopSocket to allow the adhesive to fully adhere.
2. Can I reuse the adhesive on my PopSocket?
Unfortunately, the adhesive on a PopSocket is designed for one-time use only. Once you remove the PopSocket from your phone, the adhesive loses its stickiness and cannot be reused. However, you can purchase replacement adhesives for your PopSocket if you need to reattach it to a different phone or case.
3. How do I remove a PopSocket from my phone?
To remove a PopSocket from your phone, follow these steps:
- Gently lift one edge of the PopSocket with your fingernail or a credit card.
- Slowly peel back the PopSocket from the phone, taking care not to damage the phone or case.
- If there is any adhesive residue left on your phone, use a mild adhesive remover or rubbing alcohol to clean it off.
- Allow the phone to dry completely before attaching a new PopSocket or using your phone without one.
4. Will a PopSocket stick on a silicone or leather phone case?
PopSockets are designed to adhere to most smooth, hard phone cases, including plastic, metal, and glass. While they may stick to silicone or leather cases, the adhesive may not hold as strongly, and the PopSocket may be more prone to coming loose. It’s always best to test the adhesion before relying on a PopSocket on a silicone or leather case.
5. Can I adjust the position of a PopSocket once it’s attached?
Once a PopSocket is attached to your phone, it is not recommended to try to adjust its position. Attempting to adjust the PopSocket may weaken the adhesive, making it less secure. If you need to reposition the PopSocket, it’s best to remove it completely and start the attaching process from scratch.