
Configuring an SMTP relay connector in Exchange 2013 is essential for enabling your mail server to send emails to external domains. This feature allows your organization to bypass certain email delivery restrictions and ensures that outgoing emails are relayed securely to their intended recipients.
In this article, we will guide you through the process of configuring an SMTP relay connector in Exchange 2013. Whether you need to set up a connector for a specific application, device, or to relay emails to an external email service, we’ve got you covered. By following these step-by-step instructions, you’ll be able to successfully configure an SMTP relay connector and ensure smooth email delivery from your Exchange server.
Inside This Article
- Overview of SMTP Relay Connector
- Pre-Configurations for SMTP Relay Connector
- Steps to Configure SMTP Relay Connector in Exchange 2013
- Testing and Troubleshooting SMTP Relay Connector
- Conclusion
- FAQs
Overview of SMTP Relay Connector
The SMTP Relay Connector is a crucial component in the Exchange 2013 server that enables the secure transfer of email messages between email servers. It acts as a bridge, facilitating the exchange of emails between different domains, organizations, or email systems.
In simple terms, the SMTP Relay Connector allows your Exchange server to relay email messages to external recipients by connecting to their respective email servers. This is particularly useful when you need to send emails to recipients outside of your organization, such as customers, partners, or vendors.
The relayed email messages pass through the SMTP Relay Connector, which authenticates them, applies security measures, and ensures their successful delivery to the intended recipients. It provides a secure and efficient way to send and receive emails across networks and domains.
SMTP Relay Connector is an essential feature in Exchange 2013 that enhances communication capabilities and ensures smooth email delivery in an interconnected digital world. By leveraging this connector, you can extend the reach of your email system and communicate with users and organizations beyond your internal network.
Pre-Configurations for SMTP Relay Connector
Before configuring an SMTP Relay Connector in Exchange 2013, there are a few pre-configurations that need to be completed. These pre-configurations ensure that the environment is set up correctly and that the SMTP Relay Connector functions smoothly. Let’s take a look at the essential pre-configurations:
1. Domain Configuration: Ensure that the domain you wish to relay emails for is properly configured in your Exchange organization. This involves adding the domain to the accepted domains list and configuring the necessary DNS records.
2. Allow Anonymous Authentication: By default, Exchange 2013 does not allow anonymous relay. To enable anonymous authentication, you need to modify the receive connector settings to allow unauthenticated access from the desired IP address or IP range. This is crucial for the SMTP Relay Connector to accept and forward emails.
3. IP Address and Firewall Settings: Verify that the IP address or IP range of the device or application sending emails through the SMTP Relay Connector is allowed in your firewall settings. Ensure that the necessary network routes are configured, and any network security groups or ACLs are updated accordingly.
4. Authentication and Permissions: Determine the authentication method you want to use for the SMTP Relay Connector. Options include Basic Authentication, Integrated Windows Authentication, or a combination of both. Configure the necessary permissions and access control to ensure only authorized senders can use the SMTP Relay Connector.
5. Limitations and Restrictions: Consider any limitations or restrictions you want to impose on the SMTP Relay Connector. This may include limitations on the maximum number of recipients, message size limits, or restrictions on specific sender domains or IP addresses.
6. Monitoring and Logging: Set up monitoring and logging to ensure you can track the usage of the SMTP Relay Connector, identify any potential issues or errors, and have detailed records for troubleshooting purposes.
By completing these pre-configurations, you will have a solid foundation for setting up the SMTP Relay Connector in Exchange 2013. It ensures that the necessary settings and permissions are in place, allowing for secure and efficient email relay.
Steps to Configure SMTP Relay Connector in Exchange 2013
Configuring an SMTP relay connector in Exchange 2013 allows you to send emails through external servers or services. This is especially useful when you want to relay emails to recipients outside of your organization or when you need to send bulk emails from specific applications.
Follow these steps to successfully set up an SMTP relay connector in Exchange 2013:
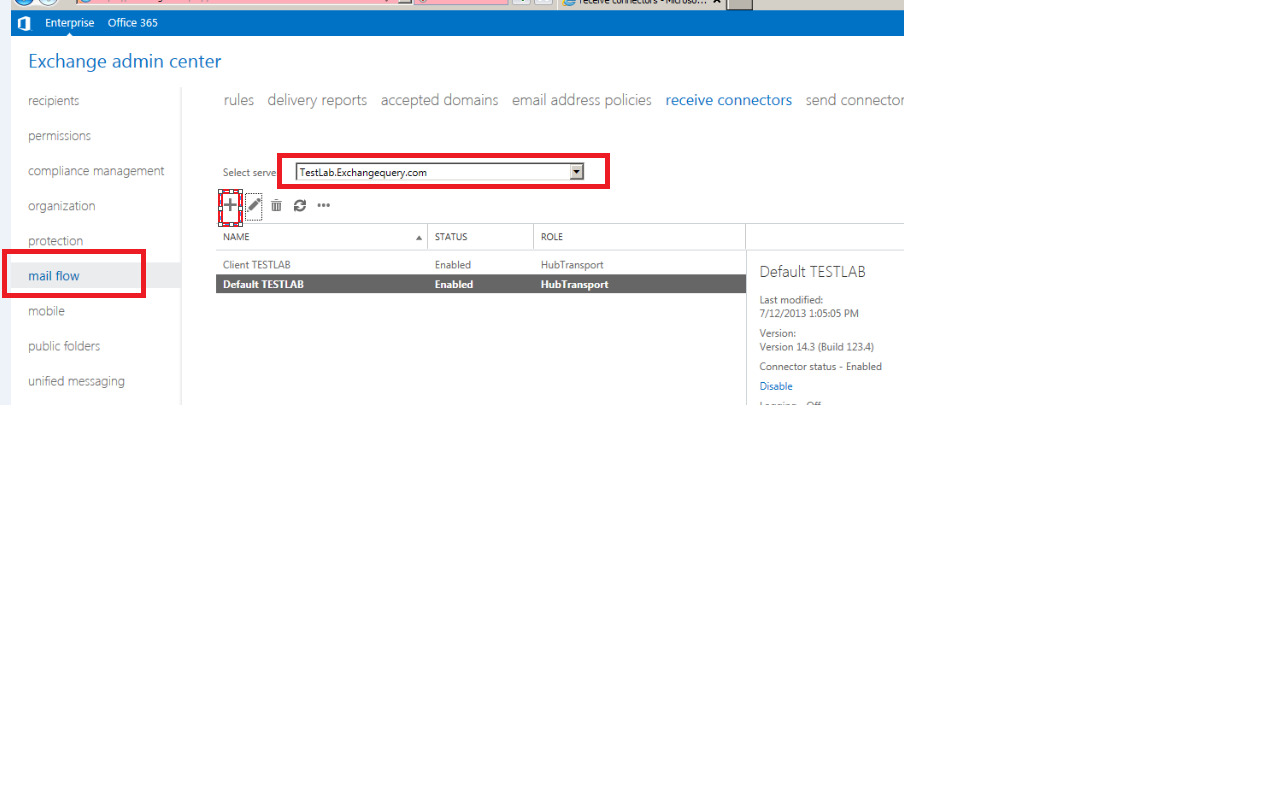
- Open the Exchange Admin Center (EAC) by entering the URL “https://localhost/ecp” in your web browser.
- Log in using the credentials of an account that has Exchange Administrator privileges.
- In the EAC, navigate to “Mail Flow” and click on “Receive Connectors” in the top menu.
- Click on the “+” icon to create a new receive connector.
- Provide a name for the connector, such as “SMTP Relay Connector”.
- Choose the intended usage for the connector. In this case, select “Custom.”
- Under the “Network Adapter Bindings” section, select the appropriate network adapter(s) for the connector.
- Next, specify the “Remote network settings.” By default, the “Use the external DNS lookup…” option is selected. If you have specific DNS servers, choose the “Use the DNS settings of the network adapter” option.
- Click “Next” to proceed to the “Authentication” settings.
- Choose the appropriate authentication method based on your requirements. For example, if you want to allow anonymous relay, select “None” under “Authentication Mechanism.” If you want to require TLS encryption for relayed messages, select “Basic Authentication” and “Offer Basic authentication only after starting TLS.”
- Click “Next” to go to the “Permission Groups” settings.
- Select the permission groups based on the level of access you want to grant. For relay purposes, it is recommended to select “Anonymous users” and “Exchange servers.”
- Click “Next” and review the configuration summary.
- If everything looks correct, click “Finish” to create the SMTP relay connector.
- Once the connector is created, you may need to modify the default receive connector’s security settings to allow the relayed messages.
With these steps completed, you have successfully configured an SMTP relay connector in Exchange 2013. This means that your Exchange server will be able to relay emails to external recipients or through specific services as per your configuration.
It is important to regularly monitor the SMTP relay connector’s usage to ensure it is not being misused or causing issues. Additionally, consider implementing security measures like IP restrictions and message throttling to prevent abuse.
Testing and Troubleshooting SMTP Relay Connector
Once you have configured the SMTP Relay Connector in Exchange 2013, it is essential to test and troubleshoot to ensure its proper functioning. This will help identify any issues that may arise during the relay process and allow you to address them promptly. Here are some steps you can follow to test and troubleshoot your SMTP Relay Connector:
- Send test emails: To verify if the SMTP Relay Connector is working correctly, send test emails using an email client or a command line tool like Telnet. Make sure to use a valid recipient address and monitor the delivery status.
- Check the SMTP logs: Exchange 2013 generates SMTP logs that provide detailed information about mail flow. Monitor these logs to identify any errors or issues while relaying emails through the SMTP Relay Connector. Look for any failed connections, authentication errors, or rejected messages.
- Test internal relay: Send test emails between internal mailboxes hosted on Exchange 2013. This will help ensure that internal mail flow is functioning correctly and that the SMTP Relay Connector is relaying emails between internal users.
- Test external relay: Send test emails from an external email account to a recipient hosted on Exchange 2013. Verify if the SMTP Relay Connector successfully delivers the emails to the internal recipient. If there are any issues, check if the connector is properly configured to allow email delivery from external sources.
- Verify recipient restrictions: If you have configured any recipient restrictions on the SMTP Relay Connector, test sending emails to both allowed and denied recipients to confirm that the restrictions are applied correctly.
- Check for blacklisting: Sometimes, the SMTP Relay Connector’s IP address or domain may get blacklisted by email security services. Perform a blacklist check to ensure that your Exchange server’s IP address is not listed. If it is blacklisted, take the necessary steps to resolve the issue and ensure smooth email delivery.
- Monitor email queues: Keep an eye on the email queues in Exchange 2013 to ensure that emails are being processed and delivered promptly. If you notice any backlogs or delays in the queues, investigate the cause and take appropriate actions to resolve the issue.
- Perform regular testing: It is crucial to regularly test the SMTP Relay Connector to ensure continuous functionality. Schedule periodic tests to send and receive emails through the connector and check for any anomalies or errors.
By following these steps, you can effectively test and troubleshoot the SMTP Relay Connector in Exchange 2013. This will help you ensure the reliable and secure relay of emails within your organization or with external sources.
Conclusion
Configuring an SMTP relay connector in Exchange 2013 is a crucial step for ensuring that your email communication flows seamlessly. By following the steps outlined in this guide, you can establish a reliable and efficient email delivery system for your organization.
Remember, an SMTP relay connector allows you to relay emails through an external server, enabling smooth communication with recipients outside your network. It is especially beneficial for organizations that send a large volume of emails or have specific requirements for email delivery.
By understanding the purpose of an SMTP relay connector and following the necessary steps to configure it in Exchange 2013, you can enhance the reliability and effectiveness of your email communication. With this knowledge, you are well equipped to optimize the email delivery process and ensure seamless communication within and beyond your organization.
FAQs
1. What is an SMTP relay connector in Exchange 2013?
An SMTP relay connector in Exchange 2013 is a configuration that allows Exchange to forward emails to external recipients or email servers outside the organization’s network. It acts as a bridge between Exchange and other mail servers, ensuring proper delivery of emails to their intended destinations.
2. Why do I need to configure an SMTP relay connector?
Configuring an SMTP relay connector is necessary when you want Exchange 2013 to send emails to recipients outside your organization. Without it, Exchange may consider these emails as external and refuse to deliver them. By configuring the SMTP relay connector, you can ensure seamless communication with external email servers and prevent email delivery issues.
3. How do I configure an SMTP relay connector in Exchange 2013?
To configure an SMTP relay connector in Exchange 2013, you need to perform the following steps:
- Open the Exchange Admin Center (EAC) and navigate to the Mail Flow section.
- Select the Receive Connectors tab and click on the + (plus) icon to add a new connector.
- Provide a name for the connector and select the Frontend Transport role.
- Choose the intended usage for the connector, such as Internet or Internal relay.
- Specify the IP addresses that can use the connector to relay email.
- Configure any necessary authentication and permissions settings.
- Save the changes and restart the Transport service for the new connector to take effect.
4. Can I restrict who can use the SMTP relay connector?
Yes, you can restrict the usage of the SMTP relay connector to specific IP addresses or IP ranges. By setting up IP restrictions, you can ensure that only authorized servers or devices can utilize the connector for relaying emails. This helps enhance the security and prevent misuse of the connector.
5. What are the common issues when configuring an SMTP relay connector?
Some common issues that you may encounter when configuring an SMTP relay connector in Exchange 2013 include:
- Incorrectly specifying or missing IP addresses for relay.
- Authentication problems, such as incorrect credentials or authentication methods.
- Firewall or network configuration issues blocking the communication between Exchange and the external email servers.
- Incorrect permissions or security settings preventing the proper usage of the connector.
If you face any of these issues, it is recommended to double-check your configuration settings and consult the Exchange documentation or support for further assistance.