
Do you find yourself frustrated with a malfunctioning rear defroster on your car? The rear defroster is an essential component that helps clear the fog and ice from your vehicle’s rear window, providing better visibility while driving. However, over time, the rear defroster connector may become damaged or disconnected, resulting in the defroster not functioning properly.
In this article, we will guide you through the process of fixing a rear defroster connector. Whether you are a DIY enthusiast or simply want to save some money on repairs, we will provide you with step-by-step instructions and tips to successfully address this issue. So, grab your tools and let’s get started on restoring your rear defroster to its optimal performance.
Inside This Article
- Common Issues with Rear Defroster Connector
- Tools and Materials Needed
- Step-by-Step Procedure to Fix Rear Defroster Connector
- Conclusion
- FAQs
Common Issues with Rear Defroster Connector
The rear defroster is an essential feature in a vehicle, allowing for clear visibility by melting away ice and frost on the rear window. One of the key components of the rear defroster system is the defroster connector, which connects the electrical circuit from the defroster grid to the vehicle’s power supply. However, these connectors can sometimes encounter issues that can affect the performance of the rear defroster. Let’s explore some common issues that you may face with the rear defroster connector.
1. Loose Connections: Over time, the electrical connections in the defroster connector can become loose or corroded. This can result in intermittent or complete loss of power to the defroster grid, rendering it ineffective in defrosting the rear window. Loose connections can be caused by vibration, exposure to moisture, or simply wear and tear.
2. Corrosion: Corrosion is a prevalent issue that can affect electrical connectors, including rear defroster connectors. Moisture, salt, and other contaminants can cause corrosion to develop on the connector terminals, leading to poor conductivity. This can result in a weak or non-operational rear defroster.
3. Damaged or Broken Wires: The wires that connect the defroster grid to the defroster connector can sometimes become damaged or broken. This can be due to factors such as accidents, physical stress, or aging of the wiring harness. When the wires are damaged, the electrical current may not flow properly, causing the rear defroster to malfunction.
4. Burnt or Melted Connectors: In some cases, excessive electrical current can cause the defroster connectors to heat up, resulting in burn marks or melted plastic. This can occur if there is a short circuit or if the defroster grid is overloaded. Burnt or melted connectors can lead to the loss of electrical connectivity, impairing the functionality of the rear defroster.
5. Connector Pin Issues: The pins within the defroster connector can sometimes get bent, twisted, or even break off. This can happen if the connector is mishandled or if there is improper installation or removal of the connector. Damaged pins can disrupt the flow of electricity, preventing the rear defroster from working correctly.
These common issues with the rear defroster connector can be frustrating, especially during the colder months when a properly functioning defroster is crucial for safe driving. The good news is that most of these problems can be addressed by repairing or replacing the defroster connector. In the next section, we’ll discuss the tools and materials you’ll need to fix the rear defroster connector yourself.
Tools and Materials Needed
When it comes to fixing a rear defroster connector, having the right tools and materials on hand is crucial. Here’s a list of what you’ll need:
- Screwdriver: A screwdriver will be necessary for removing screws or fasteners that hold components in place. Depending on the type of screws used, you may need a Phillips or flathead screwdriver. Make sure you have both types available.
- Electrical Tape: Electrical tape is an essential item for any electrical repair job. It is used to insulate and secure electrical connections. Make sure you have a roll of high-quality, durable electrical tape to ensure a reliable repair.
- Wire Cutters: Wire cutters are required to trim and strip the wires during the repair process. They make it easier to work with the connectors and ensure a clean and proper connection.
- Wire Crimpers: Wire crimpers are used to secure the wires to the connectors. Using crimpers ensures a secure and long-lasting connection, preventing any future issues with the rear defroster.
- Replacement Connector: In some cases, the rear defroster connector may be damaged beyond repair. It’s important to have a replacement connector on hand to complete the repair. Make sure you have the correct connector for your specific vehicle make and model.
- Isopropyl Alcohol: Isopropyl alcohol is used to clean the connectors and wires before making the new connection. It helps to remove any dirt, grease, or corrosion, ensuring a proper connection and optimal performance.
- Clean Cloth or Microfiber Towel: Having a clean cloth or microfiber towel handy is essential for cleaning and drying the connectors. It helps to remove any residue or moisture, which could affect the quality of the repair.
- Heat Gun or Hairdryer: A heat gun or hairdryer can be useful for heating the adhesive on the rear defroster connector. This makes it easier to remove the old connector without causing any damage to the window or surrounding components.
- Protective Gloves: It’s always a good idea to wear protective gloves when working with electrical components. They provide insulation and protect your hands from any potential hazards.
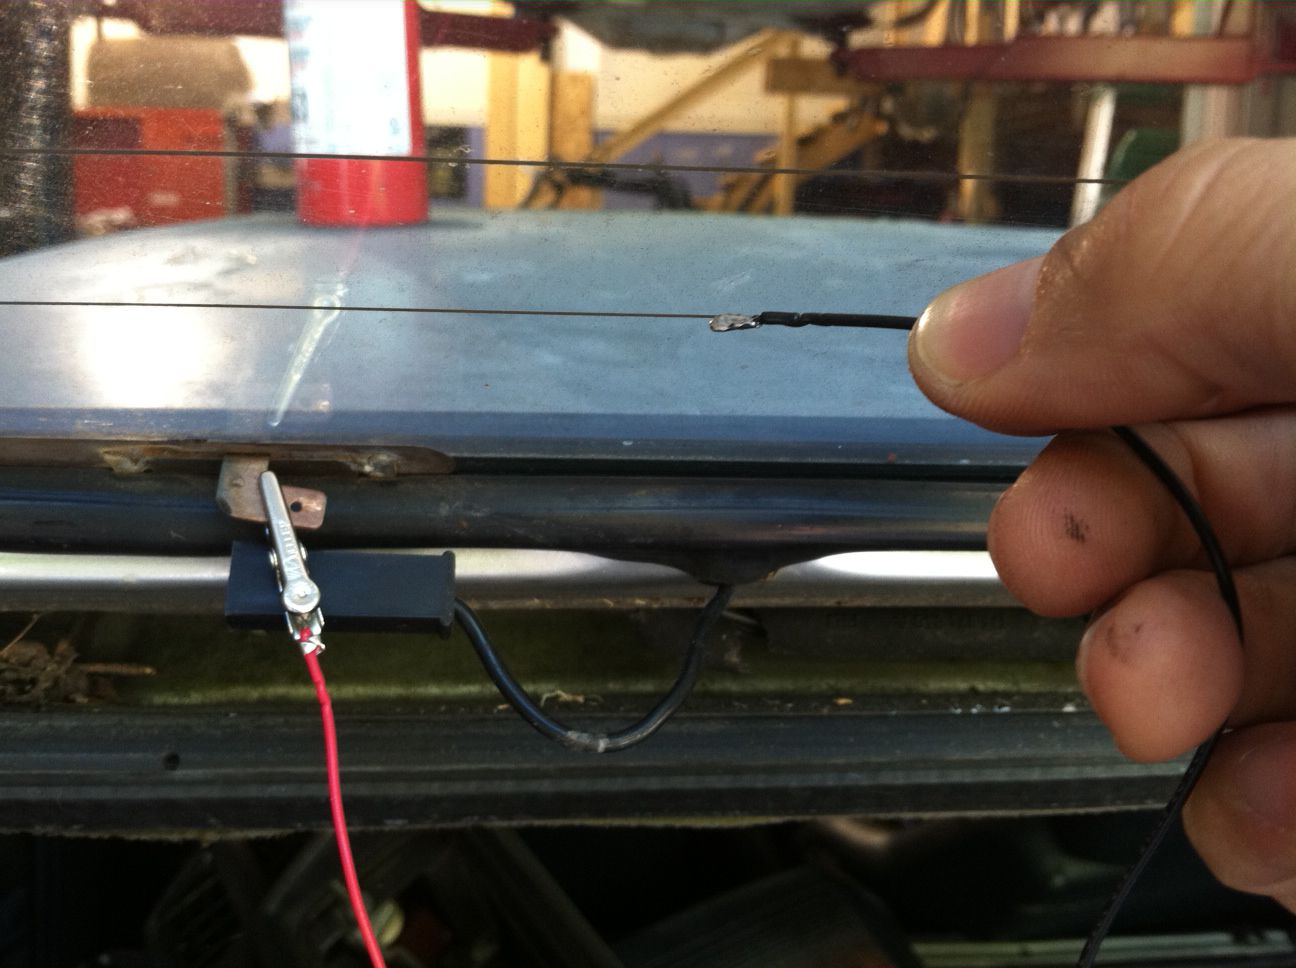
Step-by-Step Procedure to Fix Rear Defroster Connector
If you’re facing issues with your rear defroster not functioning properly, it may be due to a faulty or loose connector. Fortunately, fixing this problem is a relatively straightforward process. In this step-by-step guide, we’ll walk you through the procedure to fix your rear defroster connector.
Before you begin, gather the necessary tools and materials. You’ll need a multimeter, electrical tape, a small wire brush or sandpaper, a soldering iron, solder, heat shrink tubing, and a heat gun. Having these items on hand will make the process smoother and more efficient.
Now, let’s dive into the step-by-step procedure:
- Start by locating the rear defroster connector. You can typically find it on the rear window, usually near the bottom edge. It’s a small metal connector with several wires attached to it.
- Disconnect the rear defroster connector by carefully pulling it apart. Be gentle to avoid any damage to the wires or the connector itself.
- Inspect the connector and wires for any signs of damage or corrosion. If you notice any, use a small wire brush or sandpaper to clean the connector and wires thoroughly. This will help to improve the conductivity of the electrical connection.
- Next, use a multimeter to test the continuity of the wires. Set the multimeter to the continuity function and touch one probe to the metal part of the connector and the other probe to each wire. If there is no continuity or a weak connection, it indicates a problem with the wire and may need to be replaced.
- If you find any damaged wires, you’ll need to solder them back together. Cut out the damaged section using a pair of wire cutters, leaving enough length to create a solid connection.
- Strip the ends of the wires you just cut to expose the bare metal. Twist the exposed ends together to create a secure connection.
- Apply solder to the twisted wires using a soldering iron. Make sure the solder melts and covers the connection evenly. This will ensure a strong and reliable bond.
- After soldering, insulate the repaired area with heat shrink tubing. Slide the tubing over the soldered joint and use a heat gun to shrink it securely in place. This will protect the connection from moisture and further damage.
- Finally, reattach the rear defroster connector by carefully aligning the plug and socket. Ensure that they fit snugly together to guarantee a proper electrical connection.
- Test your rear defroster to check if it’s working correctly. Switch it on and observe if the rear window starts to clear up. If everything is in order, you’ve successfully fixed the rear defroster connector!
Remember to exercise caution and follow safety guidelines when working with electrical components. If you are uncomfortable performing these steps yourself, it may be best to consult a professional or seek assistance from a qualified technician.
By following this step-by-step procedure, you can resolve issues with your rear defroster connector and ensure your rear window remains free from fog and ice, providing you with clear visibility while driving in colder conditions.
Conclusion
In conclusion, fixing a rear defroster connector is a manageable task with the right knowledge and tools. By following the step-by-step process outlined in this article, you can save time and money by repairing the connector yourself. Remember to exercise caution when working with electrical components and always prioritize safety.
Whether you choose to solder the wires, use a connector repair kit, or replace the connector altogether, it’s important to ensure a secure and stable connection. A properly functioning rear defroster is essential for maintaining visibility and safety while driving, especially during colder months.
If you encounter any difficulties or are unsure about any aspect of the repair process, it’s always recommended to consult a professional or seek assistance from an experienced technician. These experts can provide guidance and advice specific to your vehicle’s make and model, ensuring a successful repair.
By addressing the rear defroster connector issue promptly, you can enjoy a clear field of vision and a comfortable and safe driving experience. So, roll up your sleeves and get ready to tackle this repair project with confidence!
FAQs
1. Why is my rear defroster not working?
There could be several reasons why your rear defroster is not working. It could be due to a blown fuse, a faulty rear defroster switch, a broken or disconnected defroster grid, or a malfunctioning defroster relay. It’s best to consult a professional or refer to your vehicle’s manual for troubleshooting steps specific to your car model.
2. Can I fix the rear defroster connector myself?
Fixing the rear defroster connector can be a DIY project, depending on your level of technical proficiency. It involves locating the faulty connector, cleaning it, and reconnecting it properly. However, if you’re not confident in your abilities or if the issue persists after attempting a repair, it’s advisable to seek professional assistance.
3. How can I locate the rear defroster connector?
The rear defroster connector is typically located at the rear of the vehicle, near the defroster grid on the glass. It may be concealed behind a panel or accessible through a small opening. Consulting your vehicle’s manual or seeking guidance from online forums or tutorials specific to your car model can help you locate the connector more accurately.
4. What materials do I need to fix the rear defroster connector?
To fix the rear defroster connector, you will need a few essential materials, including a cleaning solution (like rubbing alcohol), a soft cloth or sponge, electrical contact cleaner, a small brush or toothbrush, and possibly a soldering iron if there are any broken connections that need repairing. It’s always a good idea to gather all the necessary materials before starting the repair process.
5. Can a broken rear defroster connector cause any other issues?
Yes, a broken rear defroster connector can cause various issues. Apart from the rear defroster not functioning properly, it can result in poor visibility through the rear window during cold and frosty weather. This can be a safety hazard as it hinders your ability to have a clear view of the road behind you. Repairing the connector promptly can help prevent further complications.