
Are you frustrated with your iPhone’s camera displaying images and videos upside down? Don’t worry; you’re not alone. Many iPhone users have encountered this issue, where the camera flips the image and shows it inverted. It can be quite annoying, especially when you’re trying to capture special moments or record videos.
In this article, we will guide you on how to change the inverted camera on your iPhone. We’ll explore step-by-step instructions to fix this problem and get your camera back to normal. Whether you own an iPhone 11, iPhone SE, or any other iPhone model, these methods will work for you. So, let’s dive in and discover how to resolve the inverted camera issue on your iPhone.
Inside This Article
- Reasons for Inverted Camera
- How to Change Inverted Camera on iPhone
- Option 1: Adjusting the Flip Camera Setting
- Option 2: Restarting the Camera App
- Option 3: Updating iOS Software
- Option 4: Resetting All Settings
- Conclusion
- FAQs
Reasons for Inverted Camera
There could be several reasons why your iPhone camera is displaying an inverted image. Understanding these reasons can help you troubleshoot and resolve the issue effectively. Here are some of the most common causes:
1. Software Glitch: At times, a glitch in the software can cause your iPhone camera to display an inverted image. This can happen after a software update or due to other system-related issues.
2. Settings Misconfiguration: It’s possible that the camera settings on your iPhone have been accidentally changed, leading to the inverted display. This can occur if you’ve recently changed any camera-related settings or if an app has altered them.
3. Hardware Issue: In rare cases, a hardware problem may be causing the inverted camera. This could be due to a faulty camera module or an issue with the connectors.
4. Third-Party Apps: Certain third-party camera apps may not be fully compatible with your iPhone’s camera, leading to the inverted display. If you recently installed a new camera app and noticed the problem afterward, it may be causing the issue.
5. Orientation Lock: The orientation lock feature, when enabled, can result in an inverted camera image. If your iPhone’s screen orientation is locked in portrait or landscape mode, it can affect the orientation of the camera as well.
By identifying the reasons behind the inverted camera, you can proceed to the next steps of troubleshooting and resolve the issue accordingly.
How to Change Inverted Camera on iPhone
The inverted camera on an iPhone can be a frustrating issue to deal with. Whether you’re experiencing it while taking selfies or video chatting, it can disrupt your communication and create an inconvenience. But fret not! In this article, we’ll show you several options to change the inverted camera on your iPhone and get it back to normal.
Here are some common reasons why the camera on your iPhone may appear inverted:
- The Flip Camera setting is enabled
- A glitch in the camera app
- An outdated iOS software
Now let’s dive into the various methods you can try to fix the inverted camera issue:
Option 1: Adjusting the Flip Camera Setting
The first thing you can do is check if the Flip Camera setting is enabled. This setting allows you to switch between the front and rear camera. To adjust it, follow these steps:
- Open the Settings app on your iPhone.
- Scroll down and tap on “Camera”.
- Toggle off the “Mirror Front Camera” option.
Once you’ve done this, try launching the camera app again and see if the inverted issue is resolved.
Option 2: Restarting the Camera App
If adjusting the Flip Camera setting didn’t work, the next step is to restart the camera app. Sometimes, a glitch in the app can cause the camera to appear inverted. To restart the camera app, follow these steps:
- Double-click the Home button (or swipe up from the bottom on iPhone X or later) to open the app switcher.
- Swipe left or right to find the camera app.
- Swipe up on the camera app’s preview to close it.
- Relaunch the camera app and check if the inverted camera issue is resolved.
Option 3: Updating iOS Software
If the previous solutions didn’t work, it’s possible that the inverted camera issue is due to an outdated iOS software. Apple regularly releases software updates that include bug fixes and improvements. To update your iOS software, follow these steps:
- Open the Settings app on your iPhone.
- Scroll down and tap on “General”.
- Tap on “Software Update”.
- If an update is available, tap on “Download and Install”.
- Follow the on-screen instructions to complete the update.
After updating your iOS software, restart your iPhone and check if the inverted camera issue is resolved.
Option 4: Resetting All Settings
If none of the previous options worked, you can try resetting all settings on your iPhone. This will revert all settings to their default values, but it won’t delete any of your data. To reset all settings, follow these steps:
- Open the Settings app on your iPhone.
- Scroll down and tap on “General”.
- Scroll to the bottom and tap on “Reset”.
- Tap on “Reset All Settings”.
- Enter your passcode if prompted and confirm the reset.
Note that this will reset your Wi-Fi passwords, Bluetooth connections, and other settings, so make sure to reconfigure them afterwards.
Option 1: Adjusting the Flip Camera Setting
If you find that your iPhone’s camera is displaying images inverted or flipped, don’t worry! There’s a simple solution to fix this issue. One way to adjust the flip camera setting is by changing the settings within the Camera app itself.
To do this, you first need to open the Camera app on your iPhone. Once the app is open, you will see various camera modes at the bottom of the screen, such as Photo, Video, Portrait, and more.
Next, look for the flip camera icon, which is usually represented by two arrows in a circular shape. This icon allows you to switch between the front and rear cameras of your iPhone. Tap on the flip camera icon to toggle the camera view.
If the camera view is currently inverted or flipped, it means that the front camera is currently active. By tapping on the flip camera icon, you will switch to the rear camera, and the image should display correctly.
After adjusting the flip camera setting, make sure to test the camera by taking a photo or recording a video to confirm that the issue has been resolved. If the image is still inverted or flipped, try the other options mentioned in this article.
Option 2: Restarting the Camera App
If you’re facing an inverted camera issue on your iPhone, one simple but effective troubleshooting step you can try is restarting the camera app. This can help resolve any temporary software glitches or conflicts that might be causing the problem.
To restart the camera app, you can follow these steps:
- Swipe up from the bottom of the screen (for iPhone X and newer) or double-click the home button (for iPhone 8 and older) to open the app switcher.
- Scroll through the app cards and locate the camera app.
- Swipe up or flick the camera app card off the top of the screen to close it.
- Wait for a few seconds, and then open the camera app again.
By force-closing the camera app and reopening it, you essentially give it a fresh start. This can often resolve minor software issues that might be causing the camera to show an inverted image.
If after restarting the camera app the issue persists, you can try other troubleshooting options like adjusting the flip camera setting, updating the iOS software, or resetting all settings. These methods can be helpful in resolving more complex software-related problems that might be affecting the camera functionality on your iPhone.
It’s important to note that restarting the camera app is a temporary solution and may not solve the problem permanently. If you continue to experience an inverted camera issue, it is recommended to reach out to Apple support or visit an authorized service center for further assistance.
Option 3: Updating iOS Software
Updating your iOS software can often resolve various issues, including problems with the inverted camera. Apple regularly releases updates with bug fixes and improvements that can help address these issues.
To update your iOS software, follow these steps:
- Connect your iPhone to a stable Wi-Fi network.
- Go to “Settings” on your iPhone.
- Scroll down and tap on “General.”
- Select “Software Update.”
- If an update is available, click on “Download and Install.”
- Wait for the update to download and then tap on “Install Now.”
- Follow the on-screen instructions to complete the update.
It is important to note that updating your iOS software can take some time, depending on the size of the update and your internet connection. Make sure your iPhone is connected to a power source or has sufficient battery life to avoid interruptions during the update process.
Once the update is complete, check if the inverted camera issue has been resolved. If not, you may consider exploring other options or reaching out to Apple support for further assistance.
Option 4: Resetting All Settings
If you’ve tried the previous options and still find yourself dealing with an inverted camera on your iPhone, one potential solution is to reset all settings. This option can help you troubleshoot any software glitch that may be causing the issue.
Before you proceed with resetting all settings, it’s important to note that this will erase any personalized settings you have on your iPhone. However, it will not delete any of your data or media, so you don’t have to worry about losing your photos, videos, or contacts.
To reset all settings on your iPhone, follow these steps:
- Go to the “Settings” app on your iPhone’s home screen.
- Scroll down and tap on “General.”
- Scroll down again and tap on “Reset.”
- Select “Reset All Settings.”
- You may be prompted to enter your passcode or Apple ID password for security purposes.
- Confirm your decision to reset all settings.
Once the reset process is complete, your iPhone will reboot and all settings will be reset to their default values. This includes network settings, display settings, privacy settings, and more.
After the reset, check if the camera inversion issue is resolved. If not, you may need to consider contacting Apple Support or visiting an Apple Store for further assistance.
Remember, resetting all settings should be done as a last resort and only when other troubleshooting methods have not worked. It is always a good idea to back up your iPhone before performing any major changes to its settings.
Conclusion
In conclusion, changing the inverted camera on your iPhone is a simple process that can greatly enhance your photography experience. Whether you’re taking selfies or capturing beautiful landscapes, having the ability to control the camera’s orientation can make a significant difference in the quality of your photos. By following the steps outlined in this article, you can easily switch between the normal and inverted camera modes on your iPhone to suit your preferences. Remember to check if your iPhone model supports this feature, as older models may not have the option to invert the camera. So, grab your iPhone, explore the camera settings, and start capturing stunning shots from a whole new perspective.
FAQs
Q: How do I change the inverted camera on my iPhone?
To change the inverted camera on your iPhone, follow these steps:
1. Go to “Settings” on your iPhone.
2. Scroll down and tap on “Camera.”
3. Under the “Composition” section, toggle off the “Mirror Front Camera” option.
4. Close the Settings app and open the Camera app. Now, the front camera will no longer be inverted.
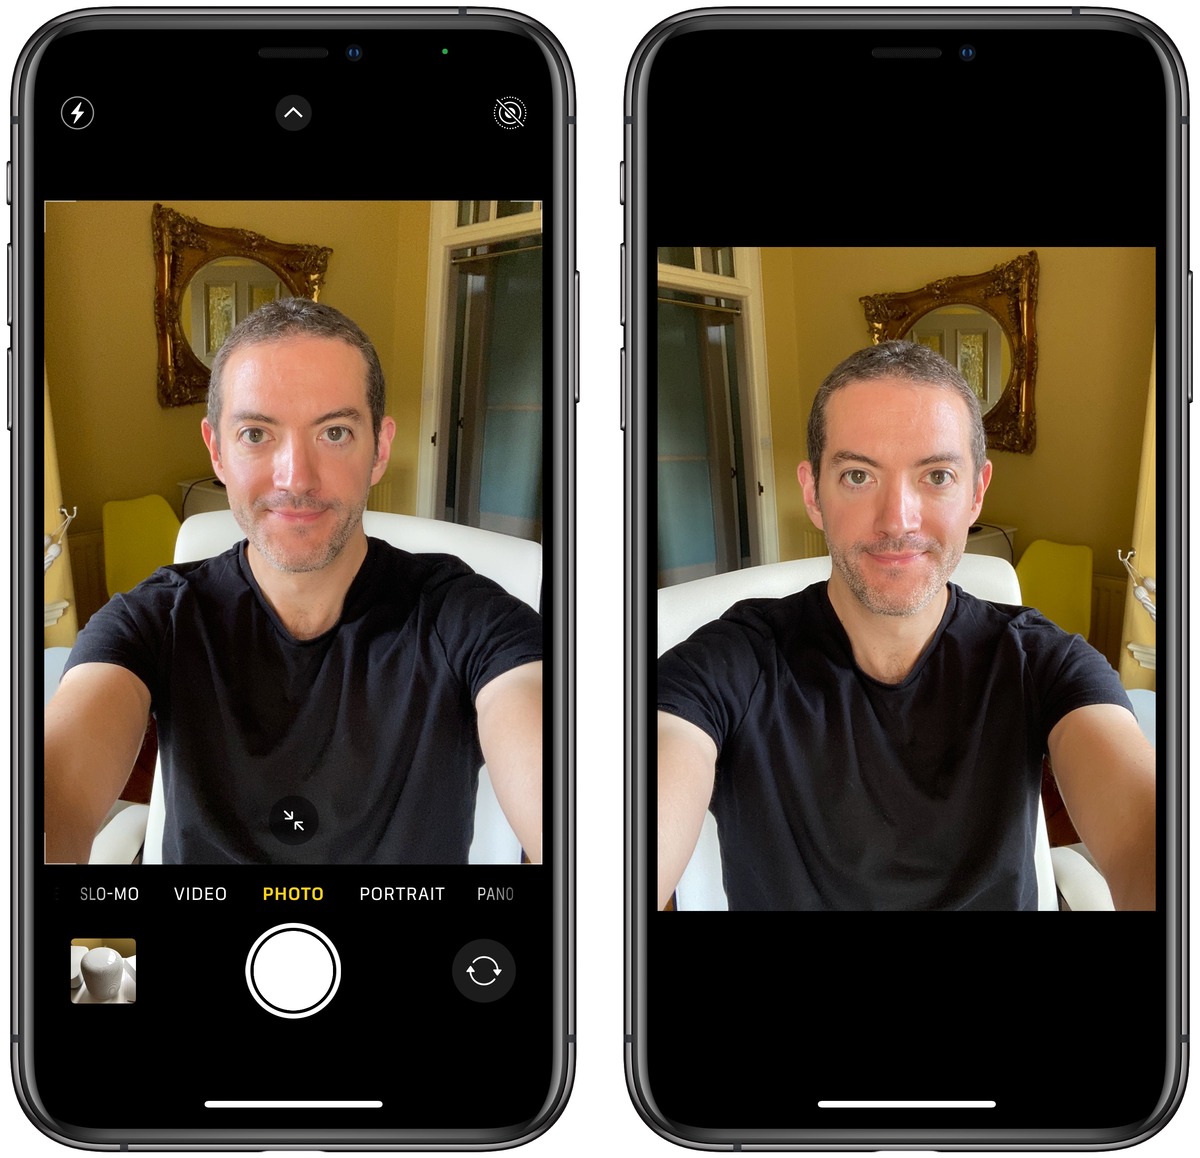
Q: Why is my iPhone front camera inverted?
The front camera on your iPhone is inverted by default to give you a more realistic perception of yourself when taking selfies or using video chat apps. This feature mirrors the image to match what you see in a mirror. However, if you prefer to have an un-inverted version of your face while using the front camera, you can change this setting in the Camera section of your iPhone’s Settings.
Q: Can I change the inverted camera on my iPhone back to its default setting?
Yes, you can change the inverted camera on your iPhone back to its default setting. Simply follow the steps mentioned earlier to go to the Camera section in the Settings app, and toggle on the “Mirror Front Camera” option. This will restore the inverted view of your face when using the front camera.
Q: Does changing the inverted camera setting affect the rear camera too?
No, changing the inverted camera setting only affects the front camera on your iPhone. The rear camera does not have a mirror option and will always capture images and videos in their natural orientation.
Q: Can I change the inverted camera setting on other iPhone models?
Yes, you can change the inverted camera setting on other iPhone models as well. The process may vary slightly depending on the iOS version and model you have, but generally, you can find the camera settings in the Settings app. Look for options related to the front camera or selfie mode, and toggle the mirror option accordingly.