
The NES 72 pin connector is a crucial component in the system’s cartridge slot, responsible for establishing a reliable connection between the game cartridges and the console itself. Over time, this connector can become worn or dirty, leading to poor gameplay experience, graphical glitches, or even the dreaded blinking red light syndrome.
In this article, we will guide you through the process of fixing a NES 72 pin connector, allowing you to restore your beloved console to its former glory. Whether you are a nostalgic gamer or a collector, this guide will help you troubleshoot and address common issues related to the connector.
Read on to discover tips, tricks, and step-by-step instructions that will have your NES running smoothly and your favorite games playing flawlessly once again.
Inside This Article
- Understanding the NES 72 Pin Connector
- Tools and Materials Needed
- Step-by-Step Guide to Fixing the NES 72 Pin Connector
- Conclusion
- FAQs
Understanding the NES 72 Pin Connector
The NES (Nintendo Entertainment System) is an iconic gaming console that brought joy to millions of gamers in the 1980s. However, as with any electronic device, it is not immune to wear and tear over time. One common issue faced by NES owners is a faulty 72 pin connector.
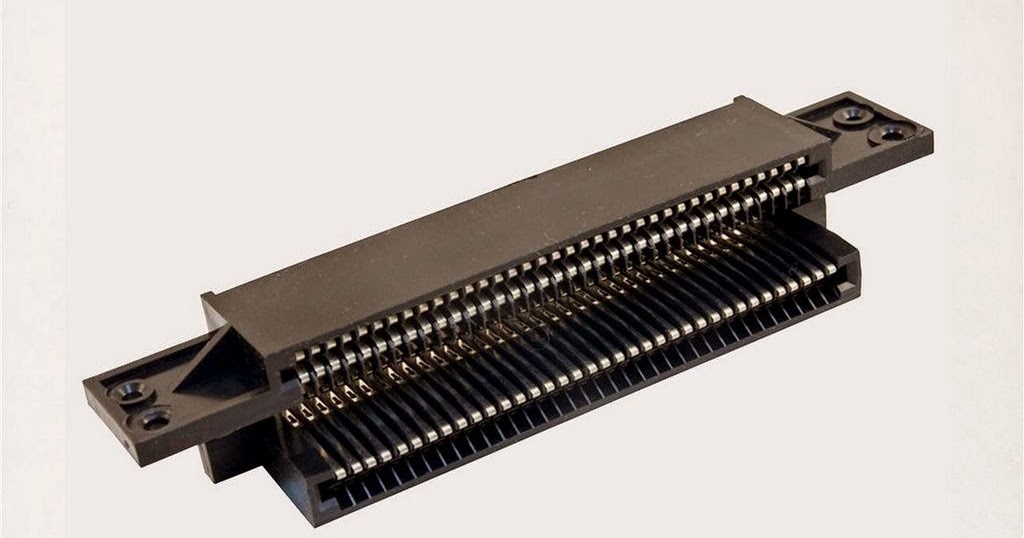
The 72 pin connector is a crucial component of the NES console that connects the game cartridge to the console. It is responsible for reading the data stored on the cartridge and transmitting it to the console for gameplay. Over time, due to repeated use, the connector may become dirty or worn out, resulting in glitches, crashing, or even complete failure to load games.
Understanding how the NES 72 pin connector works is essential for troubleshooting and fixing any issues that may arise. The connector consists of 72 metal pins that make contact with the game cartridge when inserted into the console. These pins establish an electrical connection, allowing the console to read the data from the cartridge and display it on the screen.
When the console is powered on, it sends a signal to the 72 pin connector, instructing it to send data to the console’s main circuit board. The connector then retrieves the necessary information from the game cartridge and transmits it through the pins to the console. If any of these pins are bent, corroded, or dirty, it can result in a poor connection or no connection at all, leading to gameplay issues.
It’s important to note that the NES 72 pin connector can be delicate and require careful handling during repairs. Rough handling or bending the pins too far can cause permanent damage. In some cases, cleaning the connector may be sufficient to restore functionality, while in other cases, replacement may be necessary.
Now that you have a better understanding of the NES 72 pin connector and its role in the console, you are ready to tackle any issues that may arise. In the next section, we will discuss the tools and materials you will need to fix the connector and provide a step-by-step guide to help you through the process.
Tools and Materials Needed
When it comes to fixing a NES 72 Pin Connector, having the right tools and materials is crucial. Here is a list of what you will need:
- Screwdriver set: A set of screwdrivers with various sizes and types will be necessary to open up the NES console and access the 72 pin connector. Make sure to have both Phillips and flathead screwdrivers on hand.
- NES cleaning kit: Investing in a NES cleaning kit is highly recommended. This kit usually includes a cleaning solution, special cleaning brushes, and cleaning pads. These tools are specifically designed to remove dirt, dust, and debris from the Nintendo Entertainment System.
- Isopropyl alcohol: Isopropyl alcohol is a key component in cleaning the connector. It helps to dissolve any grime or corrosion that may be affecting the functionality of the pins.
- Cotton swabs: Cotton swabs are great for applying isopropyl alcohol to the connector and reaching those hard-to-reach areas.
- Precision tweezers: Precision tweezers can come in handy when removing and reinserting the pins in the NES connector. They allow for more precise control and ensure that the pins are properly aligned during the repair process.
- Contact cleaner: Contact cleaner is another useful tool for cleaning the NES 72 pin connector. It is specifically designed to remove oxidation and improve the electrical conductivity of the pins. Look for a contact cleaner that is safe to use on electronics and leaves no residue.
- Replacement 72 pin connector: In some cases, the 72 pin connector may be beyond repair and needs to be replaced. If this is the case, having a replacement connector on hand will be necessary. Make sure to purchase a high-quality replacement that is compatible with your NES model.
With these tools and materials ready, you will be well-prepared to tackle the task of fixing your NES 72 Pin Connector. Remember to read the manufacturer”s instructions and take all necessary safety precautions when using any cleaning solutions or working inside the console. Let”s move on to the step-by-step guide to fix the NES 72 Pin Connector.
Step-by-Step Guide to Fixing the NES 72 Pin Connector
Is your NES console giving you trouble with games not loading or constantly flashing? The culprit may be a faulty NES 72 pin connector. But don’t worry, with a little patience and a few tools, you can easily fix this issue and start enjoying your favorite NES games again. In this step-by-step guide, we will walk you through the process of fixing the NES 72 pin connector.
Step 1: Gather the Necessary Tools and Materials
Before you get started, make sure you have the following tools and materials:
- Screwdriver (typically a 3.8mm or 4.5mm for the NES console)
- Clean, lint-free cloth
- Isopropyl alcohol
- Cotton swabs
- Replacement NES 72 pin connector
Step 2: Open the NES Console
Using the appropriate screwdriver, carefully remove the screws securing the top cover of the NES console. Once the screws are removed, gently lift the top cover and set it aside. Be careful not to damage any internal components.
Step 3: Remove the Existing 72 Pin Connector
Locate the 72 pin connector inside the NES console. It should be connected to the motherboard. Carefully unplug the connector from the motherboard, ensuring not to bend any pins. Once detached, set aside the old connector.
Step 4: Clean the NES Cartridge Slot
Take a clean, lint-free cloth and dampen it with isopropyl alcohol. Gently wipe the metal contacts inside the NES cartridge slot to remove any dirt, dust, or corrosion. Use cotton swabs soaked in isopropyl alcohol for hard-to-reach areas. Allow the slot to dry completely before proceeding to the next step.
Step 5: Install the Replacement 72 Pin Connector
Take the new NES 72 pin connector and carefully align it with the cartridge slot. Make sure all the pins are straight and insert it firmly into the motherboard’s connector. Double-check that it is securely attached.
Step 6: Reassemble the NES Console
Carefully put the top cover back on the NES console and secure it with the screws. Make sure all the screws are tightened, but be cautious not to overtighten them as it may damage the console. Once reassembled, plug in the NES console and give it a test run with a game cartridge.
Step 7: Test and Enjoy
Insert a game cartridge into the NES console and power it on. If all went well, the game should load without any issues. Enjoy playing your favorite NES games!
Important Tips:
- Ensure that the new 72 pin connector is flush against the cartridge slot to ensure proper contact.
- If you continue to experience issues after replacing the 72 pin connector, double-check all connections and clean the cartridge slot again.
- Consider using a game cartridge cleaning kit to clean your NES game cartridges regularly.
By following this step-by-step guide, you can fix the NES 72 pin connector and revive your beloved NES console. Don’t let a faulty connector stop you from enjoying the nostalgia and excitement of classic NES games. Get ready to immerse yourself in the world of Super Mario, Legend of Zelda, and countless other timeless classics!
Conclusion
In conclusion, fixing a NES 72 pin connector is a relatively straightforward process that can bring your beloved console back to life. By following the steps outlined earlier in this article, you can effectively address the common issue of blinking or distorted graphics. Remember to approach the repair process with caution and use the proper tools to ensure a successful outcome.
Taking the time to clean and reseat the pins, as well as considering the use of replacement pin connectors, can greatly improve the performance and longevity of your NES console. Not only will it enhance your gaming experience, but it can also help preserve this iconic piece of gaming history for years to come.
We hope that this article has provided you with valuable insights and guidance on how to fix a NES 72 pin connector. Now, grab your controller, dust off your favorite cartridge, and get ready to immerse yourself in the nostalgic world of classic gaming!
FAQs
1. What is a 72 pin connector?
A 72 pin connector is a part found in the original NES (Nintendo Entertainment System) console. It is responsible for connecting the game cartridge to the console and ensuring a stable connection for data transfer.
2. Why does the NES 72 pin connector need fixing?
Over time, the 72 pin connector can become worn out or dirty, leading to various issues such as game freezing, graphical glitches, or difficulty in reading game cartridges. Fixing the connector can help restore proper functionality to your NES console.
3. How do I know if my NES 72 pin connector needs fixing?
If you are experiencing frequent game crashes, black screens, or game cartridges that need to be repeatedly inserted and removed to get them to work, it is likely that your 72 pin connector needs fixing.
4. Can I fix the NES 72 pin connector myself?
Yes, fixing the 72 pin connector is a relatively simple DIY (do-it-yourself) task. It involves cleaning the connector and adjusting the pins to improve their contact with game cartridges. However, if you don’t feel comfortable doing it yourself, you may consider seeking professional help or purchasing a replacement connector.
5. What tools do I need to fix the NES 72 pin connector?
To fix the NES 72 pin connector, you will need a special NES cleaning kit that typically includes a cleaning solution, a cleaning cartridge, and a small brush or Q-tip. Additionally, you may need a 3.8mm security bit screwdriver to open the NES console and access the connector.