
Welcome to our guide on how to get notifications on your Fitbit Charge 4! The Fitbit Charge 4 is not just a fitness tracker but also a great companion for staying connected and receiving important information right on your wrist. With the ability to receive notifications for calls, texts, and even app alerts, you can stay connected and never miss an important message or update, even when your phone is not easily accessible. In our comprehensive guide, we will walk you through the step-by-step process of setting up notifications on your Fitbit Charge 4. Whether you’re a fitness enthusiast who wants to stay informed during your workouts or someone who simply desires the convenience of wrist notifications, we’ve got you covered. So, let’s dive in and discover how to make the most of your Fitbit Charge 4 by keeping all your notifications at your fingertips!
Inside This Article
- Setting up Notifications on Fitbit Charge 4
- Customizing Notification Alerts
- Managing App Notifications
- Troubleshooting Notifications Issues
- Conclusion
- FAQs
Setting up Notifications on Fitbit Charge 4
Fitbit Charge 4 is an excellent fitness tracker that not only helps you monitor your activities but also keeps you connected with important notifications. By setting up notifications on your Fitbit Charge 4, you can receive alerts for incoming calls, text messages, and app notifications, right on your wrist. Here’s how you can easily set up notifications on your Fitbit Charge 4:
1. First, make sure that your Fitbit Charge 4 is properly paired with your smartphone. To do this, open the Fitbit app on your smartphone and go to the Account tab. From there, select your Fitbit Charge 4 device and tap on “Notifications”.
2. In the Notifications settings, you will see a list of apps that can send notifications to your Fitbit Charge 4. Toggle on the apps from which you want to receive notifications. Keep in mind that not all apps are compatible with Fitbit notifications, so only the supported apps will appear in the list.
3. Once you have selected the apps, you can customize the notification settings for each app. For example, you can choose whether you want to receive all notifications from the app or only specific types of notifications. You can also decide whether you want the notifications to be accompanied by a vibration or sound alert.
4. After customizing the settings for each app, exit the Fitbit app on your smartphone. Your changes will be automatically synced with your Fitbit Charge 4.
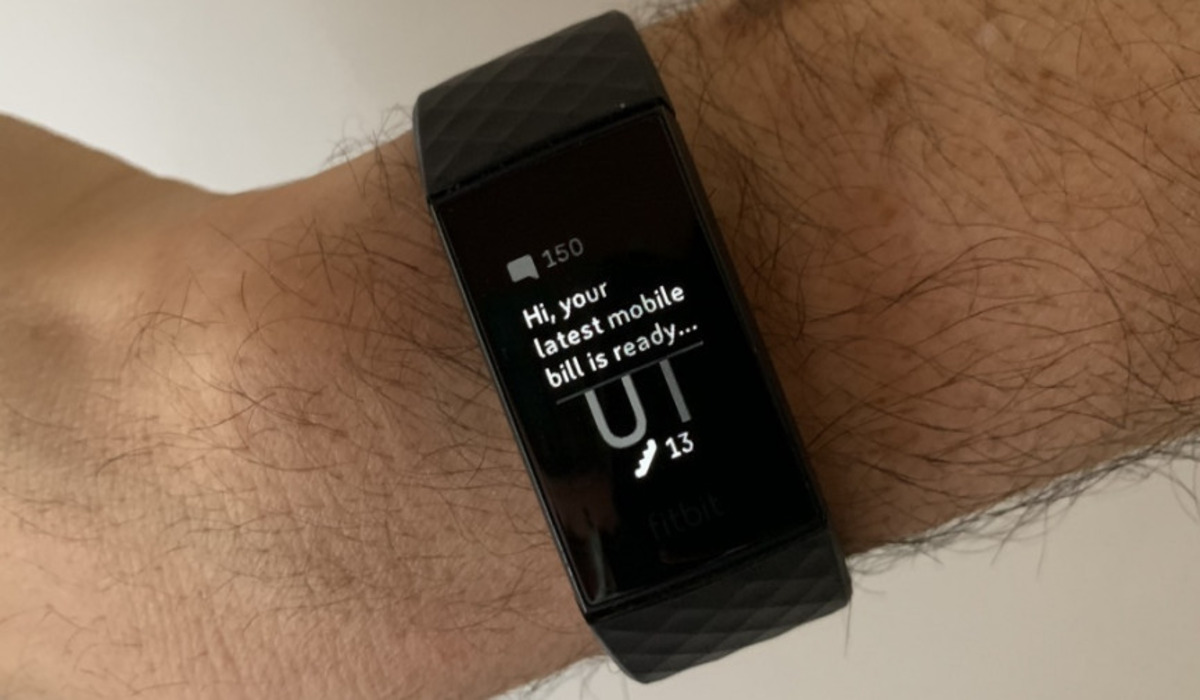
5. Now, whenever you receive a notification on your smartphone from one of the selected apps, your Fitbit Charge 4 will display a brief preview of the notification on its screen. You can tap on the notification to view more details or swipe left to dismiss it.
It’s worth mentioning that while Fitbit Charge 4 can receive notifications from various apps, it does not support direct replies to messages or calls. However, it provides a convenient way to stay informed without having to constantly check your smartphone.
By setting up notifications on your Fitbit Charge 4, you can stay connected and never miss important calls or messages, even when your phone is not within reach. It’s a great feature that adds convenience and efficiency to your daily life, making your Fitbit Charge 4 an even more valuable accessory.
Customizing Notification Alerts
With the Fitbit Charge 4, you have the flexibility to customize your notification alerts to suit your needs and preferences. Whether you want to be alerted of incoming calls, text messages, or app notifications, the Fitbit Charge 4 allows you to tailor your notifications to maximize convenience while minimizing distractions.
To start customizing your notification alerts, follow these simple steps:
- Open the Fitbit app on your smartphone and tap on your profile picture in the upper-left corner of the screen.
- Select your Fitbit Charge 4 from the list of devices.
- Tap on “Notifications” in the device settings.
- Choose the type of notification you want to customize (calls, texts, or app notifications).
- Toggle the switch to enable or disable the notification for that particular feature.
- If you want to further customize the notification settings, tap on “Customize Notifications” and select the options that best suit your preferences.
By customizing the notification alerts, you can stay connected with the important notifications while filtering out less critical ones. For example, if you’re in a meeting and want to avoid any distractions, you can disable all notifications except for calls from specific contacts or certain apps that require your immediate attention.
In addition to customizing the alerts, you can also choose to receive notifications with or without vibration. This is particularly useful when you’re in a quiet environment where discreet notifications are preferred.
It’s important to note that the Fitbit Charge 4 can only display a limited amount of text for each notification. If a message or notification exceeds the character limit, it will be truncated and you’ll need to check your smartphone for the complete message. However, this ensures that you can quickly glance at your wrist to get a preview of the notification without having to reach for your phone.
Take advantage of the customization options available on your Fitbit Charge 4 to tailor your notification alerts to your specific needs. Whether you’re a busy professional, a fitness enthusiast, or someone who simply wants to stay connected, customizing your notification alerts will enhance your overall Fitbit experience.
Managing App Notifications
One of the great features of the Fitbit Charge 4 is the ability to receive notifications from your smartphone right on your wrist. This means you can stay connected and informed without having to constantly check your phone. However, it’s important to manage your app notifications effectively to prevent overwhelm and distraction. Here’s how you can manage app notifications on your Fitbit Charge 4:
1. Accessing App Notifications: To manage app notifications on your Fitbit Charge 4, you’ll first need to access the Fitbit app on your smartphone. Open the app and tap on the “Account” tab at the bottom right corner of the screen. From there, select your Fitbit device and scroll down to find the “Notifications” option.
2. Enabling or Disabling App Notifications: In the “Notifications” section, you’ll see a list of apps currently installed on your smartphone. To enable app notifications, simply toggle the switch next to the desired app. This will allow notifications from that app to appear on your Fitbit Charge 4. To disable app notifications, simply toggle the switch off.
3. Customizing Notification Settings: Fitbit Charge 4 offers the flexibility to customize notification settings for each individual app. To do this, tap on the name of the app you want to customize. You’ll be presented with options to adjust the vibration pattern, sound, and which types of notifications are displayed. This allows you to tailor the notifications to your preferences.
4. Managing Notification Priority: If you find yourself receiving too many notifications at once, you can prioritize which apps take precedence on your Fitbit Charge 4. To do this, go back to the main “Notifications” section in the Fitbit app and tap on “Notification Priority”. Here, you can rearrange the order of the apps to determine their priority. The app at the top of the list will have its notifications displayed first.
5. Dismissing Notifications: Once you receive a notification on your Fitbit Charge 4, you can dismiss it by swiping it away from the screen. This will remove the notification from your device and clear it from your notification history.
6. Troubleshooting Notification Issues: If you’re experiencing problems with app notifications on your Fitbit Charge 4, there are a few troubleshooting steps you can take. First, make sure your Fitbit device is connected to your smartphone. If it’s not, try restarting both devices and reconnecting them. If the issue persists, check that the app has notification permissions enabled on your phone’s settings.
7. Finding the Right Balance: While app notifications can be helpful, it’s important to find the right balance that works for you. Too many notifications can be overwhelming and distracting, so consider disabling notifications from apps that aren’t essential. It’s also a good idea to customize notification settings to prioritize important apps and minimize interruptions during certain times of the day.
By effectively managing app notifications on your Fitbit Charge 4, you can stay connected and informed without sacrificing your focus and productivity. Customize your settings, prioritize your notifications, and find the balance that suits your lifestyle. Enjoy the convenience of staying connected right on your wrist with your Fitbit Charge 4!
Troubleshooting Notifications Issues
If you’re experiencing issues with receiving notifications on your Fitbit Charge 4, don’t worry – we’ve got you covered. Here are some common troubleshooting steps you can take to resolve any problems:
1. Check your device settings: Double-check that the notifications setting is enabled on your Fitbit Charge 4. To do this, go to the Fitbit app on your smartphone, tap on your device, and ensure that the “Receive Notifications” option is toggled on.
2. Ensure your smartphone is compatible: Not all smartphones are compatible with Fitbit devices and their notification features. Make sure that your smartphone is listed as a compatible device on the Fitbit website. If it’s not, you may need to consider upgrading your phone or contact Fitbit support for further assistance.
3. Check Bluetooth connection: Notifications require a stable Bluetooth connection between your Fitbit Charge 4 and your smartphone. Ensure that Bluetooth is turned on for both devices and that they are within close range of each other. If your Bluetooth connection is weak or intermittent, it can cause issues with receiving notifications.
4. Restart your devices: Sometimes, a simple restart can resolve connectivity issues. Try restarting both your Fitbit Charge 4 and your smartphone. Once they’re back on, check if you’re receiving notifications properly.
5. Update firmware and app: Make sure that both your Fitbit device and the Fitbit app on your smartphone are running the latest firmware and software versions. Outdated software can cause compatibility issues and hinder notifications. Check for any available updates and install them if necessary.
6. Check notification settings on your smartphone: Verify that the notification settings on your smartphone allow notifications from the specific apps you want to receive on your Fitbit Charge 4. Sometimes, apps may have their own notification settings that need to be enabled separately.
7. Clear cache on the Fitbit app: If you’re still experiencing issues, clearing the cache on the Fitbit app may help. Go to the app settings on your smartphone, find the Fitbit app, and clear its cache. This can help eliminate any temporary data or settings that might be causing notification problems.
8. Reset your Fitbit device: As a last resort, you can try resetting your Fitbit Charge 4 to factory settings. Keep in mind that this will erase all data and settings on your device, so make sure to back up any important data beforehand. After resetting, set up your Fitbit device again and check if the notification issues have been resolved.
If none of these troubleshooting steps work, it’s recommended to contact Fitbit support for further assistance. They can provide more specific guidance based on your device and the nature of the notification issues you’re experiencing.
In conclusion, getting notifications on your Fitbit Charge 4 can greatly enhance your overall user experience. With the ability to receive call, text, and app notifications right on your wrist, you can stay connected and never miss an important message, even when your phone is out of reach. The convenience and simplicity of the notification feature make it an essential tool for those who are constantly on the go or lead an active lifestyle.
By following the simple steps outlined in this guide, you can easily set up and customize your notification settings on the Fitbit app to suit your personal preferences. Whether you prioritize staying connected to work, tracking your fitness progress, or simply staying in the loop with loved ones, the Fitbit Charge 4 allows you to seamlessly integrate your favorite apps and services into your daily routine.
With its sleek design, advanced fitness tracking capabilities, and now the added convenience of notifications, the Fitbit Charge 4 is an excellent choice for individuals looking to stay connected and motivated on their wellness journey. So, what are you waiting for? Get your Fitbit Charge 4 today and never miss a beat!
FAQs
1. How do I receive notifications on my Fitbit Charge 4?
To receive notifications on your Fitbit Charge 4, you need to ensure that it is connected to your smartphone via Bluetooth. Open the Fitbit app on your phone and go to the device settings. From there, enable the notifications toggle for the apps you want to receive alerts from. Make sure your phone’s notification settings allow notifications from the respective apps as well.
2. What kind of notifications can I receive on my Fitbit Charge 4?
With your Fitbit Charge 4, you can receive various types of notifications, including calls, text messages, calendar alerts, and notifications from third-party apps like WhatsApp and Facebook Messenger. You will be able to see the sender or caller’s name, along with a brief preview of the message or alert.
3. Can I customize the notifications on my Fitbit Charge 4?
Yes, you can customize the notifications on your Fitbit Charge 4 to suit your preferences. In the Fitbit app, you can choose which apps you want to receive notifications from and adjust the settings for each app individually. Additionally, you can enable or disable specific types of notifications, such as calls or text messages, to reduce distractions.
4. How do I clear notifications on my Fitbit Charge 4?
When you receive a notification on your Fitbit Charge 4, it will appear on the screen. To clear the notification, simply swipe it to the left or right. Alternatively, you can press the side button on your Fitbit Charge 4 to dismiss the notification and return to the watch face.
5. What should I do if I’m not receiving notifications on my Fitbit Charge 4?
If you’re not receiving notifications on your Fitbit Charge 4, there are a few steps you can take to troubleshoot the issue. First, ensure that your phone’s Bluetooth is turned on and that your Fitbit Charge 4 is properly connected to your phone. Next, check the notification settings in the Fitbit app and make sure the toggles are enabled for the desired apps. Lastly, restart both your phone and Fitbit Charge 4 and try reconnecting them. If the problem persists, contact Fitbit support for further assistance.