
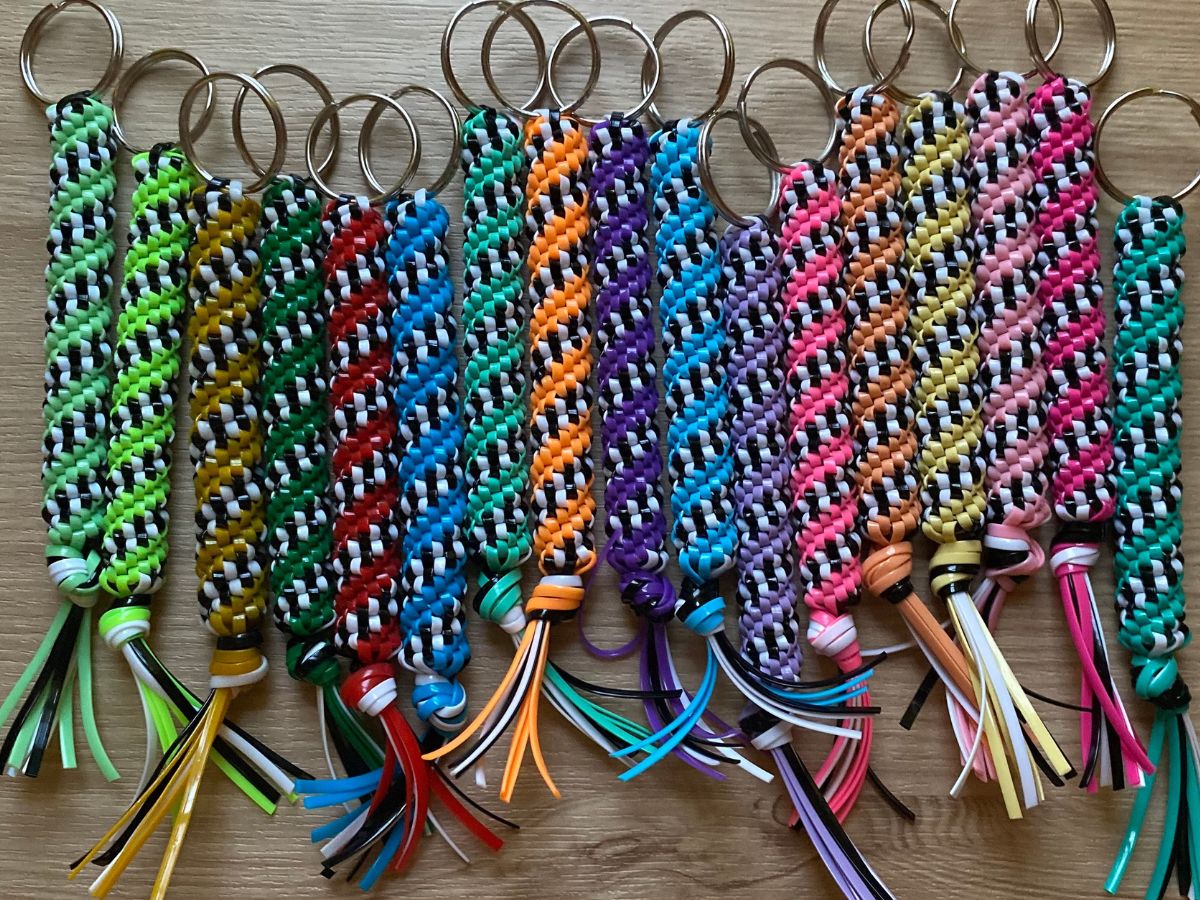
Are you looking to add a touch of creativity to your crafting repertoire? Making a boondoggle lanyard is a fun and unique way to showcase your skills and create a stylish accessory. A boondoggle lanyard, also known as a gimp or craft lace lanyard, is a braided or woven cord that can be used as a keychain, necklace, or even a decorative strap. In this article, we will guide you through the step-by-step process of making a boondoggle lanyard, from choosing the right materials to mastering various weaving techniques. Whether you are a beginner or a seasoned crafter, this article will provide you with the knowledge and inspiration to create your own personalized boondoggle lanyard. So, let’s get started on this exciting and creative journey!
Inside This Article
- Materials Needed
- Step 1: Starting the Boondoggle Lanyard
- Step 2: Weaving the Boondoggle Lanyard
- Step 3: Finishing the Boondoggle Lanyard
- Variations and Tips
- Conclusion
- FAQs
Materials Needed
Before you begin making a boondoggle lanyard, gather the following materials:
- Plastic lacing or gimp: This is the main material used in crafting a boondoggle lanyard. It comes in various colors and you can choose one that suits your preferences.
- Scissors: A good pair of scissors is essential for cutting the plastic lacing to the desired length.
- Keyring or metal clip: You will need a keyring or metal clip to attach to the end of the lanyard, allowing you to connect it to your phone, keys, or other accessories.
- Masking tape or binder clip (optional): These can be helpful for holding the lacing in place as you work, especially if you are new to boondoggle weaving.
With these materials on hand, you’re ready to start making your boondoggle lanyard. Just follow the step-by-step instructions, and you’ll have a stylish and functional accessory in no time!
Step 1: Starting the Boondoggle Lanyard
Before you can dive into creating a beautiful and unique boondoggle lanyard, you need to start by gathering the necessary materials. Here’s a list of what you’ll need:
- Scissors
- Plastic craft lace (also known as boondoggle or gimp)
Once you have your materials ready, it’s time to begin the process of starting the boondoggle lanyard. Follow these steps:
- Hold the two ends of the craft lace together, making sure they are aligned.
- Tie a knot in the ends of the craft lace, securing them together.
- Place the knot on a flat surface, keeping it tight so that it doesn’t unravel.
Now that you have successfully started the boondoggle lanyard, you can move on to the next step of weaving the intricate patterns and designs. Be sure to follow the instructions carefully to achieve the desired result. Happy crafting!
Step 2: Weaving the Boondoggle Lanyard
Now that you have started your boondoggle lanyard, it’s time to move on to the weaving process. This is where the design starts to take shape and the colors intertwine beautifully. Follow these steps to create a stunning and intricate boondoggle lanyard.
1. Take the leftmost strand and cross it over the strand next to it, creating an X-shape. The left strand should now be on the right side and the right strand should be on the left side.
2. Take the right strand and cross it over the top of the left strand, passing it through the loop created by the left strand. Pull both strands tight to form a knot.
3. Repeat this process with the next set of strands. Take the new leftmost strand and cross it over the strand next to it, creating an X-shape. Then, take the right strand and cross it over the top of the left strand, passing it through the loop. Pull tight.
4. Continue weaving in this pattern, alternating the left and right strands until you reach the desired length for your boondoggle lanyard. Make sure to keep the tension consistent throughout to create an even and tight weave.
5. If you want to incorporate additional colors or patterns into your lanyard, you can introduce them by using different colored strands or experimenting with different weaving techniques. This will add depth and visual interest to your finished lanyard.
6. As you near the end of your lanyard, make sure to leave enough space to create a loop at the top for attaching any necessary accessories, such as a keyring or ID badge holder.
7. Once you have reached the desired length and created the loop, secure the ends of the strands by tying a knot or using a plastic clip. Trim any excess length if necessary.
With each weaving step, your boondoggle lanyard becomes more intricate and visually appealing. Take your time and enjoy the process, creating a unique and personalized lanyard that showcases your creativity.
Next, we will move on to the final step: finishing the boondoggle lanyard.
Step 3: Finishing the Boondoggle Lanyard
Now that you’ve completed the weaving process, it’s time to put the finishing touches on your boondoggle lanyard. This step will not only give your lanyard a polished look but also ensure its durability and functionality. Follow these simple steps to finish your boondoggle lanyard:
1. Trim the Ends: Start by trimming the loose ends of the boondoggle strands as close to the knots as possible. Use a pair of sharp scissors for clean and precise cuts. Be careful not to cut through any of the woven strands or the lanyard itself; only trim the excess material.
2. Heat-Seal the Ends: To prevent the trimmed ends from fraying, use a heat source (such as a lighter or a candle flame) to carefully melt the ends. Hold the trimmed ends near the flame for a few seconds until the material begins to melt and fuse together. Be cautious not to hold them too close to the flame to avoid scorching or burning the lanyard.
3. Attach a Closure: To make your boondoggle lanyard functional, you’ll need to attach a closure at one end. There are various closure options to choose from, such as key rings, lobster clasps, or plastic buckles. Select a closure that suits your preferences and the purpose of your lanyard. Thread the attachment through the topmost loop on one end of the lanyard and secure it tightly.
4. Test the Closure: After attaching the closure, give it a gentle tug to ensure that it is securely fastened and won’t come loose easily. This step is crucial to prevent any accidental detachment of your lanyard while in use. If the closure feels loose, adjust and tighten it as needed.
5. Optional Embellishments: If you want to personalize your boondoggle lanyard and make it stand out, you can add decorative embellishments. This could include beads, charms, or even small pendants. Thread them onto the boondoggle strands before starting the weaving process or attach them afterwards using jump rings. Get creative and experiment with different embellishments to create a unique lanyard that reflects your style.
6. Final Inspection: Once you’ve completed all the steps, take a moment to inspect your boondoggle lanyard for any loose knots, frayed ends, or deformities. Make any necessary adjustments or repairs before considering your project complete. Doing a final inspection ensures the lanyard’s quality and longevity.
By following these steps, you’ll be able to finish your boondoggle lanyard with a professional and polished look. Remember to take your time and be patient throughout the process to achieve the best results. Now that your lanyard is complete, you can attach keys, ID cards, or other small objects to it and enjoy the functionality and style it brings.
Variations and Tips
Once you’ve mastered the basic technique of making a boondoggle lanyard, you can get creative and try out different variations and incorporate some helpful tips. Here are some ideas to enhance your boondoggle lanyard-making experience:
1. Experiment with different colors: Boondoggle lanyards can be made using a variety of colors. Mix and match different shades to create unique patterns and designs. You can even use glow-in-the-dark or neon colors for a fun and vibrant look.
2. Use different types of cords: While the traditional boondoggle lanyard is made with plastic craft lace, you can also try using different types of cords for a different feel. Paracord, satin cord, or hemp cord are great alternatives that can give your lanyard a different texture and appearance.
3. Add beads or charms: Enhance the look of your boondoggle lanyard by adding beads or charms. String them onto the starting loops or weave them into your lanyard pattern. This adds a personalized touch and can make your lanyard stand out.
4. Experiment with patterns: Once you’re comfortable with the basic box stitch pattern, you can try out different weaving patterns. Diamond, stripe, and spiral patterns are popular choices that can add complexity and visual interest to your lanyard.
5. Use different finishing techniques: Instead of simply tying off the end of your lanyard, you can explore different finishing techniques. You can use beads or knots to create a decorative end, or even attach a keyring or lobster clasp for added functionality.
6. Practice and learn from others: The more you practice making boondoggle lanyards, the better you’ll become. Don’t be afraid to experiment and learn from others. Join online forums or watch video tutorials to discover new techniques and ideas.
Remember, making boondoggle lanyards is a fun and creative activity. Don’t be afraid to add your personal touch and make it uniquely yours. Enjoy the process and let your imagination run wild!
As we conclude this article, it is clear that knowing how to make a Boondoggle lanyard can be a fun and fulfilling craft activity. By following the step-by-step instructions and practicing different techniques, you can create unique and personalized lanyards that are both functional and stylish. Whether you are making them for yourself, friends, or as gifts, the possibilities are endless.
The Boondoggle lanyard provides a versatile and durable accessory that can be used for a variety of purposes, such as holding keys, identification cards, or even as a decorative piece for your phone or bag. With its simplicity and affordability, it is a great DIY project for craft enthusiasts of all ages.
So go ahead, gather your materials, and embark on the creative journey of making your own Boondoggle lanyard. Let your imagination soar as you experiment with different colors, weaves, and patterns. Enjoy the process, and proudly wear your handcrafted lanyard knowing that you’ve created something truly one-of-a-kind!
FAQs
1. What is a Boondoggle Lanyard?
A Boondoggle Lanyard is a type of lanyard made using plastic craft lace, also known as boondoggle or gimp. It is a popular craft project that involves weaving and braiding the lace to create a sturdy and colorful lanyard that can be used to hold keys, ID cards, or other small items.
2. How do I start making a Boondoggle Lanyard?
To start making a Boondoggle Lanyard, you will need several strands of plastic craft lace in different colors. Arrange the strands parallel to each other and secure them at one end using a clip or tape. Then, start weaving the strands together using various braiding techniques such as the square stitch or the cobra stitch. Follow a pattern or create your own design as you go along.
3. What are the different weaving techniques used in making a Boondoggle Lanyard?
There are several weaving techniques commonly used in making a Boondoggle Lanyard, including the square stitch, the cobra stitch, the butterfly stitch, and the fishtail stitch. Each technique creates a different pattern and texture, allowing you to experiment and create unique designs for your lanyard.
4. Can I personalize my Boondoggle Lanyard?
Absolutely! One of the great things about making a Boondoggle Lanyard is that you can personalize it to your heart’s content. You can incorporate your favorite colors, add beads or charms, or even weave in your name or initials. The possibilities are endless, and it’s a fun way to showcase your creativity.
5. Where can I find the materials needed to make a Boondoggle Lanyard?
You can find plastic craft lace or boondoggle lace at most craft stores, or you can also purchase it online. Look for a variety of colors to make your lanyard more vibrant and eye-catching. Additionally, you may need clips or tape to secure the ends of your lanyard while working on it.