
If you’re looking to delve into the world of crafting and want to try your hand at creating beautiful lanyards, then the box stitch lanyard is the perfect project for you! Box stitch lanyards are a popular form of braiding, also known as the “boondoggle” or “scoubidou” stitch, and they can be used to make keychains, bracelets, or even dog leashes.
In this article, we will guide you through the step-by-step process of starting a box stitch lanyard. From gathering the necessary supplies to mastering the weaving technique, we’ll cover everything you need to know. So, let’s grab our cords, unleash our creativity, and begin our journey into the world of box stitch lanyards!
Inside This Article
- Materials Needed
- Step 1: Gathering the Supplies
- Step 2: Creating the Base
- Step 3: Starting the Box Stitch
- Step 4: Continuing the Box Stitch:
- Step 5: Completing the Box Stitch
- Step 6: Finishing the Lanyard
- Step 7: Adding a Clasp (Optional)
- Step 8: Personalizing Your Lanyard
- Conclusion
- FAQs
Materials Needed
Before starting the box stitch lanyard, gather the following materials:
-
Scissors: You’ll need a pair of sharp scissors to cut the lanyard cord.
-
Lanyard Cord: Choose a cord that is sturdy and durable. There are various types of cords available, such as nylon, polyester, or cotton. Select a color that you like and that complements your style.
-
Clipboard: A clipboard can be useful for holding the lanyard in place while you work. If you don’t have a clipboard, you can use a pegboard or any flat surface to secure the lanyard.
-
Tape: Transparent tape or double-sided tape can be handy for securing the starting end of the lanyard cord to the clipboard or work surface.
-
Ruler: A ruler will help you measure the length of the lanyard and ensure consistency in your stitches.
-
Keychain Clasp (Optional): If you want to attach a keychain or any other accessory to your lanyard, you’ll need a keychain clasp. Choose a clasp that matches your preferences and the size of your lanyard.
Once you have gathered all the necessary materials, you’re ready to start creating your box stitch lanyard!
Step 1: Gathering the Supplies
Before you can start making a box stitch lanyard, you need to gather all the necessary supplies. Having everything prepared and organized will make the process much smoother and enjoyable. Here are the materials you will need:
1. Craft Lace: Choose a craft lace that is durable and comes in a color of your choice. Craft laces made of plastic or nylon work well for box stitch lanyards.
2. Scissors: You’ll need a sharp pair of scissors to cut the craft lace to the desired length. Make sure they’re capable of cutting through the material easily and cleanly.
3. Clipboard or Binder Clip: Using a clipboard or a binder clip will help secure the craft lace in place while you work on the lanyard. It prevents the lace from slipping or moving around, allowing for better control and accuracy.
4. Measuring Tape or Ruler: Having a measuring tape or ruler handy will help you determine the appropriate length of the craft lace for your desired lanyard size. It ensures that you have consistent measurements throughout the process.
5. Beads or Charms (Optional): If you want to add a decorative touch to your lanyard, you can choose to include beads or charms. These can be threaded onto the craft lace as you weave, adding a personalized touch to your creation.
6. Clear Tape: Clear tape can be used to secure the ends of your craft lace to prevent fraying. This step will ensure that your lanyard remains intact and holds up well over time.
Make sure to gather all these supplies before you start making your box stitch lanyard. Having them ready will save you time and allow you to concentrate on the fun and creative process of crafting your own lanyard.
Step 2: Creating the Base
Creating the base is the foundation of a box stitch lanyard. This step will determine the width and length of your lanyard, so take your time to ensure accuracy and precision. Here’s how to create the base:
-
Start by selecting two strands of lanyard material. You can choose different colors for a vibrant look or stick to a single color for a more uniform design.
-
Cross the two strands over each other in an “X” shape, holding the midpoint of both strands together with one hand.
-
Take the right strand and loop it over the left strand, creating a loop on the left side.
-
Thread the end of the right strand through the loop on the left side, pulling it tight to create a knot. This is commonly known as a half hitch knot.
-
Now, take the left strand and loop it over the right strand, creating a loop on the right side.
-
Thread the end of the left strand through the loop on the right side, pulling it tight to create another half hitch knot.
-
Repeat steps 3 to 6 until you achieve the desired length of the base. Remember to keep the knots tight and close together to create a solid foundation for your lanyard.
Once you have completed this step, you will have a sturdy and even base to work with for the rest of the box stitch lanyard. Take a moment to double-check the length and adjust if needed before moving on to the next step.
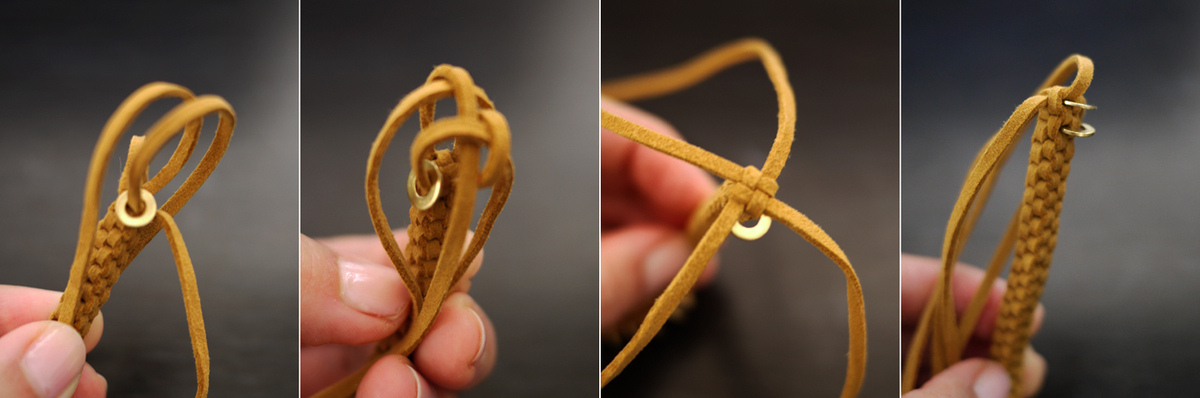
Step 3: Starting the Box Stitch
Now that you have gathered your supplies and created the base for your box stitch lanyard, it’s time to start the actual stitching! This is where the creativity and fun really begin.
To start the box stitch, follow these simple steps:
- Position the cords: Take two of your colored cords and place them vertically in front of you. These will be your working cords. Then, take the remaining two cords and position them horizontally, crossing over the first two cords.
- Tie the first knot: Take the top right cord and bring it over and under the two vertical cords. Then, take the bottom left cord and bring it under and over the two horizontal cords. Pull both cords tightly to create a secure knot.
- Tie the second knot: Now, take the top left cord and bring it under and over the two vertical cords. Take the bottom right cord and bring it over and under the two horizontal cords. Again, pull both cords tightly to ensure a tight knot.
- Alternate the knots: Repeat the process, alternating between tying the first and second knots. This will create a crisscross pattern that forms the box stitch.
- Keep tension: As you continue to tie the knots, make sure to maintain an even tension on the cords. This will ensure that your lanyard remains neat and uniform throughout the stitching process.
Continue these steps until you have reached your desired length for the lanyard or until you have used up all of your cord. Remember to periodically check the length to ensure it meets your preferences.
Starting the box stitch can be a bit tricky at first, but with a little practice, you will quickly get the hang of it. Don’t be afraid to experiment with different color combinations and knot variations to create unique and eye-catching designs.
Once you have mastered the box stitch technique, you are ready to move on to the next step: continuing the box stitch and watching your lanyard come to life!
Step 4: Continuing the Box Stitch:
Once you have completed the first row of the box stitch, it’s time to continue the pattern and create a beautiful design for your lanyard. Here’s how you can proceed:
- Take the leftmost strand and bring it over the two strands in the middle (the base strands).
- Then, take the rightmost strand and bring it under the two base strands and up through the loop created by the leftmost strand.
- Now, pull the strands tight to create a secure knot.
- Repeat this process, always starting with the leftmost strand and alternating between bringing it over and under the two base strands.
- Continue knotting until you reach the desired length for your lanyard.
Remember to keep the tension consistent throughout the process to ensure a neat and uniform appearance. You can periodically adjust the knots to make sure they are snug but not too tight.
As you continue the box stitch, you will notice the pattern forming with diagonal lines across the lanyard. This is what gives the box stitch its distinct and stylish look.
Feel free to experiment with different color combinations and patterns as you progress. You can create stripes, chevron patterns, or even incorporate beads to add some flair to your lanyard.
Keep in mind that practice makes perfect, so don’t worry if your first few attempts are not flawless. With time and patience, you will master the art of the box stitch and create stunning lanyards for yourself or as thoughtful gifts for others.
Step 5: Completing the Box Stitch
Once you have created the desired length for your box stitch lanyard, it’s time to complete the stitch. This final step will secure the loops in place and give your lanyard a finished look.
1. Make sure the last knot you made is positioned at the bottom of your last row of stitches.
2. Take the left string (string 1) and bring it up and over the first two loops, forming a cross shape.
3. Take the right string (string 2) and bring it up and over the two loops formed by string 1, creating another cross shape.
4. Tighten both strings to secure the loops in place. Make sure to pull them evenly to maintain a consistent tension.
5. Repeat this process until you have completed the entire row, making sure to alternate between the left and right strings.
6. After completing the last row, tighten the strings once again to ensure the loops are secure.
7. Once you are satisfied with the tightness, tie a knot at the end of the strings to prevent them from unraveling.
8. Trim any excess string, leaving a small tail for a neater finish.
9. Congratulations! You have successfully completed the box stitch lanyard.
Now you can use it as a keychain, a lanyard for your ID, or even a decorative accessory. The completed box stitch lanyard is not only functional but also a fun and creative craft project.
Feel free to experiment with different color combinations or weave patterns to create unique and personalized box stitch lanyards. Let your creativity shine!
Step 6: Finishing the Lanyard
After completing the box stitch pattern, it’s time to finish off your lanyard. This step is crucial to ensure that your lanyard is sturdy and secure. Here are the steps to follow:
- Cutting the excess cord: Start by trimming the excess cord, leaving about an inch of extra length.
- Melting the ends: To prevent fraying, carefully melt the ends of the cord using a lighter or a heat source. Be sure to do this in a well-ventilated area and exercise caution to avoid burns.
- Sealing the melted ends: Once the ends are melted, quickly press them together between your fingers. This will create a sealed tip, preventing the cord from unraveling.
- Adding a finishing knot: To secure the ends even further, tie a simple knot at the very end of the lanyard. This will prevent the cord from slipping out of the box stitch pattern.
By following these steps, you will achieve a clean and professional finish for your box stitch lanyard. Take your time and double-check that everything is securely fastened before moving on to the final touches.
Step 7: Adding a Clasp (Optional)
Adding a clasp to your box stitch lanyard can provide functionality and versatility. It allows you to easily attach and detach your lanyard from different objects or accessories. While this step is optional, it is worth considering if you plan on using your lanyard for keys, badges, or other items.
To add a clasp, you will need a few additional supplies:
- A small clasp or keyring
- A jump ring
- A pair of pliers
Here’s how you can add a clasp to your box stitch lanyard:
- Take one end of your completed box stitch lanyard and fold it in half to form a loop.
- Insert the loop through the jump ring.
- Take the loose ends of the lanyard and pass them through the loop, forming a lark’s head knot around the jump ring. Ensure that the knot is secure.
- If you are using a clasp, attach it to the jump ring using the pliers to open and close the jump ring.
Once you have attached the clasp, you can now easily secure and detach your lanyard whenever needed. This is especially convenient if you frequently need to remove your lanyard or switch it between different items.
Remember, adding a clasp is optional, and you can still use your box stitch lanyard without one. It depends on your personal preference and the intended use of the lanyard.
Step 8: Personalizing Your Lanyard
Now that you’ve completed the box stitch lanyard, it’s time to add a personal touch to make it truly unique. Personalizing your lanyard not only adds a sense of individuality but also helps you easily identify it among others. There are several creative ways to personalize your lanyard, so let your imagination run wild!
One popular method of personalization is adding beads to your lanyard. You can find a wide variety of beads in different shapes, sizes, and colors to suit your style. Incorporate beads into the box stitch pattern by stringing them onto the strands before starting the stitch. This will create a custom design that reflects your personal taste.
If you prefer a more subtle approach, consider adding charms or pendants to your lanyard. These small accessories can be attached to the clasp or woven into the box stitch pattern. Look for charms that represent your interests, such as animals, sports, or hobbies. This way, your lanyard becomes a conversation starter and a reflection of your personality.
Another option to personalize your lanyard is by using different colored or patterned strings. Experiment with vibrant colors or trendy patterns that suit your style. You can create eye-catching combinations by alternating colors in the box stitch or using a patterned string for one of the strands. This simple change can make a big difference in the overall look of your lanyard.
If you have artistic skills, why not try your hand at embroidery? Using embroidery floss or thread, you can create intricate designs or personalize your lanyard with your initials or a favorite quote. Embroidery adds a unique touch to your lanyard and showcases your creativity.
Lastly, consider adding other small accessories like keychains, buttons, or even small trinkets that hold sentimental value. These additions can make your lanyard even more special and serve as a reminder of cherished memories or loved ones.
Remember, the goal of personalizing your lanyard is to make it uniquely yours. Whether you choose to incorporate beads, charms, colored strings, embroidery, or other accessories, let your creativity shine through. Have fun and enjoy the process of making your lanyard a reflection of your personal style and interests.
Conclusion
In conclusion, starting a box stitch lanyard can be a fun and creative way to make your own personalized accessory. With just a few basic materials and some practice, you can create intricate and unique designs to showcase your style. Whether you want to make a lanyard for your keys, your ID badge, or simply as a fashionable accessory, the box stitch technique is a versatile and enjoyable craft.
Remember to choose the right type of cord or lacing material for your project and practice the basic box stitch pattern before moving on to more complex designs. Don’t be afraid to experiment with different colors and patterns to make your lanyard truly stand out.
So why not give it a try? Start your box stitch lanyard project today and enjoy the satisfaction of creating something by hand that reflects your unique personality.
FAQs
1. What is a box stitch lanyard?
A box stitch lanyard is a type of craft that involves weaving threads or cords together to create a decorative and functional lanyard. It is often made using square or box stitches, which give the weave pattern its name. Box stitch lanyards can be used for various purposes, such as keychains, badges, or even as a decorative accessory.
2. What materials do I need to start making a box stitch lanyard?
To start making a box stitch lanyard, you will need a few basic materials, including colorful embroidery floss or lanyard lace, scissors, and a clipboard or safety pin to secure your work. Additionally, you may want to have some beads or charms on hand to add a personal touch to your lanyard design.
3. How do I create the box stitch when making a lanyard?
To create the box stitch when making a lanyard, you will need four strands of embroidery floss or lanyard lace. Start by arranging the strands so that two colors are on the left and two colors are on the right. Cross the leftmost strand diagonally over the second strand, forming a loop. Then, take the rightmost strand and weave it under the first and second strands and through the loop created by the leftmost strand. Repeat this process, alternating sides, until you reach your desired length.
4. Are there any variations of the box stitch lanyard?
Yes, there are several variations of the box stitch lanyard that you can experiment with. One popular variation is the butterfly stitch, which involves weaving the strands in a way that creates a butterfly shape in the center of the lanyard. You can also try adding beads or charms to your lanyard, or even incorporating different types of stitches to create unique patterns and textures.
5. Can I use different types of cords or threads to make a box stitch lanyard?
Absolutely! While embroidery floss and lanyard lace are commonly used for making box stitch lanyards, you can get creative with different materials. Paracord, hemp cord, or even thin strips of fabric can be used to create unique and personalized lanyards. Just remember to adjust the thickness of the strands and the size of the stitches accordingly to accommodate the different materials.