
Whether you’re constantly on-the-go or find yourself in situations where a power outlet is out of reach, having a power bank is a game-changer. A power bank, also known as a portable charger, is a handy device that allows you to charge your electronic devices, such as your cell phone, tablet, or even headphones, on the move. It’s a must-have accessory that ensures you never run out of battery power when you need it most.
In this article, we will guide you on how to make your very own power bank. This DIY project not only allows you to customize your power bank to suit your needs and style, but it also gives you the satisfaction of creating something useful with your own hands. So, buckle up and get ready to learn the step-by-step process of making a power bank that will keep your devices powered up wherever you go!
Inside This Article
- Materials Needed
- Step 1: Choosing the battery
- Step 2: Assembling the Circuit
- Step 3: Soldering the components
- Step 4: Testing the power bank
- Conclusion
- FAQs
Materials Needed
Before you embark on the journey of creating your own power bank, it is essential to gather all the necessary materials. Listed below are the items you will need to successfully complete this DIY project:
- A high-capacity lithium-ion battery: The heart of your power bank, this is what will store the electrical energy and provide power to your devices. Look for a battery with a capacity of at least 10,000mAh to ensure long-lasting power.
- A power bank circuit: This is the brain of your power bank, responsible for regulating the flow of power and protecting your devices from overcharging or short circuiting. You can easily find pre-made circuit modules online or in electronic stores.
- A battery protection circuit: This additional circuit provides an extra layer of safety by preventing the battery from overcharging, over-discharging, and short circuiting. It is crucial for maintaining the longevity of your power bank.
- A battery charger module: To recharge your power bank, you will need a charger module capable of charging lithium-ion batteries. Look for a module that supports a charging current suitable for the capacity of your battery.
- A battery holder: This is a convenient way to securely hold your battery in place within the power bank casing. It ensures stability and easy access during assembly and maintenance.
- An enclosure: You will need a suitable enclosure to house all the components of your power bank. This can be a plastic or metal case, depending on your preferences and crafting skills. Make sure it is large enough to accommodate the battery and circuit module.
- An on/off switch: This allows you to control the flow of power to your devices, conserving energy when not in use.
- A USB charging port: An important feature of any power bank, the USB port enables you to connect and charge your devices. Choose a port that is compatible with the devices you intend to charge.
- Soldering iron and solder: These tools are essential for connecting the components together and ensuring a secure and stable electrical connection.
- Wires and connectors: You will need various lengths of wires and connectors to link the battery, circuit, switch, and charging port together. Opt for high-quality wires to minimize voltage drops and ensure efficient power transfer.
- Heat shrink tubing or electrical tape: These are used to insulate and protect the soldered connections and prevent any accidental short circuits.
- Basic hand tools: This includes a wire cutter, wire stripper, pliers, and screwdriver for assembly and modification.
With these materials in hand, you are ready to move on to the next steps of creating your own power bank.
Step 1: Choosing the battery
When it comes to making a power bank, the first and most crucial step is choosing the right battery. The battery you select will determine the capacity and performance of your power bank. Here are a few factors to consider when choosing a battery:
- Capacity: The capacity of the battery is measured in milliampere-hours (mAh), and it determines how much charge the power bank can hold. Consider your own needs and the devices you will be charging to select a battery with an appropriate capacity. Generally, a higher capacity battery will provide more charging cycles and power for your devices.
- Type of battery: There are different types of batteries available, such as lithium-ion (Li-ion) and lithium polymer (Li-Po). Li-ion batteries are more common and offer a good balance of capacity, weight, and cost. On the other hand, Li-Po batteries are more compact and lightweight, making them suitable for portable power banks.
- Voltage: Ensure that the battery you choose has a voltage compatible with the devices you plan to charge. Most smartphones and mobile devices operate at 5 volts, so make sure the battery voltage matches this requirement.
- Safety features: Look for batteries with built-in protection circuits that can prevent overcharging, overheating, and short circuits. These safety features are essential to protect your power bank and the devices you’ll be charging.
- Brand and quality: Opt for reputable brands and quality batteries to ensure durability and reliable performance. Cheap and low-quality batteries may not last as long and can pose safety risks.
Once you have chosen the appropriate battery for your power bank, move on to the next step of assembling the circuit.
Step 2: Assembling the Circuit
Once you have chosen the battery for your power bank, the next step is to assemble the circuit. The circuit is responsible for regulating the power flow and ensuring the efficient charging and discharging of your devices. Here’s how you can assemble the circuit for your power bank:
- Gather the components: To assemble the circuit, you will need a circuit board, voltage regulator, charging module, and a USB port. Make sure you have all the necessary components before proceeding.
- Prepare the circuit board: Start by preparing the circuit board. If necessary, trim the board to the desired size and shape. Ensure that it fits inside the casing or enclosure you have chosen for your power bank.
- Mount the components: Begin by soldering the voltage regulator onto the circuit board. The voltage regulator is responsible for regulating the output voltage of the power bank and ensuring it matches the requirements of your devices. Follow the manufacturer’s instructions for soldering the regulator correctly.
- Connect the charging module: Next, solder the charging module onto the circuit board. This module allows you to charge the power bank using a standard USB charger. Make sure to connect the module according to the wiring diagram provided by the manufacturer.
- Add the USB port: Solder the USB port onto the circuit board, ensuring that the data pins and power pins are connected correctly. The USB port will be used to connect your devices for charging.
- Double-check the connections: Before proceeding further, double-check all the connections on the circuit board to ensure they are secure and properly soldered. This will help avoid any potential issues or malfunctions later on.
Once you have assembled the circuit, it’s time to move on to the next step—soldering the components.
Step 3: Soldering the components
Now that you have assembled the circuit, it’s time to solder the components. Soldering is the process of joining two metal parts together using a heated soldering iron and a metal alloy called solder.
Here are the steps to solder the components:
- Prepare the soldering iron: Make sure the soldering iron is clean and properly heated. Depending on the type of soldering iron you have, it may take a few minutes to reach the desired temperature.
- Clean the components: Use a clean cloth or sponge to wipe the soldering iron tip clean. This will help ensure good heat transfer and prevent any residues from affecting the soldering process. Also, clean the components that need to be soldered to remove any dirt or oxidation.
- Apply flux: Flux is a chemical compound that helps to remove any oxides from the metal surfaces and promotes better adhesion of the solder. Apply a small amount of flux to the areas where you will be soldering.
- Heat the joint: Place the soldering iron tip at the joint where you want to solder the components. Allow the heat to transfer to the joint for a few seconds to ensure proper heat distribution.
- Apply the solder: Once the joint is heated, touch the solder wire to the joint. The heat will melt the solder, allowing it to flow and create a solid connection between the components. Be careful not to use too much solder, as it can cause short circuits.
- Inspect the solder joint: After soldering, visually inspect the joint to ensure there are no dry joints or cold solder joints. A good solder joint should have a shiny appearance and a smooth surface.
- Repeat the process: Continue soldering all the necessary components, making sure to follow the same steps for each joint.
Remember to take breaks and allow the soldering iron to cool down periodically to prevent overheating. Also, make sure to work in a well-ventilated area to avoid inhaling any fumes produced during the soldering process.
Soldering can be a delicate process, so it’s important to practice proper technique and take your time. With some practice and patience, you’ll be able to solder the components of your power bank effectively.
Step 4: Testing the power bank
Once you have completed assembling and soldering all the components of your DIY power bank, it’s time to test its functionality. Testing is an essential step to ensure that your power bank is functioning properly and is capable of delivering the required power to charge your devices.
Here’s a step-by-step guide on how to test your power bank:
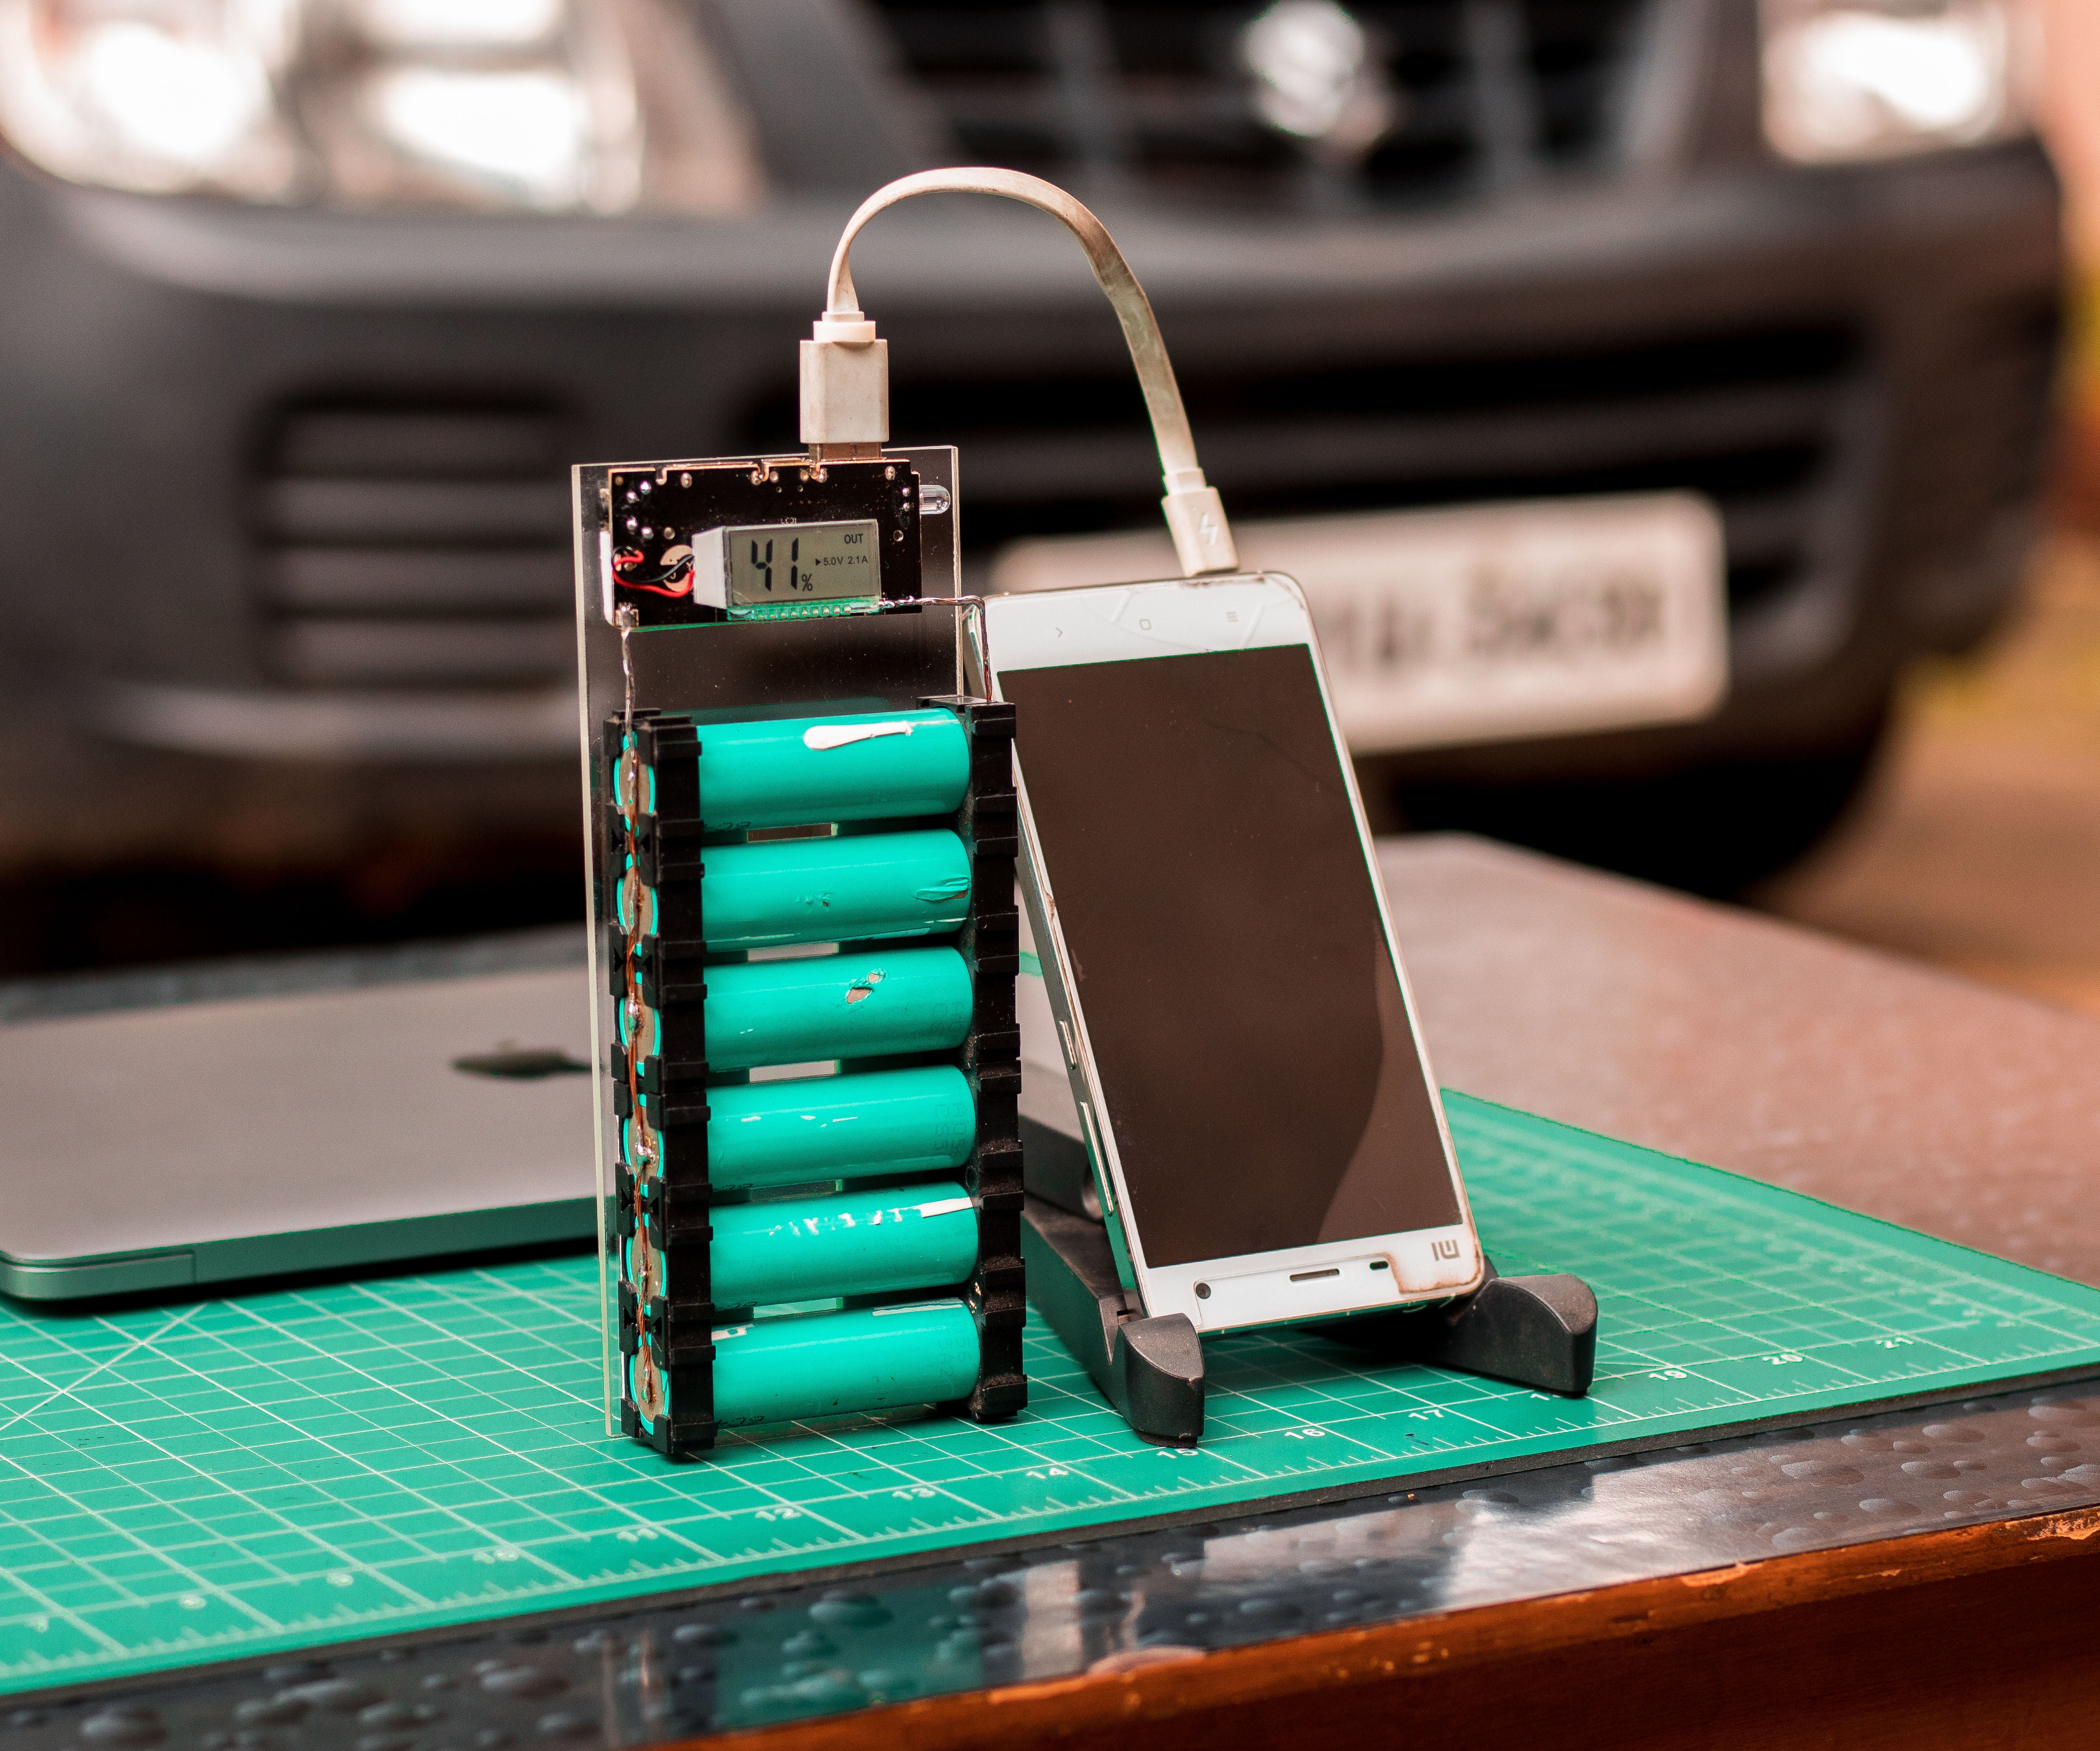
- Connect your power bank to a device: Use a USB cable to connect your power bank to a compatible device such as a smartphone or tablet.
- Power on the device: Turn on the device to initiate the charging process.
- Monitor the charging process: Keep an eye on the device’s battery level to see if it is charging. Note the speed at which the battery percentage increases.
- Check for overheating: While the device is charging, check if the power bank or any other components are overheating. Excessive heat could be a sign of a problem.
- Ensure stable charging: Pay attention to any interruptions or fluctuations in the charging process. The power bank should provide a stable and consistent power output.
- Complete charging: Allow the device to charge until it reaches your desired battery level. This will help you determine the capacity and efficiency of your power bank.
If the testing process goes smoothly without any issues, it means that your power bank is working effectively. You can now use it to charge your devices on-the-go, providing a reliable source of power wherever you are.
However, if you encounter any problems during the testing phase, such as slow charging, overheating, or inconsistent power output, there may be an issue with the assembly or soldering of the components. In such cases, it is advisable to double-check the connections, review the soldering joints, and ensure the components are correctly installed.
Additionally, if you find that your power bank is not delivering the expected capacity or charging speed, you may need to revisit the selection of components, such as the battery or charging circuit, to ensure they are suitable for your desired output.
Remember, testing is crucial to ensure the safety and functionality of your power bank. It allows you to identify any potential problems and make necessary adjustments before relying on it to charge your valuable devices.
Conclusion
In conclusion, making a power bank at home can be a fun and rewarding DIY project. By following the steps mentioned in this article, you can create a customized power bank that meets your specific needs and preferences.
Not only is making a power bank a great way to save money, but it also gives you the flexibility to choose the capacity, design, and features that best suit your requirements. Whether you need a portable charger for your smartphone, tablet, or other electronic devices, a DIY power bank allows you to have a reliable source of power on the go.
Remember to always prioritize safety when working with electronics. Make sure to follow proper guidelines and take precautions to prevent any accidents or damage.
So, why not give it a try? Gather the necessary materials, follow the instructions, and get started on your DIY power bank adventure today. Enjoy the satisfaction of creating a functional and personalized accessory that will keep your devices powered up wherever you go.
FAQs
1. What is a power bank?
A power bank is a portable device that allows you to charge your electronic devices such as smartphones, tablets, and other gadgets on the go. It acts as an external battery pack, providing you with a convenient and reliable source of power whenever you need it.
2. How does a power bank work?
A power bank works by storing electrical energy in its internal battery cells. It is charged when connected to a power source, such as a wall socket or a USB port. Once fully charged, it can be used to charge your devices by connecting them to the power bank’s output port via a USB cable.
3. How long does it take to charge a power bank?
The charging time for a power bank can vary depending on its capacity and the charging method used. Generally, it can take anywhere from a few hours to overnight to fully charge a power bank. It is recommended to refer to the manufacturer’s specifications for more accurate information.
4. How many times can a power bank charge my device?
The number of times a power bank can charge your device depends on its capacity (measured in milliampere-hours or mAh) and the battery capacity of your device. As a general rule of thumb, a higher capacity power bank will be able to charge your device multiple times before needing to be recharged itself. You can refer to the power bank’s specifications to get a better idea of how many times it can charge your specific device.
5. Can I charge multiple devices at the same time with a power bank?
Yes, most power banks come with multiple output ports that allow you to charge multiple devices simultaneously. However, it is important to consider the power bank’s total output capacity and divide it evenly among the connected devices to ensure efficient charging. Some power banks also come with fast-charging ports that prioritize charging one device at a higher speed.