
Bluetooth speakers have revolutionized the way we enjoy music and audio on the go. These portable devices offer the convenience of wireless connectivity, allowing us to stream our favorite tunes from our smartphones, tablets, or laptops without the hassle of cords and cables. While there are many great Bluetooth speakers available in the market, have you ever considered making your own?
In this article, we will explore the fascinating world of DIY Bluetooth speakers and guide you through the process of making your very own portable audio device. Whether you are a tech enthusiast looking for a fun project or someone who wants to customize their own speaker to fit their unique style, making a Bluetooth speaker offers a rewarding and creative experience.
So, let’s dive in and discover how you can make your Bluetooth speaker from scratch and enjoy high-quality audio anywhere, anytime.
Inside This Article
- Materials Needed
- Step 1: Gathering the Components
- Step 2: Assembling the Speaker Cabinet
- Step 3: Wiring the Components
- Step 4: Testing and Troubleshooting
- Step 5: Installing the Bluetooth Module
- Step 6: Connecting the Speakers to Bluetooth
- Step 7: Fine-tuning the Audio Settings
- Step 8: Enclosing the Speakers
- Step 9: Finalizing the Bluetooth Speaker
- Step 10: Enjoying Your DIY Bluetooth Speakers
- Conclusion
- FAQs
Materials Needed
To make your own DIY Bluetooth speakers, you will need the following materials:
- A pair of speakers: Choose speakers that suit your desired audio quality and power output. You can either repurpose old speakers or purchase new ones.
- Bluetooth module: This small electronic component will allow you to connect your speakers wirelessly to your devices. Make sure to choose a Bluetooth module that is compatible with your speakers and has good connectivity range.
- Amplifier board: An amplifier board is required to amplify the audio signals and provide sufficient power to the speakers. Opt for an amplifier board that matches the power requirements of your speakers.
- Power supply: You will need a power supply to power the amplifier board and the Bluetooth module. Make sure to choose a power supply that can deliver the appropriate voltage and current needed for your specific components.
- Audio cables and connectors: These cables and connectors will be used to connect the speakers, amplifier board, and Bluetooth module together. Ensure that you have the necessary cables, such as RCA cables, speaker wires, and jumper wires, as well as connectors like banana plugs or terminal blocks.
- Enclosure materials: Depending on your preference, you can choose to build the speaker cabinets using wood, acrylic, or any other suitable material. Make sure to have the necessary tools for cutting, drilling, and assembling the enclosure.
- Soldering iron and solder: In order to make electrical connections, you will need a soldering iron and solder. These are essential for soldering wires to the speakers, amplifier board, and Bluetooth module.
- Screws, nuts, and bolts: These hardware components will be used to secure the speakers, amplifier board, and Bluetooth module inside the speaker cabinet. Make sure to have a variety of sizes and types to suit your specific requirements.
- Insulation materials: To prevent unwanted vibrations and improve sound quality, you will need insulation materials like foam, acoustic insulation panels, or damping materials. These can be used to line the inside of the speaker cabinet.
- Decorative materials (optional): If you want to add a personal touch to your DIY Bluetooth speaker, you can consider using decorative materials like vinyl wrap, paint, or fabric to cover the speaker cabinet.
Once you have gathered all the necessary materials, you can proceed with the step-by-step process of assembling your Bluetooth speakers.
Step 1: Gathering the Components
Before starting your journey to create your own Bluetooth speakers, you’ll need to gather all the necessary components. Here’s a list of the essential items you’ll need:
- Bluetooth Module – This is the heart of your Bluetooth speakers, allowing them to connect wirelessly to your devices.
- Speaker Drivers – These are the main components responsible for producing sound. You’ll need two drivers for stereo sound.
- Amplifier Board – This amplifies the audio signal and provides power to the speakers.
- Power Supply – You’ll need a suitable power supply to provide the necessary voltage and current to the amplifier board.
- Enclosure – This is the casing in which all the components will be housed. Choose a durable and aesthetically pleasing enclosure.
- Wires and Cables – You’ll need various wires and cables to connect the different components together.
- Soldering Iron and Solder – These are essential tools for soldering the connections between the components.
- Basic Tools – Screwdrivers, pliers, and wire strippers are handy tools to have for assembling the speakers.
- User Manual or Guide – It’s always useful to have a user manual or guide specific to the components you’re using.
Once you have gathered all the necessary components, you’re ready to move on to the next step of assembling the speaker cabinet.
Step 2: Assembling the Speaker Cabinet
Now that you have gathered all the necessary components, it’s time to start assembling the speaker cabinet. Follow these step-by-step instructions to ensure a smooth process:
- Prepare the enclosure: Begin by determining the size and shape of the cabinet you want for your speakers. Use a measuring tape to mark the dimensions on a suitable MDF or plywood sheet.
- Cut the panels: Using a saw, carefully cut the marked panels from the sheet. Make sure to double-check the measurements to ensure accuracy.
- Drill speaker holes: Measure and mark the locations for the speakers on the front panel of the cabinet. Use a hole saw or jigsaw to cut holes of the required diameter.
- Assemble the box: Begin by attaching the sides, top, and bottom panels of the cabinet using wood glue and screws. Make sure to align the edges properly while securing the panels.
- Install internal bracing: To enhance the structural integrity of the cabinet, add internal bracing. Cut small pieces of wood and secure them inside the cabinet using wood glue and screws.
- Seal the cabinet: Apply a layer of silicone sealant along the edges and joints of the cabinet to prevent air leakage. This will help improve the overall sound quality of your speakers.
Once you have completed these steps, you will have successfully assembled the speaker cabinet. Remember to take your time and double-check your measurements and assembly process to ensure a sturdy and precise result.
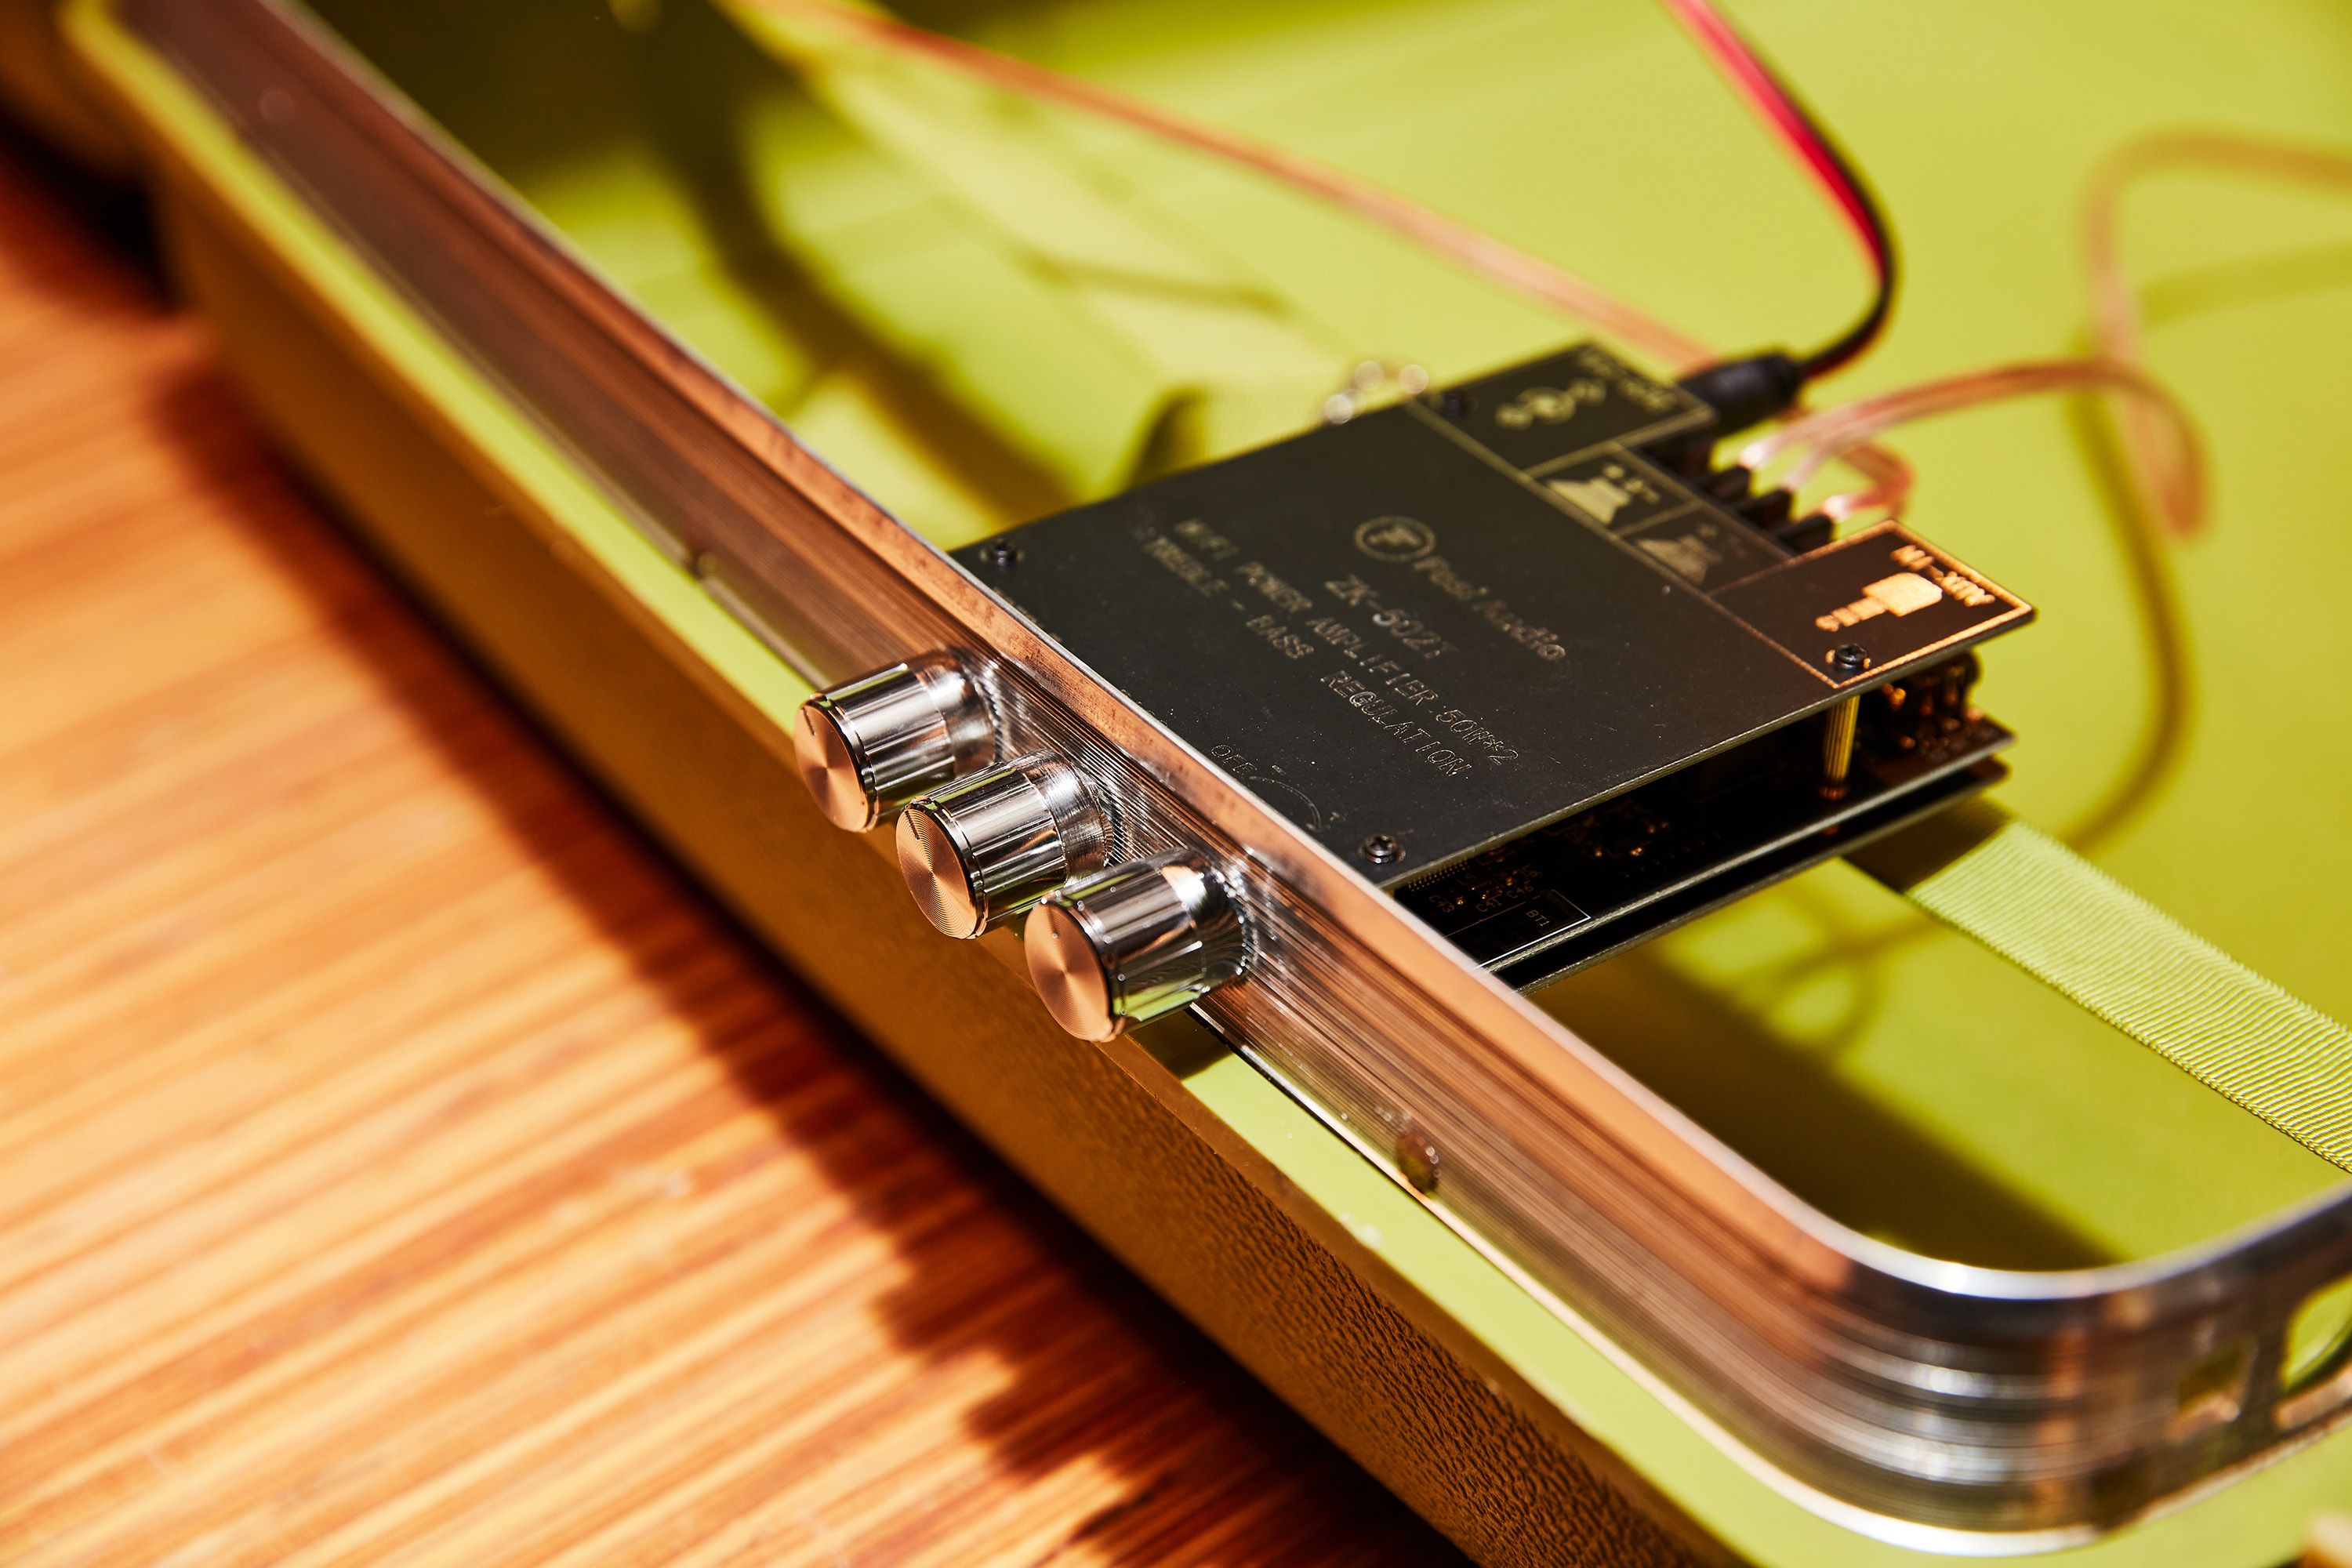
Step 3: Wiring the Components
Now that you have assembled the speaker cabinet, it’s time to wire the components together. Here is a step-by-step guide on how to do it:
1. Start by connecting the speaker wire to the terminals of the speakers. Make sure to match the positive (+) and negative (-) terminals of the speakers with the corresponding terminals on the wire.
2. Next, locate the crossover network, which is responsible for directing the audio signals to the appropriate speakers. Connect the speaker wire from the speakers to the corresponding inputs on the crossover network.
3. If you are using a separate amplifier, connect the speaker wires from the crossover network to the amplifier outputs. Again, ensure that you match the positive and negative terminals correctly.
4. For the power source, connect the positive (+) and negative (-) wires from the amplifier to the corresponding terminals on the power supply. Double-check that the voltage requirements of the amplifier and power supply are compatible.
5. If you are incorporating a Bluetooth module, follow the manufacturer’s instructions for wiring it to the amplifier or crossover network. This will allow you to connect your device wirelessly to the speakers.
6. Once all the wiring is complete, carefully tuck away any loose wires and secure them with zip ties or adhesive clips. This will help prevent any accidental damage or interference.
7. Before powering on the speakers, it’s a good idea to double-check all the connections and ensure everything is properly secured and insulated. This will minimize the risk of any short circuits or electrical accidents.
8. Finally, turn on the power supply and test the speakers. Play some audio and verify that the sound is coming out from all the speakers. Make any necessary adjustments or troubleshooting if you encounter any issues.
By following these steps, you will be able to wire the components of your Bluetooth speakers correctly, ensuring optimal audio performance and functionality.
Step 4: Testing and Troubleshooting
Now that you have assembled the Bluetooth speakers, it’s time to test them and troubleshoot any issues that may arise. Here are some steps to follow:
1. Begin by connecting your speakers to a power source and turning them on. Make sure all the cables are securely connected.
2. Play some audio through the speakers using a compatible device, such as a smartphone or a laptop. Check if the sound is coming through clearly and if both speakers are working properly. Adjust the volume as needed.
3. If you encounter any issues, start by checking the wiring connections. Make sure that all the wires are properly connected and are not loose or damaged. If necessary, redo the wiring connections to ensure they are secure.
4. If the sound quality is not satisfactory or there is a lack of bass, you may need to adjust the audio settings. Most Bluetooth speakers have built-in equalizer settings that allow you to customize the audio output according to your preference. Experiment with the settings to find the right balance for your speakers.
5. If you are experiencing connectivity issues, make sure that your Bluetooth device is within range of the speakers. Also, check if there are any obstacles or interference that may be affecting the signal. Try moving your device closer to the speakers or removing any obstructions to improve the connection.
6. If you are still facing issues, consult the user manual or reach out to the manufacturer’s customer support for further assistance. They may be able to provide specific troubleshooting steps or diagnose the problem.
7. Once you have resolved any issues and ensured that the speakers are working properly, congratulations! You have successfully tested and troubleshooted your DIY Bluetooth speakers.
Remember to enjoy your newly built speakers and share your music with friends and family!
Step 5: Installing the Bluetooth Module
Installing a Bluetooth module is an essential step in making Bluetooth speakers. The module allows the speakers to wirelessly connect with devices like smartphones, tablets, or laptops. Here’s a step-by-step guide on how to install the Bluetooth module:
1. Choose a suitable Bluetooth module: There are various Bluetooth modules available in the market. Look for one that is compatible with your speaker components and offers a good range and audio quality.
2. Prepare the module: Depending on the module you choose, you may need to solder wires to its pins. Carefully follow the manufacturer’s instructions for wiring the module correctly.
3. Find a suitable location: Determine a suitable location inside the speaker cabinet to mount the Bluetooth module. It should be easily accessible and away from any other components that may interfere with the signal.
4. Secure the module: Use adhesive or screws to secure the Bluetooth module in its designated location. Make sure it is securely fastened to avoid any movement or damage during use.
5. Connect the module to the power supply: Use wires to connect the power supply of the Bluetooth module to the speaker’s power source. Ensure proper polarity and make sure the connections are secure.
6. Connect the audio input: Connect the audio input of the Bluetooth module to the audio output of the amplifier or audio source in your speaker system. This will allow the module to receive the audio signals and transmit them wirelessly.
7. Test the connection: Power on the speaker system and pair your device with the Bluetooth module. Play some audio to ensure that the connection is working properly and the sound is transmitted wirelessly to the speakers.
8. Secure the wiring: Once you have tested the Bluetooth connection, secure the wiring using cable ties or adhesive tape. This will help prevent any accidental disconnections during transportation or movement of the speakers.
By following these steps, you can successfully install a Bluetooth module in your DIY speakers, allowing you to enjoy wireless audio playback from various devices.
Step 6: Connecting the Speakers to Bluetooth
Now that you have installed the Bluetooth module, it’s time to connect your speakers to a Bluetooth device. Follow these steps to establish the wireless connection:
1. Turn on the Bluetooth on your device: Ensure that the Bluetooth feature on your smartphone, tablet, or computer is turned on. Typically, you can find the Bluetooth toggle in the settings menu of your device.
2. Put your Bluetooth speakers in pairing mode: Check the user manual of your Bluetooth module to find out how to enable pairing mode. This step usually involves pressing and holding a button on the module until a LED indicator starts blinking.
3. Pair your device with the speakers: On your Bluetooth-enabled device, search for available devices nearby. You should see the name of your Bluetooth speakers appear in the list. Select the name of your speakers to initiate the pairing process.
4. Enter any required passcode or PIN: Depending on your Bluetooth speakers and device, you might be prompted to enter a passcode or PIN to establish the connection. Check the user manual of your speakers if you’re unsure about the passcode.
5. Confirm the connection: Once the passcode is entered correctly, your device should connect to the Bluetooth speakers. You may hear a sound or see a notification confirming the successful pairing.
6. Test the audio output: Play some music or any audio file on your device to test the audio output on your Bluetooth speakers. Make sure the volume levels are set appropriately.
7. Enjoy wireless audio: Congratulations! Your speakers are now successfully connected to your Bluetooth device. You can now enjoy wireless audio playback from your favorite apps or media files.
Remember, the range of your Bluetooth connection may vary depending on the device and any obstacles between the speakers and the device. Keep your device within a reasonable distance for optimal audio quality.
If you encounter any connectivity issues, refer to the troubleshooting section of your Bluetooth module’s manual or check for online resources specific to your module and device.
Step 7: Fine-tuning the Audio Settings
Once you have successfully connected your speakers to Bluetooth, it’s time to fine-tune the audio settings to optimize your listening experience. Here are some tips to help you get the most out of your DIY Bluetooth speakers:
- Adjust the Equalizer: Most devices come with an equalizer that allows you to adjust the sound frequencies. Experiment with different settings to find the balance that suits your preferences.
- Balance the Bass and Treble: Play some music with a good mix of low and high frequencies and adjust the bass and treble accordingly. Achieving a balanced sound ensures that no element overpowers the others.
- Experiment with Sound Modes: Some devices offer various sound modes such as “Rock,” “Pop,” or “Jazz.” Try out different modes to find the one that enhances the genre of music you enjoy the most.
- Utilize Stereo Separation: If you have multiple speakers, make sure to position them correctly for optimal stereo separation. This will create a more immersive and three-dimensional sound experience.
- Use Sound Enhancement Features: Many Bluetooth speakers come with additional sound enhancement features like surround sound, virtual 3D audio, or enhanced bass. Explore these features to enhance the audio quality even further.
Remember, audio preferences are subjective, so don’t be afraid to experiment and tweak the settings until you achieve the desired sound quality. Enjoy the process of fine-tuning your DIY Bluetooth speakers to create a personalized audio experience!
Step 8: Enclosing the Speakers
Now that you have assembled and fine-tuned your DIY Bluetooth speakers, it’s time to enclose them in a suitable housing. This step not only enhances the aesthetic appeal of the speakers but also helps in improving the overall sound quality. Here’s how you can enclose the speakers:
- Select the right enclosure: Consider the size and shape of your speakers and choose an enclosure that can accommodate them comfortably. You can use ready-made speaker cabinets or build your own using wood, plastic, or acrylic. Make sure the enclosure is sturdy and well-sealed to minimize sound leakage.
- Prepare the enclosure: Measure and mark the locations where the speakers and other components will be mounted. Cut out the necessary holes using a jigsaw or a suitable cutting tool.
- Mount the speakers: Place the speakers in the designated holes and secure them using screws or adhesive. Ensure that the speakers are securely fastened and positioned for optimum sound direction.
- Arrange the components: Arrange the Bluetooth module, amplifier, and any other components neatly inside the enclosure. Use mounting brackets or adhesive to secure them in place.
- Consider sound isolation: To minimize vibrations and resonance, you can add foam insulation or acoustic damping material inside the enclosure. This helps in achieving cleaner and more balanced sound reproduction.
- Connect the wiring: Route the wiring neatly and connect all the necessary cables to their respective components. Pay attention to proper grounding and insulation to avoid any electrical issues.
- Seal the enclosure: If your enclosure is made of multiple parts, ensure that they are tightly sealed to prevent air leakage. This helps in maintaining the integrity of the sound and reducing unwanted vibrations.
- Test the sound: Once the enclosure is sealed, power on your DIY Bluetooth speakers and play some audio to test the sound quality. Make any necessary adjustments or tweaks to achieve the desired sound output.
- Final touches: Once you are satisfied with the sound quality, give the enclosure a final inspection. Clean any dust or debris and make sure all the components are securely in place.
By following these steps, you can enclose your DIY Bluetooth speakers in a professional and functional manner. The enclosure not only protects the speakers but also contributes to a better listening experience. Enjoy your newly enclosed Bluetooth speakers!
Step 9: Finalizing the Bluetooth Speaker
Once you have completed all the previous steps, you are almost ready to enjoy your DIY Bluetooth speaker. However, there are a few final touches you can add to ensure a polished and professional finish. Here are some steps you can follow:
- Secure the components: Make sure all the components inside the speaker cabinet are securely fastened. Check that the wires, drivers, and Bluetooth module are properly secured in place.
- Seal any gaps: Use silicone sealant or foam gaskets to seal any gaps or openings in the speaker cabinet. This will help prevent any unwanted vibrations or sound leakage.
- Apply a finish: If desired, you can apply a finish to the external surface of the speaker cabinet. This could be paint, stain, or even a vinyl wrap. Choose a finish that matches your personal style and the overall aesthetic of the speaker.
- Add protective feet: Attach small rubber or silicone feet to the bottom of the speaker cabinet. This will protect the surface it sits on and prevent any scratching or sliding.
- Label your speaker: Consider adding a label or logo to your Bluetooth speaker. This can be a fun way to personalize your creation and give it a unique identity.
- Test the final product: Before enjoying your DIY Bluetooth speaker, perform a final test to ensure everything is working correctly. Connect your phone or audio device via Bluetooth and play some music to confirm that the sound quality is excellent and all the controls are functioning as intended.
By completing these final steps, you will have successfully finalized your DIY Bluetooth speaker. Take a moment to admire your handiwork and enjoy the satisfaction of creating a functional and personalized audio device.
Materials Needed
Before you start making Bluetooth speakers, make sure you have the following materials:
- Speaker drivers
- Amplifier board
- Bluetooth module
- Power supply
- Enclosure
- Wires and connectors
- Soldering iron
- Screwdriver
- Drill and drill bits
- Sanding paper
Step 1: Gathering the Components
The first step is to gather all the necessary components for your Bluetooth speakers. Make sure you have all the parts listed in the materials section. Double-check that you have the correct specifications and compatibility between the components.
Once you have everything ready, it’s time to move on to the next step.
Step 2: Assembling the Speaker Cabinet
Start by assembling the speaker cabinet or enclosure. This is where the speaker drivers will be housed. Make sure to follow the instructions and guidelines provided by the manufacturer of the enclosure.
Use the drill and drill bits to create holes for the speaker drivers, and sand the edges for a smooth finish. Once the cabinet is ready, proceed to the next step.
Step 3: Wiring the Components
After assembling the speaker cabinet, it’s time to wire the components. Begin by connecting the speaker drivers to the amplifier board. Use proper wiring techniques and connectors to ensure a secure and reliable connection.
Refer to the wiring diagram provided by the amplifier board manufacturer for the correct connections. Take your time and double-check all the connections before proceeding.
Step 4: Testing and Troubleshooting
With the components wired, it’s important to test the speakers before proceeding further. Connect the power supply to the amplifier board and play some audio to ensure that the speakers are functioning as expected.
If there are any issues, troubleshoot and resolve them before moving on. Inspect the wiring, check for loose connections, and ensure that all components are properly powered.
Step 5: Installing the Bluetooth Module
Once the speakers are working properly, it’s time to install the Bluetooth module. This module allows you to connect your speakers wirelessly to your devices.
Familiarize yourself with the Bluetooth module’s instructions and wiring diagram. Connect the module to the amplifier board following the provided guidelines. Take care not to damage any sensitive components during the installation process.
Step 6: Connecting the Speakers to Bluetooth
After installing the Bluetooth module, it’s time to connect your speakers to Bluetooth devices. Follow the instructions provided with the module to put it into pairing mode.
On your Bluetooth-enabled device, search for available devices and select your DIY Bluetooth speakers. Once paired, you’ll be able to play audio wirelessly through your speakers.
Step 7: Fine-tuning the Audio Settings
Once your DIY Bluetooth speakers are connected, you may want to adjust the audio settings to suit your preferences. Use the onboard controls or a connected device to fine-tune the volume, bass, treble, and other audio parameters.
Experiment with different settings to achieve the desired sound quality and balance.
Step 8: Enclosing the Speakers
Now that your DIY Bluetooth speakers are functional and the audio settings are adjusted, it’s time to enclose the speakers properly. This step ensures the protection and aesthetics of your speakers.
Place the speaker drivers securely into the cabinet and close it up. Use screws, nuts, or any other method suggested by the enclosure manufacturer to secure the speakers in place.
Step 9: Finalizing the Bluetooth Speaker
With the speakers enclosed, it’s time to finalize your Bluetooth speaker project. Double-check all connections, secure any loose components, and make sure everything is properly sealed within the enclosure.
Test the speakers once more to ensure that everything is working as intended before moving on to the final step.
Step 10: Enjoying Your DIY Bluetooth Speakers
Congratulations! You have successfully made your own Bluetooth speakers. Now it’s time to sit back, relax, and enjoy your favorite music wirelessly through your DIY creation.
Experiment with different placements, settings, and audio sources to discover the full potential of your DIY Bluetooth speakers.
Conclusion
In conclusion, learning how to make Bluetooth speakers is a rewarding and fulfilling process. By following the steps outlined in this article, you can create your own personalized speakers that reflect your style and preferences. Not only is it a fun project, but it also allows you to have a unique audio experience with high-quality sound.
The advancements in technology have made it easier than ever to source the necessary components and access helpful tutorials and guides online. Whether you are a tech enthusiast, a DIY hobbyist, or simply someone who wants to explore the world of audio gadgets, making Bluetooth speakers can be an exciting endeavor.
Remember to gather all the required materials, follow the step-by-step instructions, and pay attention to the small details to ensure the best results. With a little time and effort, you can have an impressive and functional Bluetooth speaker that will enhance your audio listening experience.
So, don’t hesitate to dive into the world of DIY Bluetooth speakers. Unleash your creativity, unleash your audio, and enjoy the satisfaction of creating something unique and useful.
FAQs
Q: Can I make my own Bluetooth speakers?
A: Yes, you can! Making your own Bluetooth speakers can be a fun and rewarding DIY project. There are many resources and tutorials available online that provide step-by-step instructions on how to build your own Bluetooth speakers from scratch.
Q: What materials do I need to make Bluetooth speakers?
A: The materials you’ll need will depend on the type of Bluetooth speakers you want to make. Generally, you will need speaker drivers, an amplifier, a Bluetooth module, a power supply, wires, a housing or enclosure, and various tools such as soldering iron, drill, and screwdrivers. It’s also important to have basic knowledge of electronics.
Q: Do I need any technical skills to make Bluetooth speakers?
A: While some technical skills are helpful, you don’t necessarily need to be an expert to make Bluetooth speakers. Basic knowledge of electronics and soldering can be acquired through online tutorials and practice. As long as you are patient, willing to learn, and follow instructions carefully, you can successfully build your own Bluetooth speakers.
Q: How long does it take to build Bluetooth speakers?
A: The time it takes to build Bluetooth speakers can vary depending on factors such as your experience level, the complexity of the design, and the availability of the materials. For beginners, it may take a few days or even weeks to fully assemble and test the speakers. Once you gain more experience, you can complete the process more efficiently.
Q: Are homemade Bluetooth speakers as good as commercially available ones?
A: While homemade Bluetooth speakers can be a great option for DIY enthusiasts, it’s important to note that they may not match the quality and performance of commercially available ones, especially those produced by reputable brands. However, with the right components and techniques, you can still achieve impressive sound quality and customize the design to your preferences.