
In today’s digital age, cell phones have become an indispensable part of our lives. We rely on them for communication, entertainment, and so much more. To personalize our mobile devices and add a touch of creativity, many people turn to phone accessories like phone charms. Among the various types of phone charms, clay phone charms have gained popularity due to their versatility and unique designs.
In this article, we will explore the art of making clay phone charms and discover the steps involved in creating your own customized accessories. Whether you’re a craft enthusiast or simply want to add a personal touch to your phone, this guide will provide you with all the information you need to make eye-catching and personalized clay phone charms. So, let’s dive into the world of creativity and start making some amazing accessories for your beloved phone!
Inside This Article
- Materials Needed
- Step 1: Preparing the Clay
- Step 2: Shaping the Charms
- Step 3: Adding Details
- Step 4: Baking the Charms
- Step 5: Adding Finishing Touches
- Step 6: Attaching the Phone Charms
- Tips and Tricks
- Variations and Ideas
- Resources and Recommended Products
- Conclusion
- FAQs
Materials Needed
To make clay phone charms, you will need the following materials:
- Clay: Choose a clay type that works well for sculpting, such as polymer clay or air-dry clay.
- Clay tools: Gather a set of tools, including a rolling pin, sculpting tools, and a craft knife for cutting shapes and detailing.
- Acrylic paint: Acrylic paint will be used to add color to your charms, so select a variety of colors that you’d like to use.
- Paintbrushes: Have an assortment of small paintbrushes on hand to apply the paint with precision.
- Sealer: A clear sealer will protect your finished charms and give them a glossy finish.
- Jump rings: These small metal rings will be used to attach the charms to the phone.
- Pliers: Pliers will help you open and close the jump rings securely.
- String or cord: Choose a durable string or cord to thread through the jump rings and attach the charm to the phone.
- Optional embellishments: If desired, gather additional materials such as rhinestones, beads, or glitter to add extra sparkle and personality to your charms.
Having these materials ready will ensure a smooth and enjoyable crafting process as you create your own unique and personalized phone charms.
Step 1: Preparing the Clay
Before you can start creating your clay phone charms, you need to prepare the clay itself. Follow these steps to ensure you have the perfect consistency and texture:
- Choose the right clay: There are various types of clay available, such as polymer clay or air-dry clay. Look for a clay that is suitable for your project and preferences.
- Clean your workspace: Start by cleaning your work area to ensure that it is free from any dirt or debris. This will prevent any unwanted particles from getting into your clay.
- Knead the clay: Take a chunk of clay and begin kneading it with your hands. This helps to soften the clay and make it more pliable. Continue kneading until the clay is smooth and easy to work with.
- Warm up the clay: If your clay feels a bit stiff or hard, you can warm it up slightly by rolling it between your hands or using a clay warmer. This will make it easier to shape and mold.
- Condition the clay: Conditioning the clay is an important step to ensure that it is free from air bubbles. To do this, flatten the clay and fold it in half. Repeat this process several times until the clay becomes more elastic.
- Add softeners if necessary: Depending on the type of clay you are using, you may need to add softeners to achieve the desired consistency. Follow the instructions on the packaging for the specific clay you are using.
- Divide the clay: Once your clay is ready, divide it into smaller portions. This will make it easier to work with and allow you to create multiple phone charms with different designs.
- Wrap the unused clay: To prevent the unused clay from drying out, wrap it tightly in plastic wrap or store it in an airtight container until you are ready to use it.
By following these steps, you will have properly prepared clay that is ready for shaping and creating your unique phone charms. Take your time with this step to ensure that your clay is in the best condition for crafting!
Step 2: Shaping the Charms
Now that you have prepared the clay, it’s time to start shaping your phone charms. This step allows you to get creative and bring your ideas to life. Follow these simple steps to shape your clay into stylish and unique phone charms.
1. Begin by taking a small piece of clay, about the size of a golf ball. This will be the base for your phone charm. Roll it between your palms to create a smooth, uniform shape.
2. Once you have formed the base, use your fingers or a clay shaping tool to mold it into the desired shape. Whether you prefer a simple circle, a cute animal, or a miniature object, the choice is yours! Let your imagination run wild as you shape the clay with precision.
3. As you shape the clay, ensure that it is not too thick or too thin. Aim for a thickness of about 1/4 inch, as this will make the charm sturdy and durable.
4. If you are making multiple phone charms, repeat the above steps for each one. You can experiment with different shapes and sizes to create a diverse collection of charms.
5. Once you are satisfied with the shape of your charms, carefully smooth out any imperfections or rough edges with your fingers or a clay smoothing tool. This will give your charms a polished and professional look.
6. Remember to create a small hole at the top of each charm using a toothpick or a thin needle. This hole will later serve as the attachment point for the phone charm strap.
7. Once you have shaped and refined your charms, set them aside to dry. Follow the instructions on the clay packaging for the recommended drying time. It’s essential to allow the charms to fully dry before moving on to the next step.
With these simple steps, you can easily shape your clay into adorable and personalized phone charms. Let your creativity shine as you experiment with different shapes, sizes, and designs. The next step will be adding intricate details to make your charms truly one-of-a-kind.
Step 3: Adding Details
After shaping the clay phone charms, it’s time to add some intricate details to make them truly unique and eye-catching. Adding details not only enhances the charm’s appearance but also gives it a personal touch. Here’s how you can add those special touches to your clay phone charms:
1. Start by examining the shape of your charm. Take note of any flat surfaces or raised areas that you want to embellish. These areas will be the focus of your detailing.
2. Decide on the type of details you want to incorporate into your charm. You can use smaller pieces of clay to create additional elements such as flowers, hearts, stars, or even tiny animals. Alternatively, you can use tools like toothpicks or small brushes to etch or paint designs onto the surface of the charm.
3. If you’re using additional pieces of clay, make sure they are properly attached to the main charm. Apply a small amount of water or clay adhesive to the area where you want to attach the detail piece. Gently press it onto the charm and blend the edges with your fingers to create a seamless look.
4. When using tools to add details, make sure to use a light touch and take your time. You can make small indents, lines, or patterns, depending on your desired effect. Experiment with different tools and techniques to find what works best for you.
5. Remember to consider the size and shape of your charm when adding details. If the charm is small, intricate designs may not be as visible, so opt for simpler patterns. On the other hand, a larger charm can accommodate more intricate details, allowing for more creativity.
6. Take breaks in between adding details to avoid straining your eyes or hands. Working with small and precise details requires focus and concentration. Take your time and enjoy the process.
7. Once you’re satisfied with the details, gently smooth out any rough edges or imperfections. Use a soft, lint-free cloth or your fingertips to smooth and blend the clay surface for a polished look.
Remember, adding details is a great way to personalize your clay phone charms. Let your creativity shine through as you create unique designs that reflect your style and personality.
Step 4: Baking the Charms
After you have finished shaping and adding details to your phone charms, it’s time to bake them. Baking the charms will help them to harden and become durable, ensuring that they can withstand daily use on your phone.
Here’s how to bake your clay phone charms:
- Preheat your oven to the temperature recommended by the manufacturer of the clay.
- Place your charms on a baking sheet lined with parchment paper or a silicone baking mat.
- Make sure the charms are evenly spaced and not touching each other.
- Carefully put the baking sheet with the charms inside the preheated oven.
- Set a timer for the recommended baking time. Depending on the type of clay, this can vary from 15 minutes to 45 minutes.
- While the charms are baking, make sure to monitor the oven temperature to ensure it stays consistent.
- Once the baking time is up, carefully remove the baking sheet from the oven using oven mitts or heat-resistant gloves.
- Allow the charms to cool completely before handling them. This will prevent any distortion or damage to the shape.
Always follow the instructions provided by the clay manufacturer regarding the baking temperature and time. Overbaking or underbaking the charms can result in them being too brittle or not fully hardened.
Remember to exercise caution while handling the baking sheet and hot charms. Allow them to cool on a heat-resistant surface or a cooling rack before moving or attaching them to your phone.
Now that your clay phone charms are baked and cooled, they are ready for the next step: adding the finishing touches.
Step 5: Adding Finishing Touches
Once your phone charms have been baked and cooled, it’s time to add the finishing touches to make them truly unique and eye-catching. Here are a few ideas to consider:
1. Painting: Use acrylic paints to add color to your phone charms. You can paint them completely or add designs and patterns for a more intricate look. Take your time and let the paint dry thoroughly before handling the charms.
2. Glitter and Rhinestones: Add a touch of sparkle to your phone charms by using glitter or rhinestone stickers. Simply apply the adhesive stickers to the surface of the charms and press lightly to ensure they stick securely.
3. Glossy Finish: Apply a clear gloss or glaze to your phone charms to give them a shiny and polished appearance. This not only enhances the overall look but also provides some protection to the charms.
4. Charm Attachments: Consider adding additional charms or trinkets to your phone charms for a layered effect. You can use jump rings or small chains to connect the charms together, creating a personalized and unique design.
5. Resin Coating: For a more professional-looking finish, you can apply a resin coating to your phone charms. This creates a glossy and durable surface that will make your charms stand out.
6. Personalization: If you’re making these phone charms as gifts, consider personalizing them with initials, names, or meaningful symbols. You can use small lettering stamps or even hand-paint the personalization for a personalized touch.
Remember, the finishing touches are where you can truly let your creativity shine. Experiment with different techniques and materials to achieve the desired look for your phone charms. Don’t be afraid to take risks and try new things!
Step 6: Attaching the Phone Charms
After you have created and baked your clay phone charms, it’s time to attach them to your phone! The process is simple and can be customized based on your personal preferences. Here’s a step-by-step guide on how to attach the phone charms:
1. Before attaching the phone charms, make sure that your phone case is clean and free from any dust or debris. This will ensure a secure and long-lasting attachment.
2. Determine the desired placement of the phone charm on your phone case. You can choose to attach it near the bottom, on the side, or even at the top, depending on your preference and phone model.
3. Once you have decided on the placement, apply a small amount of adhesive to the back of the phone charm. Be sure to use an adhesive that is suitable for the materials of both your phone charm and phone case.
4. Carefully press the phone charm onto the designated area of your phone case. Apply gentle pressure to ensure a strong bond between the charm and the case. Hold it in place for a few seconds to allow the adhesive to set.
5. If you are using a phone charm with a loop or jump ring, you can also attach it to your phone case using a small keychain or lanyard hook. Simply hook the charm onto the desired location on your phone case.
6. Once the phone charm is securely attached, give it a gentle tug to ensure that it is firmly in place. If it feels loose or wobbly, reapply adhesive and press it firmly again.
7. Allow the adhesive to dry completely before handling or using your phone. This will ensure that the phone charm stays in place and doesn’t detach during regular use.
By following these steps, you can easily attach your clay phone charms to your phone case and add a personalized touch to your device. Get creative and experiment with different charm designs and placements to make your phone truly unique!
Tips and Tricks
When creating clay phone charms, there are a few tips and tricks that can help you achieve the best results. Whether you’re a beginner or an experienced crafter, these tips will come in handy:
1. Choose the right type of clay: There are different types of clay available for crafting, such as polymer clay and air-dry clay. Consider the properties of each type and choose the one that suits your project the best.
2. Softening the clay: If your clay is too hard or difficult to work with, try kneading it in your hands or warming it up with a hairdryer. Softened clay is easier to shape and mold.
3. Use clean hands and tools: Before working with clay, make sure your hands and tools are clean. Any dirt or dust can leave unwanted marks on the charms.
4. Work in a clean and well-lit area: Having a clean workspace and good lighting will help you see the details clearly and prevent any accidental bumps or smudges.
5. Create a template: If you want to make multiple charms with the same design, create a template or stencil to ensure consistency in size and shape.
6. Experiment with different techniques: Clay crafting offers endless possibilities. Don’t be afraid to try different techniques such as marbling, texture stamping, or adding layers to create unique and personalized phone charms.
7. Add texture and details: Use various tools and objects to add texture and details to your clay charms. Toothpicks, paintbrushes, and small cutters can help you achieve intricate designs.
8. Smooth out any imperfections: If you notice any cracks or rough edges on the charms, gently smooth them out with your fingertips or a soft brush. This will give your charms a polished and professional look.
9. Baking temperature and time: Follow the instructions provided by the clay manufacturer regarding the baking temperature and time. This will ensure that the charms cure properly without any color changes or deformities.
10. Seal and protect the charms: After baking and cooling your clay charms, consider sealing them with a clear varnish or glaze. This will protect the surface and give your charms a glossy finish.
Remember, practice makes perfect. Don’t get discouraged if your first attempts aren’t perfect. With time and experience, you’ll master the art of making clay phone charms and create beautiful designs that reflect your style and personality.
Variations and Ideas
When it comes to making clay phone charms, the possibilities are endless. Here are some variations and ideas that you can explore to create unique and personalized accessories:
1. Custom Shapes: Instead of sticking to traditional shapes like hearts or stars, let your creativity shine by experimenting with custom shapes. You can create adorable animals, cute symbols, or even miniature food items.
2. Color Combinations: Play around with different color combinations to add a pop of vibrancy to your phone charms. Mix and match bright colors or opt for a monochromatic theme for an elegant look.
3. Glitter and Sparkle: Add some sparkle to your phone charms by incorporating glitter or shimmer powders. This will give your charms a touch of glamour and make them stand out.
4. Texture and Patterns: Explore different textures and patterns to add depth and interest to your charms. Use tools like toothpicks or small brushes to create patterns on the surface or experiment with different textures like ribbed or smooth.
5. Personalization: Make your phone charms even more unique by adding personal touches. You can use small letter stamps to add initials or names, or even include small trinkets or charms that hold sentimental value.
6. Theme-based Charms: Get creative with theme-based charms. For example, create charms that represent your favorite hobbies, sports, or even characters from your favorite movies or TV shows.
7. Mix Clay with Other Materials: Don’t limit yourself to just clay. Experiment with combining clay with other materials like beads, gemstones, or tiny rhinestones to create more intricate and eye-catching designs.
8. Multiple Charms: Instead of making just one charm, consider making multiple charms and stringing them together to create a cluster. This will make your phone charms look more elaborate and visually appealing.
9. Seasonal Charms: Create phone charms that celebrate different seasons or holidays. Make charms with colors and symbols that represent winter, spring, summer, or fall, or create charms specific to occasions like Halloween, Christmas, or Valentine’s Day.
10. Experiment with Techniques: Don’t be afraid to try different clay techniques, such as marbling, gradient effects, or creating texture with carving tools. This will add depth and visual interest to your phone charms.
Remember, the most important thing is to have fun and let your creativity flow. The beauty of making clay phone charms is that you can customize them according to your own style and preferences. So, don’t be afraid to think outside the box and create something truly unique!
Resources and Recommended Products
When it comes to making clay phone charms, having the right tools and materials can greatly enhance your crafting experience. Here are some resources and recommended products that can help you create beautiful and durable phone charms:
1. Polymer Clay: One of the most important materials for making clay phone charms is polymer clay. It is a versatile and easy-to-use material that comes in various colors and can be baked to create a durable finish. Some popular brands include Sculpey, Fimo, and Premo.
2. Clay Tools: Investing in a set of clay tools can make shaping and adding details to your charms much easier. Look for a set that includes tools like sculpting needles, blades, texture tools, and shaping tools. These tools will help you achieve precision and add intricate designs to your charms.
3. Rolling Pin: A rolling pin is essential for flattening the clay and creating an even surface. Opt for a small, lightweight rolling pin that is easy to handle and maneuver.
4. Oven or Toaster Oven: In order to bake your clay phone charms and make them firm and durable, you will need an oven or toaster oven. Make sure to follow the baking instructions provided by the manufacturer of the clay you are using.
5. Jewelry Findings: To attach the phone charms to your device, you will need jewelry findings such as jump rings, lobster clasps, or adhesive bails. These findings can be found at craft stores or online jewelry supply shops.
6. Glaze or Varathane: Adding a layer of glaze or varathane to your finished phone charms can give them a glossy and professional-looking finish. It also provides protection and helps to preserve the colors and details of the charms.
7. Beads and Charms: If you want to customize your phone charms further, consider adding beads or charms to complement your design. These can be easily attached using jump rings or adhesive bails.
8. Inspirational Books and Tutorials: To expand your skills and explore different techniques and designs, consider investing in some books or online tutorials on clay crafting. These resources can provide step-by-step instructions and inspiration for creating unique phone charms.
Remember, the quality of the materials and tools you use can greatly impact the outcome of your clay phone charms. Investing in high-quality products will not only make the process more enjoyable but also ensure that your charms are durable and long-lasting.
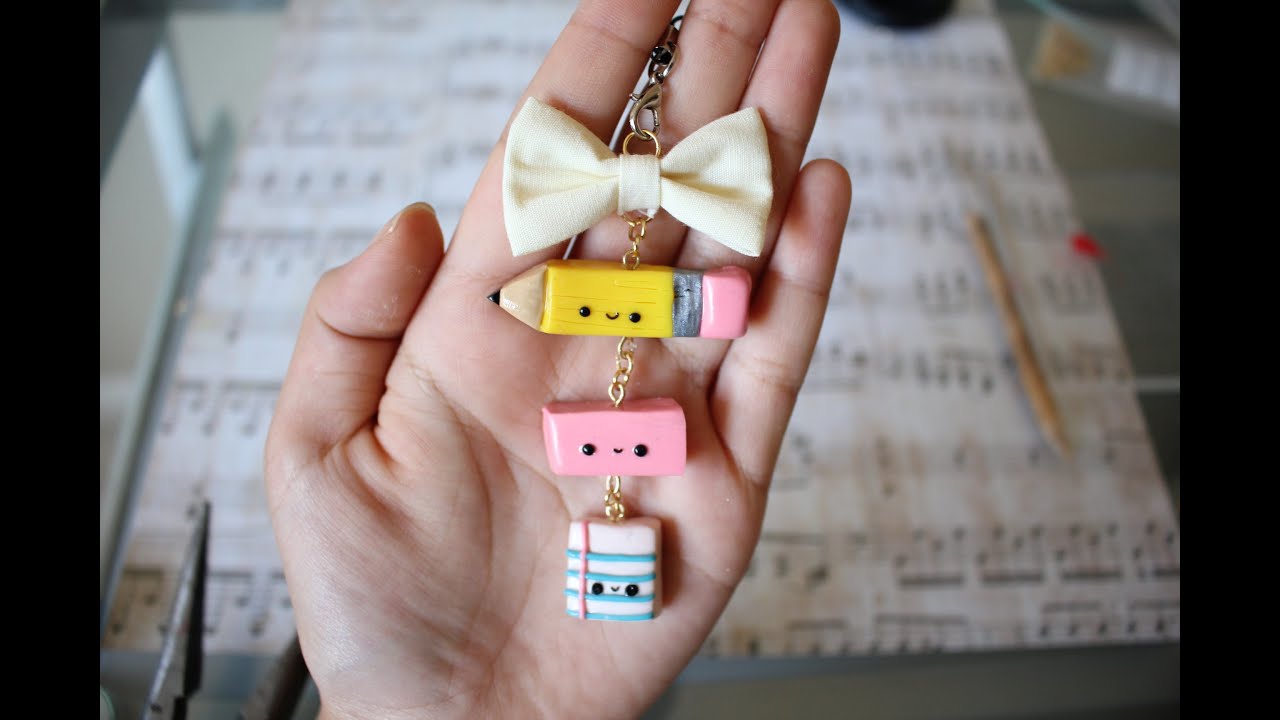
In conclusion, creating clay phone charms is a fun and creative way to personalize your mobile accessories. Whether you want to show off your unique style, express your interests, or simply add a touch of charm to your phone, clay phone charms offer endless possibilities. By following the steps outlined in this article, you can easily make beautiful and custom phone charms that reflect your personality.
Not only do clay phone charms add a personal touch to your device, but they also make excellent gifts for friends and loved ones. You can create custom designs that are tailored to suit their interests and tastes. By using different colors, shapes, and patterns, you can truly bring your creations to life.
So why not give it a try? Gather your materials, unleash your creativity, and start making your own clay phone charms today. It’s a fun and rewarding craft that allows you to showcase your individuality and make a statement with your mobile accessories.
FAQs
1. What are clay phone charms?
Clay phone charms are small decorative pieces made from clay that can be attached to your cell phone. These charms come in various shapes, sizes, and designs, adding a touch of personalization to your device.
2. How do I make clay phone charms?
To make clay phone charms, you will need polymer clay, shaping tools, a rolling pin, and a baking tray. Start by kneading the clay to make it soft and pliable. Then, shape the clay into your desired design using the tools. Once you are satisfied with the shape, bake the clay according to the manufacturer’s instructions. Let it cool, and then attach a loop or hook to the charm for easy attachment to your phone.
3. Can I customize my clay phone charms?
Absolutely! One of the great things about clay phone charms is that you can customize them to your heart’s desire. Use different colors of clay, experiment with various shapes, and add unique details to make your charm truly one-of-a-kind.
4. Are clay phone charms easy to make?
Making clay phone charms can be a fun and easy DIY project, especially with the availability of online tutorials and guides. While it might take a bit of practice to master shaping techniques, it is a craft that can be enjoyed by both beginners and experienced crafters.
5. How do I attach clay phone charms to my phone?
Depending on the design of your clay phone charm, there are different ways to attach them to your phone. You can use a adhesive strip, a charm loop, a phone case with a charm attachment, or even a small hook to hang the charm from your phone. Choose a method that suits your preference and ensures that the charm is securely attached.