
Are you struggling to remove the battery from your Fitbit One? Don’t worry, we’ve got you covered! The Fitbit One is a popular fitness tracker that helps you monitor your daily activity and sleep patterns. However, like any electronic device, the battery will eventually need to be replaced. Removing the battery from a Fitbit One may seem like a daunting task, but with the right guidance, it can be a simple and straightforward process. In this article, we’ll walk you through the steps to safely remove the battery from your Fitbit One, ensuring a seamless transition to a fresh, new battery. So, let’s get started and breathe new life into your fitness tracker!
Inside This Article
- Step 1: Gather necessary tools
- Step 2: Turn off and disconnect Fitbit One
- Step 3: Locate battery compartment
- Step 4: Remove battery from Fitbit One
- Step 5: Reassemble Fitbit One
- Conclusion
- FAQs
Step 1: Gather necessary tools
Before you begin the process of removing the battery from your Fitbit One, it’s important to make sure you have all the necessary tools at hand. Here are the tools you will need:
- Small screwdriver: You will need a small screwdriver to open the battery compartment of your Fitbit One. Make sure it is the right size to fit into the screws.
- Tweezers: Tweezers can be useful for handling small parts and components during the battery removal process.
- Soft cloth: Having a soft cloth nearby can help keep your Fitbit One clean and free from scratches.
It’s important to gather these tools in advance to ensure a smooth and efficient battery removal process. Now that you have all the necessary tools, you can proceed to the next step.
Step 2: Turn off and disconnect Fitbit One
In order to safely remove the battery from your Fitbit One, it is essential to first turn off and disconnect the device. This step will help prevent any potential damage to the internal components and ensure a smooth removal process.
To turn off your Fitbit One, simply press and hold the button located on the front of the device until you see a power icon displayed on the screen. Once the device is powered off, you can proceed with the disconnection process.
The next step is to disconnect your Fitbit One from any external devices it may be connected to, such as your smartphone or computer. This will prevent any data transfer or interference during the battery removal process.
If your Fitbit One is connected to a smartphone via Bluetooth, you can either turn off the Bluetooth feature on your phone or use the Fitbit app to disconnect the device. Simply open the app, go to the device settings, and select the option to disconnect. Alternatively, you can also disable the Bluetooth connection directly from your smartphone’s settings.
If your Fitbit One is connected to your computer, ensure that any synchronization processes have been completed and that the device is safely disconnected from your computer. This can be done by safely ejecting the device from your computer just as you would with any other USB device.
By following these simple steps to turn off and disconnect your Fitbit One, you can proceed with the battery removal process without any concerns of damaging the device or losing any important data.
Step 3: Locate battery compartment
Now that you have gathered the necessary tools and turned off your Fitbit One, it’s time to locate the battery compartment. The battery compartment is where the battery of the device is housed and can usually be found on the back of the Fitbit One.
To locate the battery compartment, flip your Fitbit One over so that you’re looking at the back of the device. Look for a small indentation or groove on the back panel. This is usually where the battery compartment is located.
Once you have identified the battery compartment, you may need to use a small tool like a screwdriver or a paper clip to open it. Some Fitbit One models have a small latch or a slot that you can push to open the battery compartment, while others may require you to unscrew a small screw.
If your Fitbit One has a latch or slot, simply push or slide it in the designated direction to open the compartment. If it has a screw, use the appropriate tool to carefully unscrew it. Make sure to keep the screw or latch safely aside so that it doesn’t get lost during the battery removal process.
Once you have successfully opened the battery compartment, you will be able to see the battery inside. Take a moment to familiarize yourself with the position and orientation of the battery. This will make it easier for you to remove it properly without causing any damage to the device.
It’s important to note that the battery compartment may vary slightly depending on the model of your Fitbit One. If you are unsure about the precise location of the battery compartment or how to open it, it is always a good idea to consult the user manual or reach out to Fitbit customer support for assistance.
Step 4: Remove battery from Fitbit One
Now that you have located the battery compartment, it’s time to remove the battery from your Fitbit One. Follow these steps carefully:
1. Use a small screwdriver or a SIM card removal tool to gently pry open the battery compartment cover. Be careful not to apply too much force, as you don’t want to damage any internal components.
2. Once the cover is removed, you will see the battery nestled inside. Take note of its orientation and how it is connected to the device. This will be important when inserting a new battery later on.
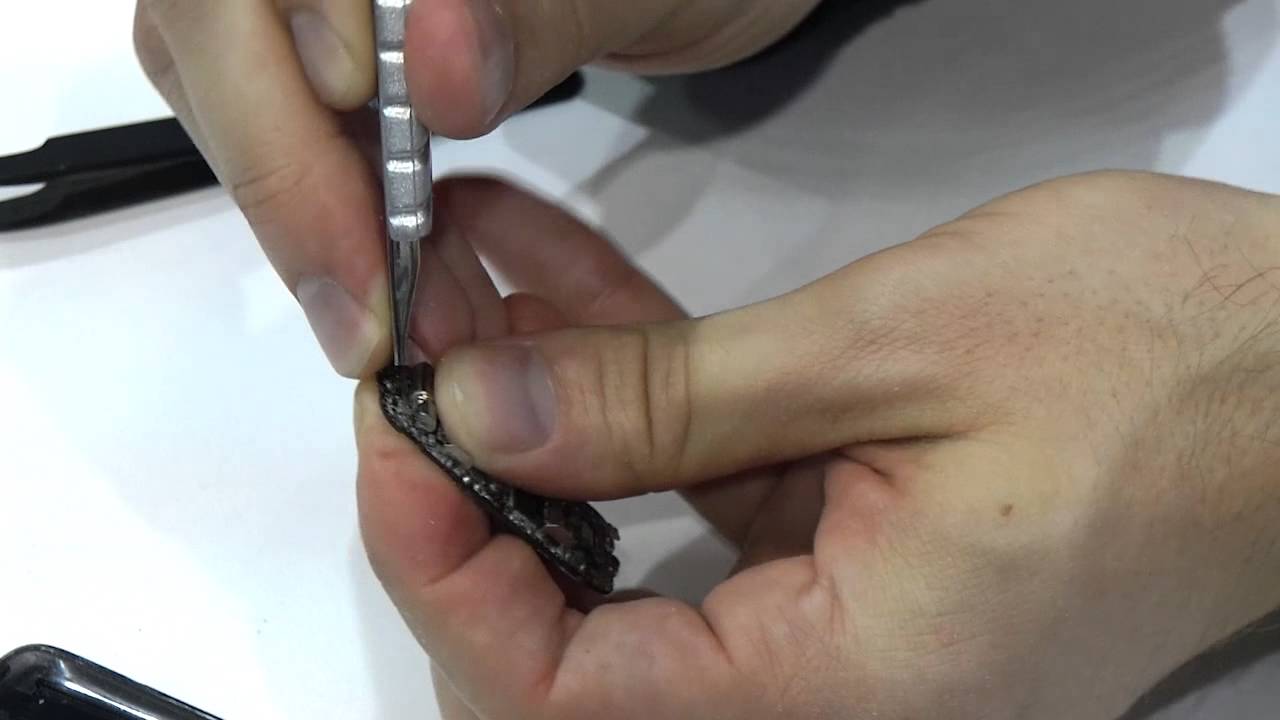
3. Using your fingers or a pair of tweezers, carefully lift the battery out of its slot. Be gentle to avoid bending or damaging the battery contacts or any other sensitive parts.
4. Inspect the battery for any signs of damage, such as leaks or corrosion. If you notice any issues, it’s best to replace the battery with a new one to ensure optimal performance.
5. If the battery is in good condition, you can either dispose of it following proper recycling guidelines or keep it as a spare in case you need it in the future.
That’s it! You have successfully removed the battery from your Fitbit One. Now you can proceed to reassembling the device and enjoying the benefits of a fresh battery.
Step 5: Reassemble Fitbit One
After successfully removing the battery from your Fitbit One, it’s time to reassemble the device. Follow these steps to ensure you put everything back together properly:
1. Carefully place the battery back into the battery compartment, aligning the positive and negative terminals correctly. Make sure the battery is securely in place and sits flat against the compartment.
2. Gently press the battery compartment cover back onto the device, ensuring that it snaps into place. Listen for a satisfying click to indicate that it is securely fastened.
3. Double-check that all components, including the battery, are properly aligned and fitting snugly. Inspect the device to ensure there are no loose or protruding parts.
4. Once you’re confident that everything is in place, turn the Fitbit One over and press the power button to turn it back on. You should see the familiar Fitbit logo appear on the screen.
5. Finally, reconnect your Fitbit One to the charging cable and allow it to charge for a few hours. This will ensure that the battery is fully powered and ready for use.
By following these steps, you can safely and effectively reassemble your Fitbit One after replacing the battery. Now, you can continue tracking your fitness goals and enjoying the convenience of your Fitbit device!
Conclusion
Removing the battery from your Fitbit One can be a simple and straightforward process when done correctly. By following the steps outlined in this guide, you can safely remove the battery without causing any damage or complications. Remember to exercise caution and take your time when performing any repairs or maintenance on your electronic devices.
Replacing the battery in your Fitbit One not only ensures that it continues to function properly but also extends its lifespan. With the right tools and a little patience, you can easily remove the old battery and install a new one to keep your Fitbit One running smoothly for years to come.
Now that you know how to remove the battery from your Fitbit One, you can confidently handle any battery replacement or troubleshooting tasks that may come your way. So go ahead, take control of your fitness journey, and keep your Fitbit One in peak condition!
FAQs
1. How do I remove the battery from my Fitbit One?
To remove the battery from your Fitbit One, follow these steps:
- Locate the battery compartment on the back of the device.
- Using your thumb or a small flat tool, gently push down and slide the battery door open.
- Take out the old battery from the compartment.
- Carefully insert a new battery with the positive (+) side facing up.
- Slide the battery door back into place until it clicks securely.
2. What type of battery does the Fitbit One use?
The Fitbit One uses a CR2032 coin cell battery. It is a common type of battery found in many small electronic devices. Make sure to replace the battery with the same type to ensure optimal performance.
3. How often do I need to change the battery in my Fitbit One?
The battery life of the Fitbit One can vary depending on usage, but on average, it lasts around 5 to 7 days. It is recommended to check the battery level regularly and replace it when the battery icon on the device’s screen indicates a low battery.
4. Can I use rechargeable batteries for my Fitbit One?
No, rechargeable batteries are not recommended for the Fitbit One. It is designed to be used with a standard CR2032 coin cell battery. Rechargeable batteries have a different voltage and may not provide the necessary power for the device to function properly.
5. What should I do if my Fitbit One does not turn on after replacing the battery?
If your Fitbit One does not turn on after replacing the battery, ensure that the battery is inserted correctly with the positive (+) side facing up. If the issue persists, try resetting your device by holding down the button on the front of the device for 10-15 seconds. If none of these steps work, contact Fitbit customer support for further assistance.