
Glow plugs play a crucial role in diesel engines, especially during cold weather. These small heating devices are responsible for igniting the fuel mixture in the cylinders to facilitate smooth engine startup. Over time, the glow plug connectors may become worn out or malfunction, leading to starting issues or even engine misfires.
If you are experiencing difficulties with your glow plug connector and need to replace it, you’ve come to the right place. In this comprehensive guide, we will walk you through the step-by-step process of removing a glow plug connector. Whether you are a seasoned DIY enthusiast or a beginner looking to save some money on car maintenance, this article will provide you with all the necessary information to get the job done right.
Inside This Article
- Tools and materials needed
- Step-by-step guide: Removing the engine cover, Disconnecting the electrical connection, Loosening the glow plug connector, Removing the glow plug connector
- Tips and Precautions
- Conclusion
- FAQs
Tools and materials needed
When it comes to removing a glow plug connector, having the right tools and materials is essential. Here are the items you will need to successfully complete the task:
- Socket wrench
- Glow plug removal tool
- Small flat-head screwdriver
- Anti-seize compound
- Shop rag or towel
- Safety goggles
- Gloves
Let’s take a closer look at each of these items and how they will aid you in the glow plug connector removal process.
First and foremost, a socket wrench is necessary for turning the fasteners that secure the engine cover in place. This tool will allow you to easily remove the engine cover and gain access to the glow plug connector.
Next, a glow plug removal tool is essential for loosening the connector from the glow plug itself. This specialized tool is designed to fit securely around the connector, allowing you to remove it without causing damage.
A small flat-head screwdriver may come in handy for disconnecting the electrical connection that attaches to the glow plug. Use this tool to carefully pry the connector away from the plug, ensuring a clean disconnection.
To prevent future issues, it is recommended to apply an anti-seize compound to the threads of the glow plug before reinstalling the connector. This will help prevent the plug from seizing or becoming difficult to remove in the future.
Having a shop rag or towel nearby is essential for wiping away any dirt or debris that may have accumulated around the glow plug connector. This will help ensure a clean and smooth removal process.
In terms of safety, it is always important to wear safety goggles when working on your vehicle. This will protect your eyes from any debris that may be accidentally dislodged during the removal process.
Lastly, wearing gloves is recommended to protect your hands from any sharp edges or potential exposure to harmful substances. This will ensure your safety and prevent any unnecessary injuries.
With these tools and materials at your disposal, you will be well-equipped to remove a glow plug connector with ease and precision. Remember to always exercise caution and follow the appropriate safety procedures when working on your vehicle.
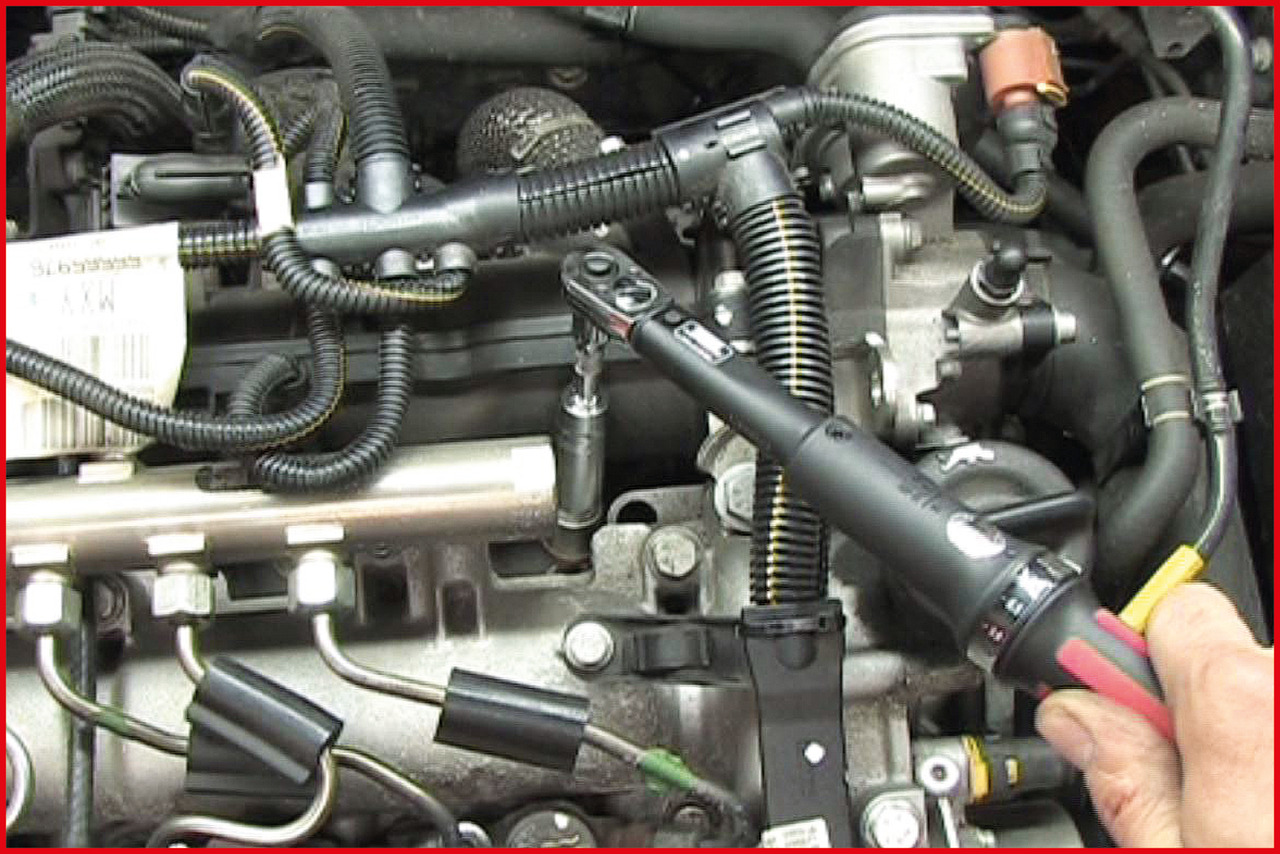
Step-by-step guide: Removing the engine cover, Disconnecting the electrical connection, Loosening the glow plug connector, Removing the glow plug connector
Removing the engine cover is the first step in accessing the glow plug connector. Here is a step-by-step guide to help you through the process:
- Step 1: Removing the engine cover
- Step 2: Disconnecting the electrical connection
- Step 3: Loosening the glow plug connector
- Step 4: Removing the glow plug connector
Start by locating the engine cover, which is usually located on top of the engine. Use a screwdriver or a socket wrench to remove the screws or bolts that secure the cover in place. Carefully lift the cover off the engine, making sure not to damage any other components.
Once the engine cover is removed, look for the glow plug connector. It is typically a small plastic or metal box with wires connected to it. To disconnect the electrical connection, locate the clip or latch that holds the connector in place and gently release it. You may need to use a small flathead screwdriver or your fingers to accomplish this. Once the clip or latch is released, carefully pull the connector apart from the glow plug.
With the electrical connection disconnected, the next step is to loosen the glow plug connector from the engine. Use a wrench or a socket set to loosen the nut that secures the connector to the glow plug. Keep in mind that glow plugs can be delicate, so be cautious not to apply too much force as you loosen the connector.
Once the nut is sufficiently loosened, carefully slide the glow plug connector off the glow plug. If the connector feels stuck, you may need to apply a small amount of lubricant to aid in the removal. Gently wiggle and pull the connector until it comes free from the glow plug.
By following these step-by-step instructions, you will be able to remove the glow plug connector safely and efficiently. Remember to take your time and be mindful of the delicate nature of glow plugs to avoid any damage.
Tips and Precautions
When removing the glow plug connector, it is important to take certain precautions to ensure a safe and successful process. Here are some tips to keep in mind:
1. Work on a cool engine: Before attempting to remove the glow plug connector, make sure the engine has cooled down completely. This will help prevent any accidental burns from hot engine parts.
2. Wear protective gear: It is always a good idea to wear protective gloves and safety glasses when working on your vehicle. This will protect your hands and eyes from any potential hazards or debris during the process.
3. Use the right tools: Ensure you have the necessary tools on hand before starting. This typically includes a socket wrench or a specialized glow plug removal tool. Using the correct tools will make the process easier and minimize the risk of damage to the glow plug or connector.
4. Disconnect the battery: Before working on any electrical components, including the glow plug connector, it is crucial to disconnect the vehicle’s battery. This will prevent any electrical shocks or short circuits from occurring.
5. Follow the manufacturer’s instructions: Different vehicles may have slightly different procedures for removing the glow plug connector. It is essential to refer to the manufacturer’s instructions or consult a reliable vehicle repair manual specific to your make and model for the correct procedure.
6. Take note of the wire placement: Before disconnecting the electrical connection, take a picture or make a note of how the wires are positioned. This will help ensure you reconnect them correctly later on.
7. Clean the area: Before reinstalling the glow plug connector, clean the surrounding area to remove any dirt or debris. This will help maintain a secure and proper connection.
8. Don’t force it: If you encounter resistance while loosening or removing the glow plug connector, do not force it. Applying excessive pressure can lead to damage. Instead, troubleshoot any issues, such as stuck or corroded connectors, before proceeding further.
9. Test the connection: After reinstalling the glow plug connector, it is a good idea to test the connection before closing everything up. This will ensure the glow plug is functioning correctly and will help avoid any potential starting issues.
10. Seek professional help if needed: If you are unsure about any step of the process or encounter difficulties during the removal of the glow plug connector, it is always wise to seek assistance from a professional mechanic or technician. They have the expertise and experience to handle the task safely and efficiently.
By following these tips and precautions, you can confidently remove the glow plug connector without compromising your safety or causing any damage to your vehicle.
After exploring the process of removing a glow plug connector, it is clear that it is a task that can be tackled with some basic knowledge and the right tools. By following the step-by-step guide and safety precautions, you can successfully remove the glow plug connector from your vehicle. Remember to take your time and be gentle to avoid causing any damage to the connector or other components.
Removing a glow plug connector may seem intimidating at first, but with practice and confidence, you can become proficient in this task. Whether you are performing routine maintenance or troubleshooting a glow plug issue, knowing how to remove the connector will come in handy. Remember to consult your vehicle’s manual and seek professional help if you encounter any difficulties or are unsure of the process.
By mastering the art of removing a glow plug connector, you can ensure that your vehicle’s glow plugs are properly maintained and functioning optimally. This will contribute to a smoother and more efficient performance of your diesel engine. So, don’t hesitate to get your hands dirty and give it a try!
FAQs
FAQ 1: What is a glow plug connector?
A glow plug connector is a crucial component of a diesel engine’s heating system. It connects the glow plug to the electrical system, allowing it to receive power and heat up. The heated glow plug helps ignite the diesel fuel during the starting process when the engine is cold. It plays a vital role in ensuring smooth and efficient engine startup.
FAQ 2: Why would I need to remove a glow plug connector?
There are various reasons why you might need to remove a glow plug connector. One common scenario is when the glow plug is faulty or needs replacement. In such cases, to access and remove the glow plug, you will need to disconnect the connector. Additionally, if you need to perform any maintenance or repairs related to the glow plug or surrounding components, removing the connector becomes necessary.
FAQ 3: How do I remove a glow plug connector?
To remove a glow plug connector, follow these steps:
- Make sure the engine is completely cooled down to avoid any risk of burns or injuries.
- Locate the glow plug connector, which is usually attached to the top of the glow plug.
- Gently pull back the rubber boot covering the connector to expose the connection point.
- Disconnect the connector by squeezing and pulling it away from the glow plug.
- Repeat the above steps for each glow plug connector that needs to be removed.
FAQ 4: Are there any tools required to remove a glow plug connector?
Typically, removing a glow plug connector does not require any specialized tools. However, having a pair of needle-nose pliers or a small flat-head screwdriver can be helpful in disconnecting the connector. These tools can assist in gently prying the connector away from the glow plug if it is stuck or difficult to release.
FAQ 5: Are there any safety precautions to keep in mind when removing a glow plug connector?
Yes, there are some safety precautions to consider when removing a glow plug connector:
- Ensure the engine is completely cool to avoid burns.
- Disconnect the vehicle’s battery to prevent any electrical mishaps.
- Handle the glow plug connector with care to avoid damaging it.
- Do not force or apply excessive pressure when disconnecting the connector.