
The USB connector is a crucial component in today’s digital world, allowing us to connect and transfer data between devices effortlessly. However, it’s not uncommon for the USB connector to break or become damaged over time due to wear and tear. Dealing with a broken USB connector can be frustrating, especially if it means being unable to charge your phone or transfer important files. But fear not! In this article, we’ll explore some effective methods to fix a broken USB connector. Whether it’s a loose connection, bent pins, or a completely snapped-off connector, we’ve got you covered. So, let’s dive in and discover how you can get your USB connector back in working order and reclaim the convenience of seamless connectivity.
Inside This Article
- Common Causes of Broken USB Connectors
- Tools and Materials Needed
- Step-by-Step Guide to Fix Broken USB Connector:
- Assessing the Damage
- – Removing the Broken Connector
- # – Preparing the Replacement Connector
- Soldering the Replacement Connector
- Tips for Preventing USB Connector Damage
- Conclusion
- FAQs
Common Causes of Broken USB Connectors
USB connectors are an integral part of our lives, allowing us to connect various devices and transfer data with ease. However, they are not immune to damage. Understanding the common causes of broken USB connectors can help us prevent such mishaps in the future. Here are some of the main culprits:
1. Cable Stress: One of the primary causes of broken USB connectors is excessive stress on the cable. This can happen when the cable is pulled at an angle, twisted, or bent too sharply. Over time, the constant strain weakens the connector, leading to eventual damage.
2. Accidental Physical Impact: Dropping or inadvertently hitting a device while the USB cable is plugged in can result in a broken connector. The impact can cause the connector to loosen, crack, or even break off completely.
3. Improper Handling: Rough handling of USB devices, such as yanking out the cable forcefully or not inserting it properly, can put unnecessary strain on the connector. This can lead to bending, misalignment, or damage to the internal pins.
4. Overloading the Port: USB ports have limits on the amount of power they can handle. Plugging in devices that draw excessive power, such as high-powered external hard drives or charging multiple devices simultaneously, can cause the connector to overheat and ultimately break.
5. Manufacturing Defects: While relatively rare, manufacturing defects can also contribute to broken USB connectors. Poor soldering, weak materials, or inadequate design can all lead to premature connector failure.
By understanding these common causes, we can take proactive steps to protect our USB connectors and prevent them from breaking. The next section will walk you through the necessary tools and materials needed for repairing a broken USB connector.
Tools and Materials Needed
When it comes to fixing a broken USB connector, having the right tools and materials is essential. Here are the items you will need for this task:
- Screwdriver or pry tool: You will need a small screwdriver or a pry tool to open the device or casing that houses the USB connector.
- Soldering iron: A soldering iron is a crucial tool for repairing the broken connector. It is used to melt solder and attach the replacement connector.
- Solder wire: You will need solder wire to create a strong and secure connection between the replacement connector and the circuit board.
- Replacement USB connector: It is important to have a replacement USB connector that matches the type and size of the broken one. There are various types of connectors, such as USB-A, USB-C, and micro-USB, so make sure you have the correct one.
- Desoldering wick or pump: If the broken USB connector is still soldered to the circuit board, you may need a desoldering wick or desoldering pump to remove the old solder and disconnect the broken connector.
- Heat shrink tubing: Heat shrink tubing is used to insulate and protect the soldered connections. It is recommended to use heat shrink tubing of the appropriate size for a clean and secure finish.
- Wire cutters/strippers: These tools are handy for cutting and stripping the wires if necessary during the replacement process.
- Flux: Flux is a substance used to improve soldering efficiency and create a better bond between the wires and replacement connector. It helps to prevent oxidation and ensures a strong connection.
- Alcohol wipes or isopropyl alcohol: These are useful for cleaning the circuit board and removing any residue or contamination that could affect the soldering process.
Having these tools and materials readily available will make the process of fixing a broken USB connector much smoother and more efficient. Before you begin, ensure you have all the necessary items to avoid delays or difficulties during the repair process.
Step-by-Step Guide to Fix Broken USB Connector:
If you find yourself with a broken USB connector, don’t panic! With a few simple steps and some basic tools, you can easily fix it yourself. Follow this step-by-step guide to get your USB connector up and running again in no time.
Step 1: Assessing the Damage
The first thing you need to do is assess the extent of the damage to your USB connector. Look for any visible signs of physical damage, such as a loose or detached connector, bent pins, or any melted plastic. This will help you determine the best course of action.
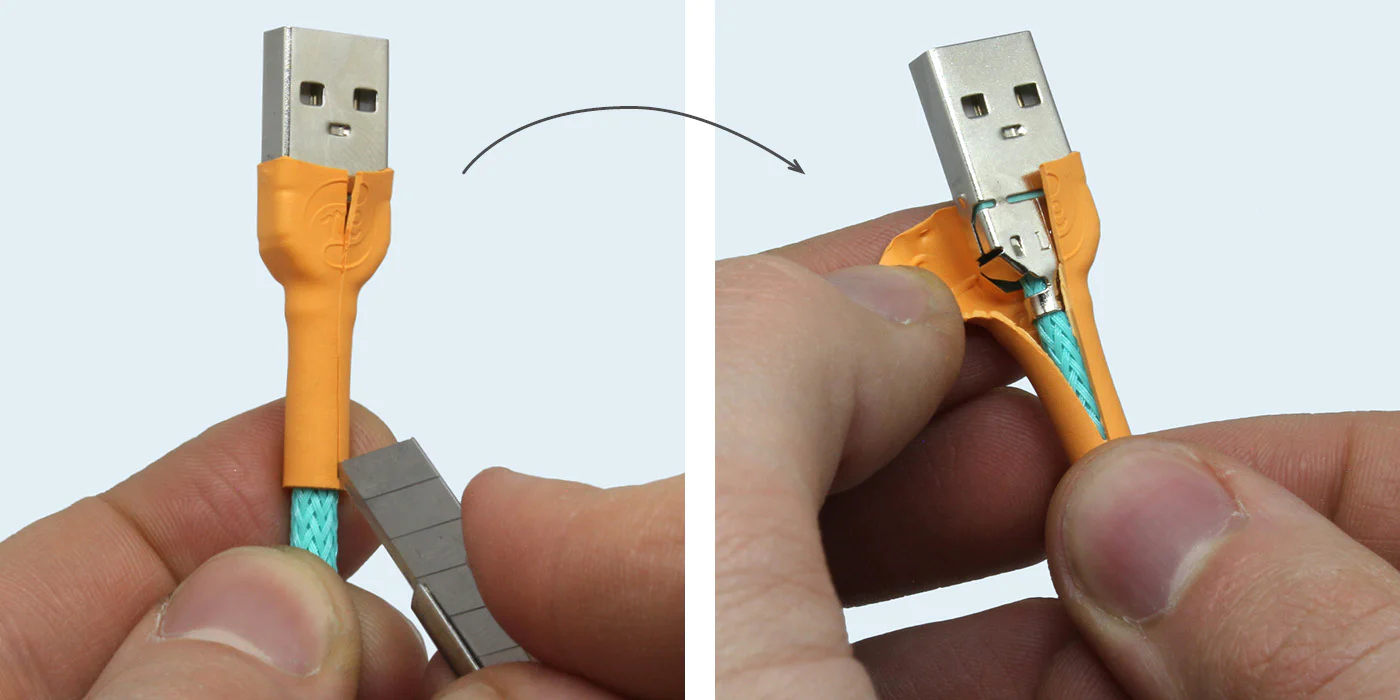
Step 2: Removing the Broken Connector
Next, you’ll need to remove the broken connector from your device. Use a small screwdriver or a pair of tweezers to gently pry it loose. Be careful not to apply too much force, as you could risk damaging the PCB (Printed Circuit Board).
Step 3: Preparing the Replacement Connector
Once the broken connector is removed, it’s time to prepare the replacement connector. Make sure you have a compatible replacement connector that matches the type and size of the broken one. Clean the area around the connector on the PCB to ensure a good connection.
Step 4: Soldering the Replacement Connector
Now comes the soldering part. Apply a small amount of flux to the pins of the replacement connector and carefully position it on the PCB. Use a soldering iron to heat up the pins and apply solder to create a strong, secure bond. Be careful not to overheat the PCB, as it can cause damage.
Step 5: Testing the Connection
Once you have soldered the replacement connector, it’s time to test the connection. Plug in a USB cable and check if the device detects it correctly. Wiggle the cable gently to ensure that the connection is stable. If everything works fine, congratulations! You have successfully fixed the broken USB connector.
It’s important to note that if you don’t have the necessary tools or experience in soldering, it’s best to seek professional help. Attempting to fix a broken USB connector without the proper knowledge can result in further damage to your device.
Remember, prevention is always better than cure. To avoid future damage to your USB connector, make sure to handle it with care. Avoid excessive force when plugging and unplugging USB cables, and store your devices in a safe and secure manner.
By following these simple steps, you can save yourself time and money by fixing a broken USB connector on your own. So, don’t let a broken USB connector stop you from enjoying the convenience of your devices. Get your tools ready and get ready to restore that connection!
Assessing the Damage
When it comes to fixing a broken USB connector, the first step is to assess the extent of the damage. This will help you determine the best course of action for repairing or replacing the connector. Here are some steps to follow when assessing the damage:
1. Visual Inspection: Take a close look at the USB connector and check for any physical damage. Look for any bent, broken, or missing pins. Also, check if the connector is loose or wobbly. This will give you a good idea of the overall condition of the connector.
2. Functionality Test: Connect a USB device to the port and check if it is recognized or if there are any connection issues. If the device is not detected or the connection is unstable, it could be a sign of a faulty connector.
3. Wiggle Test: Gently wiggle the USB cable while it is connected to the port. If there are any intermittent connection issues or if the device disconnects when the cable is moved, it indicates a potential problem with the connector.
4. Continuity Check: Using a multimeter, you can perform a continuity check to determine if there is a break in the wiring within the connector. This will help identify any internal damage that may not be visible to the naked eye.
By carefully assessing the damage, you will be able to gain a clear understanding of the problem and take appropriate measures to fix the broken USB connector.
– Removing the Broken Connector
Once you have assessed the damage to your USB connector, it’s time to remove the broken connector. Follow these steps carefully to ensure a successful removal:
1. Disconnect any devices or cables connected to the USB port to avoid interference during the removal process.
2. Gently insert a thin, flat object such as a small screwdriver or a plastic pry tool between the USB connector and the device’s port. Apply gentle pressure and wiggle the tool back and forth to loosen the broken connector.
3. Slowly and carefully pull the broken connector out of the port. Be careful not to apply excessive force as it may cause further damage to the port or the device.
4. If the broken connector proves difficult to remove, you can try using tweezers or needle-nose pliers to grip and extract it. Again, exercise caution to avoid any additional damage.
5. Once the broken connector is successfully removed, examine the port and surrounding area for any debris or loose fragments. Use compressed air or a small brush to clean out any dirt or particles.
It’s essential to be mindful and gentle when removing the broken connector, as any excessive force or rough handling may worsen the situation. If you encounter any difficulties or if the connector is stuck, it’s advisable to seek professional assistance to prevent causing further damage.
# – Preparing the Replacement Connector
Now that you have successfully removed the broken USB connector, it’s time to prepare the replacement connector. This step is crucial to ensure a secure and durable connection for your device.
Before proceeding, make sure you have the necessary tools and materials handy. You will need a new USB connector that matches the specifications of your device, a soldering iron, soldering wire, flux, and a helping hand tool or a clamp to hold the connector in place during soldering.
Start by carefully examining the replacement connector. Check for any loose or damaged pins and ensure they are aligned properly. If necessary, gently straighten them using a pair of small pliers. This will ensure that the new connector fits perfectly into your device’s port.
Next, apply a small amount of flux to the pins of the replacement connector. Flux helps in deoxidizing the metal surfaces and promotes better solder adhesion. Use a brush or a toothpick to apply the flux evenly. Be careful not to apply too much, as excessive flux can create a messy soldering joint.
Once the flux is applied, you are ready to solder the replacement connector onto your device. Position the replacement connector over the empty USB port and place the helping hand tool or a clamp to hold it securely in place.
Double-check the alignment of the pins with the corresponding holes in the USB port. This is essential to ensure a proper connection. Once you are satisfied with the alignment, heat up your soldering iron to the appropriate temperature.
With the soldering iron heated, touch the tip to the joint where the pin of the replacement connector meets the corresponding pad on the circuit board. Apply a small amount of solder wire to the joint while maintaining contact with the iron tip. The heat from the soldering iron will melt the solder and create a strong electrical connection.
Repeat this process for each pin of the replacement connector, ensuring that the solder joints are neat and secure. Take your time and work carefully, as precision is vital when soldering delicate components like USB connectors.
After soldering all the pins, allow the solder to cool and solidify. Once the solder joints have hardened, gently remove the helping hand tool or clamp. Inspect the solder joints for any excess solder or bridging between pins, and use a desoldering wick or a solder sucker to clean up any imperfections.
Now that you have prepared and soldered the replacement connector, you can proceed to the final step of reassembling your device. Refer to the manufacturer’s instructions or seek professional help if you’re unsure about the reassembly process.
Soldering the Replacement Connector
Now that you have removed the broken USB connector and prepared the replacement, it’s time to solder the new connector into place. Soldering is the process of joining two metal parts together using heated metal alloy, called solder. It creates a strong and durable connection.
Before you begin soldering, make sure you have all the necessary tools and materials ready. These include a soldering iron, solder wire, flux, and heat shrink tubing. Having a clean and well-ventilated workspace is also important for safety.
Start by heating up your soldering iron. Place a small amount of solder on the tip to help with heat transfer and ensure good conductivity. Once the iron is hot, carefully touch it to the wire or pad where the broken connector was attached. This will help heat up the area and prepare it for the new connector.
Next, take the replacement connector and position it correctly on the board. Make sure the pins align with the corresponding pads or holes. Apply a thin layer of flux to the area, as this will help the solder flow more smoothly and create a stronger connection.
With the replacement connector in place, take a small amount of solder wire and touch it to the heated pad or wire. Allow the solder to melt and flow onto the pad, ensuring it makes a solid connection with the connector’s pin. Repeat this process for each pin, being careful to not apply too much solder or create any bridging between adjacent pads.
Once all the pins have been soldered, visually inspect the solder joints to ensure they are clean, smooth, and free of any defects. This is important for the long-term functionality of the connector. If necessary, use a desoldering pump or wick to remove any excess solder or fix any mistakes.
After the soldering is complete, it’s a good idea to reinforce the connection and provide additional protection by using heat shrink tubing. Cut a suitable length of tubing and slide it over the soldered area, making sure it covers both the pins and the wire. Apply heat using a heat gun or lighter to shrink the tubing and create a tight seal.
Finally, give the newly soldered connector a gentle tug to ensure it is securely attached to the board. If it feels loose or comes off, you may need to resolder it. Once you are satisfied with the connection, you can reassemble your device and test the functionality of the USB port with a cable or device.
Remember, soldering requires precision and care. If you are not confident in your soldering skills, it’s always recommended to seek professional help or practice on scrap materials before attempting to solder a replacement connector on your valuable device.
Tips for Preventing USB Connector Damage
USB connectors are a vital component of our daily lives, allowing us to connect our devices and transfer data effortlessly. However, they are also prone to damage if not handled with care. To help you prevent USB connector damage and extend the lifespan of your devices, here are some useful tips to keep in mind:
- Handle with Care: When inserting or removing USB connectors, always do so gently and avoid applying excessive force. Yanking or twisting the connector can damage both the connector and the port it is plugged into. Take the time to align the connectors properly and insert them straight to reduce strain on the connector.
- Protect from Dust and Dirt: Dust and dirt can accumulate on the USB connectors over time, affecting their performance. To prevent this, cover unused USB ports with protective caps or use dust covers to keep them clean. Regularly cleaning the connectors with a soft cloth or compressed air can also help maintain their functionality.
- Avoid Overloading: USB connectors may be tempting to use as a hub for multiple devices, but overloading them can strain the connectors and cause damage. Check the specifications of your device and use the appropriate USB ports for each device. If you need to connect multiple devices, consider using a powered USB hub.
- Proper Cable Management: Improper cable management can put unnecessary strain on USB connectors, leading to damage over time. Avoid bending or twisting the cables excessively, and do not strain them by pulling or tugging. Use cable organizers and keep cables neatly organized to minimize stress on the connectors.
- Avoid Excessive Heat: USB connectors can be sensitive to heat, so it’s essential to keep them away from heat sources like direct sunlight, radiators, or other high-temperature areas. Excessive heat can cause the connectors to warp or melt, leading to permanent damage. Store and use your devices in temperature-controlled environments.
- Unplug Safely: When disconnecting USB cables, always unplug them directly from the connector, rather than pulling on the cable itself. Pulling on the cable can damage the internal wires and weaken the connector’s connection. Take a moment to safely eject USB drives using the computer’s operating system before unplugging them.
- Use Quality Cables: Investing in high-quality USB cables can significantly reduce the risk of connector damage. Cheap, poorly made cables may have weaker connectors that are more prone to breaking or bending. Choose cables from reputable manufacturers and ensure they are certified for the USB version your device supports.
By following these tips, you can protect your USB connectors from damage and ensure they continue to function properly. Taking a few extra precautions and being mindful of how you handle and use your devices can go a long way in extending their lifespan. Remember, prevention is always better than having to deal with a broken or damaged USB connector.
In conclusion, a broken USB connector can be a frustrating issue to deal with, but it is certainly not the end of the world. With the right knowledge and tools, you can easily fix the problem yourself and restore functionality to your device. Remember to take your time and be gentle when working on the connector to avoid causing further damage. Additionally, investing in high-quality cables and connectors can help prevent future issues. Whether you choose to repair the connector using a DIY approach or seek professional help, the most important thing is to address the problem promptly to avoid any inconvenience. By following the steps outlined in this article, you’ll be able to fix your broken USB connector and continue enjoying the convenience it brings to your digital life.
FAQs
1. How can I fix a broken USB connector?
If you have a broken USB connector, here are the steps you can follow to fix it:
- First, make sure to disconnect any device connected to the USB port.
- Inspect the broken connector for any visible damage or loose parts.
- If there are any loose parts, carefully reattach them to their proper positions.
- If the connector is damaged beyond repair, you may need to replace it. You can purchase a new USB connector and solder it onto the circuit board.
- If you are not comfortable with soldering, it is best to consult a professional technician or bring your device to a repair shop.
2. Can I use a broken USB connector?
Using a broken USB connector is not recommended. It can lead to poor or unstable connections, which can affect the performance and functionality of your device. It can also cause damage to the USB port or the device you are connecting.
If you need to continue using the USB port, consider replacing the broken connector or using an adapter that allows you to connect devices without relying on the broken connector.
3. How much does it cost to fix a broken USB connector?
The cost of fixing a broken USB connector can vary depending on various factors such as the type of device, the extent of the damage, and the expertise of the technician. In general, repairing a broken USB connector can range from a few dollars to around $50 or more.
If you are not comfortable with DIY repairs, it is advisable to consult a professional technician to get an accurate assessment of the repair cost.
4. Can I fix a broken USB connector myself?
Fixing a broken USB connector yourself is possible if you have the necessary knowledge, skills, and tools. However, it is important to note that attempting the repair without proper experience may lead to further damage or even render your device unusable.
If you are confident in your abilities, you can find online resources, tutorials, and replacement parts to guide you through the repair process. Alternatively, it is advisable to seek the assistance of a professional technician or take your device to a reputable repair shop.
5. How can I prevent USB connectors from breaking?
To prevent USB connectors from breaking, here are some tips:
- Handle the USB connector and cable with care, avoiding excessive twisting, pulling, or bending.
- Avoid forcefully inserting or removing USB devices from the port.
- Use a high-quality USB cable that is designed to withstand regular use.
- Consider using a USB extension cable or adapter to reduce strain on the USB port.
- If you often connect and disconnect USB devices, consider investing in a docking station or hub to minimize wear and tear on the port.
By following these preventive measures, you can prolong the lifespan of your USB connectors and minimize the risk of them breaking.