
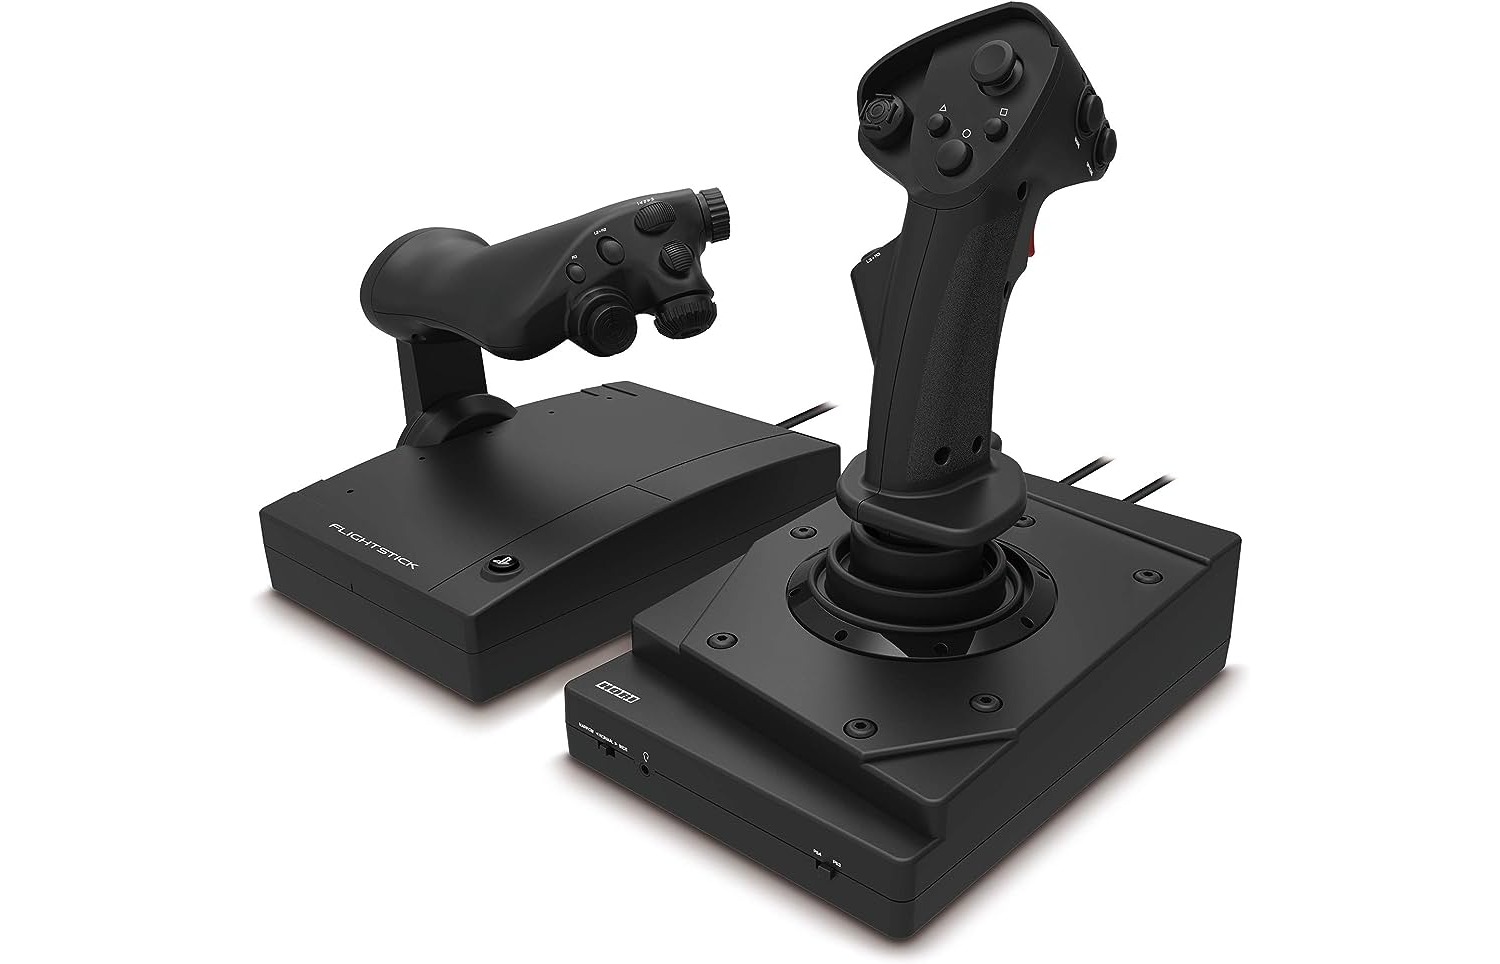
Are you ready to take your gaming experience to new heights with Hawken? If so, one essential accessory you’ll need is a flight joystick. A flight joystick adds a whole new level of immersion and control to your gaming sessions, allowing you to pilot your mech with precision and ease. But setting up a flight joystick in Hawken may seem daunting at first. That’s where we come in. In this article, we’ll provide you with a step-by-step guide on how to set up a flight joystick on Hawken. Whether you’re a seasoned pilot or just getting started, we’ve got you covered. So let’s dive in and get ready to dominate the battlefield!
Inside This Article
- How to Set Up Flight Joystick on Hawken
- Connecting the Joystick to Your PC
- Calibrating the Joystick
- Mapping Joystick Buttons to Game Controls
- Adjusting Joystick Sensitivity and Deadzone
- Troubleshooting Common Joystick Issues
- Conclusion
- FAQs
How to Set Up Flight Joystick on Hawken
Are you ready to take your Hawken gaming experience to the next level? Adding a flight joystick to your setup can bring a whole new dimension to your gameplay. With precise controls and immersive feedback, you’ll feel like you’re piloting your very own mech. In this guide, we’ll walk you through the process of setting up a flight joystick for Hawken. So, let’s dive in and get your joystick up and running!
The first step is to connect your flight joystick to your PC. Start by plugging the USB cable of the joystick into an available USB port on your computer. Make sure to use a USB 2.0 port for optimal performance. Once connected, your computer should automatically recognize the joystick and install any necessary drivers. If prompted, follow the on-screen instructions to complete the driver installation process.
Now that your flight joystick is connected, it’s time to calibrate it. Calibration ensures that your joystick’s axes and buttons are correctly mapped and aligned. To calibrate your joystick, open the Hawken game and navigate to the settings or options menu. Look for the input or controller settings section, where you’ll find the option to calibrate your joystick.
Follow the on-screen instructions to go through the calibration process. Typically, you’ll be asked to move the joystick’s axes in all directions and press each button to register them. Make sure to perform the calibration process accurately to ensure precise control over your mech in Hawken.
Next, you’ll need to map the joystick buttons to the corresponding in-game controls. This step allows you to customize the button assignments according to your preferences. Again, navigate to the settings or options menu in the game and look for the input or controller settings section. Here, you can remap the joystick buttons to perform specific actions in Hawken.
Take your time to experiment and find the button assignments that feel most comfortable for you. You may want to assign functions like firing weapons, activating abilities, or adjusting throttle to different joystick buttons. Customize the button mapping to suit your playstyle and optimize your Hawken performance.
Once you’ve mapped the joystick buttons, it’s essential to fine-tune the sensitivity and deadzone settings. Sensitivity determines how responsive your joystick is to your movements, while the deadzone determines the neutral position where no input is registered. Adjusting these settings can greatly improve your control over your mech.
In the settings or options menu, look for sensitivity and deadzone settings specifically for joystick input. Start by setting the deadzone to a value where your joystick remains still without any input. Then, gradually increase the sensitivity to achieve a balance between responsiveness and stability. Test your settings in-game and make additional adjustments if needed until you find your ideal setup.
If you encounter any issues with your flight joystick while setting it up for Hawken, don’t panic. Troubleshooting common joystick issues can help you overcome any obstacles. Check your joystick’s manufacturer website for any firmware or driver updates, as new versions can often resolve compatibility problems.
Additionally, ensure that your joystick’s USB cable is securely connected and not damaged. Try using a different USB port on your computer, as the current port may be experiencing issues. If all else fails, reach out to the game’s support team or the joystick manufacturer’s customer support for further assistance.
Now that you’ve followed the steps outlined in this guide, your flight joystick should be set up and ready to go in Hawken. Take some time to familiarize yourself with the controls and enjoy the immersive experience of piloting your mech with a joystick. Get ready to dominate the battlefield and show off your enhanced skills in Hawken!
Connecting the Joystick to Your PC
Setting up your flight joystick for playing Hawken is a crucial step to ensure a seamless gaming experience. Here’s a step-by-step guide on how to connect your joystick to your PC:
1. Check the compatibility: Before you begin, make sure your flight joystick is compatible with your PC. Check the manufacturer’s website or the product manual for compatibility information.
2. USB connection: Most flight joysticks connect to your PC via a USB cable. Plug one end of the USB cable into the joystick and the other end into an available USB port on your PC. Ensure that the cable is securely connected.
3. Software installation: Some flight joysticks require specific drivers or software to work correctly. Check the manufacturer’s website for any software downloads or installation instructions. Follow the provided steps to install the necessary software onto your PC.
4. Device recognition: Once the joystick is connected and any required software is installed, your PC should automatically recognize the device. You may see a notification or hear a sound indicating that a new device has been connected.
5. Verify joystick status: To confirm that your PC has detected the joystick, you can check the Device Manager. Right-click on the Windows Start button, select “Device Manager,” and expand the “Human Interface Devices” or “Game Controllers” category. Look for your joystick in the list of devices.
6. Test the joystick: After connecting the joystick, it’s a good idea to test it to ensure it’s functioning correctly. Open the control panel for your flight joystick software and perform any calibration or test function available. You can also test the joystick within Hawken’s game settings.
By following these steps, you can successfully connect your flight joystick to your PC for playing Hawken. Now you can delve into the immersive world of aerial combat and dominate the skies with precision controls.
Calibrating the Joystick
Calibrating your joystick is an important step to ensure optimal performance during gameplay. It allows the game to accurately interpret your joystick inputs and provide a smooth and responsive gaming experience. Here’s how you can calibrate your joystick:
1. Connect your joystick to your computer using the provided USB cable or wireless connection. Make sure the joystick is properly detected and recognized by your computer before proceeding.
2. Open the settings or control panel on your computer. The exact location may vary depending on your operating system and joystick model. Look for a section related to game controllers or devices.
3. Locate your joystick in the list of connected devices and select it. You may need to click on a specific tab or button to access the calibration settings for your joystick.
4. Follow the on-screen instructions provided by the calibration wizard. This typically involves moving your joystick’s axes and pressing its buttons as directed. The wizard will guide you through the process of calibrating each component of the joystick.
5. Pay attention to the displayed values and make sure they correspond to your physical joystick movements. If you notice any inconsistencies or inaccuracies, you may need to recalibrate or adjust the joystick settings accordingly.
6. Once the calibration process is complete, test your joystick in a game or a simulator to verify that it is functioning correctly. Ensure that the game is properly recognizing your joystick inputs and that the movements are smooth and responsive.
7. If you encounter any issues or difficulties during the calibration process, consult the documentation or support resources provided by the joystick manufacturer. They may have specific troubleshooting steps or software updates that can help resolve any problems.
Calibrating your joystick ensures that your movements and inputs are accurately translated within the game, allowing for a more immersive and enjoyable gaming experience. Take the time to calibrate your joystick properly, and you’ll be ready to take control of the skies in your favorite flight simulators or games like Hawken.
Mapping Joystick Buttons to Game Controls
Mapping the buttons on your flight joystick to the game controls in Hawken is a crucial step in optimizing your gaming experience. By assigning specific functions to each button, you can easily maneuver your aircraft, activate weapons, and execute various in-game actions. Here’s how you can map the joystick buttons to game controls:
1. Launch Hawken and navigate to the settings menu. Look for the “Controls” or “Keybindings” option.
2. In the controls menu, you should find a section specifically for joystick settings. Select that option to access the joystick configuration panel.
3. Start by identifying the buttons on your flight joystick. Most modern joysticks have a variety of buttons, including triggers, thumb buttons, and hat switches.
4. To assign a function to a button, simply click on the corresponding field or button label in the configuration panel.
5. A dropdown menu or a prompt will appear, allowing you to select the desired action or control from a list of available options. For example, you can assign the trigger button to fire weapons or the thumb button to activate boosters.
6. Repeat this process for each button you wish to customize, ensuring that every important function is assigned to a convenient button on your joystick.
7. If your joystick has additional features like a throttle or a twist axis for rudder control, make sure to configure them as well by selecting the appropriate fields in the configuration panel.
8. Once you have finished mapping the buttons to your desired game controls, save your settings. This will ensure that your configurations are applied each time you launch Hawken.
That’s it! You have successfully mapped your flight joystick buttons to the game controls in Hawken. Take some time to familiarize yourself with the newly configured buttons, and make any adjustments as needed to optimize your gameplay.
Remember, mapping the buttons to your personal preference can greatly improve your efficiency and enjoyment while playing Hawken. Experiment with different configurations until you find the setup that works best for you. Happy gaming!
Adjusting Joystick Sensitivity and Deadzone
When using a flight joystick with Hawken, it’s crucial to ensure that the sensitivity and deadzone settings are properly adjusted. These settings can significantly impact your gaming experience, as they affect how the joystick responds to your input.
To start, you’ll need to access the game’s control options. Navigate to the settings menu and locate the joystick settings section. Here, you’ll find options to adjust the sensitivity and deadzone.
The sensitivity setting determines how quickly the joystick responds to your input. If you prefer a more sensitive joystick, increasing the sensitivity will result in a faster and more responsive control. On the other hand, if you prefer smoother and more precise movements, you can lower the sensitivity.
It’s essential to find the right balance that suits your playing style. Experiment with different sensitivity levels to see which one feels the most comfortable for you. Keep in mind that it may take some time to get used to a new sensitivity setting, so be patient and give yourself time to adapt.
The deadzone setting, on the other hand, refers to a small area in the center of the joystick where no input is registered. This is to account for the slight natural movement or “play” in the joystick. Adjusting the deadzone allows you to eliminate any unintended drift or unwanted movement when the joystick is in its neutral position.
If you notice that your joystick is not responding accurately or if there’s any slight movement even when you’re not touching it, you may need to decrease the deadzone. On the other hand, if you find that the joystick is too sensitive and registering movement even when you’re not touching it, increasing the deadzone may help resolve this issue.
Similar to sensitivity, finding the right deadzone setting is a matter of personal preference. Start with a small deadzone and gradually increase it until the unwanted movement or drift is eliminated. Be mindful not to set the deadzone too high as it may hinder your ability to make precise movements.
Remember, the goal is to find the optimal sensitivity and deadzone settings that offer you the best control and responsiveness. Take the time to experiment and fine-tune these settings until you achieve a comfortable and accurate flight experience in Hawken.
Troubleshooting Common Joystick Issues
Using a flight joystick for gaming can greatly enhance your experience, but like any technology, it can sometimes have its hiccups. If you’re facing issues with your joystick while playing Hawken or any other game, don’t worry! In this section, we’ll guide you through some common joystick problems and their solutions.
1. Joystick Not Recognized: If your joystick is not being recognized by your computer, make sure it’s properly connected. Double-check the USB port to ensure it’s fully inserted. If the problem persists, try connecting the joystick to a different USB port or even a different computer to see if it’s recognized there. If it still doesn’t work, the joystick might be faulty and require replacement.
2. Calibration Issues: Calibration is crucial to ensure optimal performance of your joystick. If you’re experiencing calibration issues, go to your PC’s control panel and search for “Joystick” or “Game Controllers.” There, you should find an option to calibrate your joystick. Follow the on-screen instructions to calibrate it properly. If the issue persists, try using a different calibration tool or contact the manufacturer for further assistance.
3. Buttons Not Functioning: If some of the buttons on your joystick are not working, it’s possible that they’re not correctly mapped to the game controls. Launch Hawken and head to the game’s settings or control configuration menu. Look for the option to customize joystick controls and ensure that the buttons on your joystick are assigned to the desired functions. If the problem continues, try running the game as an administrator or reinstalling the joystick drivers.
4. Joystick Sensitivity or Deadzone: If you’re experiencing issues with joystick sensitivity or the deadzone (the region in which the joystick doesn’t register any input), you can usually adjust these settings within the game’s control options. Increase the sensitivity if the joystick feels unresponsive or decrease it if it’s too sensitive. Similarly, adjust the deadzone to eliminate any unwanted movement when the joystick is at rest. Experiment with different settings until you find the right balance for your gameplay.
5. Compatibility Issues: Some flight joysticks may have compatibility issues with certain games or operating systems. Check the game’s system requirements to ensure your joystick is supported. Additionally, visit the manufacturer’s website or support forums to look for any drivers or updates that might improve compatibility. If all else fails, consider reaching out to the game’s support team or the joystick manufacturer for additional assistance.
6. Physical Damage: If your joystick has suffered physical damage, such as a broken cable or buttons, troubleshooting may not be enough. In such cases, it may be best to replace the joystick with a new one or get it repaired by a professional.
Remember, troubleshooting joystick issues can sometimes require a bit of patience and experimentation. Don’t hesitate to try different solutions or seek help from online forums and support communities. By resolving common joystick issues, you can enjoy smoother gameplay and make the most of your flight simulation experience in Hawken or any other game.
Conclusion
In conclusion, setting up a flight joystick for Hawken can greatly enhance your gaming experience. By following the steps outlined in this article, you can easily connect your joystick to your computer and configure it to work seamlessly with the game. The added precision and control of a joystick can make maneuvering through the virtual battlefield feel more immersive and intuitive.
Remember to choose a high-quality flight joystick that suits your needs and preferences. Whether you’re a casual player or an avid Hawken enthusiast, investing in a reliable and responsive joystick is a worthwhile decision. With the right setup, you’ll have a significant advantage over your opponents and be able to take your gaming skills to new heights.
So, don’t hesitate to give it a try and experience the thrill of piloting your mech with a flight joystick in Hawken. Get ready to dominate the skies and conquer the enemy!
FAQs
1. Can I connect multiple Bluetooth devices to my smartphone simultaneously?
– Yes, most modern smartphones support connecting multiple Bluetooth devices at the same time. However, it depends on the specific device and its Bluetooth version. Make sure to check the manufacturer’s specifications to confirm this capability.
2. How do I protect my smartphone screen from scratches?
– There are several ways to protect your smartphone screen. One option is to use a tempered glass screen protector, which provides a layer of impact resistance and scratch protection. Another option is to use a phone case with a built-in screen protector. Additionally, you can avoid placing your phone with other sharp objects in your bag or pocket to minimize the risk of scratches.
3. What is the difference between a wired and wireless charger for smartphones?
– A wired charger uses a physical cable to connect your smartphone to a power source, such as a wall outlet or USB port. On the other hand, a wireless charger utilizes induction technology to charge your phone without the need for any cables. You simply place your smartphone on the charging pad, and it will start charging wirelessly. Wireless chargers are convenient and reduce cable clutter, but they may charge your device slower compared to a wired charger.
4. How can I extend the battery life of my smartphone?
– There are several ways to extend the battery life of your smartphone. You can adjust your screen brightness to a lower level, disable unnecessary background app refresh, turn off push email notifications, and reduce the frequency of location services usage. Additionally, closing unused apps running in the background and enabling power-saving mode can help conserve battery life. Remember to avoid extreme temperature conditions that can negatively impact battery performance.
5. Are all phone cases compatible with wireless charging?
– No, not all phone cases are compatible with wireless charging. Some thicker or metal phone cases can interfere with the wireless charging function, preventing your phone from charging efficiently or not charging at all. To ensure compatibility, look for phone cases labeled as “wireless charging compatible” or those specifically designed to work with wireless charging technology.